- PRO Courses Guides New Tech Help Pro Expert Videos About wikiHow Pro Upgrade Sign In
- EDIT Edit this Article
- EXPLORE Tech Help Pro About Us Random Article Quizzes Request a New Article Community Dashboard This Or That Game Popular Categories Arts and Entertainment Artwork Books Movies Computers and Electronics Computers Phone Skills Technology Hacks Health Men's Health Mental Health Women's Health Relationships Dating Love Relationship Issues Hobbies and Crafts Crafts Drawing Games Education & Communication Communication Skills Personal Development Studying Personal Care and Style Fashion Hair Care Personal Hygiene Youth Personal Care School Stuff Dating All Categories Arts and Entertainment Finance and Business Home and Garden Relationship Quizzes Cars & Other Vehicles Food and Entertaining Personal Care and Style Sports and Fitness Computers and Electronics Health Pets and Animals Travel Education & Communication Hobbies and Crafts Philosophy and Religion Work World Family Life Holidays and Traditions Relationships Youth
- Browse Articles
- Learn Something New
- Quizzes Hot
- This Or That Game New
- Train Your Brain
- Explore More
- Support wikiHow
- About wikiHow
- Log in / Sign up
- Computers and Electronics
- Presentation Software
- PowerPoint Presentations

How to Print a PowerPoint Presentation
Last Updated: April 8, 2021
wikiHow is a “wiki,” similar to Wikipedia, which means that many of our articles are co-written by multiple authors. To create this article, volunteer authors worked to edit and improve it over time. This article has been viewed 133,462 times. Learn more...
Are you running a big meeting that you need to print off notes for yourself or others, from which come from a PowerPoint presentation? This article will tell you how to print off your slides so others can see these slides in a hard-based paper form.

- You can also select the "Printer" icon from the "Standard toolbar" which can also be found at the top of the screen.

- You have choices for "Slides" (full page printouts for slides), "Handouts" (which can be given to people based on all your slides, and has several slides on each page), "Notes" pages (slides and the Notes you've created from the PowerPoint program's Notes area), or Outline View (creates a set of notes in an organized outline form).

Community Q&A
- Although many printers contain options for printing in color versus black-and white, the PowerPoint Print dialog box has its own version of this box that is available for generic device driver printers (and which can be quickly used for even those which have regular software that is installed directly from the printer driver software). Thanks Helpful 7 Not Helpful 0
- Dependent on what printer you have, some printers have special software that may activate the "Properties" box, but due to differences between all printers, these boxes vary from model number to brand name to model, so these options from the "Properties" dialog box vary. Thanks Helpful 6 Not Helpful 0
- There are many other areas in the dialog box for printing slides from PowerPoint that, for most of us, would be used seldomly, including "Scale to fit paper", "Frame slides", "Print comments and ink markup" and "Print hidden slides". Thanks Helpful 5 Not Helpful 2
Things You'll Need
- computer printer
- Microsoft Powerpoint
- computer mouse and/or keyboard
- file presentation to print out
You Might Also Like

About This Article
- Send fan mail to authors
Is this article up to date?

Featured Articles

Trending Articles

Watch Articles

- Terms of Use
- Privacy Policy
- Do Not Sell or Share My Info
- Not Selling Info
Keep up with tech in just 5 minutes a week!
- The Best Tech Gifts Under $100
- Traveling? Get These Gadgets!
- How to Print PowerPoint Slides
- Brock University
In This Article
Jump to a Section
- Choosing Print Settings
- Selecting Which Slides to Print
- Framing Slides for Handouts
- Print Color Options
- Step-by-Step: Print Full Page Slides
- Print Notes Pages for the Speaker
- Print in Outline View
- Print Handouts
- Print Handouts for Note Taking
Print your PowerPoint presentation when you need a copy to help you deliver your presentation or to help your audience follow along. You have several choices from printing an entire slideshow to printing handouts and notes pages. Learn the various ways to print PowerPoint slides and select the best option for your needs.
Instructions in this article apply to PowerPoint 2019, 2016, 2013, 2010; PowerPoint for Mac, and PowerPoint for Microsoft 365.
Choose Your Print Settings
The print options and settings for PowerPoint are found by choosing File > Print .
The following settings are displayed in the print window by default. Modify these settings as needed.
Print Copies : Select the number of copies to print.
Printer : If more than one printer is installed on your computer or network, select the printer you want to use. Select the Printer drop-down arrow and make your choice.
Settings : Print all slides is the default setting. Select the drop-down arrow to make an alternate choice.
Full Page Slides : Select the drop-down arrow to make an alternate choice. More details about all of these options will follow.
Collated : Pages will be collated as pages 1,2,3; 1,2,3; 1,2,3 and so on, unless you choose to print uncollated pages as 1,1,1; 2,2,2; 3,3,3 and so on.
Color : The default selection is to print in color. If the selected printer is a color printer, slides will print in color. On a black and white printer, the slides print in grayscale . More details about this printing selection will follow.
Select Which Slides to Print
In the Settings section, the default selection is to print all slides. To make an alternate choice, select the drop-down arrow.
Other choices are:
Print Selection : To use this option, first select only the slides you wish to print. Select these slides either from the Slide pane in Normal view or from the Slide Sorter view. These views show thumbnail versions of your slides so it is easy to make a group selection.
Print Current Slide : The active slide is printed.
Custom Range : You may choose to print out only a few of your slides. These selections can be made by entering the slide numbers in the text box as follows:
- Enter specific slide numbers separated by commas, such as 2,6,7.
- Enter a contiguous group of slide numbers as 3-7
Print Hidden Slides : This option is available only if you have slides in your presentation that have been marked as hidden. Hidden slides do not show during a slideshow but are available to view in the editing stage.
Frame PowerPoint Slides When Printing Handouts
There are four options available when you make printouts of your PowerPoint slides.
These options are:
Frame Slides : This is a nice finishing touch for your printed handouts.
Scale to Fit Paper : Printable areas of the margins vary with each printer. Make sure that complete slides print out on your handouts by selecting this option.
High Quality : Select this option only if you need exceptional looking printouts, such as a brochure. This option uses extra toner or ink in your printer, so don't choose this for regular printouts.
Print Comments and Ink Markup : This option is available only when the presentation has been reviewed by another person who made written comments in the file.
Print PowerPoint Slides in Color, Grayscale or Pure Black and White
There are three different options for color or non-color printouts.
Choose from the following:
Color : Color printouts are the default option. However, not all printers have this capability. If you choose the Color option but do not have a color printer, the printout will be similar to, but not of the same quality as, printing in grayscale.
Grayscale : If you do not have a color printer or do not require a color printout, choose Grayscale to print all objects on the page in shades of gray. Objects appear crisper and cleaner if Grayscale is selected for non-color printers rather than printing using the default Color option.
Pure Black and White : This option prints slides in black and white. There are no shades of gray. As a result, several objects on the design theme of the slide, such as embossing and drop shadows do not print. Text prints as black, even if you chose gray as the original color of the text.
Print Full Page Slides in PowerPoint
Go to File .
Select Print .
Choose the number of copies to print if you wish to print more than one copy.
Select the printer if you wish to print to a different printer than the default selection.
By default, PowerPoint prints all slides. Select only the specific slides to print, if necessary.
Select other options, such as Frame Slides if you wish.
Select Print . Full page slides print, as this is the default printing selection.
Print PowerPoint Notes Pages for the Speaker
Print speaker notes with each slide as an aid when giving a PowerPoint presentation. Each slide is printed in miniature (called a thumbnail) on a single page, with the speaker notes below. These notes do not show on the screen during the slide show.
Speaker notes can also be exported for use in Microsoft Word documents. Learn how to convert PowerPoint presentations to Word documents .
Choose the pages to print.
Select the Full Page Slides drop-down arrow and choose Notes Pages .
Select any other options.
Print PowerPoint in Outline View
Outline view in PowerPoint shows only the text content of the slides. This view is useful when only the text is required for quick editing.
Select File > Print .
Select the Full Page Slides drop-down arrow.
In the Print Layout section, choose Outline .
Choose other options if desired.
Print PowerPoint Handouts
Print handouts in PowerPoint to create a take-home package of the presentation for the audience. Choose to print one full-size slide to nine miniature slides per page.
In the Handouts section, select the number of slides to print on each page.
Choose any other settings, such as the number of copies. It is a nice touch to frame the slides on the handout and it is always a good idea to choose to Scale to fit Paper .
Print PowerPoint Handouts for Note Taking
Presenters often give out the handouts prior to the presentation so that the audience may take notes during the slideshow. If that is the case, there is one option for handouts that prints three thumbnail slides per page along with lines next to the slides for note taking.
In the Handouts sections, choose 3 Slides .
Select any other options you wish.
Get the Latest Tech News Delivered Every Day
- How to Print PowerPoint Slides With Notes
- Print a PowerPoint Handout in PDF Format Without a Date
- Hide Background Images for Cleaner Printed PowerPoint Slides
- Converting PowerPoint Slides to Word Documents
- How to Make a Poster in PowerPoint
- How to Print Multiple Slides on One Page in PowerPoint
- How to Print Part of a Word Document
- Different Ways to View Slides in PowerPoint
- How to Use Speaker Notes in PowerPoint
- 9 PowerPoint Presentation Tips for Students
- How to Hide and Unhide a Slide in PowerPoint
- How to Add Page Numbers in PowerPoint
- How to Print Google Slides With Notes
- Outline View in PowerPoint or OpenOffice
- Grayscale and Color Picture Effect in PowerPoint

Use a screen reader to print presentations in PowerPoint
This article is for people with visual or cognitive impairments who use a screen reader program such as Windows Narrator, JAWS, or NVDA with Microsoft 365 products. This article is part of the Microsoft 365 screen reader support content set where you can find more accessibility information on our apps. For general help, visit Microsoft Support .
Use PowerPoint with your keyboard and a screen reader to print the slides, handouts, and notes pages for your presentation. We have tested it with Narrator, JAWS, and NVDA, but it might work with other screen readers as long as they follow common accessibility standards and techniques.
New Microsoft 365 features are released gradually to Microsoft 365 subscribers, so your app might not have these features yet. To learn how you can get new features faster, join the Office Insider program .
To learn more about screen readers, go to How screen readers work with Microsoft 365 .
In this topic
Print your presentation.
Print your presentation using default settings
Print your presentation using customized settings
Optimize printing, add a new printer, print to file, select the slides to print, print multiple slides on a page, set single-sided or double-sided printing, set collation, change page orientation, print slides in color, black and white, or grayscale.
You can print slides, handouts, or notes pages of your presentation using the default settings or customize the printing settings.
Print your presentation using default settings
By default, PowerPoint prints all the slides in your presentation as full page slides (one slide per page).
In your presentation, press Ctrl+P. The Print menu opens and PowerPoint places the focus on the Print button.
To print your presentation with the default settings, press Enter.
You can specify the number of copies you want, select the range of slides to print, set the page orientation, and more.
To specify the number of copies to print, press the Tab key until you hear "Copies," and then type the number of copies you want.
To select a printer, press the Tab key until you hear "Printer," followed by the name of the currently selected printer. Press the Up or Down arrow key until you hear the name of the printer you want, and then press Enter. If you don't hear the name of the printer that you want to use, you can add a new printer to the list. For instructions, refer to Add a new printer .
To choose your printing settings, press the Tab key until you hear "Settings," and then do one or more of the following:
Note: The available options depend on your printer type and model.
If you don't want to print all slides in your presentation, you can select the slides to print. For instructions, go to Select the slides to print .
To save paper, you can print several slides on one page. For instructions, go to Print multiple slides on a page .
You can choose to print your slides on one side of the paper only or use both sides. For instructions, go to Set single-sided or double-sided printing .
To specify how multiple sheets of paper are gathered and arranged, you can select if they are collated or not. For instructions, go to Set collation .
You can choose if the presentation is printed using landscape or portrait orientation. For instructions, go to Change page orientation .
If you don't want to print the slides in color, you can choose to print them in black and white or grayscale. For instructions, go to Print slides in color, black and white, or grayscale .
To print your presentation, press the Tab key or Shift+Tab until you hear "Print button," and then press Enter.
You can customize the printing settings to better suite your printing needs.
In the Print menu, to move to focus to the Printer list, do one of the following:
Press the Tab key until you hear "Printer," followed by the name of the currently selected printer.
Press Alt+P, I.
Press the Down arrow key until you hear "Add printer," and then press Enter. The Printers & scanners page opens, and the focus is on the Add device button.
Press Enter. The list of available printers is displayed. Press the Tab key or arrow keys until you hear the name of the printer you want, and then press Enter.
If you want to quickly make a PDF copy of your presentation, you can choose to print it to file, and the copy is saved to a file folder, for example.
Press the Down arrow key until you hear "Print to file," and then press Enter.
Press Shift+Tab until you hear "Print button," and then press Enter. The Print to File dialog box opens. The focus is on the File name text field.
Type a descriptive name for the file.
Use the Tab key and the arrow keys to navigate to the file location you want.
When in the right location, press Alt+S to save and print the presentation to file.
In the Print menu, press Alt+P, A. You hear the currently selected option, for example, “Print all slides.”
Use the Up or Down arrow keys browse the list of options. The following options are available:
Print All Slides . Select this option to print all slides in the presentation.
Print Selection . Select this option to print the current selection. This option only appears if you have already selected a set of slides.
Print Current Slide . Select this option to print only the current slide.
Custom Range . Select this option to specify the slides you want to print by the slide number.
Print Hidden Slides . Select this option to print hidden slides. This option only appears if you have hidden slides in your presentation.
When on the option you want, press Enter. If you selected Custom Range , PowerPoint places the focus in the Slides text box. Type a range of slides to print, for example, 10-12 or 1,2,5 .
In the Print menu, press Alt+P, H. You hear: “Print layout,” followed by the currently selected print layout.
Do one of the following:
Use the Right or Left arrow key browse the list of print layout options. The following print layout options are available:
Full Page Slides . Select this option to print each slide on its own page.
Notes Pages . Select this option to print slide notes, either for a speaker or as handouts for your audience. This option prints one slide per page with speaker notes printed below it.
Tip: The other options in the Print Layout list and all of the options in the Handouts list print only slides or slide content, not speaker notes.
Outline . Select this option if you want to print only the text in your slides, without images.
Use the arrow keys to browse the available handout layouts.
When on the option you want to use, press Enter.
The option to choose between single- and double-sided printing is only available if your printer supports double-sided printing.
In the Print menu, press Alt+P, D.
Press the Up or Down arrow key until you hear the option you want, and then press Enter.
The option to specify the collating settings is available only if your printer supports collating.
In the Print menu, press Alt+P, C.
Press the Down or Up arrow key until you hear the option you want, and then press Enter.
In the Print menu, press Alt+P, O.
You can print your whole presentation — the slides, outline, notes pages, and audience handouts — in color, grayscale, or pure black and white.
In the Print menu, press Alt+P, Y, 1. The menu for selecting the color mode opens.
Press the Down and Up arrow keys until you hear the option you want. The following options are available:
Color . If you choose the Color option but don’t have a color printer, the printout will be similar to, but not of the same quality as, a printout in grayscale.
Grayscale . If you don’t have a color printer or don’t require a color printout, choose Grayscale to print all objects on the page in shades of gray. Objects such as charts and tables will appear crisper and cleaner than if you choose the Color option on a noncolor printer.
Pure Black and White . This option prints slides in black and white without any shades of gray. As a result, some objects in the slide design theme, such as embossing and drop shadows, will not print. Text will print as black even if you choose gray as the original color of the text.
Use a screen reader to add and format text in PowerPoint
Use a screen reader to insert and edit pictures and tables in PowerPoint
Use keyboard shortcuts to create PowerPoint presentations
Use keyboard shortcuts to deliver PowerPoint presentations
Basic tasks to create a presentation in PowerPoint with a screen reader
Set up your device to work with accessibility in Microsoft 365
Use a screen reader to explore and navigate PowerPoint
Use PowerPoint with your keyboard and VoiceOver, the built-in macOS screen reader, to print the slides, handouts, and notes pages of your presentation.
This topic assumes that you are using the built-in macOS screen reader, VoiceOver. To learn more about using VoiceOver, go to VoiceOver Getting Started Guide .
The availability of the printing options described in this topic depend on the features of your printer. For details, refer to the printer manual.
Print your presentation using default print settings
Access all printing options , select a single slide to print, select a range of slides to print, set two-sided printing, print slides in black and white or grayscale, print slides with speaker notes.
You can print your presentation quickly with the default settings. To learn how to change and optimize the print settings, refer to Optimize printing .
In your presentation, press Command+P. You hear "Print, in dialog," followed by the name of the selected printer. The focus is on the Printer dropdown menu.
If you want to change the printer, press Control+Option+Spacebar. Press the Up or Down arrow key until you hear the printer you want to select, and then press Control+Option+Spacebar.
To specify the number of copies to print, press the Tab key once. You hear the currently selected number of copies. Type the number of copies you want to print.
By default, PowerPoint prints all the slides in your presentation as full page slides (one slide per page). To print with the current settings, press the Tab key until you hear "Print button," and then press Control+Option+Spacebar.
By default, the print dialog box shows only the basic printing options. You can easily access the hidden printing details and optimize printing.
To open the print dialog box, press Command+P.
To access all printing options, press the Tab key until you hear "Show details button," and then press Control+Option+Spacebar. All printing options and details are now available.
Save paper and print only the slides you need.
In the printing details dialog box, press the Tab key until you hear: "Print all slides."
Tip: To print the currently selected slide, press the Down arrow key until you hear "Print selected slides," and then press Control+Option+Spacebar.
Press the Down arrow key until you hear "Custom shows, selected, radio button," and then press the Tab key until you hear: "Edit text, blank."
Type the number of the slide you want to print.
Press the Down arrow key until you hear: "Print slides range."
Press the Tab key once, and then type the number of the first slide in the range.
Press the Tab key once, and then type the number of the last slide in the range.
You can print multiple slides on one page either as full slides or as handouts.
Print multiple full slides on a page
In the printing details dialog box, press the Tab key until you hear: "Layout to print, popup button."
Press the Down arrow key until you hear "Layout," and then press Control+Option+Spacebar.
Press the Up or Down arrow key until you hear the option you want to select, and then press Control+Option+Spacebar.
Print handouts
In the printing details dialog box, press the Tab key until you hear: "Layout to print, popup button."
Press the Down arrow key until you hear the handout option you want to select, for example, "Handouts, four slides per page," and press Control+Option+Spacebar.
You can print on both sides of the paper also when you've selected to print several slides on a page.
Note: This feature is available only if it is supported by your printer and it is turned on in the printer settings. For details, refer to your printer's manual or contact your company IT department for help.
In the printing details dialog box, press the Tab key until you hear "Two-sided, unchecked checkbox," and then press Control+Option+Spacebar. Long-edge binding is on by default.
To change the binding type for the two-sided printing, press the Tab key until you hear "Layout," and then press the Down arrow key until you hear "Off, two-sided," and then press Control+Option+Spacebar.
Press the Down arrow key until you hear the option you want to select and then press Control+Option+Spacebar.
If you need to print several copies of your slides, you can select whether to print the slides of one copy before printing the others.
In the printing details dialog box, press the Tab key until you hear: "Paper handling, popup button."
Press the Down arrow key until you hear "Off, collate pages," and then press Control+Option+Spacebar.
In the printing details dialog box, press the Tab key until you hear the current orientation, for example, "Landscape orientation."
To change the orientation, press Control+Option+Left or Right arrow key to choose the other option.
You can print your whole presentation, the slides, notes pages, and audience handouts in grayscale, or black and white.
In the printing details dialog box, press the Tab key until you hear: "Output color format."
Press the Down arrow key until you hear either "Grayscale" or "Black and white," and then press Control+Option+Spacebar.
By default, the slides are printed without the speaker notes. You can quickly change the settings and provide your audience the notes, too.
In the printing details dialog box, press the Tab key until you hear: "Layout to print."
Press the Down arrow key until you hear "Notes," and then press Control+Option+Spacebar.
Use a screen reader to show your presentation with PowerPoint
Use PowerPoint with VoiceOver, the built-in iOS screen reader, to quickly print your slides from your iPhone to a nearby printer. You can also change the default printing settings in PowerPoint to, for example, select the slides to print.
This topic assumes that you are using the built-in iOS screen reader, VoiceOver. To learn more about using VoiceOver, visit Apple accessibility .
Print your slides directly from your iPhone to a printer that supports AirPrint. To learn more about AirPrint and the supported printers, refer to Use AirPrint to print from your iPhone or iPad .
Print your presentation with default print settings
You can quickly print your slides with the default layout, orientation, and color options.
Make sure that your iPhone and printer are connected to the same Wi-Fi network.
In your presentation, tap near the top of the screen with four fingers. Swipe right until you hear "File button," and then double-tap the screen.
Swipe right until you hear "Print button," and double-tap the screen.
Swipe right until you hear "AirPrint button," and double-tap the screen. The Layout Options dialog box opens.
Swipe right until you hear "Next button," and double-tap the screen. The Print Options dialog box opens.
Swipe right until you hear "Printer, Select printer button," and then double-tap the screen. The list of available AirPrint printers opens. Swipe right until you hear the printer you want to select, and then double-tap the screen.
To specify the number of copies you want to print, swipe right until you hear "Decrement" or "Increment," and double-tap the screen to change the value by one.
To start printing, in the Print Options dialog box, tap near the top of the screen with four fingers, swipe right until you hear "Print button," and then double-tap the screen.
Print your presentation with customized print settings
You can change the page layout, orientation, and color mode to customize how the printouts will look.
Swipe right until you hear "Print button," and then double-tap the screen.
Swipe right until you hear "AirPrint button," and double-tap the screen. The Layout Options dialog box opens. You can now change the page layout, orientation, or color.
If you want to review or change the page layout, swipe right until you hear the currently selected layout option, and then do one of the following:
If you're happy with the current selection, proceed to step 6.
If you want to change the layout, slide one finger on the top part of the screen until you hear the layout you want, and double-tap the screen to select.
If you don't hear a suitable layout, swipe right until you hear the number of the current options page, followed by "Adjustable," for example "Page one of three, adjustable." Swipe up or down with one finger to move the focus to another options page and then slide one finger on the top part of the screen to find the layout you want. When on the correct layout option, double-tap the screen to select.
If you want to change the page orientation, swipe right until you hear "Page orientation," followed by the currently selected orientation, and then double-tap the screen. Swipe right or left until you hear the option you want, and double-tap the screen.
If you want to set the printing color mode, swipe right until you hear "Page color," followed by the currently selected mode, and double-tap the screen. Swipe right or left until you hear the color mode you want, and then double-tap the screen.
When you're happy with your selections, tap near the top of the screen with four fingers, swipe right until you hear "Next button," and double-tap the screen. The Print Options dialog box opens.
Swipe right until you hear: "Printer, select printer button." Double-tap the screen. The list of available AirPrint printers opens. Swipe right until you hear the printer you want to select, and then double-tap the screen.
If you don't want to print all slides in your presentation, you can select the range you want to print.
In the Print Options dialog box, swipe right until you hear "Range," followed by the current value, and then double-tap the screen.
Swipe right until you hear the number of the first slide in the current page range, followed by "Adjustable." To change the value, swipe up or down with one finger until you hear the slide number you want.
Swipe right until you hear the number of the last slide in the current page range, followed by "Adjustable." To change the value, swipe up or down with one finger until you hear the slide number you want.
Use PowerPoint for Android with TalkBack, the built-in Android screen reader, to quickly print slides from your phone.
This topic assumes that you are using the built-in Android screen reader, TalkBack. To learn more about using TalkBack, go to Android accessibility .
Print your slides directly from your Android phone to a compatible printer. Make sure your phone and the printer are connected to the same Wi-Fi network. You can print your presentation from the editing view or from the reading view.
Note: These instructions apply only to printers supported by Android and Google Cloud Print. To check if your printer is supported, go to Cloud-ready printers . Android does not support USB, Bluetooth, or Windows network printing. Google recommends setting up Cloud Print on a PC connected to such a printer. If you want to print to such a printer directly, you will have to use a third-party app.
To print from the editing view, swipe left or right until you hear "More options menu," and then double-tap the screen. You hear: "New slide button."
To print from the reading view, swipe left or right until you hear "Menu," and double-tap the screen. You hear: "Notes button."
Swipe right until you hear "Print button," and double-tap the screen. The printing dialog box opens.
To select the printer, swipe right or left until you hear "Dropdown list," followed by the currently selected printer or "Save as PDF." Double-tap the screen to open the list of available printers and other printing options. To cycle through the list, swipe right or left. When on the printer you want to use, double-tap the screen to select.
To select the number of copies, paper size, color, printing orientation, mode, and range, swipe right until you hear "Summary," followed by the currently selected number of copies and paper size. Double-tap the screen. The print options handle is expanded. To review or change the print options, do one or more of the following:
To specify the number of copies, swipe right or left until you hear the current number of copies, followed by "Edit box for copies." Double-tap the screen and then use the on-screen keyboard to type the number you want.
To select the paper size, swipe right or left until you hear the currently selected paper size, followed by "For paper size." Double-tap the screen, swipe right or left until you hear the size you want, and then double-tap the screen to select.
To select the printing orientation, swipe right or left until you hear the currently selected orientation, followed by "For orientation." Double-tap the screen, swipe right or left until you hear the orientation you want, and then double-tap the screen to select.
To select the print color, swipe right or left until you hear the currently selected color mode, followed by "For color." Double-tap the screen, swipe right or left until you hear the color mode you want, and then double-tap the screen to select.
To specify which slides to print, swipe right or left until you hear the currently selected printing range, followed by "For pages." Double-tap the screen, swipe right or left until you hear the range you want, and then double-tap the screen to select.
To select one-sided or two-sided printing, swipe right or left until you hear the currently selected printing mode, followed by "For two-sided." Double-tap the screen, swipe right or left until you hear the mode you want, and then double-tap the screen to select.
When done, to collapse the print options handle, swipe right until you hear "Collapse handle," and double-tap the screen.
To print the slides or save them as a PDF file, swipe right until you hear either "Print button" or "Save to PDF," and then double-tap the screen.
Use a screen reader to work with slides in PowerPoint
Use PowerPoint for the web with your keyboard and a screen reader to print your slides. We have tested it with Narrator in Microsoft Edge and JAWS and NVDA in Chrome, but it might work with other screen readers and web browsers as long as they follow common accessibility standards and techniques.
Switch the Narrator scan mode off to use the keyboard shortcuts. Press the SR key+Spacebar to toggle the scan mode off or on.
When you use PowerPoint for the web with a screen reader, switch to the full screen mode. Press F11 to toggle the full screen on or off.
When you use PowerPoint for the web, we recommend that you use Microsoft Edge as your web browser. Because PowerPoint for the web runs in your web browser, the keyboard shortcuts are different from those in the desktop program. For example, you’ll use Ctrl+F6 instead of F6 for jumping in and out of the commands. Also, common shortcuts like F1 (Help) and Ctrl+O (Open) apply to the web browser – not PowerPoint for the web.
Print a presentation
You can print your slides with or without notes or as handouts.
In your presentation, do one of the following:
To print full page slides, one slide per page, press Alt+Windows logo key, F, P, and R.
To print the slides with the notes pages, press Alt+Windows logo key, F, P, and N.
To print your slides as handouts, press Alt+Windows logo key, F, P, and H.
Tip: Instead of using the keyboard shortcuts listed above, you can press Alt+Windows logo key, F, P to open the Print menu. To move to focus to menu, press the Tab key once. To navigate to the option you want, press the Down or Up arrow key, and then press Enter to select.
You hear: "Microsoft PowerPoint, all done, your file is ready to print." The focus is on the Open PDF button. Press Enter. The Print dialog box opens.
You can now select the printer, number of copies, page layout, the range to print, and more. To move through the options in the dialog box, press the Tab key. To expand option menus, press Alt+Down arrow key. To make a selection, press Enter.
To print, press the Tab key until you hear "Print button," and then press Enter.
Technical support for customers with disabilities
Microsoft wants to provide the best possible experience for all our customers. If you have a disability or questions related to accessibility, please contact the Microsoft Disability Answer Desk for technical assistance. The Disability Answer Desk support team is trained in using many popular assistive technologies and can offer assistance in English, Spanish, French, and American Sign Language. Please go to the Microsoft Disability Answer Desk site to find out the contact details for your region.
If you are a government, commercial, or enterprise user, please contact the enterprise Disability Answer Desk .

Need more help?
Want more options.
Explore subscription benefits, browse training courses, learn how to secure your device, and more.

Microsoft 365 subscription benefits

Microsoft 365 training

Microsoft security

Accessibility center
Communities help you ask and answer questions, give feedback, and hear from experts with rich knowledge.

Ask the Microsoft Community

Microsoft Tech Community

Windows Insiders
Microsoft 365 Insiders
Find solutions to common problems or get help from a support agent.

Online support
Was this information helpful?
Thank you for your feedback.

How to Insert Screenshots in PowerPoint and Word (Part 1: Office Tools)

Capture Screenshots Easily in PowerPoint, Word and Other Microsoft Office Programs
by Avantix Learning Team | Updated October 4, 2017
Applies to: Microsoft ® PowerPoint ® and Word ® 2010, 2013, 2016 and 365 (Windows)
In 2010 and later versions, you can insert screenshots and screen clippings in PowerPoint, Word, Excel and Outlook using built-in tools on the Ribbon. For the purposes of this article, we'll use Word and PowerPoint but the same principles apply to Excel and Outlook.
Recommended articles; How to Insert Screenshots in PowerPoint and Word (Part 2: Windows Snipping Tool)
Do you want to learn more about Microsoft Word or PowerPoint? Check out our virtual classroom or live classroom Word or PowerPoint courses >
Printing the screen
If you are using 2007 and earlier versions, you can press Print Screen (PrtScn) on your keyboard to take a shot of the current screen or Alt + Print Screen (PrtScn) to take a shot of the active window. The screenshot will be saved in the Clipboard and you can then paste it into your document by pressing Control + V and crop it using the Crop tool on the Ribbon. You can certainly still use this method in 2010 and later versions.
If the Print Screen key is not working, you may need to press the Fn (Function) key first before pressing the Print Screen key. If the Print Screen key is still not working, try restarting your computer.
Using the Screenshot command on the Ribbon
When using the Screenshot command on the Insert tab on the Ribbon, you can't take a shot of the current screen. You'll need to create another document or occurrence of the same program to use this tool. Note that you can only add one screenshot or clipping at a time.
Inserting a screenshot in PowerPoint or Word
To insert a screenshot in PowerPoint or Word:
- Open the document or web site you want to capture as a screenshot.
- Open a PowerPoint presentation or Word document.
- Click in the Word document or display the desired PowerPoint slide.
- Click the Insert tab on the Ribbon and then click Screenshot in the Images group. Thumbnails will appear of each program that is currently running on your computer.
- Click the desired thumbnail. A screenshot will be placed in the Word document at the cursor or on the selected PowerPoint slide.

Inserting a screen clipping in PowerPoint or Word
You also have the option of inserting a screen clipping or portion of another window:
- Display the screen or window that you want to capture as a screenshot. This must be the most recent window or screen.
- Click the Insert tab on the Ribbon and then click Screenshot in the Images group.
- In the menu that appears, choose Screen Clipping (below the thumbnails). You will be taken to the most recent window or screen.
- Drag around the area of the screen that you want to capture starting from the top left.
- Release the mouse button. A screen clipping will be placed in the Word document at the cursor or on the selected PowerPoint slide.
Cropping the image
If you need to crop the image:
- Click the screenshot or screen clipping and click on the Picture Tools Format or Picture Format tab on the Ribbon.
- Click Crop in the Size group and crop as necessary by dragging the cropping handles on the image.
- Click Crop to save the crop settings.
Crop appears on the Picture Tools Format or Picture Format tab in the Ribbon:

It's really simple to insert screen shots into your PowerPoint presentations or your Word documents using these tools. You can also try out these strategies in Outlook or Excel.
More resources
How to Insert an Excel Chart or Graph into PowerPoint (Linked or Unlinked)
How to Reduce PowerPoint File Size (10 Ways to Compress PowerPoint Decks)
How to Remove the Background of an Image in PowerPoint
Related courses
Microsoft PowerPoint: Intermediate / Advanced
Microsoft PowerPoint: Design for Non-Designers
Microsoft Word: Intermediate / Advanced
VIEW MORE COURSES >
Our instructor-led courses are delivered in virtual classroom format or at our downtown Toronto location at 18 King Street East, Suite 1400, Toronto, Ontario, Canada (some in-person classroom courses may also be delivered at an alternate downtown Toronto location). Contact us at [email protected] if you'd like to arrange custom instructor-led virtual classroom or onsite training on a date that's convenient for you.
Copyright 2024 Avantix ® Learning
You may also like

How to Insert or Type A with an Accent Mark in Word (À, Á, Â, Ä, à, á, â, or ä)
You can insert or type a with an accent mark in Word using built-in tools or keyboard shortcuts (including Alt code shortcuts). The letter a can be inserted with an accent in both upper or lower case. The following are common accents in upper or lower case – À, Á, Â, Ä, à, á, â, or ä.

10 Word Shortcuts to Select Text Using a Keyboard
You can use several shortcuts in Word to select text in your documents using only your keyboard. When you select text, it will typically be highlighted in grey. After you select text, you can cut, copy, or delete the selected text or apply character or paragraph formatting.

How to Replace Zeros (0) with Blanks in Excel
There are several strategies to replace zero values (0) with blanks in Excel. If you want to replace zero values in cells with blanks, you can use the Replace command or write a formula to return blanks. However, if you simply want to display blanks instead of zeros, you have two formatting options – create a custom number format or a conditional format.
Microsoft, the Microsoft logo, Microsoft Office and related Microsoft applications and logos are registered trademarks of Microsoft Corporation in Canada, US and other countries. All other trademarks are the property of the registered owners.
Avantix Learning |18 King Street East, Suite 1400, Toronto, Ontario, Canada M5C 1C4 | Contact us at [email protected]
Our Courses
Avantix Learning courses are offered online in virtual classroom format or as in-person classroom training. Our hands-on, instructor-led courses are available both as public scheduled courses or on demand as a custom training solution.
All Avantix Learning courses include a comprehensive course manual including tips, tricks and shortcuts as well as sample and exercise files.
VIEW COURSES >
Contact us at [email protected] for more information about any of our courses or to arrange custom training.
Privacy Overview
Pin it on pinterest.
- Print Friendly
How to Print Out in PowerPoint With Comments On: A Step-by-Step Guide
Printing out a PowerPoint presentation with comments is a handy feature for reviewing feedback or preparing for meetings. To accomplish this, you’ll need to access the ‘Print’ settings in PowerPoint and adjust the layout to include comments. It’s a straightforward process that can be completed in a few clicks.
After completing this action, you’ll have a physical copy of your presentation that includes all the comments made by you or others. This can serve as a valuable resource for making revisions or as a reference during discussions.
Introduction
PowerPoint presentations are a staple in the business and academic worlds. They serve as visual aids, help to convey information clearly, and can be a powerful tool for persuasion. But what happens when you need to share the feedback on your presentation with others, or you want to have a hard copy to review offline? That’s where printing your PowerPoint with comments comes in handy.
Being able to print out PowerPoint slides with comments is crucial for various reasons. For one, it allows you to see the feedback in the context of the slide they’re referring to, making it easier to understand and implement changes. It’s also essential for meetings and presentations where you might need to discuss the comments with colleagues or clients. Essentially, anyone who uses PowerPoint and receives feedback on their presentations can benefit from knowing how to print their slides with comments.
Step by Step Tutorial: How to Print Out in PowerPoint With Comments On
Before diving into the steps, let’s clarify what we’ll achieve. By following these steps, you’ll be able to print your PowerPoint slides along with any comments that have been added. This is perfect for reviewing feedback or preparing for a meeting where you might need to discuss the comments.
Step 1: Open your presentation in PowerPoint
Open the PowerPoint presentation that includes the comments you want to print.
This step is pretty self-explanatory, but it’s crucial. Make sure you have the correct presentation open and that all the comments you want to include are saved.
Step 2: Click on ‘File’ and then ‘Print’
Navigate to the ‘File’ tab in the top-left corner of PowerPoint and click on ‘Print’.
The ‘Print’ menu is where you’ll find all the settings needed to include comments in your printout.
Step 3: Under ‘Settings’, click on ‘Full Page Slides’
In the ‘Print’ menu, you’ll see a ‘Settings’ section. Click on the dropdown that usually says ‘Full Page Slides’.
This will open up more printing options for your presentation.
Step 4: Choose the ‘Print Layout’
In the dropdown menu, select ‘Notes Pages’ to print the slides with the comments on the side.
When you select ‘Notes Pages’, you’re telling PowerPoint that you want to include the notes pane, which is where the comments are displayed, in your printout.
Step 5: Click ‘Print’
After selecting ‘Notes Pages’, just click on ‘Print’, and your presentation, along with the comments, will begin printing.
Make sure your printer is set up correctly before clicking ‘Print’ to avoid any mishaps.
Additional Information
When printing out PowerPoint slides with comments, there are a few things to keep in mind. Firstly, the comments will print out on the notes pages, which means each slide will be accompanied by a full page of notes. This can consume a lot of paper, so it’s a good idea to review and consolidate comments before printing.
Another tip is to make sure that the comments are properly formatted and easy to read. You can adjust the font size and style of the comments in the ‘Notes Master’ to make them more print-friendly. Additionally, keep in mind that not all printers are created equal, so you may need to adjust your printer settings to ensure the best quality printout.
Lastly, if you’re printing comments for a meeting or presentation, consider organizing them in a way that makes them easy to refer to during the discussion. This might mean printing out a separate copy for each participant or creating a summary of the most critical comments to focus on.
- Open your presentation in PowerPoint.
- Navigate to ‘File’ and click on ‘Print’.
- Click on the dropdown under ‘Settings’ and select ‘Full Page Slides’.
- Choose the ‘Print Layout’ by selecting ‘Notes Pages’.
- Click ‘Print’ to print your presentation with comments.
Frequently Asked Questions
Can i print comments from powerpoint online.
Yes, you can print comments from the online version of PowerPoint by accessing the ‘Print’ menu and following similar steps.
Can I customize the way comments are printed?
Yes, you can customize the printout by adjusting settings in the ‘Notes Master’ section.
Can I print comments without the slides?
No, comments are printed on the notes pages alongside the slides.
What if my comments don’t print correctly?
Ensure your printer settings are correct and that the comments are formatted properly in PowerPoint.
Can I save the presentation with comments as a PDF instead?
Yes, you can save your presentation as a PDF with comments by choosing ‘Save As’ and selecting ‘PDF’.
Knowing how to print out in PowerPoint with comments on can significantly enhance your ability to review and share feedback efficiently. Whether you’re preparing for a big meeting, collaborating on a group project, or just need a clear way to see all the suggestions for your presentation, this feature is incredibly useful.
Remember, it’s not just about printing; it’s about creating a tangible record of the valuable input you’ve received. So next time you get feedback on a PowerPoint presentation, don’t just skim through it on your computer screen—print it out, mark it up, and make those comments count!

Matthew Burleigh has been writing tech tutorials since 2008. His writing has appeared on dozens of different websites and been read over 50 million times.
After receiving his Bachelor’s and Master’s degrees in Computer Science he spent several years working in IT management for small businesses. However, he now works full time writing content online and creating websites.
His main writing topics include iPhones, Microsoft Office, Google Apps, Android, and Photoshop, but he has also written about many other tech topics as well.
Read his full bio here.
Share this:
Join our free newsletter.
Featured guides and deals
You may opt out at any time. Read our Privacy Policy
Related posts:
- How to Save Powerpoint as PDF with Notes
- Can I Convert My Powerpoint to Google Slides?
- How to Print Comments Only in MS Word: A Step-by-Step Guide
- How Do I Print Just the Notes in Powerpoint 2010?
- How to Show Speaker Notes in Google Slides
- How to Drag Slides From One PowerPoint to Another: A Step-by-Step Guide
- How to Set Time for Slides in Powerpoint
- How to Check Word Count on Powerpoint 2010
- How to Make a Powerpoint Slide Vertical in Powerpoint 2013
- How to See Notes on PowerPoint on the Laptop: A Step-by-Step Guide
- How to Print an Outline of the Presentation in Powerpoint
- How to Print Powerpoint with Comments
- How to Remove Markup Notes in a Microsoft Word Document Easily
- How to Unhide a Slide in Powerpoint 2013
- How to Change the Font on All Slides in Google Slides
- How to Loop a Slideshow on Powerpoint 2013
- How to Print Comments in Excel 2010
- How to Insert Slides from Another Presentation in Powerpoint 2010
- How to Convert a PowerPoint to Word and Edit with Ease
- How to Change Hyperlink Color in Powerpoint 2010 (An Easy 5 Step Guide)
How to Take a Screenshot for PowerPoint? [Complete Guide!]
By: Author Shrot Katewa
![How to Take a Screenshot for PowerPoint? [Complete Guide!]](https://artofpresentations.com/wp-content/uploads/2022/11/Featured-Image-How-to-tae-a-screenshot-in-Powerpoint.webp "screen printing powerpoint presentation")
Taking screenshots in Windows is a useful tool to have and learn. This is because sometimes we may not want to share our entire screen with an audience but only a section of it and put it into our PowerPoint presentations.
To take a screenshot, open the window from where you want to take the screenshot. Then, go to the PowerPoint file, and select the “Insert” tab. From the Images group, select the “Screenshot” option. Click on the Window that you previously opened and take your screenshot.
There are other ways to customize your capture, as listed in the article below. Read on to learn more about taking screenshots using different methods.
1. Taking a Screenshot Using PowerPoint
Microsoft PowerPoint offers a special feature that you can use to take a screenshot and insert it into the selected slide without having to save the screenshot first. To do so, you have to use the “Screenshot” option from the “Images” group of the “Insert” tab.
1.1 Method 1 – Available Window Screenshot
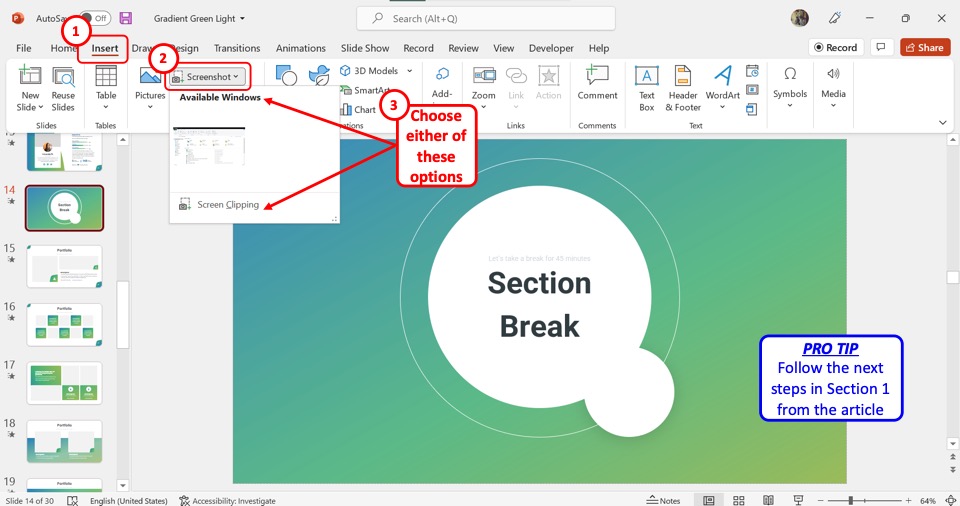
The “Available Windows” option in PowerPoint allows you to take a screenshot from any of the open windows on your computer. To take a screenshot using the “Available Windows” option, follow the 3 simple steps.
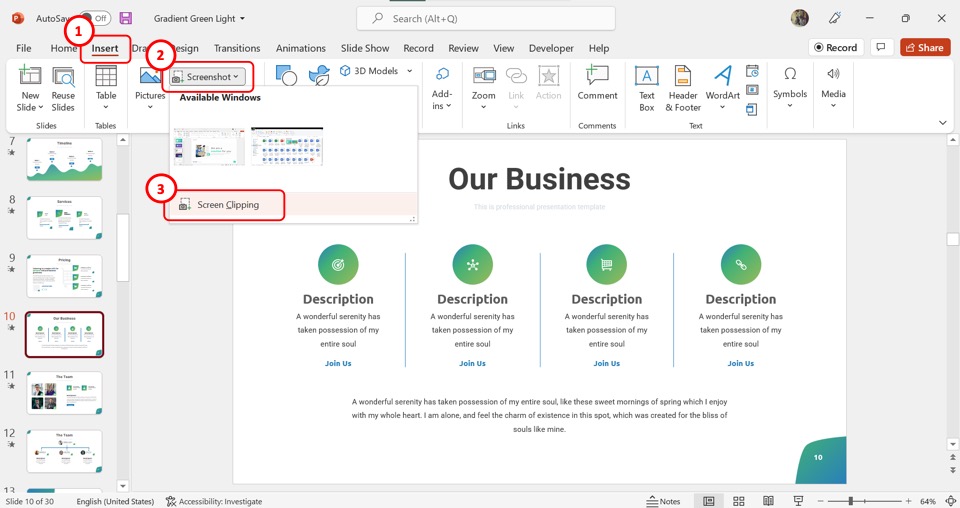
Step-1: Click on the “Insert” tab
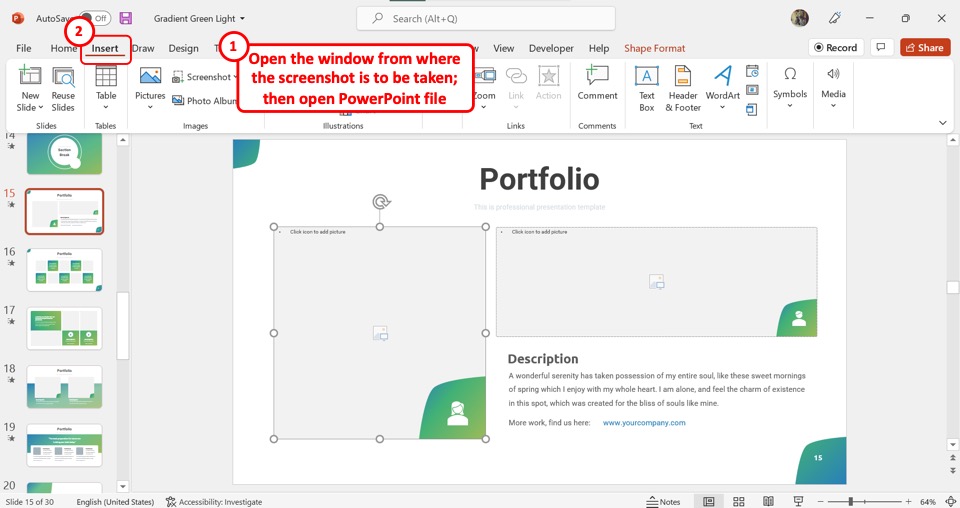
The first step is to open the window from where you want to insert the screenshot. Then open the PowerPoint file. In the menu ribbon located at the top of the screen, click on the “Insert” tab .
Step-2: Click on the “Screenshot” option
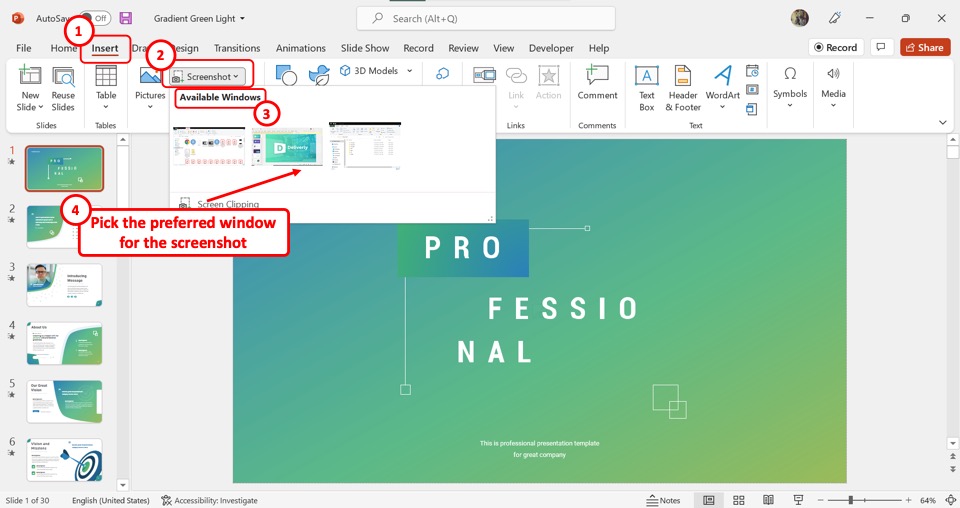
The next step is to take the screenshot. In the “Images” group of the “Insert” tab, click on the “Screenshot” option. In the dropdown menu under the “Screenshot” option, click on the preferred window from the “Available Windows” section.
Step-3: Click on the “Picture Format” tab
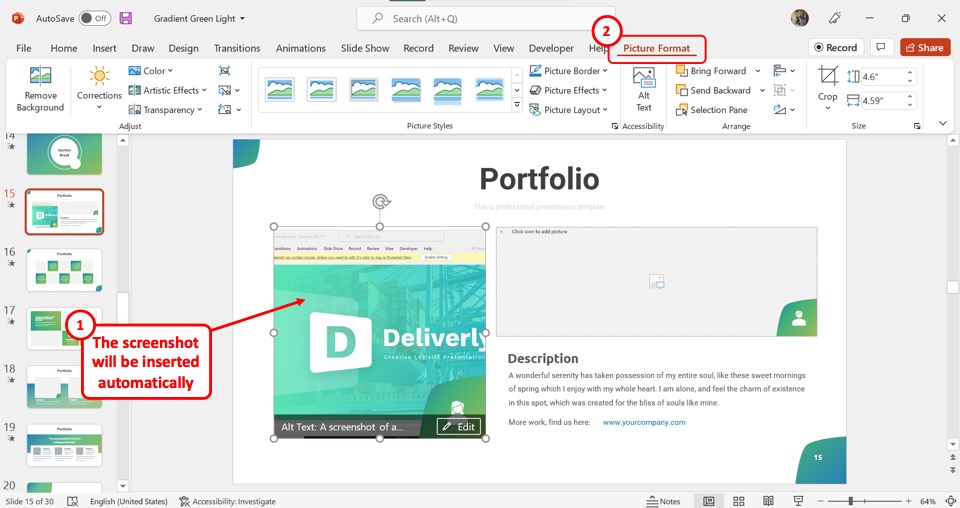
The screenshot will be automatically taken and inserted into the selected PowerPoint slide. Then all you have to do is click on the “Picture Format” tab from the menu ribbon located at the top of the screen to format the inserted screenshot.
1.2 Method 2 – Screen Clipping Option
Using the “Screen Clipping” option in Microsoft PowerPoint, you can directly take a screenshot and add it to your slide without the help of any other apps.
The feature allows you to take a screenshot from the open window on your computer which is automatically inserted into the slide. To add a screenshot using the “Screen Clipping” option, follow the 4 quick steps.
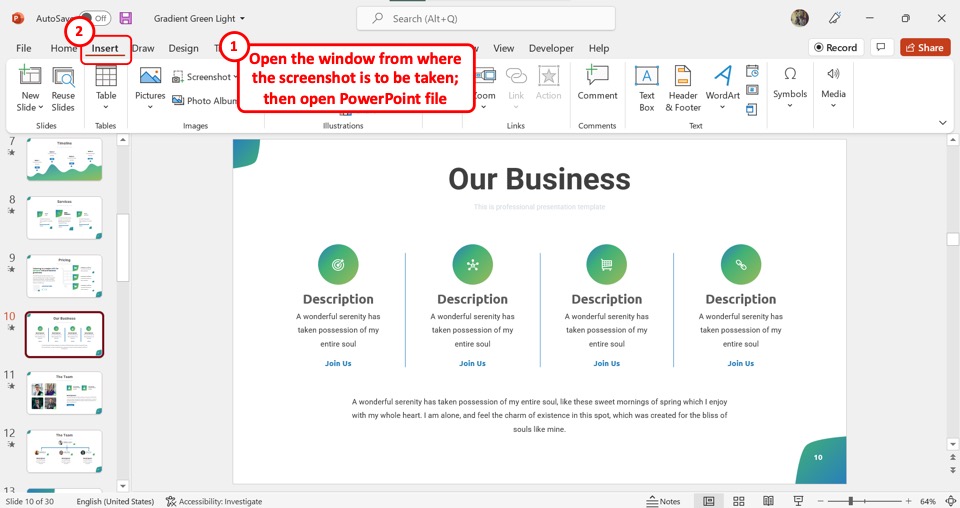
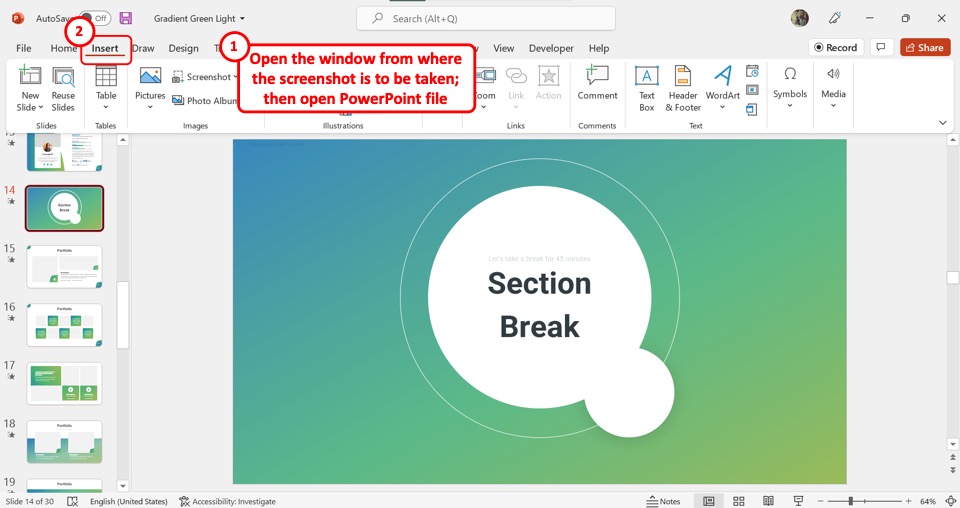
The first step is to open the window from where you want to take the screenshot. Then open the PowerPoint file. Click on the “Insert” tab from the menu ribbon located at the top of the screen.
Step-2: Click on the “Screen Clipping” option
In the “Images” group of the “Insert” tab, click on the “Screenshot” option. Then click on the “Screen Clipping” option from the dropdown menu under the “Screenshot” option. This will open the window right under the PowerPoint file.
Step-3: Drag the cursor to take the screenshot
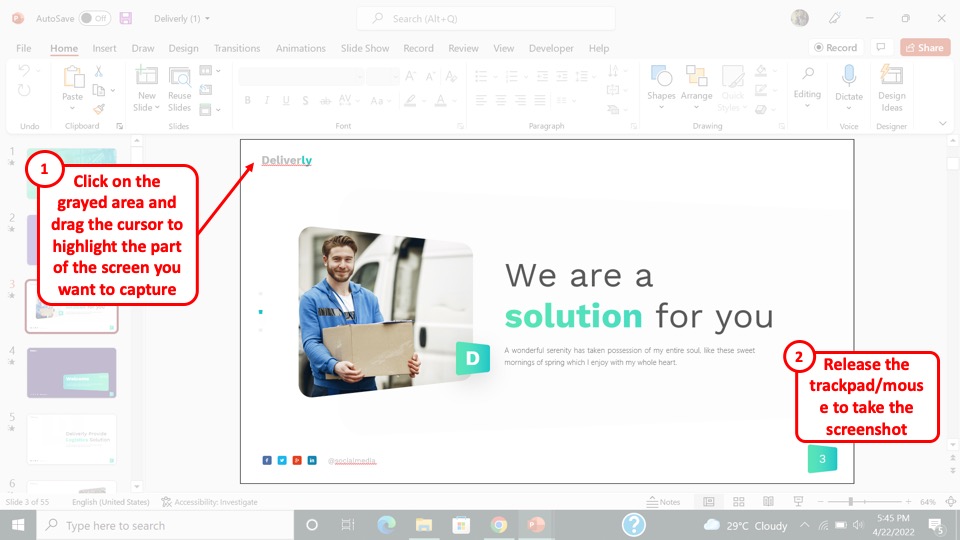
In the grayed-out window, you have to now click on the screen with the cursor and drag it to highlight the part of the screen that you want to capture. Then release the mouse or trackpad to take a screenshot of the selected part of the window.
Step-4: Click on the “Picture Format” tab
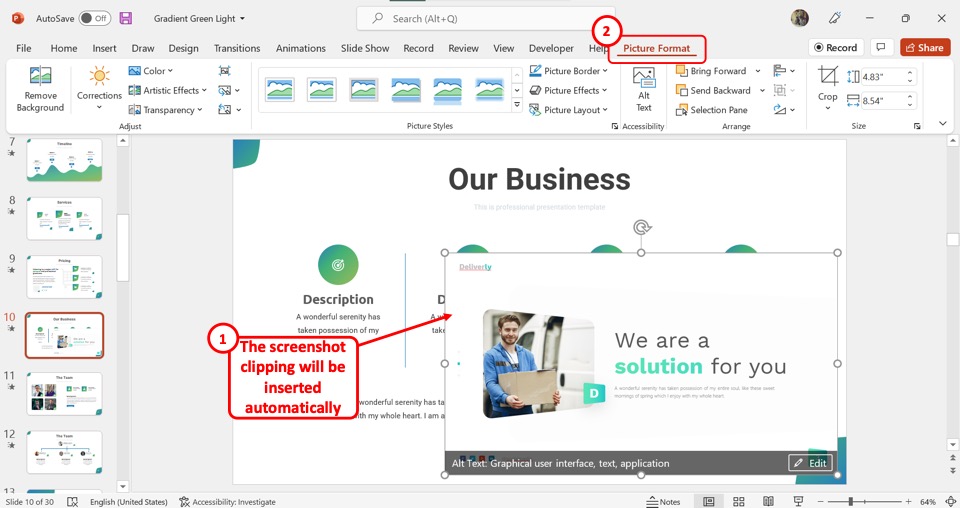
The screen clipping will automatically be added to the open slide in your PowerPoint file. You can now click on the “Picture Format” tab in the menu ribbon to format the screenshot.
2. How to Insert a Screenshot in PowerPoint?
In Microsoft PowerPoint, you can add a screenshot as an image in your slide. To do so, you can either use the “Screenshot” option or the “Clipboard” option in PowerPoint.
2.1 Method-1: Using the “Screenshot” Option
The “Screenshot” option in PowerPoint allows you to directly take and add a screenshot to the presentation slide without the help of another app. To insert a screenshot using the “Screenshot” option, follow the 2 simple steps.
Step-1: Click on the “Screenshot” option
The first step is to open the window from where you want to take the screenshot. Then open the PowerPoint file and click on the “Insert” tab from the menu ribbon.
Step-2: Insert the screenshot into the slide
In the dropdown menu under the “Screenshot” option, you can either click on a window under the “Available Windows” section or click on the “Screen Clipping” option to take the screenshot. Refer to section 1 to know more about which option you should use.
2.2 Method-2: Using the “Clipboard” Option
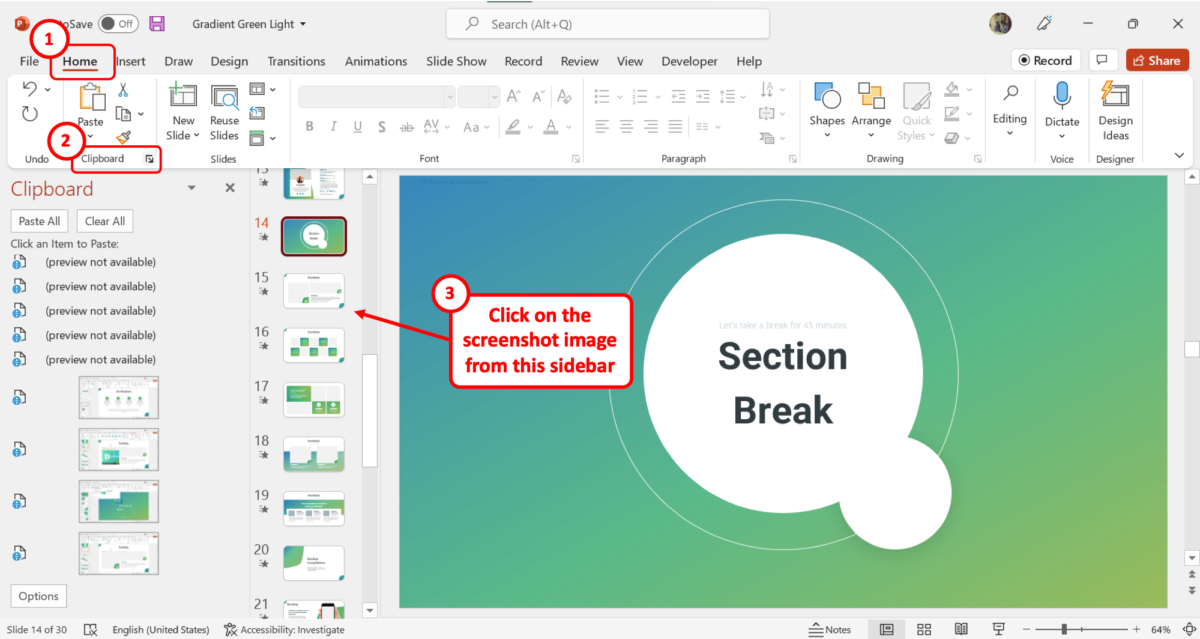
To insert a screenshot already taken on your computer into a PowerPoint slide, you can use the “Clipboard” option. You have to first open the “Clipboard” sidebar on the left side of your screen.
To do so, click on the dialog launcher icon at the bottom right corner of the “Clipboard” group in the “Home” tab. Then all you have to do is click on the screenshot image from the “Clipboard” sidebar to insert it into the slide.
3. Taking a Screenshot on Windows (Snipping Tool)
On a Windows computer, you can easily take a screenshot using the “Snipping Tool” . The tool lets you take a screenshot of the entire screen or a portion of it, and also edit the screenshot.
3.1 Method-1: Using the “Snip & Sketch” App
Using the “Snip & Sketch” app, you can access the snipping tool in Windows. To take a screenshot using the app, follow the 3 easy steps.
Step-1: Click on the “Snip & Sketch” app
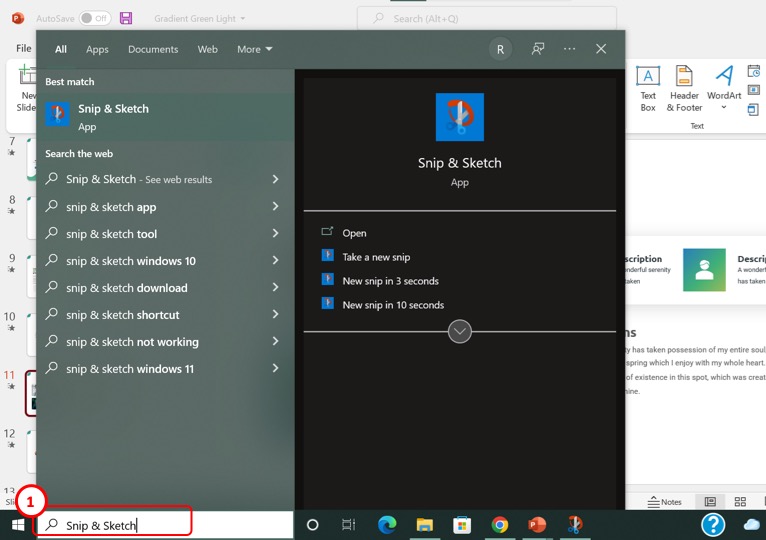
In the Windows search bar located in the left corner of the taskbar at the bottom of the screen, type in “Snip & Sketch” to find the app and open it.
Step-2: Click on the “New” option

In the “Snip & Sketch” app, click on the down arrow beside the “New” option located at the left corner of the top of the screen. In the dropdown list under the “New” option, select when you want to take the screenshot.
Finally, all you have to do is drag the cursor to highlight the part of the screen you want to capture. The selection tool is rectangle by default. You can also choose a different snipping tool from the toolbar at the top of the screen.
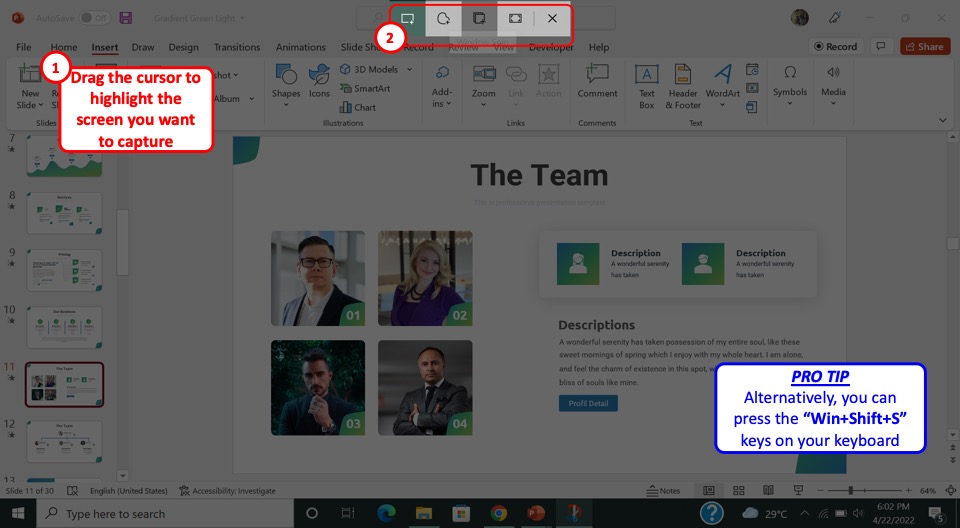
3.2 Method-2: Using the Keyboard Shortcut
To take a screenshot using the keyboard shortcut, all you have to do is press the “Win+Shift+S” keys on your keyboard.
In the grayed-out screen, drag the cursor to highlight the part of the screen that you want to capture. You can also select the shape of the screenshot from the toolbar at the top of the screen (as mentioned in the above image).
4. Taking a Screenshot on Mac
On a Mac device, you can take a screenshot using your keyboard only. There are different keyboard shortcuts that you can use depending on the part of the screen that you want to capture.
4.1 Method-1: Screenshot of the Entire Screen
To take a screenshot of the entire screen on a Mac, you have to press the “Shift+Command+3” keys on your keyboard. You can then click on the thumbnail in the corner of the screen to edit the screenshot.
4.2 Method-2: Screenshot of a Portion of the Screen
To take a screenshot of a portion of the screen, press the “Shift+Command+4” keys on your keyboard. Then click and drag the cursor to select a portion of the screen. Release your mouse or trackpad button to take a screenshot of the selected part of the screen.
You can now edit the screenshot by clicking on the thumbnail in the corner of your screen.
4.3 Method-3: Screenshot of a Window or Menu
To take a screenshot of a window or a menu, press the “Shift+Command+4+Space” keys on your keyboard. When the pointer changes to a camera icon, you can take a screenshot. All you have to do now is click on the window or menu to capture it.
Credit to cookie_studio (on Freepik) for the featured image of this article (further edited).
Screen printing

Screen printing originated in China during the Song Dynasty and later spread to other Asian countries and Europe. It was first patented in England in 1907 and used mainly for wallpaper printing. In the 1960s, Andy Warhol popularized screen printing in the US with depictions of Marilyn Monroe. Screen printing involves forcing ink through a porous fabric with a stencil design to produce an image. It can print on many substrates and is used commercially and in fine arts. The key tools and processes include frames, screens, stencils, inks, and squeegees. Read less

Recommended
More related content, what's hot, what's hot ( 20 ), similar to screen printing, similar to screen printing ( 20 ), more from md ali hossain, more from md ali hossain ( 20 ), recently uploaded, recently uploaded ( 20 ).
- 3. ScreenScreen PrintingPrinting
- 4. History - beginningsHistory - beginnings • Screen-printing firstScreen-printing first appeared in aappeared in a recognizable form inrecognizable form in China during the SongChina during the Song Dynasty (960–1279 CE).Dynasty (960–1279 CE). Japan and other AsianJapan and other Asian countries adopted thiscountries adopted this method of printing andmethod of printing and advanced the craft usingadvanced the craft using it in conjunction with blockit in conjunction with block printing and paints.printing and paints.
- 5. History – western introductionHistory – western introduction • Screen-printing was introduced to WesternScreen-printing was introduced to Western Europe from Asia sometime in the lateEurope from Asia sometime in the late 1700s, but did not gain large acceptance1700s, but did not gain large acceptance or use in Europe until silk mesh was moreor use in Europe until silk mesh was more available for trade from the east and aavailable for trade from the east and a profitable outlet for the mediumprofitable outlet for the medium discovered.discovered.
- 6. History – popularity increasesHistory – popularity increases • Screen-printing was first patented inScreen-printing was first patented in England by Samuel Simon in 1907. It wasEngland by Samuel Simon in 1907. It was originally used as a popular method tooriginally used as a popular method to print expensive wall paper, printed onprint expensive wall paper, printed on linen, silk, and other fine fabrics. Westernlinen, silk, and other fine fabrics. Western screen printers developed businessscreen printers developed business policies intended to keep secret theirpolicies intended to keep secret their workshops' knowledge and techniques.workshops' knowledge and techniques.
- 7. • Originally a profitable industrial technology,Originally a profitable industrial technology, screen printing was eventually adopted by artistsscreen printing was eventually adopted by artists as an expressive and conveniently repeatableas an expressive and conveniently repeatable medium for duplication well before the 1900s. Itmedium for duplication well before the 1900s. It is currently popular both in fine arts and inis currently popular both in fine arts and in commercial printing, where it is commonly usedcommercial printing, where it is commonly used to print images on T-shirts, hats, CDs, DVDs,to print images on T-shirts, hats, CDs, DVDs, ceramics, glass, polyethylene, polypropylene,ceramics, glass, polyethylene, polypropylene, paper, metals, and wood.paper, metals, and wood.
- 8. The process of forcing inkThe process of forcing ink through a porous fabricthrough a porous fabric and the open areas of aand the open areas of a stencil to produce anstencil to produce an image.image.
- 9. Screen Printing ProcessScreen Printing Process
- 10. 1960’s to present1960’s to present • Credit is generally givenCredit is generally given to the artist Andyto the artist Andy Warhol for popularizingWarhol for popularizing screen printingscreen printing identified as serigraphy,identified as serigraphy, in the United States.in the United States. Warhol is particularlyWarhol is particularly identified with his 1962identified with his 1962 depiction of actressdepiction of actress Marilyn Monroe screenMarilyn Monroe screen printed in garish colors.printed in garish colors.
- 11. Two terms commonly used:Two terms commonly used: Serigraphy (in the field ofSerigraphy (in the field of fine arts) and Screenfine arts) and Screen Printing used in the graphicPrinting used in the graphic communications industry.communications industry.
- 12. Applications for ScreenApplications for Screen Printing:Printing: • PostersPosters • Plastic bottlesPlastic bottles • Drinking glassesDrinking glasses • Soda bottlesSoda bottles • Mirrors, metal surfacesMirrors, metal surfaces • WoodWood • TextilesTextiles • Printed circuit boardsPrinted circuit boards • Product displaysProduct displays • Vinyl bindersVinyl binders
- 13. Advantages of Screen PrintingAdvantages of Screen Printing • Images can be printed on a wide variety ofImages can be printed on a wide variety of substrates.substrates. • The production process is relatively easy.The production process is relatively easy. • Capital expenditures are low compared to otherCapital expenditures are low compared to other printing processes.printing processes. • Images can be printed with glitter, flock, andImages can be printed with glitter, flock, and other decorative finishes.other decorative finishes. • The ink film is very resilient due to the extremeThe ink film is very resilient due to the extreme thickness of the ink deposit.thickness of the ink deposit.
- 14. Disadvantages of ScreenDisadvantages of Screen PrintingPrinting • The process is usually limited to flat, relativelyThe process is usually limited to flat, relatively thin substrates, such as paper, metal, orthin substrates, such as paper, metal, or plastic.plastic. • Rate of production is slow.Rate of production is slow. • Ink mileage is poor.Ink mileage is poor. • Excessive drying times may be necessary.Excessive drying times may be necessary. • Details and fine line images may be difficult toDetails and fine line images may be difficult to print.print.
- 15. Basic tools & Equipment for ScreenBasic tools & Equipment for Screen Printing:Printing: • FrameFrame • SqueegeeSqueegee • Vacuum Printing FrameVacuum Printing Frame • Printing TablePrinting Table • Screw DriverScrew Driver • DividerDivider • HammerHammer • Sharp KnifeSharp Knife
- 16. FramesFrames Materials ◦ Wood– less expensive, warps or rots faster ◦ Aluminum– more expensive, durable Sizes ◦ Labeled according to I.D. (inside dimension) Recommended sizes for printing: at least 6 inches beyond. Image size at top and bottom: at least 6 inches on each side. Types ◦ Wooden with groove: made for attaching fabric with a rope. ◦ Wooden or aluminum without a groove: fabric attached with glue. ◦ Retensionable aluminum: screen can be tightened repeatedly.
- 17. FabricsFabrics • Two main functions • Provide support for stencil. • Control ink flow. • Mesh count: how many opening per inch. • Fine mesh=100 count (ct) up to 500 ct. mesh • More detail and uses less ink; feels softer to touch. • Less likely to smear on non-absorbent substrates. • Coarse mesh=40 to 100 ct. mesh • Heavy ink deposit (good for light inks on dark shirts. • Better opacity
- 18. FabricsFabrics cont…cont… Two general types Multifilament: tiny strands twisted together Includes: polyester and silk Good for film stencils (like amber film)—sticks to it better Monofilament: (mono= one) single strand of thread Good for liquid emulsion Includes polyester; stainless steel Good for fine detail; easier to clean than multifilament
- 19. FabricsFabrics cont…cont… Colored Fabrics: used to reduce unwanted glare during exposure, called “halation’s.” Halation’s cause distortion around edge of images.
- 20. Chemicals Used In Screen Printing Autosol. Photocure Texture. Sp-1300. Benzene. Carbon tetra chloride Detergent powder Glue(swan Aica) Cold and clean water
- 21. Light Sensitive Film For Screen Printing Direct film Indirect film (Pre-sensitized gelatin film & Pre-sensitized synthetic polymer coated film. Known as five star film) Indirect film used for indirect stencil making.
- 22. StencilsStencils (Two Types)(Two Types) Non-photographic: hand cut (i.e. amber film, or paper) Photographic: (light sensitive) photo emulsion (liquid) ◦ Exposure process: Some type of light is used to harden emulsion. Why does the image spray out?- The particles in the emulsion that the positive was not covering, was hardened by the UV light. ◦ Overexposure: results in image NOT spraying out completely. ◦ Underexposure: results in scuming (an almost invisible film forms on stencil from the still soft emulsion running across screen as it dries)
- 23. Stencil Making There are two way of stencil making. Direct process. Indirect Process
- 24. Stencil Making of Direct Process In a darkened room or in a room with a yellow safe light, pour the emulsion into a scoop coater
- 25. Coat the screen, applying 2 thin coats of emulsion on each side of the screen.
- 26. If your scoop coater is smaller than the width of your screen, coat as shown in this slide. Once you have one coat on this side, turn the screen upside down to apply the second coat. Then apply two thin coats onto the back side of the screen, again flipping the screen upside down in between coats. Wipe off any excess emulsion that gathers around the edges.
- 27. Store the coated screens in a dark room or light-tight box until they are dry. Screens should dry with the flat side down (the side you used the squeegee on should be facing up). They need to dry perfectly flat. If the screen is tilted even the slightest bit, then the emulsion might dry unevenly and run off the screen.
- 28. If you are coating more than one screen, stack them using small blocks in between each one.
- 29. Once the screens are dry they may be put in black plastic garbage bags until you are ready to expose them
- 30. Expose the silkscreen with the students’ Film Positives. There are different types of exposing units. This one is a light table with clear glass and florescent light bulbs.
- 31. This process involves direct contact exposure. There must be no space between the Film Positive and the screen. Build a flat that is larger than your image, but small enough to fit inside the screen to ensure direct contact. Cover the flat in padding and black fabric to protect the screen.
- 32. Weigh down the flat with something heavy.
- 33. After your exposure time is up, rinse the screen on both sides. The emulsion that was not exposed to light (because it was blocked by the opaque black areas of the Film Positive) will wash away. Wash the screen until there are very few white bubbles remaining. Store the screen on a flat surface to dry or use a fan. When dry, screen is ready to proof.
- 34. InksInks Consist of…Consist of… ◦ Pigment--- provides thePigment--- provides the colorcolor ◦ Vehicle--- gives it “bulk”Vehicle--- gives it “bulk” ◦ Solvent--- makes it flow, then evaporates, leaving the rest of theSolvent--- makes it flow, then evaporates, leaving the rest of the ink behindink behind ◦ Modifiers--- examples: thinners; phoshluorescents; puff agents;Modifiers--- examples: thinners; phoshluorescents; puff agents; etc.etc.
- 35. Types of InkTypes of Ink Conventional– dry by air Water based Solvent based Non-conventional– cured by “polymerization” Plastisol– cured with heat (325 degrees); used for absorbent materials only (textiles); won’t work on paper, except for heat transfers. UV (ultraviolet) inks– cured with UV light; for non-absorbent substrates such as vinyl, and coated papers. Quick, clean method.
- 36. Inks cont…Inks cont… Process inks vs. spot colors Process inks- ________, ________, _______,________ combined to produce full color prints. Process inks have less “opacity.” Spot color– one or more colors to improve appearance without expense of process printing (or could be a special color added to a process print)
- 37. Squeegees Three main purposes Force ink through mesh “Flood” stroke: purpose Control ink deposit
- 38. Squeegees cont…Squeegees cont… Recommended size:Recommended size: two inches wider than image widthtwo inches wider than image width (maximum)(maximum) Storage:Storage: Blade upBlade up Blades vary in:Blades vary in: ◦ Material: vinyl or rubberMaterial: vinyl or rubber ◦ Hardness: durometer rating (the higher the rating, the stiffer theHardness: durometer rating (the higher the rating, the stiffer the blade)blade) ◦ Shape:Shape:
- 39. Squeegee cont…Squeegee cont… Clean-up Water based ink- cleans up with Water!! Plastisols require __________ (paint thinner) or other specially made ink cleaning solutions. Liquid (direct) emulsion– remove by degreasing first to get rid of ink solvents left behind, then apply reclaimer.
- 40. Potential for Further Development The main focus of further development lies principally in the plate making sector: • The direct imaging of screens (computer to screen) will become more and more prevalent, especially in conjunction with rotary screen printing units for large print runs. • The already available but still little used filmless stencil production with ink jet printing technology is of particular interest for large format applications. At approximately 600dpi, the resolution guarantees sufficiently good print quality even with color gradations.
- 41. Computer to screen for screen printing • Computer to screen printing is the digital production of image carriers for screen printing in which the print image data, controlled directly via the computer, are output onto the stencil or screen. Most computer to screen systems work using the ink jet technology, in which either heated wax or ink is applied to the screen. • First the screen must be lined with a closed layer/ emulsion (stencil material). The print image is applied to this coating using ink jet ink (as a film substitute). This is then followed by the usual exposure to cure the stencil material. The uncured ink-covered areas of the coating are then washed off with water. After drying, the stencil/ screen plate is ready for printing.
- 42. Different type of screen printing process
- 43. Modern screen printing proces s
- 44. Terms to Know!Terms to Know! Scum: Unexpected image which comes from stencil or plate. Haze: Generalized faint staining of screen mesh caused photo stencils, screen filters, printing mixtures and varnishes: cf. ghost. Fisheye: Unwanted open area in a photo stencil which prints with the appearance of the eye of a fish. Margin: Perimeter of mesh adjacent to the frame of the screen: this non printing area is closed during printing, either temporarily or permanently, to protect the mesh and to be used as a printing mix reservoir. Digital positive: Positive created and output using a computer.
- 45. Artwork: A general term for photographs, drawings, and others materials prepared to illustrate printed matter. Heat transfer paper: The substrate used in thermal transfer printing. The design is first printed on it with inks containing sublimely dispersed. Flood stroke: The squeegee motion that deposits a thick layer of ink on top of the screen printing screen under light pressure. The excessive ink prevents the image areas from drying between printing strokes. Mesh aperture: The space between the woven threads of screen printing fabric, through which the ink passes during printing.
- 46. Screen opener: A chemical, usually in aerosol spray from, used to clear dried-in areas of a screen printing stencil. Dark reaction: In an unexposed light-sensitive emulsion or coating, the sloe chemical change that occurs when the material is stored in an unlighted area. Mesh? Stencil?
Got any suggestions?
We want to hear from you! Send us a message and help improve Slidesgo
Top searches
Trending searches

teacher appreciation
11 templates

cybersecurity
6 templates

spring season
34 templates

archaeology
45 templates

46 templates

23 templates
Travel Guide: Moscow
Travel guide: moscow presentation, free google slides theme and powerpoint template.
Do you know some acquaintances that want to travel to Russia, the biggest country in this planet? Now you can be their own tour guide with this template. Include as much information as possible about tourist attractions, monuments and things to do in Moscow. Let the simplicity of these slides and their cool illustrations speak in favor too!
Features of this template
- 100% editable and easy to modify
- 25 different slides to impress your audience
- Contains easy-to-edit graphics such as graphs, maps, tables, timelines and mockups
- Includes 500+ icons and Flaticon’s extension for customizing your slides
- Designed to be used in Google Slides and Microsoft PowerPoint
- 16:9 widescreen format suitable for all types of screens
- Includes information about fonts, colors, and credits of the free resources used
How can I use the template?
Am I free to use the templates?
How to attribute?
Attribution required If you are a free user, you must attribute Slidesgo by keeping the slide where the credits appear. How to attribute?
Related posts on our blog.

How to Add, Duplicate, Move, Delete or Hide Slides in Google Slides

How to Change Layouts in PowerPoint

How to Change the Slide Size in Google Slides
Related presentations.

Premium template
Unlock this template and gain unlimited access

Moscow - City Map PowerPoint Template
City map of Moscow with administrative districts and numerous design examples
Instant Download:
- 100% Editable Powerpoint Slides / Graphics
- Outstanding Customer Support
- SSL Secure Payment
- Made in Germany
- Information
- Template (4:3)
High quality city map "Moscow" for PowerPoint
This detailed citymap of "Moscow" you can present in Microsoft PowerPoint. The vector graphic enables you to easily edit and scale your map as much as you need to. Change the colour and edit the separate districts. The map comes in different design-variations.

Infographics Bundle
Flat design – presentation people bundle, change management bundle, 150 strategy & management models, agile management bundle, gearwheel bundle, project charter, growth mindset, project canvas, artificial intelligence, gdpr: data protection powerpoint template, digital transformation, corporate services.
We’ll optimize your existing PowerPoint presentation and create slides in your corporate design.
New PowerPoint Templates
We are continually bringing you new PowerPoint templates on current business topics and in modern designs.
View, manage, and install add-ins for Excel, PowerPoint, and Word
When you enable an add-in, it adds custom commands and new features to Microsoft 365 programs that help increase your productivity. Because add-ins can be used by attackers to do harm to your computer, you can use add-in security settings to help protect yourself.
Note: This article only applies to Microsoft 365 applications running on Windows.
View installed add-ins

You can directly install add-ins from this page or select More Add-ins to explore.
In the Office Add-ins dialog, select My Add-ins tab.
Select an add-in you want to view the details for and right-click to select Add-in details option.
Click a heading below for more information .
Add-in categories explained
Active Application Add-ins Add-ins registered and currently running on your Microsoft 365 program.
Inactive Application Add-ins These are present on your computer but not currently loaded. For example, XML schemas are active when the document that refers to them is open. Another example is the COM add-in: if a COM add-in is selected, the add-in is active. If the check box is cleared, the add-in is inactive.
Document Related Add-ins Template files referred to by open documents.
Disabled Application Add-ins These add-ins are automatically disabled because they are causing Microsoft 365 programs to crash.
Add-in The title of the add-in.
Publisher The software developer or organization responsible for creating the add-in.
Compatibility Look here for any compatibility issues.
Location This file path indicates where the add-in is installed on your computer.
Description This text explains the add-in function.
Note: Microsoft Outlook has one add-in option in the Trust Center: Apply macro security settings to installed add-ins . InfoPath has no security settings for add-ins.
Permanently disable or remove an add-in
To disable or remove an add-in follow these steps:
Select File > Get Add-ins . Alternatively, you can select Home > Add-ins .
In the Office Add-ins dialog, select My Add-ins tab.
Select an add-in you want to remove and right click to select Remove option.
View or change add-in settings
You can see and change add-in settings in the Trust Center, descriptions of which are in the following section. Add-in security settings may have been determined by your organization so not all options may be available to change.
Select File > Get Add-ins .
Select More Add-ins > Manage My Add-ins.
Select Trust Center > Trust Center Settings > Add-ins.
Check or uncheck the boxes you want.
Add-in settings explained
Require Application Add-ins to be signed by Trusted Publisher Check this box to have the Trust Center check that the add-in uses a publisher's trusted signature. If the publisher's signature hasn’t been trusted, the Microsoft 365 program doesn’t load the add-in, and the Trust Bar displays a notification that the add-in has been disabled.
Disable notification for unsigned add-ins (code will remain disabled) When you check the Require Application Extensions to be signed by Trusted Publisher box, this option is no longer grayed out. Add-ins signed by a trusted publisher are enabled, but unsigned add-ins are disabled.
Disable all Application Add-ins (may impair functionality) Check this box if you don't trust any add-ins. All add-ins are disabled without any notification, and the other add-in boxes are grayed out.
Note: This setting takes effect after you exit and restart your Microsoft 365 program.
While working with add-ins, you may need to learn more about digital signatures and certificates , which authenticate an add-in, and trusted publishers , the software developers who often create add-ins.
Manage and install add-ins
Use the following instruction to manage and install add-ins.
To install a new add-in:
You can directly install popular add-ins on the page or go to More Add-ins to explore.
Select the add-in and select Add . Or browse by selecting Store tab in the Office add-in dialog to find other add-ins to install and select Add for that add-in.
To manage your add-ins:
Select File > Get Add-ins and from the bottom, select More Add-ins. Or select Home > Add-ins > More add-ins.
In the Office dialog, select My Add-ins tab. If you are not able to see your add-ins, select Refresh to reload your add-ins.
Select Manage My Add-in to manage and select Upload to browse and add an add-in from your device.
How to cancel a purchased add-in
If you've subscribed to an add-in through the Microsoft 365 Store that you don't want to continue, you can cancel that subscription.
Open the Microsoft 365 application and go to the Home tab of the ribbon.
Select Add-ins and then select More Add-ins > My Add-ins tab to view your existing add-ins.
Select the app you want to cancel and select Manage My Add-ins .
Under the Payment and Billing section choose Cancel Subscription .
Select OK and then Continue .
Once that's complete you should see a message that says "You have cancelled your app subscription" in the comments field of your apps list.
Why is my add-in crashing?
Some add-ins might not be compatible with your organization's IT department policies. If that is the case with add-ins recently installed on your Microsoft 365 program, Data Execution Prevention (DEP) will disable the add-in and the program might crash.
Learn more about DEP
Get a Microsoft 365 Add-in for Outlook
Get a Microsoft 365 Add-in for Project
Taking linked notes
If you're looking for Help on linking notes in OneNote to a Word or PowerPoint document, see Take linked notes .
Excel Windows Add-ins
If you're looking for Help on specific Excel Add-ins, such as Solver or Inquire, see Help for Excel for Windows add-ins .
If you're looking for additional help with Excel add-ins using the COM Add-ins dialog box, see Add or remove add-ins in Excel .
Get a Microsoft 365 Add-in for Excel

Need more help?
Want more options.
Explore subscription benefits, browse training courses, learn how to secure your device, and more.
Microsoft 365 subscription benefits
Microsoft 365 training
Microsoft security
Accessibility center
Communities help you ask and answer questions, give feedback, and hear from experts with rich knowledge.
Ask the Microsoft Community
Microsoft Tech Community
Windows Insiders
Microsoft 365 Insiders
Find solutions to common problems or get help from a support agent.
Online support
Was this information helpful?
Thank you for your feedback.
Moscow city PowerPoint Templates and PowerPoint Backgrounds
DigitalOfficePro's Moscow city PowerPoint Template and Moscow city PowerPoint Backgrounds helps you engage your audience from top to bottom with artistically enhanced and visually stunning slides - aesthetically perfect to match today's audience expectations. Above all, it is pretty simple to customize text, color, font or layout of any of these PPT templates. Each of our templates comes with a set of PowerPoint Diagrams & Charts, Shapes and Icons too. Inspire & Engage your audience with Moscow city PowerPoint Background Templates. Moscow city PowerPoint Templates are available in both standard and widescreen formats.
So, what’s stopping you now? Use our Moscow city PowerPoint Templates to kick start your next PowerPoint show.
Moscow city PowerPoint Templates
IMAGES
VIDEO
COMMENTS
To save your PowerPoint as a PDF, click on the File option in the toolbar at the very top of your screen. When you click on File, a menu drops down. Choose the Save As… option. After clicking on this option, a window appears. Next, in the File Format: field, choose the PDF option.
Select File > Print. For Printer, select the printer you want to print to. Print All Slides: To print each slide on a single sheet or change to just print a range of slides. Slides: From the drop-down, choose to print all slides, selected slides, or the current slide. Or, in the Slides box, type which slide numbers to print, separated by a comma.
Step-1: Click on the "Print" option. In the Microsoft Powerpoint presentation, click on the "File" tab from the menu bar. Then click on the "Print" option to access the print settings. Step-2: Click on the "Notes Pages" option. Under the settings option, click on the "Full Page Slides" box to open a dropdown menu.
1. Open Microsoft Powerpoint with whatever procedure you prefer to use. 2. Open your file you'd like to print. 3. Select the "File" option from the Menu toolbar at the top of your screen. 4. Click "Print" button. You can also select the "Printer" icon from the "Standard toolbar" which can also be found at the top of the screen.
In PowerPoint, slide backgrounds span to all edges of your screen. But when you print your presentation, you'll get a white margin around the edges, shown below. This limitation stems from the design of most printers that don't print content in the margins. PowerPoint can't change this printer-margin limitation, but here's a workaround you ...
Print your presentation. Select the File > Print. For Printer, select the printer you want to print to. For Settings, select the options you want: Slides - from the drop-down, choose to print all slides, selected slides, or the current slide. Or, in the Slides box, type which slide numbers to print, separated by a comma.
Open your PowerPoint presentation. Click File → Print. Printing options. In Settings you can select if you want to print your presentation in colour or black and white. Click the icon at the bottom of the window to the right to select among the options: To print in color: Settings → Color. To print in grayscale: Settings → Grayscale.
Screen Printing Workshop Presentation . Education . Free Google Slides theme and PowerPoint template . We like design a lot, that's for sure. ... Designed to be used in Google Slides and Microsoft PowerPoint; 16:9 widescreen format suitable for all types of screens; Includes information about fonts, colors, and credits of the free resources ...
Print PowerPoint Notes Pages for the Speaker . Print speaker notes with each slide as an aid when giving a PowerPoint presentation. Each slide is printed in miniature (called a thumbnail) on a single page, with the speaker notes below. These notes do not show on the screen during the slide show.
Use your screen reader to print slides, handouts, speaker notes, and outlines with the default or customized printing settings.
As above, go to the Insert tab, click on Screenshot and choose Screen Clipping . PowerPoint will switch to your screenshot and fade it. To select the clipping you want, just drag a new window over the bit of the screenshot you want to add. This screen clipping will then be added to the active slide in your presentation.
To insert a screenshot in PowerPoint or Word: Open the document or web site you want to capture as a screenshot. Open a PowerPoint presentation or Word document. Click in the Word document or display the desired PowerPoint slide. Click the Insert tab on the Ribbon and then click Screenshot in the Images group.
Steps. Start a blank presentation in PowerPoint and, in the main menu bar, select the Design tab. Here, click on the Slide Size button on the right and then select Custom Slide Size. Note: Some versions of PowerPoint may have a Page Setup option instead of the Slide Size button. The Slide Size dialogue box that will pop on your screen provides ...
Open your presentation in PowerPoint. Navigate to 'File' and click on 'Print'. Click on the dropdown under 'Settings' and select 'Full Page Slides'. Choose the 'Print Layout' by selecting 'Notes Pages'. Click 'Print' to print your presentation with comments.
Introduction to Screenprinting. Aug 14, 2010 • Download as PPTX, PDF •. 29 likes • 25,607 views. AI-enhanced title. Keira Dooley. Education. 1 of 26. Download now. Introduction to Screenprinting - Download as a PDF or view online for free.
Print Preview. See Printing and print preview for information about preview features. Troubleshooting. If you've having trouble being able to print, see My Print button and some printer settings aren't available. See also. For more information about printing in PowerPoint, check out the following: Create or change a presentation's handout
Step-1: Click on the "Insert" tab. The first step is to open the window from where you want to insert the screenshot. Then open the PowerPoint file. In the menu ribbon located at the top of the screen, click on the "Insert" tab . Step-2: Click on the "Screenshot" option. The next step is to take the screenshot.
Dec 18, 2014 • Download as PPT, PDF •. 24 likes • 27,814 views. AI-enhanced description. Md Ali Hossain. Screen printing originated in China during the Song Dynasty and later spread to other Asian countries and Europe. It was first patented in England in 1907 and used mainly for wallpaper printing. In the 1960s, Andy Warhol popularized ...
Free Google Slides theme and PowerPoint template. Do you know some acquaintances that want to travel to Russia, the biggest country in this planet? Now you can be their own tour guide with this template. Include as much information as possible about tourist attractions, monuments and things to do in Moscow. Let the simplicity of these slides ...
In PowerPoint for the web, slide backgrounds extend to the edges of the slide. But when you print, a white margin appears around the edges of the slide. This is because most printers can't do borderless printing. Some printers have a "margin" option you can adjust that may make white margins smaller, but it still may not eliminate them entirely.
Moscow - City Map PowerPoint Template. (M4010) City map of Moscow with administrative districts and numerous design examples. Add to cart. $19.00*. Add to wish list. Quantity of slides. : 20.
Above all, it is pretty simple to customize text, color, font or layout of any of these PPT templates. Each of our templates comes with a set of PowerPoint Diagrams & Charts, Shapes and Icons too. Inspire & Engage your audience with Moscow city skyscrapers PowerPoint Background Templates.
Note: This article only applies to add-ins in Excel, PowerPoint, and Word.For guidance on how to view, install, and manage add-ins in Outlook, see Use add-ins in Outlook.
Above all, it is pretty simple to customize text, color, font or layout of any of these PPT templates. Each of our templates comes with a set of PowerPoint Diagrams & Charts, Shapes and Icons too. Inspire & Engage your audience with Moscow city PowerPoint Background Templates. Moscow city PowerPoint Templates are available in both standard and ...