How-To Geek
How to crop a picture in microsoft powerpoint.
You can remove unwanted areas of images by using Microsoft PowerPoint's built-in cropping tool. Here's how.

Quick Links
Crop a picture in powerpoint, crop a picture as a shape.
You can remove unnecessary pixels from an image directly in Microsoft PowerPoint using the built-in cropping tool. You can also crop a photo to fit a specific shape. Here’s how to crop a picture in Microsoft PowerPoint.
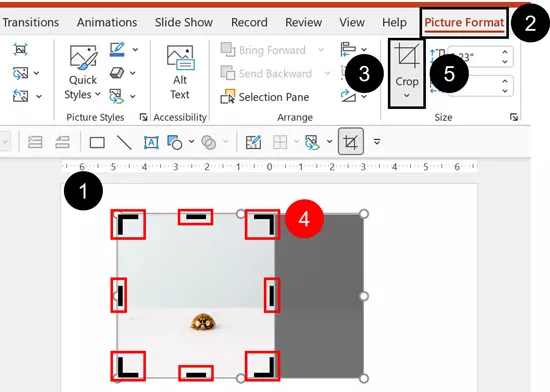
To crop a picture in PowerPoint, open the presentation, add the picture (Insert > Picture), then select the photo.
Once selected, the “Picture Format” tab will appear. Select it, then click the “Crop” button found in the “Size” group.
A drop-down menu will appear. Here, select “Crop.”
Cropping handles will now appear around the frame of the image. To crop out certain areas, click and drag the handles to capture only the content you want to keep.
After setting the areas of the frame, select the icon in the upper half of the “Crop” option in the “Size” group of the “Picture Format” tab.
Your image will now be cropped.
Related: How to Blur an Image in PowerPoint
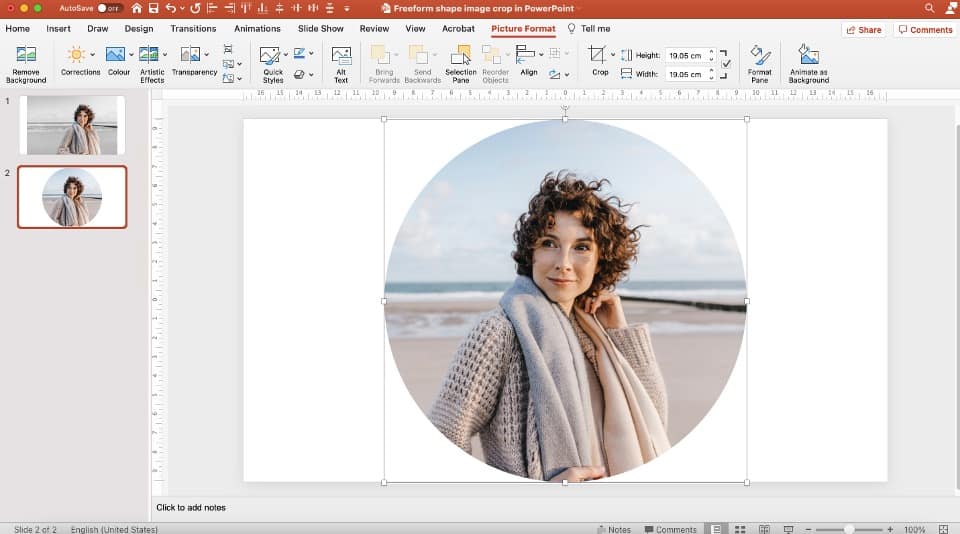
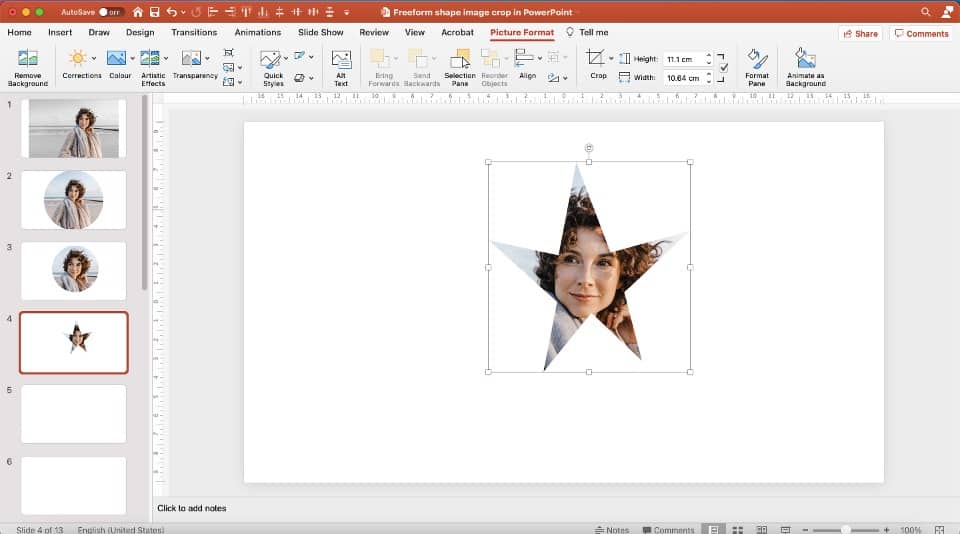
To crop a picture to as a shape, open the PowerPoint presentation, insert a picture (Insert > Picture), then select the shape.
In the “Picture Format” tab, click the “Crop” button found in the “Size” group. In the drop-down menu that appears, select “Crop To Shape.”
Another menu displaying a large library of shapes will appear. Select the shape you’d like to crop the image to. We’ll use a basic oval in this example.
Once selected, the oval shape will appear over your image, as well as cropping handles to set the area to be cropped. Set them as desired.
When you’re ready, select the icon above “Crop” in the “Size” group of the “Picture Format” tab.
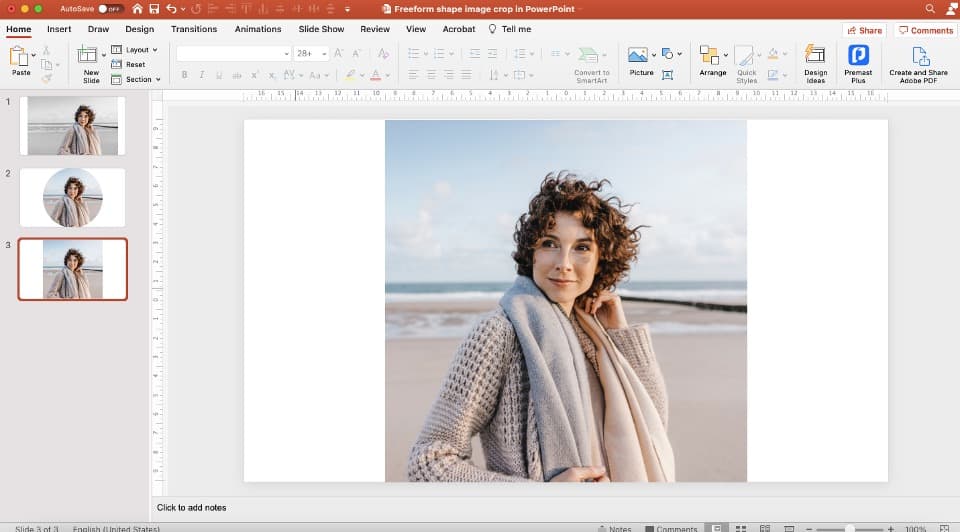
Your image is now cropped.
Critical PowerPoint Shortcuts – Claim Your FREE Training Module and Get Your Time Back!
How to crop a picture in PowerPoint (Step-by-Step)
- PowerPoint Tutorials
- Pictures, Icons, Videos, Etc.
- June 5, 2018
In this tutorial, you’ll learn how to crop pictures in PowerPoint using the different tools and features that PowerPoint provides. This gives you more control over the images you use in your presentations and does not require Photoshop.
And there is more to cropping images than just resizing them for your slides. For example, you can:
- Crop images into circles (or other shapes)
- Crop images into specific aspect ratios to fit your slides better
- Reduce your image file size by cropping out the parts you don’t want

Table of Contents
[watch] how to crop a picture in powerpoint.
You are currently viewing a placeholder content from Youtube . To access the actual content, click the button below. Please note that doing so will share data with third-party providers.
If you decide to use the Crop to Aspect Ratio feature, you can quickly and easily make great slide backgrounds for your presentations.
Cropping pictures in PowerPoint (basics)
To crop a picture in PowerPoint, follow these steps:
- Select the picture you want to crop.
- Select the Picture Format tab
- Click the Crop command to enter cropping mode.
- Resize the Cropping Handles (they are black) on your photo.
- Select Crop again (or hit the Esc key) to exit cropping mode.
After you adjust the black handlebars on your picture, the grey or faded parts are what is removed from your image. Only the colorful parts of your picture remain after you close the Crop command as you can see in the picture below.

If you have a lot of pictures in your presentation, you can reduce your file size by compressing your images after you crop them. To learn how to compress your images in PowerPoint, read our guide here .
Take your PPT skills to the next level
How to crop a picture into a circle (crop to shape).
Instead of just cropping an image down to a normal square or rectangle, you can also use PowerPoint’s cropping tool to immediately crop your image into a circle, triangle, or other shape.
There are two different ways to do this. I personally prefer the second method – Intersect to Shape – but that feature is not available in all versions of PowerPoint. So, let’s first look at the most basic way to crop a picture into a shape.

To crop a picture into a circle in PowerPoint:
- Navigate to the Picture Format tab.
- Open the Crop dropdown.
- Select Crop to Shape .
- Choose the Circle shape (or other shape)
- Click the Crop tool again or hit Esc on your keyboard.
When you crop a rectangular image into a circle, it looks like the oval below.

Notice how the ladybug is not centered perfectly inside of the oval? If this happens to you, you will want to adjust the image. You can do that manually or use the Offset X and Offset Y commands in the Format Picture dialog box as discussed below.
Note: If you’d rather have your image be a circle instead of an oval, you need to start with a square picture (rather than a rectangle). Squares and circles have same height and width.
How to crop multiple pictures at once (‘Power Cropping’)
Instead of cropping your images one by one, you can also save yourself a lot of time by using SmartArt. This method allows you to quickly crop and resize all your pictures at once (detailed below).
Warning: This Power Cropping trick only works on PC versions of PowerPoint 2013 and later. If you have an earlier version of PowerPoint, this is one of many good reasons to consider upgrading soon.

To crop and resize multiple pictures at the same time using SmartArt, simply:
- Select your images
- Navigate to the Picture Format tab
- Open the Picture Layout dropdown
- Select a SmartArt layout to crop your images
As you hover over the different SmartArt layouts, you get a live preview of how your pictures will be cropped and resized. Your goal at this stage is to find the shape that gets you closest to the shape you are looking for. You can adjust the shape later.
Below is an example of cropping pictures using the Bending Picture Semi-Transparent Text layout.

After you choose a layout, you can then break the SmartArt graphic apart so that you can freely work with the cropped pictures.

To break your SmartArt graphic apart, simply hit Ctrl+Shift+G twice on your keyboard to Ungroup the object.
Alternatively, you can use the Convert to Shapes command:
- Select your SmartArt graphic
- Navigate to the SmartArt Design tab
- Open the Convert dropdown
- Select Convert to Shapes
That turns your SmartArt graphic into a group of cropped pictures that you can then ungroup and use any way you like within your presentation. If any of the pictures aren’t cropped the way you like them, you can adjust the cropping as discussed below.
How to adjust a cropped image in PowerPoint

You can adjust what parts of your cropped image show within the cropped area in PowerPoint. To do that, simply:
- Select the cropped picture
- Select the Crop tool
- Move the picture around within the frame (you can just click and drag, or readjust the black handlebars on the photo)
- Select the Crop command again (or hit Esc ) to exit cropping mode
You can also adjust your photo within the cropped area using the Offset X and Offset Y values in the Format Picture dialog box. This is what I would recommend if you are stuck with an off-centered picture inside your circle crop.

To adjust a cropped picture using the Offset X and Offset Y values, simply:
- Right-click your picture
- Select Format Picture
- Click on the Picture icon
- Under the Crop area, adjust the Offset X and Offset Y fields
Adjusting the Offset X value moves your picture horizontally within your cropped area. Adjusting the Offset Y value moves your picture vertically within your cropped picture area.
How to intersect a picture to a shape
The fastest and easiest way to crop to shape is to use the Intersect command in PowerPoint 2013 and later.
The reason it’s faster and easier is that you can draw the shape directly over the part of the photo that you want. This saves you from having to do all the manual adjusting.

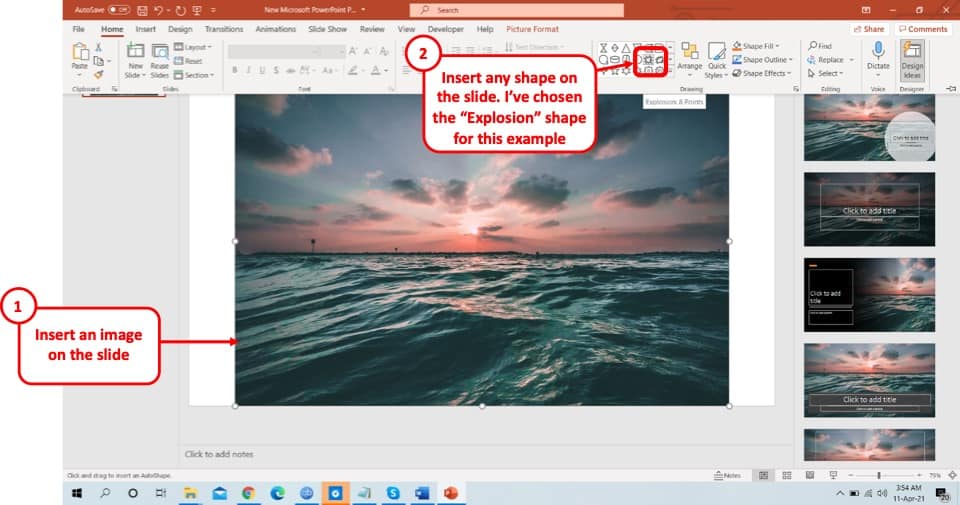
To crop a picture to a shape using the Intersect command in PowerPoint simply:
- Insert the PowerPoint shape that you want and place it on top of your photo (in the picture above I’ve inserted an Explosion: 8 Points shape).
- Select the picture.
- While holding the Shift key, now select the shape (if you do it in the reverse order it won’t work).
- With the picture and shape selected, navigate to the Shape Format tab.
- Open the Merge Shapes tool.
- Select the Intersect command.
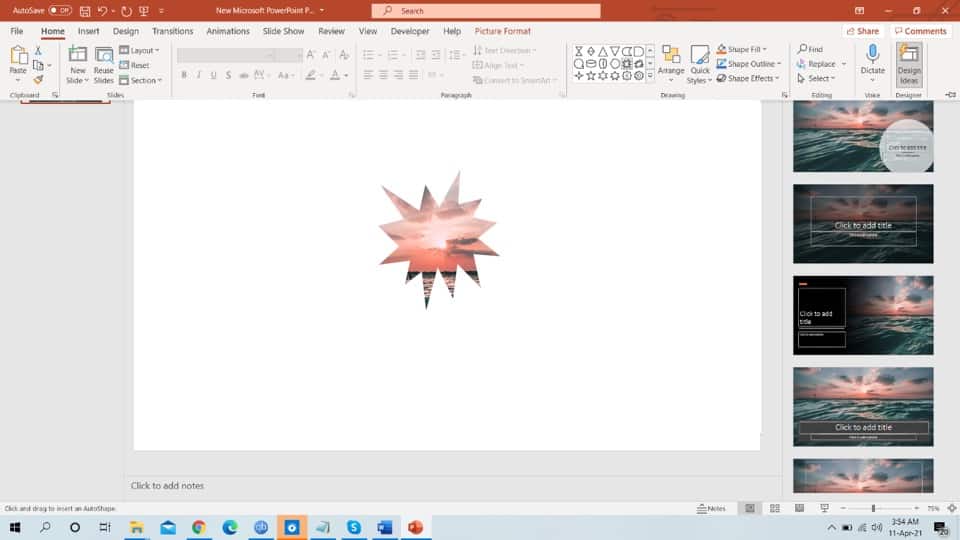
Selecting Intersect, the intersection points between the shape and picture are combined, as pictured below.

How to crop a picture to an aspect ratio
The fastest way to turn a photo into a full-screen visual image for your slide background is to use the Aspect Ratio crop tool.
This allows you to crop a photo down to either the 16:9 aspect ratio for widescreen monitors or the 4:3 aspect ratio for printed slides.

To crop a picture to the 16:9 aspect ratio, simply:
- Open the Aspect Ratio options.
- Choose your aspect ratio. In the picture above I chose 16:9 for widescreen photos (another common aspect ratio is 4:3 for printed slides).
- Adjust your photo within the frame.
- Hit the Crop command again or hit Esc on your keyboard.
Once you have cropped it to the 16:9 aspect ratio, your photo should fit perfectly on your 16:9 slide. Just make sure you hold the Shift key while you enlarge your image, so you don’t accidentally warp it.

The Crop to Aspect Ratio command works best on photos that have a lot of negative space (like sky and sand, as pictured below). That’s because there is enough room in your photo to be cropped out and still look like a complete picture.
The negative space also works well for placing your content.

When you don’t have a lot of negative space in your photo, cropping to aspect ratio increases the size of the main people or objects in your photo.
3D picture cropping trick
Another clever cropping trick in PowerPoint allows you to create 3D pictures in PowerPoint, as you can see with the apple below (what is known as an ‘out of bounds’ effect).

The trick is to overlay two photos and then use the cropping tools to create the 3D effect.
The 3-part process for creating a 3D image in PowerPoint is as follows:
- Find a high-quality image (see the blog post linked below for image requirements).
- Properly frame your picture in PowerPoint.
- Overlay and crop your images down to create the 3D picture effect.
To see the step-by-step process for creating 3D pictures like this, read our guide here .
So that’s how to crop a picture in PowerPoint, and a variety of the formatting options you have available to you.
Like many things in PowerPoint, there are many ways to do the same thing. Which one you use depends on your desired outcome.
Because adding visual elements like photos is critical to your success in designing your slides, I consider cropping photos a must-know in PowerPoint.
If you enjoyed the depth of this tutorial and want to learn more about our online training courses and other free resources, visit us here .
🔒 Unlock the PowerPoint Shortcuts Trusted by Industry Leaders KKR, American Express, HSBC, and More!
Join over 114,880 professionals from diverse fields including consulting, investment banking, advertising, marketing, sales, and business development who have supercharged their PowerPoint game with our proven methods.
✅ Customize compelling presentations effortlessly.
✅ Master time-saving techniques for faster deck creation.
✅ Boost your career prospects with top-notch PowerPoint skills.
Get FREE access to the Critical PowerPoint Shortcuts module of our premium training course by entering your name and email below.
DISCLAIMER: PC Users Only!
We respect your privacy and will keep your info safe and confidential.
Related Articles
About the author.

Popular Tutorials
- How to Strikethrough Text (l̶i̶k̶e̶ ̶t̶h̶i̶s̶) in Word, Excel & PowerPoint
- How to Make Animated Fireworks in PowerPoint (Step-by-Step)
- Strikethrough Shortcut (l̶i̶k̶e̶ ̶t̶h̶i̶s̶) for Word, Excel & PowerPoint
- How to Create a Flash Card Memory Game in PowerPoint (Like Jeopardy)
- Keyboard Shortcuts Not Working: Solved
PowerPoint Tutorial Categories
- Strategies & Opinions
- Shortcuts & Hacks
- Presentation Design
- New Features
- Miscellaneous
- Charts & Data Viz
We help busy professionals save hours and gain peace of mind, with corporate workshops, self-paced courses and tutorials for PowerPoint and Word.
Work With Us
- Corporate Training
- Presentation & Template Design
- Courses & Downloads
- PowerPoint Articles
- Word Articles
- Productivity Resources
Find a Tutorial
- Free Training
- For Businesses
We help busy office workers save hours and gain peace of mind, with tips, training and tutorials for Microsoft PowerPoint and Word.
Master Critical PowerPoint Shortcuts – Secure Your FREE Training Module and Save Valuable Time!
⌛ Master time-saving expert techniques.
🔥 Create powerful presentations.
🚀 Propel your career to new heights.
We value your privacy – we keep your info safe.
Discover PowerPoint Hacks Loved by Industry Giants - KKR, AmEx, HSBC!
Over 114,880 professionals in finance, marketing and sales have revolutionized their PPT skills with our proven methods.
Gain FREE access to a full module of our premium PowerPoint training program – Get started today!
We hate spam too and promise to keep your information safe.
You are currently viewing a placeholder content from Facebook . To access the actual content, click the button below. Please note that doing so will share data with third-party providers.
How to Crop a Picture in PowerPoint? [Step-by-Step Guide!]
By: Author Shrot Katewa
![How to Crop a Picture in PowerPoint? [Step-by-Step Guide!]](https://artofpresentations.com/wp-content/uploads/2021/04/Featured-Image-How-to-crop-an-image-in-PowerPoint.jpg "crop image in powerpoint presentation")
The ability to crop and edit images in PowerPoint is by far one of the most underrated qualities of PowerPoint! You can not only insert images to it, but you can also crop the images into a pre-built shape, custom shape, or even to a smaller size! But, you may be wondering, how exactly do you crop a Picture in PowerPoint?
Here’s how to crop a picture in PowerPoint –
- Select the picture.
- Then, click on the “Picture Format” ribbon.
- Next, click on “Crop”. You will notice black crop handles around the edges of your image.
- Adjust the image crop area using the crop handles.
- Finally, click on the “ESC” key on your keyboard.
I have also provided a detailed explanation with images in the article below in order to help you understand the exact process further. Additionally, in this article, we will take a look at other innovative ways we can use the “crop” feature in PowerPoint!
So, let’s get started!
1. How to Crop a Picture in PowerPoint?
Preparing almost any presentation requires the addition of pictures and image, and in many cases, these images need to be cropped in some form or another. Lucky for us, Microsoft PowerPoint has multiple cropping options available to its users.
Below, I’ll show you the simplest way to crop a picture in Microsoft PowerPoint, step-by-step:
Step-1: Click on the ‘Crop’ option from ‘Picture Format.’
For cropping out unwanted portions of your picture, first select the picture and click on the ‘Picture Format’ option from the ribbon. After that, at the top right corner of your screen, find and select the ‘Crop’ option.
Step-2: Crop the Picture using the Crop Handles
As soon as you click on the ‘Crop’ icon, you will notice the crop handles appearing on the edges and sides of the picture. You can just crop the picture by dragging the crop handles using your mouse.
The cropped-out portions of the picture will appear as shaded, which will help you identify the cropped portions.
Step-3: Press the Escape Key.
Now simply press the ‘ESC’ button on your keyboard and you are done cropping the image in PowerPoint.
2. How to Crop a Picture into a Shape?
PowerPoint allows users to crop their pictures in a variety of shapes. The basic shapes include square, circle, rectangle etc. There are also some of the more unique shapes such as trapezium, cross, lightning bolt, arc, chord etc.
Follow the steps below and learn how to crop a picture into different shapes using Microsoft PowerPoint:
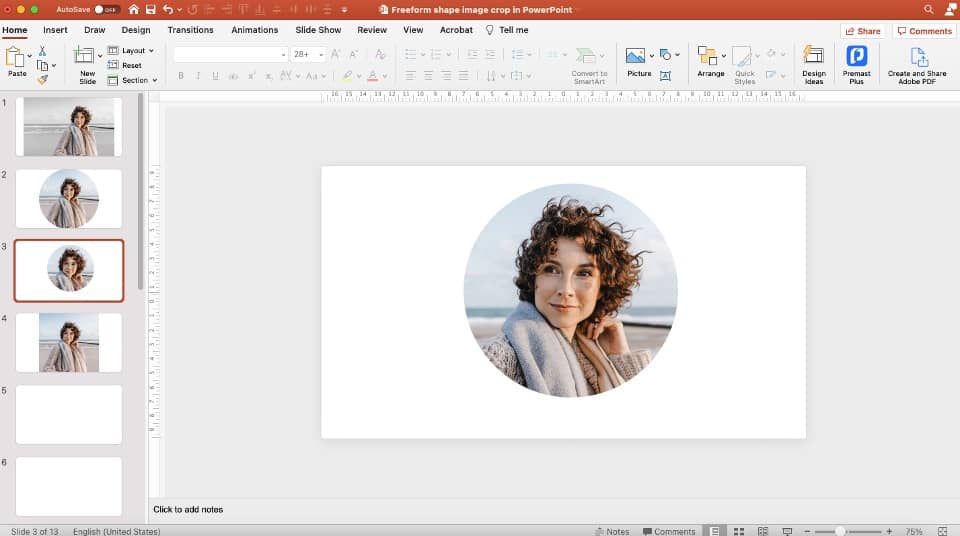
How to Crop a Picture into a Circle?
First, let’s understand how you can crop an image into a circle.
Step-1: Crop the picture to a 1:1 Aspect Ratio
At first, select the picture you want to crop and from the ribbon, click on the‘Picture Format’ option. On the top right corner, you will find the ‘Crop’ option with an arrow mark just below it.
Click on the arrow mark and from the dropdown, place your cursor on ‘aspect ratio.’ From there, select the 1:1 aspect ratio under ‘Square’.
Step-2: Crop the Picture to Oval shape.

After that, click on the arrow mark bellow the ‘Crop’ button again and scroll to ‘Crop to Shape.’. From the basic shapes, select the ‘Oval’ shape.
Step-3: Press ‘esc’ to finish off
Now, press ‘esc’ on your keyboard to successfully crop the picture into circle shape.
Remember! In order to crop the picture into a perfectly circular shape, it is important to have it in a 1:1 aspect ratio before using the oval shape since an oval with a 1:1 aspect ratio is actually a perfect circle.
How to Crop a Picture into a Square?
Pictures that you use in your presentation slides often needs to be in a perfect square shape. Microsoft PowerPoint has a built-in tool to directly crop a picture into a perfect square shape. This saves you the trouble of having to do it manually, like in most other applications. Here’s how to do it:
Step-1: Select the ‘Crop’ option
Just as before, select the picture you want to crop and click on ‘Format Picture’ from the ribbon to find the ‘Crop’ option.
Step-2: Crop the picture to a 1:1 Aspect Ratio
On the top right corner of your screen, you will find the ‘Crop’ option with an arrow mark just below it. Click on the arrow mark and from the dropdown, place your cursor on ‘aspect ratio.’ From there, select the 1:1 aspect ratio under ‘Square’.
Step-3: Crop the image into a square shape.
Lastly, click anywhere outside the image or press the ‘esc’ button on your keyboard and voila! You are done cropping the image into a square.
How to Convert a Square Image to Circle?
If you have a square image which you need to convert a circle than don’t worry because Microsoft PowerPoint has your back! Follow these easy steps and convert any square image to circle:
Step-1: Select the ‘Crop to shape’ option.
First, select the square shaped picture and click on the ‘Picture Format’ option to find ‘Crop.’ Click on the arrow mark beneath it and from the dropdown menu place your cursor on ‘Crop to shape.’
Step-2: Select the Oval Shape
Select the ‘Oval’ shape from the chart that appears after clicking on the ‘Crop to shape’ option. As the picture was a square one, to begin with, selecting the ‘Oval’ shape will automatically crop it to a circle.
Step-3: Convert the image to circle
Simply click outside the image or press the ‘esc’ button on your keyboard to complete the conversion of the image from a square to a circle.
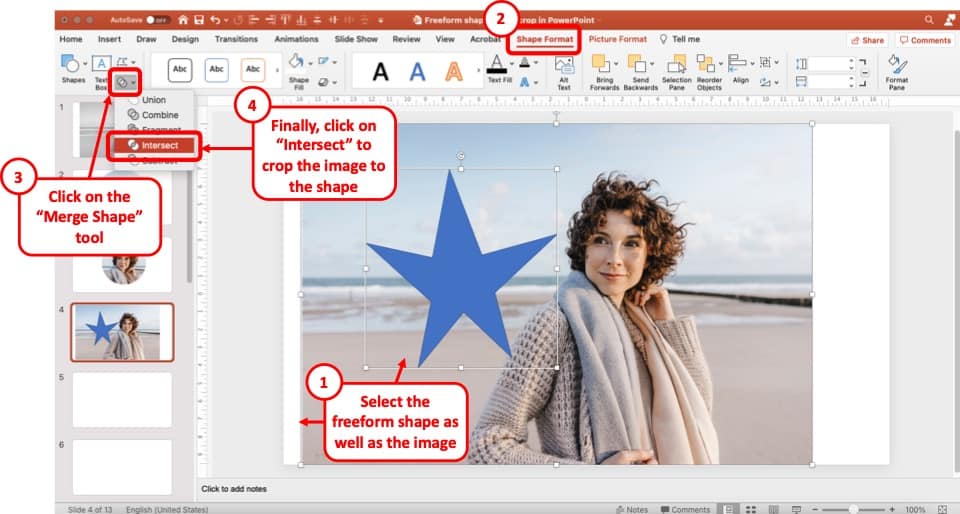
Intersect an Image with Shape
Intersecting an image with a shape can be quite fun and help you make your presentations more visually attractive. It can be a little tricky to accomplish, so you’ll need to carefully follow the steps below:
Step-1: Select and Insert a Shape
The first step is to select the shape you want to intersect the image with. To do that, go to the ‘Home’ tab from the ribbon, where you’ll find a range of shapes in the ‘Drawing’ section. Select the shape you want to use and insert it on top of your photo using your mouse.
Step-2: Go to ‘Shape Format’

This is the part where it gets a little tricky. First, click on the picture to select it. Then holding the shift key, click on the shape you’ve just inserted on top of the picture. You will find the ‘Shape Format’ tab on your ribbon to click on.
Step-3: Click on ‘Merge Shapes’
From the dropdown menu, find and click on the ‘Merge Shapes’ option.
Step-4: Click on ‘Intersect’
Click on ‘Intersect’ to finish intersecting the image with your shape.
3. Cropping vs Resizing an Image: What’s the Difference?
When it comes to editing images, cropping and resizing are two of the most commonly performed tasks out there. Although both of these might sound a lot similar, they are actually very different concepts.
The key difference between cropping and resizing an image in PowerPoint is that cropping involves removing a certain unwanted portion out of the image. Whereas, resizing, as the name suggests, is simply changing the size of the image or customizing its resolution.
While creating presentation slides, both cropping and resizing tools come in handy and are widely used. It is important to have clear idea about the size and dimension of the image you are using while performing any of these tasks.
For example, if you want to upload your presentation on the internet, it is better not to use images with high resolution, as they are likely to take longer to load. In such a case, the best thing you can do is to resize the image into smaller dimensions, so that it can load faster.
On the other hand, cropping is the best way to go if you want to insert a certain portion of your image into the slide. A picture can be both cropped and resized at the same time but, it is always better to crop an image before resizing it.
Having a basic idea on these will not only prevent you from uploading/inserting a blurry image, but also ones that don’t fit properly or go well with the slides.
Microsoft PowerPoint offers a range of options to its users for cropping an image. From simply leaving a certain portion out of your image to freeform cropping, cropping in different shapes, aspect ratios, there are plenty of options available.
On the other hand, you can also resize your image using Microsoft PowerPoint to a preferred height and width. While resizing your image, you also have the option to maintain or not maintain the aspect ratio of the image.
4. How to Resize a Cropped Image?
After successfully cropping an image, you might want to resize the image to a certain resolution or dimension. No need to worry Microsoft PowerPoint is equipped with a quick resizing tool to come to your aid. Just follow the simple steps below:
Step-1: Select Picture Format
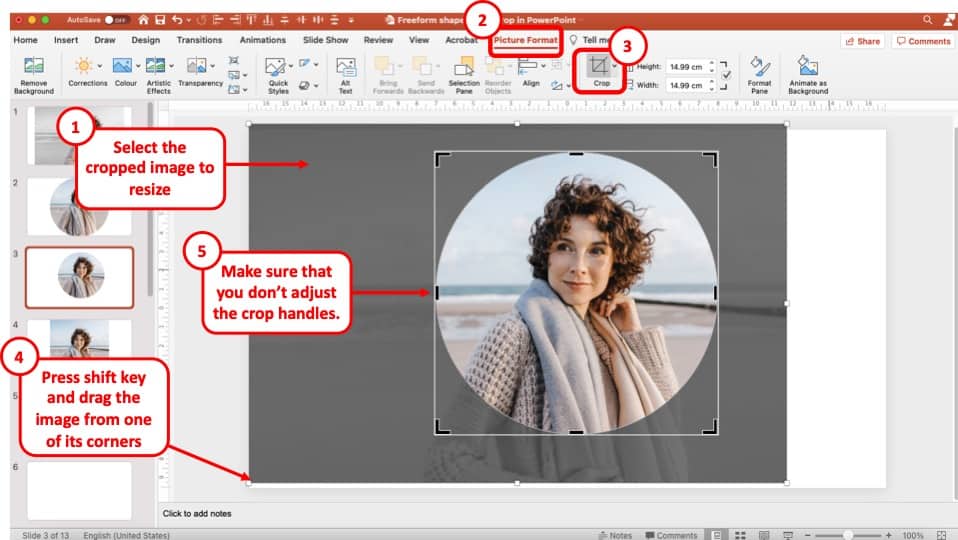
Firstly, select the picture that you have already cropped and go to the ‘Picture Format’ tab from the Ribbon. Then, click on Crop. Since you are using an image that has already been cropped, you will now be able to see both cropped and visible part of the image.
Note that cropped part of the image will be greyed out.
Step-2: Resize the image by dragging it from the corner
Now, all you need to do is resize the image. To do that, hold the shift key on the keyboard and drag the image from one of its corners. Make sure that you resize the image and not the crop handle (which will otherwise change the crop area).
Pro Tip! Remember to press the “Shift” key on the keyboard when resizing the image. This will ensure that the aspect ratio of the image is always maintained the image gets resized proportionately!
Step-3: Press ‘ESC’ key once resizing is complete
Once you are happy with the resizing of the image, simply press the escape key on your keyboard. You will now notice that the crop area remains the same, however, the image will have resized showing a smaller part of the image (or bigger depending on how it has been resized).
5. How to Crop a Picture to a Specific Size?
Cropping an image to a specific size might come in handy when you want to insert an image to a very specific portion of your slide. This is something every PowerPoint user should learn how to do, as there are often empty spaces left on your slides to fill out. So without further ado, find out the steps to it below:
Step-1: Click on the ‘Format Picture’ option.
Select the picture that you want to crop and right-click on it. A dropdown menu will appear, from which you will have to select the ‘Format Picture’ option.
Step-2: Insert the specific size for cropping.
From the ‘Format Picture’ panel, you will find the ‘Picture’ icon at the very right. Here, under the ‘Crop’ section, you’ll find another section called ‘Crop position.’
Insert the specific size and measurement in which you want your image to be cropped. You can also drag the picture to fit within your cropped area using a cursor.
Step-3: Crop the picture to your specified dimensions
Simply click anywhere outside the image or press the ‘esc’ button on your keyboard to finish the cropping. That’s how easy it is!
6. Freeform Crop of an Image in PowerPoint?
Freeform cropping of an image is not directly available on PowerPoint. However, you can still do it by drawing a freeform shape over the image and then intersecting the image with that shape. This might sound a little difficult, but I’ll break it down in the steps below:
Step-1: Selecting the ‘Freeform:Scribble’ option from Shapes and drawing the Freeform shape
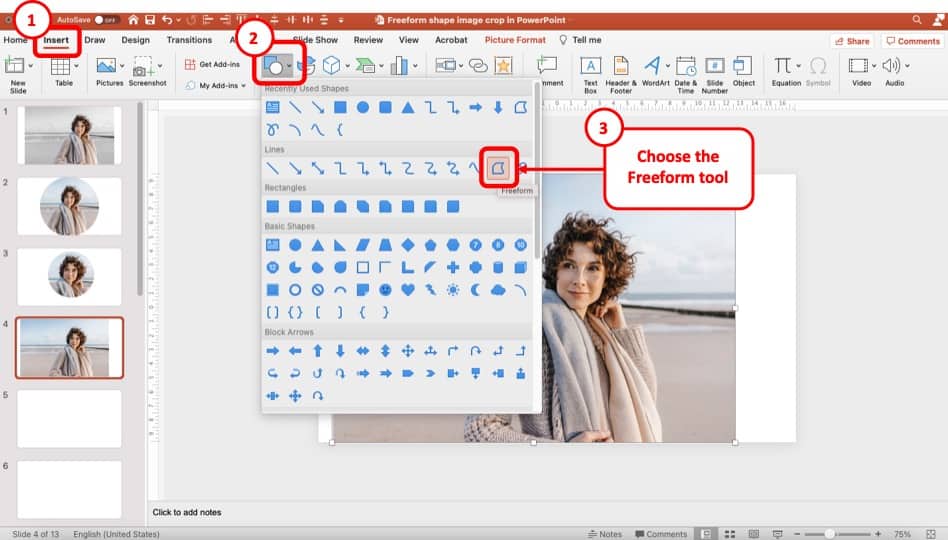
Go to the ‘Home’ tab from the Ribbon and from its ‘Drawing’ section, find and select the ‘Freeform:Scribble’ shape. Now draw your freeform shape over the image using your mouse or touchpad.
Now all you have to do is intersect the image with this shape. To do that, click on the picture to select it. Then holding the shift key, click on the freeform shape you’ve just inserted on top of the picture. You will find the ‘Shape Format’ tab on your ribbon to click on.
Click on ‘Intersect’ to finish the freeform crop of your image.
7. How to Crop an Image to an Aspect Ratio
Cropping an image to a specific Aspect Ratio on Microsoft PowerPoint is actually a lot easier than it sounds. Just follow the simple steps below:
Step-1: Select the ‘Crop’ option.
Select the picture you want to crop and click on the ‘Picture Format’ tab to find ‘Crop’ option. Click on ‘Crop’ and a dropdown menu will appear on your screen.
Step-2: Selecting Aspect Ratio.
From the dropdown, place your cursor on the ‘Aspect Ratio’ option to find a list of aspect ratios to choose from. Click on your desired aspect ratio and drag the image to fit the portion you want to keep within the frame.
Step-3: Image Cropped to the aspect ratio
Finally, press the ‘esc’ button on your keyboard to finish cropping your image into the specified aspect ratio.
More PowerPoint Related Topics
- How to Give a Presentation Successfully on Zoom? [A Complete Guide!]
- Change the Style of Your Bullet Points and Stand-out from the Crowd!
- 7 EASY Tips to Always Make your Presentations Attractive! (Even if You are a Beginner)
- How to Reduce the Size of Your PowerPoint File? The Perfect Method!
- Auto Create Your PowerPoint Slides using Design Ideas Feature!
- Main Features of PowerPoint! [I Bet You DIDN’T Know These]
Credit to Mary Markevich for the Featured Image of this Article
How to Crop Image in PowerPoint 2019: A Step-by-Step Guide
Cropping an image in PowerPoint 2019 is a breeze, and it’s a great skill to have when you want to focus on a particular area of a picture or remove unwanted parts. The process involves selecting the image, clicking on the ‘Format’ tab, and then using the ‘Crop’ tool to adjust the image’s edges to your liking. With a few clicks, you can achieve the perfect image for your presentation.
Step by Step Tutorial on How to Crop Image in PowerPoint 2019
Before we dive into the steps, it’s essential to know that cropping an image allows you to trim the edges, reshape, or zoom into a specific part of the picture. This can help you highlight a particular area or make the image fit better into your slide.
Step 1: Select the image
Click on the image you want to crop.
Selecting the image is the first step because you need to tell PowerPoint which picture you’re working on. Make sure you click on the image so that it’s highlighted.
Step 2: Click on the ‘Format’ tab
Find and click the ‘Format’ tab on the PowerPoint ribbon.
The ‘Format’ tab is where all the image editing tools are located, including the ‘Crop’ tool. It’s usually at the top of your PowerPoint window.
Step 3: Click on the ‘Crop’ button
Click the ‘Crop’ button in the ‘Size’ group.
Once you’re in the ‘Format’ tab, you’ll see the ‘Crop’ button. It’s typically represented by two intersecting right angles. Clicking this button activates the cropping mode for your selected image.
Step 4: Adjust the crop handles
Drag the black crop handles to adjust the image.
When you click on ‘Crop,’ you’ll see black handles appear around the edge of the image. These handles let you adjust the area you want to keep. You can move them in or out to get the crop just right.
Step 5: Click ‘Crop’ again or press ‘Enter’
Once you’re satisfied with the cropped image, click ‘Crop’ again or press ‘Enter’ to finalize the crop.
After adjusting the crop handles, you need to tell PowerPoint that you’re done cropping. Clicking ‘Crop’ again or pressing ‘Enter’ will apply the crop and exit the cropping mode.
After completing these steps, your image will be cropped to your specifications, and you can continue editing your PowerPoint presentation as needed.
Tips for Cropping Images in PowerPoint 2019
- Always make a copy of your image before cropping, just in case you need to revert to the original.
- Use the ‘Aspect Ratio’ option under ‘Crop’ to maintain the image’s proportions while cropping.
- If you need to crop to a specific shape, use the ‘Crop to Shape’ feature to select a shape from the gallery.
- Zoom in on your slide for a more precise crop, especially when dealing with small images.
- Use the ‘Undo’ function if you make a mistake while cropping. It can save you a lot of time and frustration.
Frequently Asked Questions
Can i crop an image into a circle or other shapes in powerpoint 2019.
Yes, you can use the ‘Crop to Shape’ feature to crop your image into a variety of shapes, including circles, stars, and arrows.
Is there a way to crop multiple images at once?
Unfortunately, PowerPoint 2019 does not support cropping multiple images simultaneously. You’ll need to crop them one at a time.
Can I undo a crop in PowerPoint 2019?
Yes, you can undo a crop by pressing ‘Ctrl + Z’ on your keyboard or by clicking the ‘Undo’ button on the ribbon.
What happens if I crop too much?
If you’ve cropped too much, you can either undo the crop or click on the ‘Crop’ button again and adjust the handles to include more of the image.
Can I save the cropped image as a separate file?
Yes, after cropping the image, right-click on it and select ‘Save as Picture’ to save the cropped version to your computer.
- Select the image.
- Click on the ‘Format’ tab.
- Click on the ‘Crop’ button.
- Adjust the crop handles.
- Click ‘Crop’ again or press ‘Enter’.
Mastering how to crop an image in PowerPoint 2019 can significantly enhance your presentation’s visual appeal. It’s a simple yet powerful tool that can help you create a more focused and professional-looking slide. Remember, the key is to select the image, find the ‘Crop’ tool under the ‘Format’ tab, adjust the crop handles to your liking, and then apply the crop. With practice, you’ll be cropping images like a pro in no time. And don’t forget to experiment with different shapes and aspect ratios to add some creative flair to your slides. Now, go ahead and give it a try in your next PowerPoint presentation!

Matthew Burleigh has been writing tech tutorials since 2008. His writing has appeared on dozens of different websites and been read over 50 million times.
After receiving his Bachelor’s and Master’s degrees in Computer Science he spent several years working in IT management for small businesses. However, he now works full time writing content online and creating websites.
His main writing topics include iPhones, Microsoft Office, Google Apps, Android, and Photoshop, but he has also written about many other tech topics as well.
Read his full bio here.
Share this:
Join our free newsletter.
Featured guides and deals
You may opt out at any time. Read our Privacy Policy
Related posts:
- How to Crop Photos on iPhone 14
- How to Crop Many Pictures at Once in Photoshop
- iOS 17 How to Crop Photos: A Step-by-Step Guide
- How to Crop a Picture on the iPhone 5
- How to Save Powerpoint as PDF with Notes
- How to Crop a Photo in iOS 7 on the iPhone
- How to Make All Columns the Same Width in Excel 2013
- How to Erase Part of a Picture in Powerpoint for Office 365
- How to Crop a Picture in Word 2013
- How to Crop a Picture in iOS 10
- How to Make a Powerpoint Slide Vertical in Powerpoint 2013
- How to Change Hyperlink Color in Powerpoint 2010 (An Easy 5 Step Guide)
- Can I Convert My Powerpoint to Google Slides?
- How to Resize Image in Paint
- How to Flip an Image in Powerpoint: A Step-by-Step Guide
- How to Loop a Slideshow on Powerpoint 2013
- How to Make Curved Text in Powerpoint 2013
- How to Undo in Notes on iPhone: A Step-by-Step Guide
- Can You Save a Powerpoint as a Video in Powerpoint 2013?
- How to Flip a Picture in Powerpoint 2010
- Slidesgo School
- PowerPoint Tutorials
How to Insert, Crop or Mask Images in PowerPoint

Learn with Slidesgo School, step by step, how to add images to your PowerPoint presentations . You’ll also find out how to crop pictures and how to mask them .
Inserting an Image or GIF from Your Computer
Inserting an online image, taking and inserting a screenshot, cropping an image, masking an image.
- Open your presentation in PowerPoint.
- Select the slide where you want to add the image or GIF.
- On the Insert tab, in the Images group, click Pictures.
- A new window will open, where you can locate and select the image that you want to add to the slide. By default, it will be inserted directly into the presentation.
- Instead of clicking Insert, you can also click its drop-down arrow. You’ll see three different options:
- Insert. This is the one set by default.
- Link to File. With this one, the image will be linked and the size of the PowerPoint file won’t increase. However, you’ll need to link the image again if you open this presentation in a different computer. Otherwise, it won’t be displayed.
- Insert and Link. This option combines the other two.
- Choose the desired option from this drop-down list to add the image to your presentation.
- Select the slide where you want to add the image.
- On the Insert tab, in the Images group, click Online Pictures (if you have Microsoft PowerPoint 2013 or a newer version, you’ll be able to choose the source of the image, such as Bing or Onedrive).
- If you choose Bing Image Search, you can set it to display only images that are licensed under Creative Commons. You can also filter the results by size, type, color or design. Once you’ve selected the image that you want to add, click Insert.
- If you have an older PowerPoint version, this option won’t be available. Instead, you’ll find the Clip Art option, where you can choose an image from a preset gallery.
- This is not available either if you’re using older versions of PowerPoint for Mac (pre-2019).
- On the Insert tab, in the Images group, click the Screenshot drop-down arrow. You’ll see all the windows currently open in your computer.
- If you want to take a screenshot to a portion of any window, click Screen Clipping. PowerPoint will minimize itself and you’ll be able to take a screenshot of what’s on the background. We suggest that you prepare beforehand whatever you want to capture prior to clicking Screen Clipping. Once you’ve taken the screenshot, it will be inserted into the slide.
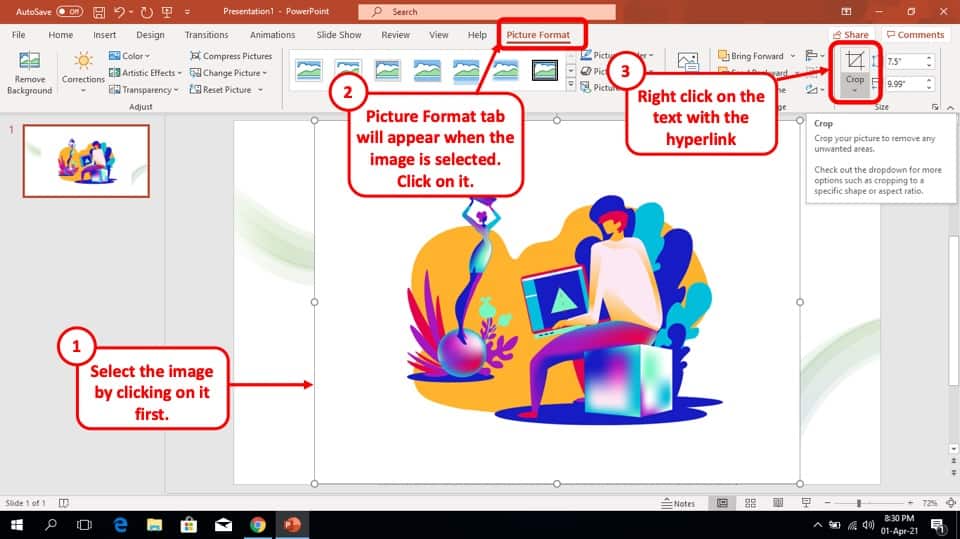
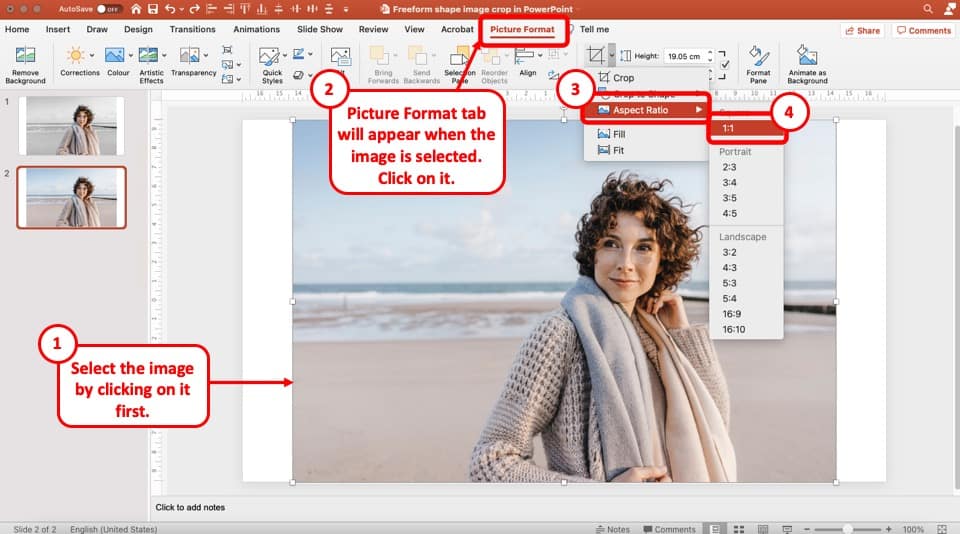
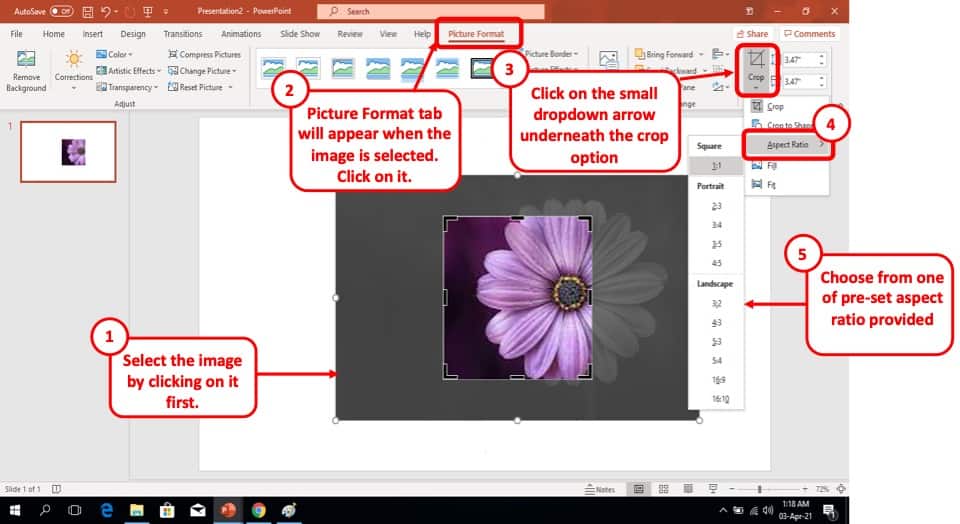
- Select the image you want to crop.
- A new tab will appear at the top, called Picture Format.
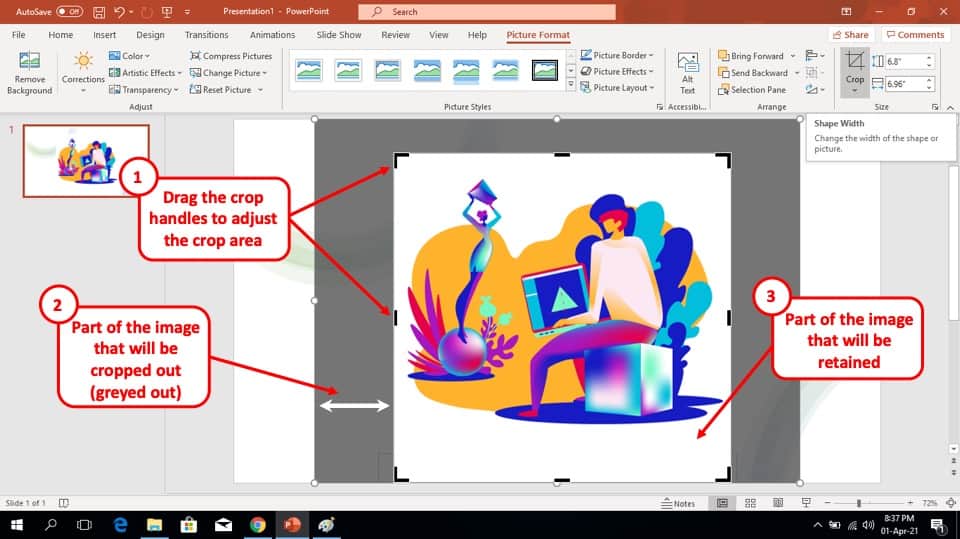
- On this tab, in the Size group, click Crop. Use the black handles to adjust the cropping.
- Use the Fill and Fit options to further adjust the cropping. If you want to manually set the height or width of the cropping, you can enter the values in the boxes next to Height or Width.
- To adjust the cropping to a specific aspect ratio, click the Crop drop-down arrow → Aspect Ratio. Then choose the desired option.
- To reset the image and remove the cropping, select the image, go to the Format Options tab and, in the Adjust group, click the Reset Picture drop-down arrow and select Reset Picture & Size.
- Select the image you want to mask.
- On the Picture Format tab, in the Size group, click the Crop drop-down arrow.
- Click Crop to Shape and choose the shape that best fits your needs. Once done, it will be applied to the image.
- To reset the image and remove the mask, select the image, go to the Picture Format tab and, in the Adjust group, click Reset Picture.
Do you find this article useful?
Related tutorials.

How to Make a Banner in PowerPoint
The uses that a banner has are almost endless: from ads to sections for websites, or even signatures for certain types of emails. The purpose is up to you, but the thing is: how to design one? If you think that you need expensive software to make banners, think again. Here at Slidesgo, we know a lot about presentations and, thus, about programs such as PowerPoint. The truth is that PowerPoint is all you need to create your own design! Keep reading to learn how!

How to Create a Banner in Google Slides
Banners have been around us (at least, when it comes to browsing the net or participating in forums, among other things) for a long time. Creating one is by no means a difficult task, and you can do it with free software such as Google Slides. The steps that you’ll need to follow are very simple, so we’re sure you’ll start creating banners one after another in a few minutes. Let’s see how to proceed!

Storyset by Freepik: Awesome illustrations for creative presentations
With inspiration and the adequate resources, a PowerPoint or Google Slides presentation can be the most creative slide deck your audience has ever been, regardless of topic. In this Slidesgo School article, we’re going to introduce Storyset, a new Freepik project where you’ll find illustrated concepts to visually reinforce the message you want to convey, turning your work into a memorable experience.

How to Add a Watermark in Google Slides
A watermark is a little identifying image used as a fixed element in digital creations such as photos, documents, videos or, in this case, presentations. It helps protect that creation and prevents plagiarism or uses without attribution. In this Slidesgo School tutorial, you’ll learn, step by step, how to insert a watermark into your presentation.
Buy Me a Coffee
- Share this article

- Posted in in How To PowerPoint
How to Crop Picture in PowerPoint
Pictures can make a presentation interesting. When inserting a picture into a PowerPoint slide, you might want to eliminate any unwanted portions and focus on a specific area or you can also crop the picture into a shape. However, you can easily achieve this using the PowerPoint crop tool.
Insert Your Picture or Image First:
Before cropping, we first need to insert pictures into our PowerPoint slide by selecting the ‘Insert’ tab and clicking on the ‘Pictures’ option. Otherwise, you can even copy-paste or drag-and-drop images as well.

Let’s Crop the Inserted Picture:
You can crop a picture by selecting it manually or using the crop-to-shape option. Below, we have discussed both options.
Method 1: Crop Manually
Step 1: go to the picture format tab.
First, select the picture that you want to crop, and go to the ‘Picture Format’ tab (this tab only appears after selecting a picture).

Step 2: Use the Crop Tool
Under the picture format tab, click on the ‘Crop’ tool option.

Step 3: Adjust the Cropping Handles
Adjust the ‘cropping handles’ by dragging from any side or corner . Using these handles you can easily eliminate any unwanted areas from the picture.

Step 4: Exit from the Crop Tool
Once you are satisfied with cropping press ‘Enter’ or click outside of the picture to finish the process. However, you can make further adjustments, by going back to the crop tool.

Method 2: Crop to Shape:
Click on the dropdown arrow from the ‘Crop’ tool and select the ‘Corp to Shape’ option. A full list of available PowerPoint shapes will appear that you can select to crop the picture accordingly.

Method 2.1: Let’s crop the picture to a circle shape
Here, we have selected an oval shape with a 1:1 aspect ratio to get a full circle crop for the selected pictures.

Method 2.2: Let’s try to crop to a flowchart shape
For example, here, we have selected another shape from the flowchart section to demonstrate how it crops our pictures.

Crop Picture by Aspect Ratio:
Selecting the right aspect ratio is very important when using the “crop to shape” tool. For example, if you want to keep a square crop selection, choose a 1:1 aspect ratio. Additionally, there are other aspect ratios in the ‘Portrait’ and ‘Landscape’ sections that you can explore as well.

Demo Slide with 2:3 Aspect Ratio:
Here you can see one of our demo slides where we have cropped the pictures with a 2:3 aspect ratio.

Create Image Placeholders in PowerPoint
Using shapes, you can create custom image placeholders . We will cover this topic in another detailed article to teach how to crop pictures using custom shapes or create custom image placeholders in PowerPoint.
Get a Printable PDF of this Article
Similar to our other PowerPoint how-to articles, you have the option to download a printable PDF of this easy-to-understand step-by-step guide on how to crop a picture in PowerPoint.
Frequently Asked Questions
Here we have tried to answer some of your questions on how to crop a picture in PowerPoint.
Can I take a screenshot in PowerPoint?
To insert an image in PowerPoint, you can use the built-in ‘Screenshot’ tool to take a screenshot located under the ‘Insert’ tab in the ‘Images’ block. This will allow you to directly insert a screenshot of any open window on your device, or manually select and capture a specific part of the screen using the ‘Screen Clipping’ option. We will cover this topic in detail to provide step-by-step instructions on how to take screenshots in PowerPoint.
Can I remove the background from a picture in PowerPoint?
Yes, you can remove the background from a picture in PowerPoint. Simply go to the ‘Picture Format’ tab, where you will find the ‘Remove Background’ option. This tool can easily remove any simple background but for more complex backgrounds, you need to adjust additional settings, which we will cover in another how-to PowerPoint article.
Become a Sponsor and Support Our Creative Journey.
Hey there! This is Team PowerPoint School. You can support our work by sending us a cup of coffee and get access to all our premium templates.
More Reading
Post navigation.

How to Insert Picture in PowerPoint

- Posted in in Infographic Steps
Animated Steps Infographic Presentation Template for PowerPoint and Google Slides
Leave a comment, leave a reply.
Your email address will not be published. Required fields are marked *
You might also like
Stay a while and check more templates like this

How to Insert Hyperlink in PowerPoint
Subscribe to our newsletter.
3 Ways to Crop an Image Using Microsoft PowerPoint
Let's learn three easy ways to crop or resize photos and images in Microsoft PowerPoint.
It's not easy to think of Microsoft PowerPoint as an image editor, but as presentation software, it needs to also be a design tool in order to help you create said presentations. This is why you need to learn how to manipulate images and create interesting effects with your images in PowerPoint.
Let's learn three easy ways to edit your photos and images in Microsoft PowerPoint.
Method 1: Crop an Image by Dragging
- Go to the Ribbon and click Insert > Picture to add an image to the slide.
- Drag one of the handles inward or outwards to crop the image. You can also crop equally on four sides (Press Ctrl + drag corner handle) or crop equally on two parallel sides (Press Ctrl + drag the crop handle on the sides). If you want you can drag the picture to re-focus the area you want to keep.
- Press Esc to finish or click anywhere outside the picture.
Method 2: Crop an Image to Aspect Ratio
Let's say you have a photo and you want to crop it into a square or any of the common aspect ratios---perhaps if you have imported a PDF into PowerPoint . PowerPoint allows one-click cropping for several standard aspect ratios.
- Click and select the image in the slide.
- Select the Aspect Ratio you want from the dropdown and apply it to the image.
- Use the Crop rectangle to adjust the crop area. You can also use the crop handles to adjust the final view.
Method 3: Crop an Image to Any Shape
A Shape Fill can be manipulated with the Crop tool and used for interesting effects. For instance, you can use a circular shape to crop a headshot.
- Go to Insert > Shapes and select a shape from the options available. Select the drawn shape.
- Click Drawing Tools > Format . In the Shape Styles group, click Shape Fill > Picture .
- Browse to the picture you want and insert it into the shape as a shape fill.
- Click to select the new shape picture fill.
- Go to Picture Tools > Format . In the Size group, click the arrow under Crop to show the two cropping options.
- Choose from Fill or Fit .
Fill matches the picture with the shape’s height or width, whichever is greatest. Fit sets the picture size so that the picture’s height and width both match the shape’s boundaries.
Like any other crop, you can use the cropping handles to fine-tune the position of the shape fill within the cropped shape. You can even crop an image in Mac , before you put it in PowerPoint.
PowerPoint has many workarounds and it is the perfect platform even if you are a newbie to designing presentations or need help creating professional PowerPoint presentations . And as you might have guessed, starting with a few cool PowerPoint templates is a good idea.
PowerPoint Tips Blog
Helping you with presenting, PowerPoint, and speaking
Crop a picture by an exact measurement in PowerPoint
July 15, 2013 by Ellen Finkelstein 3 Comments
Usually, you crop a picture by selecting the picture, clicking the Format tab, and clicking the Crop button. Then you drag the crop handles. This process works well for many situations.
But if you want to end up with an exact measurement — let’s say to fit the picture into a predefined space — you can do that as well.
Here you see a slide that uses the Frame shape. It’s great for framing photos. The inside is not filled but of course you can place a photo in that blank space. At the bottom of the slide, you see a red arrow pointing to the frame shape’s yellow handle. This handle lets you adjust the width of the frame and therefore the size of the inner space.
At the upper-right, you see a shape that I’ve inserted inside the frame. I adjusted the yellow handle so that the inside rectangle is exactly 1.5″ wide by 2″ high. This gives me the dimensions that I need for my photos.
Find the exact size of any object on a slide
First, how do you discover the exact size of that inner rectangle — or any object for that matter? Here are the steps:
- Select the object.
- Click the Format tab.
- Look for the size in the Size group. You can see this on the right.
Alternatively, right-click the object and choose Size and Position. Look on the Size tab of the Size and Position dialog box that opens.
So here you can see that the size I want for my photos is 2″ high by 1.5″ wide. Of course, the problem is that I need to crop all of my photos to that size. Although the photos themselves might all be the same size, I want headshots and I’ll need to crop so that all of the photos fit into the frames.
Crop to an exact measurement
Remember, I want to crop a photo to make it a headshot. It needs to fit into the 2″ high x 1.5″ wide space in my frame. This will involve cropping the image to get rid of the parts that I don’t want — and leave just the head.
Start by resizing the photo so that the head of the person was approximately the size I needed, but the full photo was larger. Always resize by dragging on a corner handle so that you don’t distort the photo.
PowerPoint 2013 makes this quite easy, but you can do it in earlier versions, too. Here are the steps that I used in PowerPoint 2013:
- Click the Picture icon at the top. Doing so displays settings for picture corrections, picture color, and cropping. If necessary, expand the Crop section.
- There are 2 sections. You’ll use the Crop Position section for this operation. Crop position sets the final width and height of the image and also lets you specify how much you want to crop off from the edges. In the Crop Position section, enter the desired size of your image in the Width and height boxes.
- Your picture may not be properly centered. Use the Left and Top boxes to move the cropping border. Click the arrows up or down to easily make fine adjustments.
Here are the steps for PowerPoint 2007 and 2010:
- Rich-click the image and choose Size and Position. The Size and Position dialog box opens.
- On the Size tab, use the Crop From boxes — Left, Right, Top, and Bottom — to crop off the amount you need. Use the Height and Width boxes at the top (in the Size and Rotate section of the dialog box) to figure out how much you need to crop off.
- To see the result, click the Close button. You’ll probably need to make a few adjustments to get the result that you want.
Here’s the final slide.
Related posts:
- How to resize and crop pictures in PowerPoint
- Crop around an image in PowerPoint 2003
- Change a picture in PowerPoint 2007 and 2010
- 4 ways to change a picture in PowerPoint without losing formatting
3 Leave a Reply
I’m on the fence about this, while more customization is good, I have a feeling this is a “in-progress” update, it just feels incomplete and half-way there. We use badge layout for apps on design approvals (visual projects), so the image being displayed is important. Old layout “feels like” it had larger images, maybe because the images were cropped more loosely so it’s easier to tell which project it was at quick glance. Now the image is cropped closer, making it harder to scan thru at quick glance. I find myself needing to click into the project more often than … Read more »

- Skill Assessments
- AI Course Builder
- Free Courses
- PowerPoint 2019 Basic
How to Crop a Picture in PowerPoint

Start Free Trial
Or log in with:

When you crop a picture or graphic, you trim its horizontal and vertical sides. Cropping is useful when you only want to include a portion of a picture or graphic.
- Select the picture.
- Click the Format tab on the ribbon.

Crop handles appear around the border of the picture.
To crop all four sides of a picture or graphic at once while maintaining the graphic’s proportions, press and hold down Ctrl as you drag the mouse.

Aspect Ratio
Sometimes you may want to crop to an aspect ratio to keep a picture's dimensions consistent.
- With the picture selected, click the Crop button list arrow on the Format tab.
- Select Aspect Ratio .

The aspect ratio is applied.
Crop as a Shape
You can also crop a picture into any shape, as if you were to cut it out with scissors.
- Select Crop to Shape .

FREE Quick Reference
Free to distribute with our compliments; we hope you will consider our paid training.
- LinkedIn-ready certificate
- Skill assessments
- Bite-sized, interactive lessons
- Saved progress
TechRepublic
Account information.

Share with Your Friends
How to crop images in Microsoft PowerPoint
Your email has been sent

For the most part, the graphics you add to a slide should be specific–in purpose and in content. Pictures are seldom so well-honed. That’s why PowerPoint’s Crop tool might become one of your favorite tools.
Cropping a picture removes the outer edges of the image. You do so to remove both empty and busy areas as both can distract from the graphic’s focus. Either way, you can use PowerPoint’s Crop tool to fine-tune what viewers see.
In this article, I’ll show you how to use this easy and intuitive tool.
I’m using Office 365’s PowerPoint, but the Crop tool has been around for a long time. Basic cropping is available in the browser, but the options aren’t. For the purposes of this article, I’ll use the term picture to define any graphic file you might work with. (To insert a file, use the options in the Images group on the Insert tab.) This article assumes that you’re familiar enough with PowerPoint to insert pictures. There’s no demonstration file; you won’t need one. You can work with any graphic file.
SEE: Windows 10 power tips: Secret shortcuts to your favorite settings (Tech Pro Research)
You’ll use the Crop tool to edit pictures once you’ve inserted them. Specifically, this tool lets you trim the outer edges of the picture. You’ll find Crop on the contextual Format tab in the Size group. To crop a picture, you click Crop, the default option. This quick click displays cropping handles along the picture’s border ( Figure A ). You’ll usually see four corners and four side handles. Drag a handle inward to remove part of the picture. For instance, Figure B shows the handle to the right pushed in to remove the empty water. Moving a corner handle will adjust the two adjacent sides accordingly. To commit the crop, click Crop again. Doing so changes the view of the underlying picture. Ctrl+z will undo the crop.
Use the cropping handles to change what you see.

Cropping changes what viewers see; it doesn’t change the underlying picture.
Basic shortcuts.
You’re a step ahead if you’ve used the Crop tool before, but there might be a couple of basic shortcuts you don’t know about:
- Hold down the Ctrl key while dragging a side handle to adjust the opposite side at the same time.
- Hold down the Ctrl key while dragging a corner handle to adjust all four corners at the same time.
If you have precise measurements, you can use the Shape Height and Shape Width options to the right of the Crop tool. These controls aren’t true cropping options though because they maintain aspect ratio (which we’ll discuss later).
PowerPoint doesn’t change the underlying picture when you crop it. To reset the size–remove the cropping–click the picture. Then, click the contextual Format tab. To the left, you’ll find the Reset Picture in the Adjust group. Choose Reset Picture & Size from the Reset Picture dropdown to remove any cropping.
If the picture was compressed, you might not be able to reset it (more about that later), and there’s a quick test. Select the picture and access the Crop tool, as if you want to crop it again. If you can see the gray area where the picture was originally cropped, resetting should work. If you don’t see the gray, what you see is all you have to work with.
SEE: Windows spotlight: 30 tips and tricks for power users (Tech Pro Research)
Move to crop
One of the neatest tricks I’ve run into is the ability to move the picture within the cropped area (the placeholder area). To do so, display the cropping handles, and then hover over the picture (anywhere) until you see the four-arrow cursor. Click and drag the picture to reposition the focus as required. As you can see in Figure C , I’ve moved the goose to the right side of the slide within the cropping handles. By doing so, I moved the goose to the right of the slide and hid the empty water. There are other ways to achieve the same effect but moving the focus within the cropping handles is efficient and flexible. Once the focus is exactly where you want it, click Crop again to perform the crop.

Move the focus within the cropping handles.
Crop to shape.
You can trim a picture to a specific shape, which adds a bit of artistry (not everything has to be a square). However, like most bells and whistles, you’ll want to show a little restraint. Choosing a simple shape can totally change the mood of a slide. Choosing several scatters the viewer’s attention, and you might momentarily lose your audience. They will be too busy considering all of the different shapes, not your message.
To crop a picture into a shape, choose Crop to Shape from the Crop option’s dropdown menu. Doing so will display PowerPoint’s full palette of shapes (also available on the Insert tab in the Illustrations group). Figure D shows the results of choosing the heart shape and then moving the goose to center it. To crop to the heart shape, do the following:
- Select the picture.
- On the contextual Format tab, click the Crop dropdown.
- Choose Crop to Shape.
- From the resulting gallery dropdown, click the heart.
- Once the heart is in place, simply grab the picture and drag it until the goose is in the center.

Crop to a shape.
That was easy, and the shape makes a point–we love geese. Because PowerPoint’s cropping feature doesn’t change the underlying picture, you’re not stuck with anything. You can choose as many shapes as you like until you get it just right.
The remaining options
The Crop tool has three more options: Aspect Ratio, Fill, and Fit. Aspect ratio is the ratio of the width to the height of a picture. You don’t need to fully understand how it works to implement it. In a nutshell, aspect ratio is expressed as two values separated by a colon: x:y. What it means is this: Regardless of how you enlarge or reduce its size, its proportions persist. When using this feature from the Crop tool, you can crop and set the ratio at the same time.
SEE: Windows administrator’s PowerShell script kit (Tech Pro Research)
The Fill and Fit options let you perfect the results a bit. Use Fill to expand the picture, filling the entire space; PowerPoint expands both the picture’s height and width to match the shape’s greatest dimension while retaining aspect ratio. You might lose components of the picture using this option. The Fit option uses the entire picture to fill the shape while maintaining aspect ratio by matching the picture’s largest dimension. You might end up with empty space showing inside the shape.
You can drag the picture within the shape to better expose specific parts of the picture (as I did earlier with the heart). Both options fit and fill within the placeholder, not the slide. Combining all the crop features will give you the best results. Explore these options until choices begin to make sense to you–it’s the best way to learn about it.
Delete the cropped area
There are two reasons to permanently delete the cropped area from a picture: To reduce the size of the overall file and to remove areas you don’t want anyone else to see. To permanently delete the cropped area of a picture, compress it. First, select the picture. Then, on the contextual Format tab, click Compress Pictures in the Adjust group.
When you have more than one picture, PowerPoint displays the options shown in Figure E . You can choose to compress only the currently selected picture, and the Delete cropped areas of pictures must be checked. You can restore the cropped areas only until you save the file.

Compression options.
Send me your question about office.
I answer readers’ questions when I can, but there’s no guarantee. Don’t send files unless requested; initial requests for help that arrive with attached files will be deleted unread. You can send screenshots of your data to help clarify your question. When contacting me, be as specific as possible. For example, “Please troubleshoot my workbook and fix what’s wrong” probably won’t get a response, but “Can you tell me why this formula isn’t returning the expected results?” might. Please mention the app and version that you’re using. I’m not reimbursed by TechRepublic for my time or expertise when helping readers, nor do I ask for a fee from readers I help. You can contact me at [email protected] .
- 9 shortcuts for working more efficiently with Excel expressions (TechRepublic)
- How to add a traditional glossary to a Microsoft Word document (TechRepublic)
- 4 tips for refreshing Excel PivotTable objects (TechRepublic)
- Office Q&A: Excel referencing, Word field codes, and a table trick (TechRepublic)
- 2 ways to annotate a Word table of contents (TechRepublic)
- Microsoft Office 365 for business: Everything you need to know (ZDNet)
- 7 ways you can (maybe) get Microsoft Office 365 for free (ZDNet)

Subscribe to the Developer Insider Newsletter
From the hottest programming languages to commentary on the Linux OS, get the developer and open source news and tips you need to know. Delivered Tuesdays and Thursdays

Create a TechRepublic Account
Get the web's best business technology news, tutorials, reviews, trends, and analysis—in your inbox. Let's start with the basics.
* - indicates required fields
Sign in to TechRepublic
Lost your password? Request a new password
Reset Password
Please enter your email adress. You will receive an email message with instructions on how to reset your password.
Check your email for a password reset link. If you didn't receive an email don't forgot to check your spam folder, otherwise contact support .
Welcome. Tell us a little bit about you.
This will help us provide you with customized content.
Want to receive more TechRepublic news?
You're all set.
Thanks for signing up! Keep an eye out for a confirmation email from our team. To ensure any newsletters you subscribed to hit your inbox, make sure to add [email protected] to your contacts list.
- Get One: Tornado Alert Apps
- The Best Tech Gifts Under $100
How to Crop a Shape in PowerPoint
Options include rectangles, arrow, and stars
:max_bytes(150000):strip_icc():format(webp)/RyanDube-214359-8f50cb3133cd47c7ae1f3d4f09349f4e.JPG "crop image in powerpoint presentation")
- University of Maine
:max_bytes(150000):strip_icc():format(webp)/jonfishersquare-93eb80e77a004035887f56816d3623c5.jpg "crop image in powerpoint presentation")
- Wichita Technical Institute
What to Know
- Picture Format menu > Crop from Size section of ribbon > Crop to Shape , and then select the shape you'd like to use.
- Select the text box to crop > Shape Format menu > Change Shape to crop a shape for a text box.
- Change the cropped shape using the same process for a picture or text box but choose a different shape.
This article explains how to crop images and text blocks into shapes in PowerPoint.
How to Crop a Shape in Powerpoint
Cropping a shape in PowerPoint can give images or text on a slide a much more creative flair.
These instructions apply to Microsoft PowerPoint 2013, 2016, 2019, and 365. The ribbon options described may display differently in different versions, but the process is the same.
- How to Crop a Picture in PowerPoint
The most common use for the crop feature in PowerPoint is to crop a picture into a specific shape. You can do this in just a few simple steps.
To insert a picture into your PowerPoint presentation , select the Insert menu, select Pictures from the ribbon, and then select one of the options to insert an image.
Select the Picture Format menu, select the arrow below Crop from the Size section of the ribbon, choose Crop to Shape , and then select the shape you'd like to use.
In some versions of PowerPoint, the Picture Format menu is only called Format. You'll find the same Crop options in that menu.
You'll see the image immediately cropped using that shape. You can use the resize handles around the image to resize it. Or select the box and drag it to move it anywhere you want to place it on the slide.
How to Crop a Shape for Text in PowerPoint
You can do something similar with text wrapping in PowerPoint by cropping the text box itself into a specific shape.
Cropping a shape for text is different than creating curved text in PowerPoint . Instead of shaping the text, the process below will crop a shape for the text box itself.
To add the text you'd like to place inside a shape, select the Insert menu and then select Text Box from the Text section of the ribbon.
Click the mouse anywhere in the slide to insert the text box at that point. Type the text you'd like to appear inside the shape into the text box.
Select the Shape Format menu and select Edit Shape from the Insert Shapes section of the ribbon. Select Change Shape from the dropdown menu. Choose the shape you'd like to crop the text box into from the list.
The step above will change the shape of the text box, but it may not be immediately apparent until you change the background color and the outline of the text box. To do that, use Shape Outline and Shape Effects from the Shape Styles section of the ribbon.
How to Update a Cropped Shape in PowerPoint
Just because you've chosen one shape to crop an image doesn't mean you're stuck with it. You can change that cropped shape at any time.
Select the image you want to change the cropped shape for and select Picture Format from the menu.
Select Crop from the Size section of the ribbon. Select Crop to Shape . Select the new cropped shape you want to use for the image.
Once you select the new cropped shape, it'll immediately change in the slide view.
If you want to crop pictures in PowerPoint to a standard size, hold Shift and select the images you want to crop. You can then crop and resize all your photos all at once.
To crop videos in PowerPoint, go to Video Format > Video Shape and choose a shape. To retain the original shape, choose a rectangle and resize it as desired.
To change the size of a slide in PowerPoint, go to Design > Slide Size . You can choose between Standard (4:3), Widescreen (16:9), or Custom.
Get the Latest Tech News Delivered Every Day
- Resize Images and Objects in Microsoft Word
- How to Make an Image Background Transparent in PowerPoint
- How to Place a Picture Inside a PowerPoint Shape
- Image Basics for Microsoft Office and Microsoft 365
- How to Make a Word Cloud in PowerPoint
- How to Make a Shape Transparent in PowerPoint
- How to Draw Freehand in PowerPoint
- A Beginner's Guide to Text Wrap in PowerPoint
- How to Add a Border in Google Docs
- Create a Watermark on PowerPoint Slides
- How to Make a Timeline on Google Slides
- Slide Layouts in PowerPoint
- How to Change a Black-and-White Picture to Color in PowerPoint
- What Is a PowerPoint Placeholder?
- How to Apply a Text Shadow in PowerPoint
Free All-in-One Office Suite with PDF Editor
Edit Word, Excel, and PPT for FREE.
Read, edit, and convert PDFs with the powerful PDF toolkit.
Microsoft-like interface, easy to use.
Windows • MacOS • Linux • iOS • Android

- Articles of PPT
How to Crop a Picture in PowerPoint: A Step-by-Step Guide
Often, images can diminish the overall aesthetics of a presentation due to unnecessary or distracting elements. Maintaining a consistent visual style throughout your presentation is crucial, and this can be achieved by simply cropping images. Learning how to crop a picture in PowerPoint is important, allowing you to tailor images to fit specific shapes or dimensions and enhance the overall design. In this article, we will walk you through PowerPoint cropping techniques and explore additional useful options.
Easy Steps to Crop a Picture in PowerPoint
If you have a picture but only require a specific area, learning how to crop an image in PowerPoint can be beneficial for you. Let's delve into the steps to efficiently crop an image.
Step 1: Open your PowerPoint presentation and select the image you want to crop.
Step 2 : Navigate to the Picture Format tab and click on the "Crop" option in the ribbon menu.
Step 3 : You'll find various crop options, but to remove specific areas of the image, choose the basic "Crop" feature.
Step 4 : Upon clicking, you'll notice the border around your picture changing. The borders, represented by dotted lines, will transform into black blocks, forming lines or an L-shape.
Step 5 : To crop, drag these black block shapes to resize the image. Only the area within the border's center will be visible, and the rest will be cropped.
Step 6 : Press "Enter" on your keyboard to finalize the crop. Your image will be cropped according to your specifications.
Quite straightforward, isn't it? It's akin to adjusting borders to resize the image, but here, you're precisely removing the unwanted portions of the image!
How to Crop a Picture to Fit in a Shape in PowerPoint
Cropping a picture to fit within a shape can soften the edges of the image, adding a touch of refinement. In this section, we will learn how to crop in PowerPoint.
Step 1 : Begin by opening your PowerPoint presentation and selecting the desired image for shaping.
Step 2 : Navigate to the Picture Format Tab, then click the "Crop" button in the ribbon menu.
Step 3 : From the drop-down menu, choose "Crop to shape".
Step 4 : In the Shapes flyout menu, opt for the specific shape for cropping your image.
How to Crop Multiple Pictures at Once in PowerPoint
In this section, we will learn how to crop multiple images in PowerPoint into shapes available in the application.
Step 1 : First, we need to select all the images. To do this, press "CTRL" on your keyboard and then move your cursor to the images you wish to select. Click to make multiple selections.
Step 2 : Now, visit the Picture Format Tab and click on the "Crop" button in the ribbon menu.
Step 3 : In the drop-down menu, click on "Crop to shape" to select a shape.
Step 4 : In the Shapes flyout menu, select the shape you wish to crop your image to.
And there you have it! All your images will be cropped into the selected shape. This technique is a valuable tool to enhance the visual appeal of your presentation, making your images more captivating after cropping them into a shape.
Best Free Alternative to Microsoft PowerPoint - WPS Presentation
PowerPoint is a powerful tool, but its cost can be a barrier. A superior alternative to Microsoft PowerPoint is the lightweight and robust WPS Office—a free office suite with applications to meet all your writing needs. WPS Office facilitates an easy transition from Microsoft Office, ensuring full compatibility with all Microsoft files, whether it's PowerPoint presentation animations or Excel formulas, it makes the experience smooth and seamless.
WPS Office takes it a step further by offering free and advanced PDF editing tools within the same interface. Edit your PDF files, sign them if necessary, or use the free converter to convert your PowerPoint presentations to PDF. And if that's not enough, WPS Office boasts an extensive collection of prebuilt templates—over 10,000 of them—for every category, crafted by professionals! WPS Office is the choice of millions of users worldwide, download WPS Office now and discover for yourself why they prefer it!
How to Crop a Picture in PowerPoint Using WPS Presentation
Cropping an image in WPS Office is an exceptionally straightforward task, and it's even more straightforward compared to cropping an image in PowerPoint. Let's acquire this valuable skill:
Step 1 : Open WPS Presentation and click on the image you want to crop.
Step 2 : Upon clicking the image, options will appear in the top-right corner of the picture. Click on the "Crop" option.
Step 3 : Clicking on the crop option will bring up a Crop flyout menu, presenting two options: "Crop by Scale" and "Crop by Shape".
Step 4 : Choose "Crop by Scale" and select a ratio to crop the image.
Step 5 : Opt for "Crop by Shape" and select a shape to crop the image accordingly.
Step 6 : If you intend to eliminate unwanted areas, simply drag the borders. This action will reduce the image area and eliminate any undesired portions.
Step 7 : Alternatively, you can access the crop feature in the Picture Tools tab ribbon menu.
WPS Office excels in its user-friendly interface, making it exceptionally easy for users to navigate and utilize various features efficiently, whether working on documents, spreadsheets, or presentations.
Q1. What is the shortcut for crop in PowerPoint?
There isn’t a specific keyboard shortcut for cropping in PowerPoint. However, to crop images in PowerPoint, follow these steps:
Step 1 : Select all desired images for cropping.
Step 2 : Access the “Format” tab within the ribbon.
Step 3 : Go to the “Crop” section
Step 4 : Click on the Crop button to initiate the cropping process.
Q2. How do I crop irregular shapes online?
You can use Canva to crop irregular shapes online. Here is a guide on how to do it:
Step 1 : Access the official website of Canva on your Web Browser.
Step 2 : Upload the image you want to crop in the “Upload your image” option.
Step 3 : Select the "Crop" tool in the top toolbar to focus on specific areas of your image.
Step 4 : Refine the cropped section using Canva's photo editor.
Step 5 : Download your design in high-resolution formats such as JPG or PNG, or instantly share it online.
Q3. Why is cropping important in a PowerPoint presentation?
Cropping in PowerPoint is crucial as it allows you to focus on specific elements, eliminating unnecessary details and enhancing the visual impact of your slides. This intentional focus helps maintain audience attention, making your message more powerful. Through strategic cropping, you guide viewers seamlessly through the essential content, elevating the professionalism and impact of your PowerPoint presentation.
Revamp Your Presentation
Irrelevant images can pose a significant obstacle when delivering an effective presentation, as they may divert viewers from what's important. Learning how to crop a picture in PowerPoint will help you address this issue. However, WPS Office offers a better solution, and for free along with numerous other benefits. WPS Office not only enables users to crop images but also allows them to leverage various other advanced features to further enhance their presentations. Download WPS Office to explore WPS Presentation and enjoy the complimentary perks.
- 1. How to Fade a Picture in PowerPoint (Step-By-Step Guide)
- 2. How to Crop a PDF Without Using Acrobat: A Comprehensive Guide
- 3. How to Make a Picture Transparent in PowerPoint (Step-by-Step Guide)
- 4. Top 5 Practical Tools to Help You Crop PDF Efficiently
- 5. How to Export PowerPoint Slide as a Picture [Step-by-Step Guideline]
- 6. How to Make a Picture and Background on PowerPoint (Step-by-Step)

15 years of office industry experience, tech lover and copywriter. Follow me for product reviews, comparisons, and recommendations for new apps and software.
Crop Images in PowerPoint: Skillfully Crop Images and Highlight Image Details!
Images are essential in presentations. Often, images can convey more than plain text, making the decision to use images in your PowerPoint presentation the right one.
During preparation, there may be occasions when you need to crop your selected PowerPoint images. In such cases, you can avoid using external programs and skillfully crop images directly in Microsoft PowerPoint with our guide.
Why Images Are Important for Presentations
“A picture is worth a thousand words.” You’ve probably heard this saying before, and it holds true for PowerPoint presentations as well. I mages often visualize content better than plain text . Additionally, they visually enhance your slides, add variety, and, not to mention, evoke emotions . Generating emotions is crucial, especially when you have a specific goal with your presentation.
Always remember to choose professional images that make your presentation unique. Furthermore, be cautious not to overload your slides with images. Use images in a well-dosed and thoughtful manner.
We will now show you how to crop images correctly to appear even more professional and achieve your objectives.
How to Crop Images in PowerPoint: Tutorial
1. Insert the desired image into your presentation by selecting the “Insert” tab and then “Pictures” . You can choose the image source from the drop-down menu. (Tip: To insert images even faster, use the Scan&Paste app/PowerPoint add-in . Find more information in this article .)

2. Right-click on the image you want to crop. A pop-up menu will appear with two buttons.

3. In the pop-up menu, select the “Crop” option. Black crop handles will now appear along the edges of your image.

4. Press and hold the left mouse button on the desired crop handle and drag it towards the interior of the image to crop it. The gray area will indicate the portion that will be removed. In this view, you can also undo the cropped area. Clicking outside the image will apply the changes.
Pro Tip: Want to crop multiple sides of the image simultaneously ? No problem. Hold down the CTRL key and: a) Drag the side crop handles inward to crop parallel sides. b) Drag one of the corner crop handles inward to crop all four sides simultaneously.
Pro Tip 2 : Not satisfied with the selected crop and accidentally clicked outside the image, making the crop area unrecognizable? In the “Picture Format” tab, you can restore the original state of the image by using the “Reset Picture” and “Reset Picture & Size” options.
Using a Mac? The process is slightly different:
1. Insert the image as described above. 2.Click on the image, then click on the “Picture Format” tab that appears. 3. In the Picture Format tab, select the “Crop” option. 4. The black crop handles will now appear as described above. Crop the image as described in step 4 above.
If you find that your image file is still too large after cropping, you can compress your image. Learn how to do it in this article .
Crop Images in PowerPoint: Skillfully Highlight Image Details!
When working with many images, it’s important to choose the right crop . Especially with images involving people that evoke strong emotions, selecting the correct image detail while cropping can enhance the significance of your image.
Microsoft Office PowerPoint provides an easy way to crop images or experiment with different crop shapes . Here’s how you can do it:
- Select your desired image and upload it using the “Insert” and “Pictures” options in the ribbon.
- Click on the image, and the “Picture Format ” tab will open. Select “Crop” . In the dropdown menu that appears, choose the “Crop to Shape” option.

3. Now, choose the desired shape , such as a rectangle with rounded corners. Click on it, and your image will take on the selected shape. With the wide range of shapes available, you can experiment to find the perfect crop for your image.

4. You will still see the crop handles and the cropped area of the image. Adjust the image according to the crop handles as described above, aligning it as desired . The actual image remains unchanged and does not distort.
5. Once you have cropped the image to the desired shape, click outside the image on the slide, and the image will automatically be applied with the selected crop .
Pro Tip: If you’re not satisfied with the selected crop afterwards, you can undo it by pressing CTRL+Z and then crop it again .
PowerPoint Image Cropping: Crop Images without Distortion
Especially when inserting images into shapes using the fill effect, there may be distortions due to mismatched aspect ratios . To rectify the distorted image, follow these steps:
Right-click on the image. The pop-up menu described above with two buttons will appear. To correct distortions, use the commands “Crop” -> “Fill” or “Crop” -> “Fit” :
- Draw a rectangle by selecting the “Insert” tab and then “Shapes” . Keep the rectangle selected.

2. In the “Shape Format” tab, select the “Shape Fill” option. In the drop-down menu, choose the “ Shape Fill” option.

3. PowerPoint will now insert your image. If the proportions of the image do not match the shape, PowerPoint will distort the image.
4. Click on the image. The “Picture Format” tab will appear. Here, select the “Crop” option.
5. In the drop-down menu, use the “Fill” and “Fit” options to adjust your distorted image. Move the image within the placeholder until it has a suitable crop.

Here is the “Fit” function :

Here is the image with the “Fill” function :

PowerPoint Image Cropping: The Newspaper Clipping Effect – Eye-catching for Your Presentation!
With the crop option in PowerPoint, you can not only crop images but also create a great design for your images, such as the newspaper clipping effect . This effect can be especially useful when you want to highlight a quote or an important text passage. You can create the newspaper clipping effect in three simple steps:
- Insert your image as usual using the “Insert” and “Pictures” options.
- In the “Home” tab, select the “Draw” option and choose “Freeform Shape: Shape” .

Now, draw a zigzag shape at the bottom end of the image.

3. Now, merge the torn edge shape with the image. To do this, select the “Merge Shapes” option in the “Shape Format” tab. In the drop-down menu, choose “Subtract” .

4. If desired, you can also add a shadow effect . To do this, select the “Shape Effects” option in the “Shape Format” tab. In the drop-down menu, choose “Shadow” . For the newspaper effect, the “Outer” option or “Offset: Bottom” is optimal.

The newspaper clipping now looks like this in its finished state:

Conclusion: Easily and quickly crop images in PowerPoint!
Cropping images to fit and make them visually appealing in your presentation is not a difficult task. With just a few clicks, you can perfectly adjust your images without the need for external image editing software. Thanks to the wide range of shapes available, you can experiment with different image crops and even create design effects like the newspaper clipping effect. Give it a try today!
If you have any questions about cropping PowerPoint images or PowerPoint in general, feel free to contact us at [email protected] . We’re here to help!
Are you looking for visually supportive and professionally designed slide templates ? Feel free to take a look around our store. Here we have numerous slides prepared for you to download on a wide variety of (business) topics. Take a look today! ►To the store
You may also find these articles helpful:
- Compressing PowerPoint images
- Inserting images faster using the Scan&Paste app
- Making PowerPoint images transparent
- Flipping PowerPoint images
- Blur Images in PowerPoint
Share this post
- share
- save

Design Thinking: Problem Solving with a Difference

Why Corporate Mission Statements Are So Important

7 Tips & Learnings from the Apple Keynote
Thank you for visiting nature.com. You are using a browser version with limited support for CSS. To obtain the best experience, we recommend you use a more up to date browser (or turn off compatibility mode in Internet Explorer). In the meantime, to ensure continued support, we are displaying the site without styles and JavaScript.
- View all journals
- My Account Login
- Explore content
- About the journal
- Publish with us
- Sign up for alerts
- Open access
- Published: 23 April 2024
SM-CycleGAN: crop image data enhancement method based on self-attention mechanism CycleGAN
- Dian Liu 1 ,
- Yang Cao 1 ,
- Jing Yang 1 , 3 ,
- Jianyu Wei 2 ,
- Jili Zhang 2 ,
- Chenglin Rao 1 ,
- Banghong Wu 1 &
- Dabin Zhang 1
Scientific Reports volume 14 , Article number: 9277 ( 2024 ) Cite this article
80 Accesses
Metrics details
- Computer science
- Mechanical engineering
Crop disease detection and crop baking stage judgement require large image data to improve accuracy. However, the existing crop disease image datasets have high asymmetry, and the poor baking environment leads to image acquisition difficulties and colour distortion. Therefore, we explore the potential of the self-attention mechanism on crop image datasets and propose an innovative crop image data-enhancement method for recurrent generative adversarial networks (GANs) fused with the self-attention mechanism to significantly enhance the perception and information capture capabilities of recurrent GANs. By introducing the self-attention mechanism module, the cycle-consistent GAN (CycleGAN) is more adept at capturing the internal correlations and dependencies of image data, thus more effectively capturing the critical information among image data. Furthermore, we propose a new enhanced loss function for crop image data to optimise the model performance and meet specific task requirements. We further investigate crop image data enhancement in different contexts to validate the performance and stability of the model. The experimental results show that, the peak signal-to-noise ratio of the SM-CycleGAN for tobacco images and tea leaf disease images are improved by 2.13% and 3.55%, and the structural similarity index measure is improved by 1.16% and 2.48% compared to CycleGAN, respectively.
Detection and identification of tea leaf diseases based on AX-RetinaNet

Image-based crop disease detection with federated learning

A new generative adversarial network for medical images super resolution
Introduction.
Cash crops (e.g. tobacco, tea) are critical in agricultural development. During crop roasting (e.g. tobacco), the colour of the leaf is the most intuitive observational guide to the maturity of the tobacco roast and is defined as a maturity index in determining, for example, the harvest time. As the maturation process changes, the most prominent feature is the change in leaf colour to yellow. However, the harsh environment of tobacco roasting makes image acquisition challenging, and images are prone to colour distortion. Crop leaf (e.g. tea) diseases are severe problems faced by the agro-industry, and tea disease recognition and detection require large data as a dataset to improve the recognition accuracy. However, the image data for tea diseases are small and challenging to collect. Therefore, crop image distortion recovery and image data augmentation can be performed using image data-enhancement methods.
Image data-enhancement methods are widely used to solve problems of insufficient datasets and image restoration and can be broadly categorised into traditional-based and deep-learning-based methods. Traditional-based methods are typically based on the direct manipulation of image pixel values and mathematical transformations, such as spatial transformation-based image flipping, cropping, rotating, scaling, morphing 1 , filtering-based methods 2 , and multi-sample synthesis techniques such as sample pairing. Image enhancement based on deep-learning methods uses deep-learning network technology to process the original image, learn image features and the relationship between them and process them to improve the image quality and visual effects, such as generative adversarial networks (GANs) 3 and image restoration 4 . Although traditional digital enhancement methods are straightforward, intuitive and interpretable, they have poor generalisation and are challenging to generalise to diverse image data. However, deep-learning-based image data-enhancement methods can adapt to different tasks and data distributions, perform image data enhancement on diverse image data and are more effective under large-scale data. In recent years, deep learning has made breakthrough progress in crop image data enhancement (CIDE), which has a fundamental role in practical applications, such as plant classification data augmentation 5 , 6 and plant disease identification data enhancement and detection 7 , 8 , and has received increasing attention. It can extract and learn high-level features from images, making it is suitable for extracting visual features of plant leaves and stems. GAN learns from the feature distributions of the original images and generates images with similar distributions, which can provide more feature information for classification models. Despite the many advantages of GAN, the training process is slow to converge and prone to crashes.
The cycle-consistent GAN (CycleGAN) is a derivative model of GAN, an unsupervised learning method 9 . Its core idea is derived from GANs and by introducing the cyclic consistency loss. It can realise unsupervised image transformation from one domain to another and simultaneously realise mutual data transformation in two image domains. The CycleGAN models have been used for leaf disease identification 10 , 11 , citrus-greening disease generation and recognition 12 , plant image synthesis generation 13 and leaf disease sample amplification and classification 5 , 6 . Although CycleGAN has made significant progress, its images are too similar, lack diversity and its unsupervised nature makes it challenging to provide fine control over the generated images. The self-attention mechanism is used to process sequential data and is widely used in deep-learning models, such as crop leaf disease identification and detection 14 , 15 , 16 , rice pest detection 17 and crop classification and identification 18 , 19 . Its introduction helps improve the performance of the model, allows the model to capture global and local image information better and helps generate higher quality and a greater number of images. Therefore, the self-attention mechanism is added to the CycleGAN model to improve the quality of image recovery and data diversity.
Based on the above, we propose a new CIDE method based on the CycleGAN with the self-attention mechanism. Our method introduces CycleGAN as the primary framework of the network. It adds self-attention to the generator and discriminator to help the network focus on more critical regions in the image and extract essential feature information to improve image data diversity. Furthermore, SM-CycleGAN can be used for tobacco drying, tea disease data enhancement and image data enhancement of other economic crops. The primary contributions of this paper are the following.
We have proposed a new SM-CycleGAN crop image-data-augmentation method that introduces the self-attention mechanism into the generator and discriminator of the main network framework CycleGAN. By helping the CycleGAN network focus on important areas in the image, we can extract important feature information of the image and reduce the interference of noise. Thus, the dependence and connection between normal crop images and distorted (disease) crop images are learned, improving the diversity of image data.
We have added the self-attention mechanism to the backbone network of CycleGAN to strengthen the learning of image features and the relationship between images in the crop image data enhancement task. By accurately capturing the key feature information between the original image and the target image, the accuracy and performance of the image data enhancement task and the adaptive mapping ability of the model are improved. Meanwhile, based on the original CycleGAN loss and the loss of self-attention mechanism, a new CIDE loss function is designed to achieve more realistic image-data enhancement.
We have conducted a comprehensive experimental evaluation of SM-CycleGAN in the scenarios of tobacco-leaf image-distortion restoration and tea disease image-data enhancement, and we conducted ablation experiments and comparison experiments with baseline methods and existing advanced methods. The experimental results show that SM-CycleGAN have a significant effect on image processing. Moreover, in the future, SM-CycleGAN can not only be used for image-data enhancement of tobacco-leaf drying and tea disease but also for image-data enhancement of other cash crops.
The rest of paper is organised as follows. In “ Related work ” section presents research-related work. In “ Methods ” section proposes an SM-CycleGAN-based image data-enhancement method and network for cash crops. In “ Isolated crop image online acquisition equipment ” section demonstrates an online image acquisition device for isolated crop drying. In “ Experimentation and analysis ” section, experiments and analysis are performed. The conclusions are presented in “ Conclusion ” section.
Related work
Traditional image data processing methods.
In recent years, traditional image data processing methods have achieved remarkable results in crop leaf disease image data enhancement and colour distortion recovery. Hu, GS 1 proposed a geometric semantic segmentation method for natural scene images of tea leaves based on the discriminative pyramid network, which uses techniques such as image flipping, translating, mirroring and random scaling to enhance the training samples. It adopts local histogram equalisation techniques to reduce the effect of uneven illumination on segmentation. To improve and enhance the richness and diversity of the tea training samples, Bao 20 used offline data-enhancement techniques to pan, rotate by 30° and horizontally flip the original training images before training and detecting the network to obtain rich angular information about the target. Bao 21 expanded the number of training and validation images by horizontally flipping, rotating and translating wheat images. Arun Pandian et al. 22 developed a dataset of augmented plant leaf diseases using conventional image processing, such as image flipping, cropping, rotation, colour transformation, principal components analysis (PCA) colour enhancement and noise injection techniques. While photographing leaf samples at various times during tobacco roasting, Odabas, Mehmet Serhat 23 used the X-rite colour checker for colour correction to eliminate the negative effect of ambient light. However, all the above conventional methods for image data enhancement require manual extraction of lesion features or colour features and are limited in their effectiveness in processing similar disease features or colour features. Furthermore, such methods cannot increase the diversity of images and, thus, cannot solve the diversity problem.
Machine-learning-based image data processing methods
With the continuous development of machine learning, some researchers have applied convolutional neural networks (CNNs) to crops such as wheat 24 , cucumber 25 , cereal 26 , 27 , 28 and apple leaf diseases 29 . Experiments with different crop datasets show that deep-learning methods are significantly better than traditional machine-learning methods. It is well known that deep-learning methods require extensive data. However, collecting sufficient and usable datasets is unreliable and time-consuming. In agriculture, data availability faces significant challenges due to the collection of light conditions and collection equipment, and the dependence on the annotation of the dataset size increases. Therefore, synthetic datasets have been investigated in recent years. Data expansion aims to increase the dataset size 30 , which is widely used in various fields. Zhang et al. 31 designed a multi-feature fusion faster Region-CNN (MF3 R-CNN) to solve the problem of insufficient images of soybean blades in complex scenes. However, manually combining images with Photoshop is labour-intensive and time-consuming.
The emergence of GANs has provided researchers with a new way of thinking 3 . Goodfellow et al. compared the recognition accuracy of enhancement methods such as Conditional Generative Adversarial Nets (CGAN) 32 , rotation and translation, and non-enhancement methods. The results proved that using GAN to generate images is superior to traditional data-enhancement methods. Wu et al. 33 used a deep convolutional generative adversarial networks (DCGAN) to generate tomato leaf images and trained a GoogLeNet deep-learning network to recognise tomato leaf diseases. Hu et al. 34 proposed a C-DCGAN to enhance tea disease samples and trained a VGG16 deep-learning network for disease recognition. However, this method converts noise into images, producing images of mediocre quality and containing much noise. Furthermore, this method is only suitable for generating more similar images from the same domain and cannot solve the imbalance between dataset categories. Another approach to image generation using GAN is image data enhancement using image pairs, which forms pairs of related images. Qu et al. 35 proposed an enhanced Pix2Pix defogging network to solve the image-to-image translation problem and generate fog-free images without using a physical scattering model. Experimental results demonstrate that the model outperforms other methods. The method requires the geometric pairing of input images from two domains. However, in most cases, the one-to-one correspondence of image pairs is not satisfied.
Zhu et al. 36 proposed an innovative CycleGAN, which can use unpaired images for image data enhancement. In the same year, Yi et al. 37 proposed Dual GAN, which enables an image translator to be trained from two sets of unlabelled images from two domains, eliminating the need for paired data for image-to-image translation. Tian et al. 38 used CycleGAN to address the issue of insufficient image data. To address the problem of insufficient image data due to the random occurrence of apple diseases, in addition to traditional image augmentation techniques, the CycleGAN deep-learning model was used to accomplish data augmentation. These methods effectively enriched the diversity of the training data and provided a solid foundation for training the detection model. Chen et al. 39 proposed a framework combining YOLOv4 and CycleGAN to improve the quality of diamond pineapple surface-defect detection. The data enhancement of these image pairs all shares the same framework with two generators (GX2Y and GY2X) performing opposite transformations, which can be considered as double learning and two discriminators, DX and DY, to predict whether an image belongs to the domain or not. The generators (GX2Y, GY2X) transform the image from one domain to another. The discriminators (DX, DY) for each domain determine whether the image belongs to that domain or not.
Generative adversarial network method based on self-attention mechanism
Traditional GANs have the problems of unstable training and poor generation quality. Although CycleGAN has made significant progress, it is difficult to intricately control the generated images owing to its unsupervised nature. Self-attention provides a solution to this problem. Pathak et al. 28 were the first to train a generative adversarial network (GAN) with attention from scratch using a large-scale shelter image dataset, generating images with high PSNR and SSIM scores. Lu et al. 40 proposed an image-translation method based on a self-attention mechanism. The main idea is to use a self-attention mechanism module in the generator network to expand the size of the feature map and enhance its description of the spatial structure around the central pixel. Compared with the original CycleGAN, the proposed method achieves excellent results, which fully demonstrates the strong data-augmentation ability of the proposed method. Li et al. 41 proposed an SS-CycleGAN(Spatial and Semantic rationality CycleGAN) grayscale image coloring network and evaluated its performance on the natural color dataset and the flower dataset. Based on the cycle consistency adversarial network, SS-CycleGAN adds a self-attention mechanism to the generator and discriminator. The self-attention mechanism can guide the patch discriminator to pay attention to the semantic rationality of the object to be colored. Experimental results on a natural-color dataset and flower dataset verify the effectiveness of the proposed SS-CycleGAN. Aiming at the problem of the limited scale and insufficient diversity of maize leaf disease research dataset, Guo et al. 5 proposed a maize-disease image-generation algorithm based on CycleGAN. Using the disease image-conversion method, practitioners can convert a healthy corn image to a disease crop image. The proposed method not only solves the limitations of existing maize disease datasets but also improves the accuracy of maize disease recognition in a small-sample maize-leaf disease-classification task. Additionally, Guowei et al. 42 , 43 , 44 proposed a deep-learning model (PPLC-Net) consisting of an extended convolution, a multilevel attention mechanism, and a GAP layer. The model uses a novel meteorological data-enhancement method to expand the sample size and enhance the generalization and robustness of feature extraction. The feature-extraction network uses the zigzag expansion convolution with a variable expansion rate to expand the perceptual field of the convolution domain, which effectively solves the problem of insufficient spatial-information extraction. The lightweight CBAM attention mechanism is located in the middle layer of the feature-extraction network to enhance the information representation of the model. The GAP layer prevents the overfitting of the model by reducing the number and complexity of the network calculation parameters. Aiming at the problem of poor consistency between the enhanced sample and the original sample in the current data-augmentation methods, Siyuan et al. 45 proposed a data-augmentation method to improve symplectic geometric reconstruction. This method expands a sufficient number of augmented samples while ensuring a high similarity with real samples.
So far, existing methods in crop disease image augmentation and colour distortion recovery suffer from training instability. It is challenging to converge CycleGAN to the equilibrium point using gradient training. Therefore, this paper proposes a new CycleGAN crop image data-augmentation method based on the self-attention mechanism to solve crop image colour distortion. The small dataset is insufficient to train CNNs.
Deep-learning algorithms, such as CNNs and attention mechanisms, have successfully enhanced image data. Some achievements have been made in image data enhancement. This paper proposes a CIDE method based on SM-CycleGAN by combining the self-attention mechanism and the recurrent GAN. We design the general architecture of the model. In “ CycleGAN principles ” section introduces the principle of CycleGAN. In “ SM-CycleGAN-based CIDE approach ” section describes the CIDE method based on SM-CycleGAN, and the self-attention loss (SAL) function is introduced to reduce the long-tail problem between classes in “ CIDE loss function ” section.
CycleGAN principles
CycleGAN is a variant of GAN networks using two transform networks to facilitate data transformations between domains. Dual GAN 35 and Disco-GAN 46 employ a similar idea that partially alleviates the need for data. Each transformation network is trained by a separate GAN network and its respective generator. The primary purpose of the discriminator is to distinguish the generated data from the real data.
Adversarial losses
Apply the adversarial loss to two mapping functions. For the mapping function G : X → Y and its identification ware D Y , denote the objective as
where G tries to generate an image G ( x ) that look similar to the image in domain Y , while x and y aim to distinguish between the panning sample G ( x ) and the real sample Y . A similar adversarial loss for the mapping function F : Y → X and its discriminator D X as well: i.e. L gan ( F , D X , Y , X ).
Loss of cyclic consistency
Adversarial training can learn mappings G and F , which produce outputs with the same distribution as the target domain Y and X , respectively. However, with sufficiently large capacity, the network can map the same set of input images to any random arrangement of images in the target domain, where either of the learned mappings can produce an output distribution that matches the target distribution. We further reduce the space of possible mapping functions by arguing that the learned mapping functions should be cyclically consistent using cyclic consistency loss to motivate this behaviour
Loss function of the original CycleGAN
The loss function of the original CycleGAN comprises three parts: generating adversarial loss for X to Y , generating adversarial loss for Y to X , and cyclic consistency loss function, denoted as
where λ is a weighting parameter to balance the importance of cyclic consistency and adversarial losses.
SM-CycleGAN-based CIDE approach
The focus of this paper is to enhance crop image data. This paper constructs an improved crop image data-generation model by introducing the self-attention mechanism into CycleGAN, as shown in Fig. 1 .

SM-CycleGAN crop image data-enhancement (CIDE) network.
- Self-attention mechanism
The attention mechanism used in generators and discriminators is the self-attention mechanism method 47 . This method highlights crucial features and reduces the influence of irrelevant information by learning the dependencies between different regions within the image. Self-attention mechanism localisation within the image is achieved by dynamically assigning weights to different regions, allowing the model to focus on the most critical regions of the image and better enabling the capture of global and local information. The self-attention mechanism generates a feature map the same size as the input image, identifying regions whose location is relevant to the label category. The computation of the feature map for the self-attention mechanism uses a global approach involving the entire feature map.
The self-attention mechanism operates on the feature maps obtained by convolution. The attention score is obtained by calculating the dot product between Query and Key and dividing it by \(\sqrt {d_{k} }\) for scaling. This result is categorised using SoftMax to obtain the weight of each position. After calculating the matrix Q , K , and V , the output is obtained by
where K T is the number of matrix columns of matrices Q and K .
Generating network structure
In the original CycleGAN model, the generator comprises an encoder, a converter and a decoder. The original CycleGAN used six ResBlock structures in its generator. With the inclusion of the self-attention mechanism, the six ResBlock structures in the converter are subdivided and added to the encoder and decoder of the generator network, respectively. Furthermore, the classifier A is included between the encoder and decoder of the generator. Figure 2 shows the generator structure based on the self-attention mechanism. In the augmented generator, as shown in Fig. 2 , the input images are derived from the source domain X and the target domain Y . The generator’s encoder generates low-dimensional feature vectors. Classifier A determines whether the input image belongs to the source domain X by evaluating the feature maps from the input source and the target domain images after the generator encoded them. Furthermore, the self-attention technique allows a global pool to compute a weight value for each channel in the encoded feature map W. Using the principle of the self-attention mechanism, by multiplying and summing the weights of each channel with the encoded feature map, a feature map with the attention mechanism feature map is designed. Subsequently, this feature map with the attention mechanism is fed to the decoder of the generator, where it is up-sampled to recover its size to match the size of the input image. Classifier A in the generator is used as a binary classifier to recognise the feature maps generated from the input source and target domain images.

Structure of the generating network.
Discriminant network structure
The input to the discriminator comprises real crop images and generated images. After down-sampling by the encoder, the input is convolved in one dimension, combined with bias vectors, and then passed through an S-shaped function to accomplish binary classification using probability values. The discriminator output value 1 indicates that the input crop image is recognised as real, whereas value 0 indicates that the generated crop image is classified. Figure 3 shows the network structure of the discriminator after integrating the self-attention mechanism module into the original model.

Structure of the discriminative network.
The discriminator integrates the self-attention mechanism module. As shown in Fig. 3 , the discriminator receives input images from a generative image G ( X ) and a target domain image Y . The discriminator has two binary classifiers, B and C. Classifier B determines whether the input image is generative or from the target domain by processing the feature maps extracted from the input generative and target domain images encoded by discriminator Ds . The output of classifier B is the probability that the input image is generated. However, classifier C determines the same by processing the feature map of the attention mechanism generated by the self-attention mechanism. This feature map is obtained from the input generated and target domain images processed by the self-attention mechanism. The output of classifier C also indicates the probability that the input image is generated. Classifiers B and C aim to determine whether the input image originates from the generated or target domain images.
CIDE loss function
Sal function.
The SAL monitors the self-attention mechanism in a model to ensure that the model effectively captures fundamental relationships between elements as it learns sequence data. The goal is to encourage the model to focus on crucial elements during self-attention by assigning appropriate attention weights to better model dependencies in sequences.
where x i and x j are elements in the input sequence, and n is the sequence length. The goal of SAL is to minimise this loss to motivate the model to learn appropriate attention patterns to better model the relationships in sequence data and improve the performance of the model in various natural language processing and computer vision tasks.
Ethical statement
We promise to comply with the IUCN Policy Statement on Research Involving Species at Risk of Extinction and the Convention on the Trade in Endangered Species of Wild Fauna and Flora, and confirm that the research complies with relevant institutional, national and international norms and legislation.
Isolated crop image online acquisition equipment
The data used in this experiment were collected using a real-time crop image integrated information acquisition system (Fig. 4 ). The system comprises a high-temperature and high-humidity-resistant camera, a dandelion router, a Transmission Control Protocol (TCP) data transmission module, a switching power supply, and an open-source development board. The high-temperature and high-humidity camera is installed facing the crop. The dry and wet bulb temperature sensor, the S-type weight sensor and the display are connected to the Printed Circuit Board (PCB) development board. The image information acquisition system communicates with the tobacco-baking comprehensive information big data system through the TCP data transmission module and transmits the images and other information to the big data system for real-time display and storage.

Real-time image integrated information acquisition equipment [( a ) Real-time data display, ( b ) High-temperature and humidity-resistant camera, ( c ) Suspended weight sensor, ( d ) TCP data transmission module, ( e ) Dandelion router, ( f ) Switching power supply, ( g ) Wet and dry bulb temperature and humidity sensor, ( h ) Transformer, ( i ) Open-source development board].
Experimentation and analysis
Experimental environment.
The experiments used an Ubuntu 20.04.2LTS operating system, a PyTorch deep-learning development framework, and Python as the development language. The Central Processing Unit (CPU) is Intel Core i7-9700F, and the Graphics Processing Unit (GPU) is NVIDIA GeForce RTX 3090Ti.
Experimental process and assessment indicators
Experimental procedure.
The following steps are taken to verify the effectiveness of the SM-CycleGAN model: (1) First, based on the tobacco roasting and tea disease image datasets, the quality of the generated images is evaluated using the structural similarity index (SSIM) 48 and the peak signal-to-noise ratio (PSNR) 49 as the objective evaluation indexes. (2) Compare and contrast the stability of the improved model through multiple experiments to verify its generative ability and stability. (3) Evaluate the performance of the SM-CycleGAN in this paper through ablation experiments and compare it with the original CycleGAN and other methods.
Assessment of indicators
To validate the performance of the SM-CycleGAN model in generating tea disease images and normal tobacco image augmentation, the PSNR and SSIM were used for quantitative comparison.
The PSNR is a metric used to compare the error between the corresponding pixels in the image of diseased tea leaves (normal tobacco) and the generated image (normal colour tobacco),
where MAX denotes the maximum possible value of an image pixel value, typically 255 in an 8-bit image. MSE denotes the mean squared error, which is the average of the squares of the differences of each pixel between the original and the compressed or distorted versions of an image or video.
The SSIM assesses the similarity between the data distribution of the normal diseased tea leaf blade (normal tobacco) image ( x ) and the generated diseased tea leaf blade (normal colour tobacco) image ( y ),
where x denotes the original image. y denotes the distorted or processed image. μ x and μ y denote the luminance (average luminance) of x and y , respectively. σ x and σ y denote the variance of the luminance of x and y , respectively. σ xy denotes the luminance covariance between x and y . C 1 and C 2 are constants to avoid zero values in the denominator; C 1 = ( k 1 L ) 2 and C 2 = ( k 2 L ) 2 , where L denotes the dynamic range of the pixel value, typically 0–255 in 8-bit images.
Two datasets were selected for this study: the tobacco roasting and tea disease image datasets. The tobacco leaf-baking image dataset is distributed in two categories: 206 normal and 206 colour-distorted tobacco leaf-baking images. The tea disease image dataset is distributed in five categories: 80 slices of normal and 80 slices of diseased tea images, totalling five categories, which is an imbalance. Each image has the same size as the input to the neural network (256 × 256 pixels) and is in the red–green–blue (RGB) colour space and JPG format. When the dataset is unbalanced between categories, the accuracy of deep learning in recognition will be severely affected. Therefore, considering the overfitting problem caused by too many parameters and too little data, SM-CycleGAN is used to generate images to balance or augment the dataset. Therefore, the healthy (non-normal colour) to diseased (normal colour) model is used to convert healthy (non-normal colour) leaves to leaves carrying disease (normal colour). The dataset is divided into a training set (including a validation set) and a test set (Table 1 ).
Implementation details
SM-CycleGAN uses a CycleGAN (baseline) model pre-trained on ImageNet as the backbone network for crop image data enhancement, which is fine-tuned to optimize the performance of the model. The CNN extracts global features from 256 × 256 × 3 images as input for both generator and discriminator modules. These modules have different structures and parameters, with three MLPs mapping global, low-level, and high-level features to 256 × 256 × 3 using ReLU, LayerNorm, and Dropout respectively. We use 256 × 256 × 3 crop images as input to the image feature encoder with lsgan for SM-CycleGAN, CycleGAN, contrastive-unpaired-translation (CUT) 50 , AugCGAN 51 and U-GAT-IT 52 ; vanilla is used for Pix2Pix. During training we employ Adam optimizer with batch size set at 1; maximum number of epochs at 200; initial learning rate at 0.0002 to train each module from scratch. For SM-CycleGAN, CycleGAN, AugCGAN, U-GAT-IT weighting factors lambda_A,lambda_B,and lambda_identity are set at 10, 10, and 0.5, respectively. For Pix2Pix, the weighting factor lambda_L1 is set at 100; for CUT weighting factors lambda_GAN and lambda_NCE are set at 1 and 10 respectively.
Tobacco-roasting image data analysis
Model stability analysis.
Figure 5 shows that on the tobacco-roasting image recovery dataset, although the loss function of SM-CycleGAN and the original CycleGAN is more oscillatory in the pre-training period, it shows a better convergence effect in the late training period. In particular, the D_B loss of SM-CycleGAN is more evident in the late training stage than in the original CycleGAN. This result indicates that the generator learns a better way to generate class A images after adding the attention mechanism, making it more challenging for the discriminator to distinguish between the generated and real images. For the G_B loss, it shows obvious oscillations at 140–180 epochs and then stabilises relative to the original CycleGAN, indicating that the generator becomes more effective in learning after adding the self-attention mechanism.

Comparison of loss function for tobacco-roasting image data recovery.
Comparative analysis of training time
Figure 6 shows that on the tobacco-roasting image recovery dataset, SM-CycleGAN does not significantly increase the time for the entire training process compared to the original CycleGAN. This result indicates that even though the self-attention mechanism increases the computational cost of each training step, it does not significantly impact the overall training duration, and there is no additional loss of computational resources. And compared with AugCGAN and U-GAT-IT, the training time of SM-CycleGAN is closer.

Comparative analysis of training time for tobacco-roasting images distortion recovery.
Analysis of ablation experiments and comparative tests
Objective evaluation
We conducted ablation experiments and comparison experiments. The experiments were conducted on non-normal-coloured tobacco images, and the quality of the generated images was compared. We compared the performance of SM-CycleGAN with offline data augmentation methods (Flip), Pix2Pix, Original CycleGAN (baseline method), CUT, AugCGAN and U-GAT-IT on the constructed tobacco leaf image dataset. Figure 7 shows the PSNR and SSIM comparisons of the validation sets of the seven methods for generating normal tobacco images, and Table 2 shows the average quality comparisons.

Comparison of evaluation metrics for the tobacco-roasting image recovery test set.
Table 2 shows that the SM-CycleGAN for generating normal tobacco images achieved higher PSNR and SSIM values than the original CycleGAN and other methods. For the normal tobacco images, SM-CycleGAN achieved a PSNR value of 38.0592 dB and an SSIM value of 0.9870, which is an improvement of 23.0435 dB and 0.2823, respectively, compared with Flip; an improvement of 2.7356 dB and 0.0181, respectively, compared with Pix2Pix; an improvement of 0.7940 dB and 0.0113, respectively, compared with CycleGAN; an improvement of 2.6326 dB and 0.0050, respectively, compared with CUT; an improvement of 0.7059 dB and 0.0072, respectively, compared with AugCGAN; an improvement of 0.6780 dB and 0.0045, respectively, compared with U-GAT-IT. These results demonstrate the effectiveness of the SM-CycleGAN in generating a normal tobacco image with an excellent resemblance to the real image, similar to the normal tobacco images with superior performance.
Subjective analysis
By the visual representation of the enhancement effect of non-normal-coloured tobacco image data, Fig. 8 shows that SM-CycleGAN shows better results in generating normal-coloured tobacco image data. Other methods show residual background interference and non-normal image colours in the generated images.

Comparison of tobacco-roasting image data enhancement by abnormal colour map, normal colour map, Flip, Pix2Pix, CycleGAN, CUT, AugCGAN, U-GAT-IT, SM-CycleGAN.
Tea disease image data analysis
Figure 9 shows the loss function comparison analysis of the original CycleGAN and SM-CycleGAN models by tea disease image enhancement. When running the same epoch, the original CycleGAN did not converge, whereas the model gradually converged at the late training stage after adding the self-attention mechanism. The loss function oscillation of SM-CycleGAN is smoother than the CycleGAN, and the model converges faster, indicating that the generator and discriminator reach a more efficient state, which is more conducive to generating better image data.

Comparison of amplification loss functions for tea disease images.
Figure 10 shows that on the tea disease image dataset, SM-CycleGAN does not significantly increase the time of the whole training process compared with the original CycleGAN, indicating that even though the self-attention mechanism is introduced, the computational cost of each training step increases, but it does not have a great impact on the overall training time. However, SM-CycleGAN significantly reduces the time for the whole training process compared with AugCGAN and U-GAT-IT. Therefore, SM-CycleGAN can meet the training requirements while saving computing resources.

Comparative analysis of training time for tea disease images data enhancement.
We conducted ablation experiments and comparison experiments. The experiments were conducted to compare the quality of the generated images with tobacco colour distortion and tea leaf disease. We compared the performance of the proposed method with offline data augmentation methods (Flip), Pix2Pix, Original CycleGAN, CUT, AugCGAN and U-GAT-IT on the constructed tea disease image dataset. Figure 11 shows the PSNR and SSIM comparisons of the validation sets of the three methods for generating tea disease images, and Table 3 shows the average quality of the comparisons.

Comparison of evaluation metrics for the tea leaf disease image data-enhancement validation set.
Table 3 shows that the SM-CycleGAN for generating tea-leaf disease images achieved higher PSNR and SSIM values than the original CycleGAN and other methods. For the tea-leaf disease image, SM-CycleGAN achieved a PSNR value of 17.9724 dB and an SSIM value of 0.8539, which is an improvement of 2.9654 dB and 0.1094, respectively, compared with Flip; an improvement of 2.6868 dB and 0.1012, respectively, compared with Pix2Pix; an improvement of 1.3216 dB and 0.0207, respectively, compared with CycleGAN; an improvement of 3.0115 dB and 0.1446, respectively, compared with CUT; an improvement of 1.1830 dB and 0.0175, respectively, compared with AugCGAN; an improvement of 0.4780 dB and 0.0557, respectively, compared with U-GAT-IT. These results demonstrate the effectiveness of SM-CycleGAN in generating a tea-leaf disease image with an excellent resemblance to the real image, similar to the tea disease images with superior performance.
Figure 12 shows the SM-CycleGAN performs the best for visualising tea leaf disease images generated by the three methods. In generating tea leaf disease images in different backgrounds, SM-CycleGAN avoids generating interfering images with disease characteristics in the background, thus producing more realistic diseased images. Pix2Pix performed the worst, with the tea leaf image losing crucial information but retaining the colour of the diseased image. Compared with the original CycleGAN and other methods, SM-CycleGAN shows some improvement regarding image clarity and interference information in the background of the image. However, it might still be challenging to generate disease colour feature information on complex backgrounds fully.

Study of the effect of generating images of tea leaf diseases using seven methods on different backgrounds.
In Fig. 13 , due to the intuitive representation of disease severity in severe tea leaf disease images where other methods show residual background interference in the generated images, SM-CycleGAN shows better results in generating tea leaf images severely affected by tea disease.

Comparison of tea leaf disease image data enhancement by normal map, disease map, Flip, Pix2Pix, CUT, CycleGAN, AugCGAN, U-GAT-IT, and SM-CycleGAN.
Model robustness analysis
Figure 14 demonstrates that when SM-CycleGAN is trained on the tobacco leaf baking image dataset and the tea leaf disease dataset, the loss function of the former converges at a lower value compared to that of the latter. Notably, all four losses (cycle_A loss, cycle_B loss, idt_A loss, and idt_B loss) exhibit rapid convergence with their values gradually approaching zero. A smaller loss function indicates greater model stability and robustness; thus, the SM-CycleGAN model demonstrates superior robustness in handling tobacco baking image datasets. This can be attributed to the larger volume of image data available in the tobacco leaf baking image dataset compared to that in the tea disease image dataset. The abundance of data enables more comprehensive and accurate information for effective learning of genuine patterns within the data while mitigating overfitting.

Comparison of SM-CycleGAN training loss function in tobacco leaf baking image dataset and tea leaf disease dataset.
We propose a crop image data enhancement method based on SM-CycleGAN to realize the restoration and expansion of the crop dataset. In order to test the performance of the SM-CycleGAN model, we use the original CycleGAN and other six methods to conduct ablation and comparison experiments on the tobacco leaf baking image data set and the tea leaf disease image data set. The experimental results show that, taking the tobacco leaf baking image as an example, compared with the tobacco leaf normal image quality, SM-CycleGAN improves the PSNR and SSIM by 2.13%and 1.16%respectively compared with the original CycleGAN. Taking the tea image as an example, compared with the tea leaf disease images, the PSNR and SSIM of SM-CycleGAN are improved by 3.55% and 2.48%. By comparing the quality of generated images of different crops, SM-CycleGAN is better than other methods in PSNR and SSIM indicators of generated images. In summary, SM-CycleGAN effectively expanded the datasets, increasing the available training samples and achieving sustainable development in agricultural disease and baking data. The results can be applied to improve the early identification of crop leaf diseases and the classification of crop diseases in the baking stage, which can ultimately help to improve the efficiency of agricultural production.
Although our method can yield good enhanced results, we only collected two crop data sets for experimental analysis due to time constraints. In the future, we will collect image data of other types of crops and diseases for training and testing to enhance the generalization ability of SM-CycleGAN.
Data availability
Data is provided within the manuscript information files. The tobacco image dataset in this paper is created by using the images collected from the tobacco curing factory in Bozhou district, Zunyi City, Guizhou Province, published in https://blog.csdn.net/ld1314_/article/details/137572185 ; and the tea image dataset in this paper is created using images from the linked datasets below: https://blog.csdn.net/qq_40840797/article/details/131837877 .
Hu, G. et al. Semantic segmentation of tea geometrid in natural scene images using discriminative pyramid network. Appl. Soft Comput. 113 , 107984. https://doi.org/10.1016/J.Asoc.2021.107984 (2021).
Article Google Scholar
Gao, Y. et al. Apple leaf disease identification in complex background based on BAM-Net. Agronomy 13 (5), 1240. https://doi.org/10.3390/agronomy13051240 (2023).
Goodfellow, I. et al. Generative adversarial nets. Adv. Neural Inf. Process. Syst. 27 , 2672–2680. https://doi.org/10.48550/arXiv.1406.2661 (2014).
Achddou, R., Gousseau, Y. & Ladjal, S. Fully synthetic training for image restoration tasks. Comput. Vis. Image Underst. 233 , 103723. https://doi.org/10.1016/j.cviu.2023.103723 (2023).
Guo, H. et al. Sample expansion and classification model of maize leaf diseases based on the self-attention CycleGAN. Sustainability 15 (18), 13420. https://doi.org/10.3390/su151813420 (2023).
Van Marrewijk, B. M., Polder, G. & Kootstra, G. Investigation of the added value of CycleGAN on the plant pathology dataset. IFAC-PapersOnLine 55 (32), 89–94. https://doi.org/10.1016/j.ifacol.2022.11.120 (2022).
Article MathSciNet Google Scholar
Almasoud, A. S. et al. Artificial intelligence-based fusion model for paddy leaf disease detection and classification. Comput. Mater. Contin. 72 , 1391–1407 (2022).
Google Scholar
Al-Wesabi, F. N. et al. Artificial intelligence enabled apple leaf disease classification for precision agriculture. Comput. Mater. Contin. 70 (3), 6223–6238. https://doi.org/10.32604/cmc.2022.021299 (2022).
Chen, X. et al. Underwater image enhancement using CycleGAN. In NCIT 2022; Proceedings of International Conference on Networks, Communications and Information Technology, Virtual , 1–5 (2022).
Chen, Y., Pan, J. & Wu, Q. Apple leaf disease identification via improved CycleGAN and convolutional neural network. Soft Comput. 27 (14), 9773–9786. https://doi.org/10.1007/s00500-023-07811-y (2023).
Liu, W., Zhai, Y. & Xia, Y. Tomato leaf disease identification method based on improved YOLOX. Agronomy 13 (6), 1455. https://doi.org/10.3390/agronomy13061455 (2023).
Xiao, D. et al. Citrus greening disease recognition algorithm based on classification network using TRL-GAN. Comput. Electron. Agric. 200 , 107206. https://doi.org/10.1016/j.compag.2022.107206 (2022).
Sun, C. et al. Individual tree crown segmentation and crown width extraction from a heightmap derived from aerial laser scanning data using a deep learning framework. Front. Plant Sci. 13 , 914974. https://doi.org/10.3389/fpls.2022.914974 (2022).
Article PubMed PubMed Central Google Scholar
Zeng, W. & Li, M. Crop leaf disease recognition based on self-attention convolutional neural network. Comput. Electron. Agric. 172 , 105341. https://doi.org/10.1016/j.compag.2020.105341 (2020).
Qian, X. et al. Deep learning-based identification of maize leaf diseases is improved by an attention mechanism: Self-attention. Front. Plant Sci. 13 , 864486. https://doi.org/10.3389/fpls.2022.864486 (2022).
Stephen, A., Punitha, A. & Chandrasekar, A. Designing self attention-based ResNet architecture for rice leaf disease classification. Neural Comput. Appl. 35 (9), 6737–6751. https://doi.org/10.1007/s00521-022-07793-2 (2023).
Hu, Y. et al. Detection of rice pests based on self-attention mechanism and multi-scale feature fusion. Insects 14 (3), 280. https://doi.org/10.3390/insects14030280 (2023).
Meng, Y. et al. Fine hyperspectral classification of rice varieties based on self-attention mechanism. Ecol. Inf. 75 , 102035. https://doi.org/10.1016/j.ecoinf.2023.102035 (2023).
He, Z. et al. Pyramid feature fusion through shifted window self-attention for tobacco leaf classification. Expert Syst. Appl. https://doi.org/10.1016/j.eswa.2023.120601 (2023).
Bao, W. et al. UAV remote sensing detection of tea leaf blight based on DDMA-YOLO. Comput. Electron. Agric. 205 , 107637. https://doi.org/10.1016/j.compag.2023.107637 (2023).
Bao, W. et al. Lightweight convolutional neural network model for field wheat ear disease identification. Comput. Electron. Agric. 189 , 106367. https://doi.org/10.1016/j.compag.2021.106367 (2021).
Arun Pandian, J., Geetharamani, G. & Annette, B. Data augmentation on plant leaf disease image dataset using image manipulation and deep learning techniques. In 2019 IEEE 9th International Conference on Advanced Computing (IACC) , 199–204 (2019). https://doi.org/10.1109/IACC48062.2019.8971580 .
Odabas, M. S., Şenyer, N. & Kurt, D. Determination of quality grade of tobacco leaf by image processing on correlated color temperature. Concurr. Comput. Pract. Exp. 35 (2), e7506. https://doi.org/10.1002/cpe.7506 (2023).
Lu, J. et al. An in-field automatic wheat disease diagnosis system. Comput. Electron. Agric. 142 , 369–379. https://doi.org/10.1016/j.compag.2017.09.012 (2017).
Ma, J. et al. A recognition method for cucumber diseases using leaf symptom images based on deep convolutional neural network. Comput. Electron. Agric. 154 , 18–24. https://doi.org/10.1016/j.compag.2018.08.048 (2018).
Rasti, S. et al. Assessment of deep learning methods for classification of cereal crop growth stage pre and post canopy closure. J. Electron. Imaging https://doi.org/10.1117/1.JEI.32.3.033014 (2023).
Rasti, S. et al. Crop growth stage estimation prior to canopy closure using deep learning algorithms. Neural Comput. Appl. 33 , 1733–1743. https://doi.org/10.1007/s00521-020-05064-6 (2021).
Rasti, S. et al. A survey of high resolution image processing techniques for cereal crop growth monitoring. Inf. Process. Agric. https://doi.org/10.1016/j.inpa.2021.02.005 (2021).
Chen, Y., Pan, J. & Wu, Q. Apple leaf disease identification via improved CycleGAN and convolutional neural network. Soft Comput. 27 , 9773–9786. https://doi.org/10.1007/s00500-023-07811-y (2023).
Kukačka, J., Golkov, V. & Cremers, D. Regularization for deep learning: A taxonomy. arXiv preprint arXiv:1710.10686 (2017). https://doi.org/10.48550/arXiv.1710.10686 .
Zhang, K., Wu, Q. & Chen, Y. Detecting soybean leaf disease from synthetic image using multi-feature fusion faster R-CNN. Comput. Electron. Agric. 183 , 106064. https://doi.org/10.1016/j.compag.2021.106064 (2021).
Mirza, M. & Osindero, S. Conditional generative adversarial nets. arXiv preprint arXiv:1411.1784 (2014). https://doi.org/10.48550/arXiv.1411.1784 .
Wu, Q., Chen, Y. & Meng, J. DCGAN-based data augmentation for tomato leaf disease identification. IEEE Access 8 , 98716–98728. https://doi.org/10.1109/ACCESS.2020.2997001 (2020).
Hu, G. et al. A low shot learning method for tea leaf’s disease identification. Comput. Electron. Agric. 163 , 104852. https://doi.org/10.1016/j.compag.2019.104852 (2019).
Qu, Y., Chen, Y., Huang, J. & Xie, Y. Enhanced Pix2pix Dehazing Network. In 2019 IEEE/CVF Conference on Computer Vision and Pattern Recognition (CVPR) , 8152–8160 (2019). https://doi.org/10.1109/CVPR.2019.00835 .
Zhu, J.-Y., Park, T., Isola, P. & Efros, A. A. Unpaired image-to-image translation using cycle-consistent adversarial networks. In 2017 IEEE International Conference on Computer Vision (ICCV) , 2242–2251 (2017). https://doi.org/10.1109/ICCV.2017.244 .
Yi, Z., Zhang, H., Tan, P. & Gong, M. DualGAN: Unsupervised dual learning for image-to-image translation. In 2017 IEEE International Conference on Computer Vision (ICCV) , 2868–2876 (2017). https://doi.org/10.1109/ICCV.2017.310 .
Tian, Y. et al. Detection of apple lesions in orchards based on deep learning methods of CycleGAN and YOLOV3-dense. J. Sens. 2019 , 7630926. https://doi.org/10.1155/2019/7630926 (2019).
Chen, S. H. et al. A surface defect detection system for golden diamond pineapple based on CycleGAN and YOLOv4. J. King Saud Univ. Comput. Inf. Sci. 34 (10), 8041–8053. https://doi.org/10.1016/j.jksuci.2022.07.018 (2022).
Lu, Y., Liu, J., Zhao, X. et al . Image translation with attention mechanism based on generative adversarial networks. In IEEE INFOCOM 2020—IEEE Conference on Computer Communications Workshops (INFOCOM WKSHPS) , 364–369 (2020). https://doi.org/10.1109/INFOCOMWKSHPS50562.2020.9162836 .
Li, B. et al. Image colorization using CycleGAN with semantic and spatial rationality. Multimed. Tools Appl. https://doi.org/10.1007/s11042-023-14675-9 (2023).
Dai, G. et al. PPLC-Net: Neural network-based plant disease identification model supported by weather data augmentation and multi-level attention mechanism. J. King Saud Univ. Comput. Inf. Sci. https://doi.org/10.1016/j.jksuci.2023.101555 (2023).
Dai, G. et al. DFN-PSAN: Multi-level deep information feature fusion extraction network for interpretable plant disease classification. Comput. Electron. Agric. 216 , 108481. https://doi.org/10.1016/j.compag.2023.108481 (2024).
Dai, G., Fan, J. & Dewi, C. ITF-WPI: Image and text based cross-modal feature fusion model for wolfberry pest recognition. Comput. Electron. Agric. 212 , 108129. https://doi.org/10.1016/j.compag.2023.108129 (2023).
Liu, S. et al. Fault diagnosis study of hydraulic pump based on improved symplectic geometry reconstruction data enhancement method. Adv. Eng. Inform. https://doi.org/10.1016/j.aei.2024.102459 (2024).
Kim, T., Cha, M., Kim, H. et al . Learning to discover cross-domain relations with generative adversarial networks. In International Conference on Machine Learning , 1857–1865 (2017). https://doi.org/10.48550/arXiv.1703.05192 .
Vaswani, A., Shazeer, N., Parmar, N. et al . Attention is all you need. arXiv (2017). https://doi.org/10.48550/arXiv.1706.03762 .
Wang, Z. et al. Image quality assessment: From error visibility to structural similarity. IEEE Trans Image Process. 13 (4), 600–612. https://doi.org/10.1109/TIP.2003.819861 (2004).
Article ADS PubMed Google Scholar
Sheikh, H. R. et al. A statistical evaluation of recent full reference image quality assessment algorithms. IEEE Trans Image Process. 15 (11), 3440–3451. https://doi.org/10.1109/tip.2006.881959 (2006).
Park, T., Efros, A. A., Zhang, R. & Zhu, J. Contrastive learning for unpaired image-to-image translation. In European Conference on Computer Vision (2020).
Almahairi, A., Rajeshwar, S., Sordoni, A., Bachman, P. & Courville, A. Augmented CycleGAN: Learning many-to-many mappings from unpaired data. In International Conference on Machine Learning (2018). https://doi.org/10.48550/arXiv.1802.10151 .
Kim, J., Kim, M., Kang, H. & Lee, K. U-GAT-IT: Unsupervised generative attentional networks with adaptive layer-instance normalization for image-to-image translation. arXiv abs/1907.10830.
Download references
Acknowledgements
The authors would like to acknowledge the support of China Tobacco Guangxi Industrial Co., Ltd and Science and Technology Department of Guizhou Province for paying the Article Processing Charges (APC) of this publication.
The authors extend their appreciation to the China Tobacco Guangxi Industrial Co., Ltd for funding this work under Grant Number (2022450000340036); Science and Technology Department of Guizhou Province for funding this work under Grant Number (QKHZC[2021]General Project 335 and QKHZYD[2023]010).
Author information
Authors and affiliations.
School of Mechanical Engineering, Guizhou University, Guiyang, 550025, China
Dian Liu, Yang Cao, Jing Yang, Chenglin Rao, Banghong Wu & Dabin Zhang
China Tobacco Guangxi Industrial Co., Ltd, Nanning, 530000, China
Jianyu Wei & Jili Zhang
State Key Laboratory of Public Big Data, Guizhou University, Guiyang, 550025, China
You can also search for this author in PubMed Google Scholar
Contributions
D.L. and Y.C. conceptualized and designed the study. C.R. and B.W. collected and curated the datasets. D.L. performed the image processing and the statistical analysis. D.L., J.Y. and Y.C. participated in writing the manuscript. All authors reviewed the manuscript. J.Z., D.Z. and J.W. provided resources and supervised the project.
Corresponding author
Correspondence to Yang Cao .
Ethics declarations
Competing interests.
The authors declare no competing interests.
Additional information
Publisher's note.
Springer Nature remains neutral with regard to jurisdictional claims in published maps and institutional affiliations.
Rights and permissions
Open Access This article is licensed under a Creative Commons Attribution 4.0 International License, which permits use, sharing, adaptation, distribution and reproduction in any medium or format, as long as you give appropriate credit to the original author(s) and the source, provide a link to the Creative Commons licence, and indicate if changes were made. The images or other third party material in this article are included in the article's Creative Commons licence, unless indicated otherwise in a credit line to the material. If material is not included in the article's Creative Commons licence and your intended use is not permitted by statutory regulation or exceeds the permitted use, you will need to obtain permission directly from the copyright holder. To view a copy of this licence, visit http://creativecommons.org/licenses/by/4.0/ .
Reprints and permissions
About this article
Cite this article.
Liu, D., Cao, Y., Yang, J. et al. SM-CycleGAN: crop image data enhancement method based on self-attention mechanism CycleGAN. Sci Rep 14 , 9277 (2024). https://doi.org/10.1038/s41598-024-59918-3
Download citation
Received : 04 January 2024
Accepted : 16 April 2024
Published : 23 April 2024
DOI : https://doi.org/10.1038/s41598-024-59918-3
Share this article
Anyone you share the following link with will be able to read this content:
Sorry, a shareable link is not currently available for this article.
Provided by the Springer Nature SharedIt content-sharing initiative
- Cyclic consistency adversarial network
- Tea disease
- Tobacco roasting
By submitting a comment you agree to abide by our Terms and Community Guidelines . If you find something abusive or that does not comply with our terms or guidelines please flag it as inappropriate.
Quick links
- Explore articles by subject
- Guide to authors
- Editorial policies
Sign up for the Nature Briefing: AI and Robotics newsletter — what matters in AI and robotics research, free to your inbox weekly.

- Canon Community
- Desktop Inkjet Printers
- Printer Software & Networking
- Office Printers
- Professional Photo Printers
- Mobile & Compact Printers
- Production Printing
- EOS DSLR & Mirrorless Cameras
- Point & Shoot Digital Cameras
- EF & RF Lenses
- Camera Software
- Speedlite Flashes
- Camera Accessories
- EOS Webcam Utility Pro - Discussions
- Professional Video
- Video Accessories
- General Discussion
- Community Events
- Featured Photo Galleries
- Share Your Photos
- Learn With Canon
- Welcome To The Community
- Getting Started & Guidelines
- Discussions & Help
- EOS DSLR & Mirrorless Cameras
- Re: R6 Mark II: Using Cropping/aspect ratio vs. Di...
- Subscribe to RSS Feed
- Mark Topic as New
- Mark Topic as Read
- Float this Topic for Current User
- Printer Friendly Page
R6 Mark II: Using Cropping/aspect ratio vs. Digital tele-conv vs. longer lens to extend reach

- Mark as New
- Report Inappropriate Content
04-25-2024 01:07 PM
- All forum topics
- Previous Topic

04-25-2024 01:22 PM
04-25-2024 02:44 PM

04-25-2024 02:08 PM
04-25-2024 02:45 PM

04-25-2024 04:44 PM - edited 04-25-2024 04:58 PM
04-26-2024 08:52 AM

04-26-2024 05:28 AM
Enter for a chance to win!
April 20th-28th
04/16/2024: New firmware updates are available.
RF100-300mm F2.8 L IS USM - Version 1.0.6
RF400mm F2.8 L IS USM - Version 1.0.6
RF600mm F4 L IS USM - Version 1.0.6
RF800mm F5.6 L IS USM - Version 1.0.4
RF1200mm F8 L IS USM - Version 1.0.4
03/26/2024: New firmware updates are available.
EOS R3 - Version 1.7.1
EOS R5 - Version 2.0.0
EOS R6 - Version 1.8.4
EOS 1DX Mark III - Version 1.9.0
WFT-R10 - Version 1.3.1
12/05/2023: New firmware updates are available.
EOS R6 Mark II - Version 1.3.0
EOS R7 - Version 1.4.0
EOS R8 - Version 1.2.0
EOS R10 - Version 1.4.0
Selphy QX10 - Version 1.1.0.0
07/31/2023: New firmware updates are available.
CR-N700 - Version 1.2.0
CR-N500 - Version 1.3.0
CR-N300 - Version 1.3.0
CR-X300 - Version 1.1.0
- R6 Mark II: Using Cropping/aspect ratio vs. Digital tele-conv vs. longer lens to extend reach in EOS DSLR & Mirrorless Cameras 04-25-2024
- PowerShot SX120 IS randomly turning off, lens won't always retract in Point & Shoot Digital Cameras 04-25-2024
- EOS R7 Menus Do No Match Online Manual in EOS DSLR & Mirrorless Cameras 04-23-2024
- EOS M200 - Digital Lens Optimization (DLO) profiles and shooting in RAW in EOS DSLR & Mirrorless Cameras 04-23-2024
- DPP4 Transfer to Photoshop options? in Camera Software 04-18-2024

- Terms of Use
- Privacy Statement
Canon U.S.A Inc. All Rights Reserved. Reproduction in whole or part without permission is prohibited.

IMAGES
VIDEO
COMMENTS
To crop a picture to as a shape, open the PowerPoint presentation, insert a picture (Insert > Picture), then select the shape. In the "Picture Format" tab, click the "Crop" button found in the "Size" group. In the drop-down menu that appears, select "Crop To Shape.". Another menu displaying a large library of shapes will appear.
Use Insert > Picture to add the image to an Office file (such as a Word document, PowerPoint presentation, or an Excel workbook). In your file, select the picture that you want to crop. On the Picture Format tab, click the arrow next to Crop .
Use Insert > Picture to add the image to a Office file (such as a Word document, PowerPoint presentation, or an Excel workbook). Click the picture. Click Picture Tools > Format , and in the Size group, click the arrow under Crop .
In Normal View or Slide Master View, select the picture you want to crop. Click the Picture Tools Format or Picture Format tab in the Ribbon and in the Size group, click the arrow below Crop. From the drop-down menu, choose Aspect Ratio and then select an aspect ratio (such as 16:9).
To crop a picture in PowerPoint, follow these steps: Select the picture you want to crop. Select the Picture Format tab. Click the Crop command to enter cropping mode. Resize the Cropping Handles (they are black) on your photo. Select Crop again (or hit the Esc key) to exit cropping mode.
Step-1: Select the 'Crop' option. Just as before, select the picture you want to crop and click on 'Format Picture' from the ribbon to find the 'Crop' option. Step-2: Crop the picture to a 1:1 Aspect Ratio. On the top right corner of your screen, you will find the 'Crop' option with an arrow mark just below it.
Step 3: Click on the 'Crop' button. Click the 'Crop' button in the 'Size' group. Once you're in the 'Format' tab, you'll see the 'Crop' button. It's typically represented by two intersecting right angles. Clicking this button activates the cropping mode for your selected image.
Inserting an Online Image. Open your presentation in PowerPoint. Select the slide where you want to add the image. On the Insert tab, in the Images group, click Online Pictures (if you have Microsoft PowerPoint 2013 or a newer version, you'll be able to choose the source of the image, such as Bing or Onedrive).
Click the picture that you want within the shape. Click PICTURE TOOLS > FORMAT > Size and click the arrow under Crop. If you don't see the Picture Tools and Format tabs, make sure that you selected a picture. Click Fill or Fit. Fill sets the picture size to match the shape's height or width, whichever is greatest.
Open the presentation with the image you want to crop (or create a new presentation and add a picture). Double click the image you want to crop to open the Picture Format tab. You can also single-click the image and then click Picture Format or the Format menu, and then Crop. To freehand crop an image, click the Crop button and skip to the next ...
First, select the picture that you want to crop, and go to the 'Picture Format' tab (this tab only appears after selecting a picture). Step 2: Use the Crop Tool Under the picture format tab, click on the 'Crop' tool option.
Click Drawing Tools > Format. In the Shape Styles group, click Shape Fill > Picture . Browse to the picture you want and insert it into the shape as a shape fill. Click to select the new shape picture fill. Go to Picture Tools > Format. In the Size group, click the arrow under Crop to show the two cropping options.
Learn how to crop images to shapes, and create more interesting image layouts. Explore more Microsoft Powerpoint courses and advance your skills on LinkedIn ...
Here are the steps that I used in PowerPoint 2013: Right-click the image and choose Format Picture. The Format Picture taskpane opens on the right. Click the Picture icon at the top. Doing so displays settings for picture corrections, picture color, and cropping. If necessary, expand the Crop section. There are 2 sections.
Learn how to crop pictures in PowerPoint including how to crop to shape and how to crop to a 4:3 or 16:9 aspect ratio.🚀 UNLOCK the critical PowerPoint short...
Crop. Select the picture. Click the Format tab on the ribbon. Click the Crop button. Crop handles appear around the border of the picture. Click and drag the crop handles inward. To crop all four sides of a picture or graphic at once while maintaining the graphic's proportions, press and hold down Ctrl as you drag the mouse.
You'll find Crop on the contextual Format tab in the Size group. To crop a picture, you click Crop, the default option. This quick click displays cropping handles along the picture's border ...
Insert a shape by going to Insert > Shapes. Click on the shape of your choice, and on the slide, adjust the handlebars to get the size you want. Click on the shape and then select Shape Format from the toolbar. In Shape Styles, and choose Shape Fill. Use this button to crop an image into a shape in PowerPoint.
Select the Picture Format menu, select the arrow below Crop from the Size section of the ribbon, choose Crop to Shape, and then select the shape you'd like to use. In some versions of PowerPoint, the Picture Format menu is only called Format. You'll find the same Crop options in that menu. You'll see the image immediately cropped using that shape.
Let's delve into the steps to efficiently crop an image. Step 1: Open your PowerPoint presentation and select the image you want to crop. Step 2: Navigate to the Picture Format tab and click on the "Crop" option in the ribbon menu. Step 3: You'll find various crop options, but to remove specific areas of the image, choose the basic "Crop ...
1. Insert the image as described above. 2.Click on the image, then click on the "Picture Format" tab that appears. 3. In the Picture Format tab, select the "Crop" option. 4. The black crop handles will now appear as described above. Crop the image as described in step 4 above.
Ensure the picture is selected. Click the Picture Format or Picture Tools Format tab in the Ribbon. In the Size group, click the arrow below Crop. A drop-down menu will appear. Choose Aspect Ratio. A sub-menu will appear. Select 1:1 to crop the image into a circle (this changes the oval into a circle).
Crop Calendar; Previous 7-day | Next 7-day; 2024 Winter Crops (Mar - Oct) — (Next Update on 4/29/2024) Click on a State region to view its thematic charts. View in Google Earth View in Google Earth: Top: Stay Connected FAS on Twitter. Get Email Updates. FAS Home; USDA.gov; Economic Research Service ...
Crop disease detection and crop baking stage judgement require large image data to improve accuracy. However, the existing crop disease image datasets have high asymmetry, and the poor baking ...
Hello, Buddy! I agree with the others. CLICK HERE to see some test shots of the moon that I took using the R6 II comparing a cropped Raw with the electronic tele-converter feature of the R6 II. As Brian mentioned, using the 1.6X crop will result in a big loss of resolution. I've used it in my R5, and although others report it's OK, it's not up to my standards.
To resize your image, right-click the image, then choose Picture. Select the Size tab and use the options to resize your image. To keep the image proportions, make sure to keep the Lock aspect ratio checkbox checked. When you're done, select OK, then select OK again to save the changes to your signature.
Bianca Censori has fully embraced summer fashion, stepping out in an all-white outfit yet again, this time a skintight shorts set.. The 29-year-old Australian model was photographed in West ...
2024 Spring Crop Season (Apr - Dec) 2023 Winter Crop Season (Sep - Aug) 2023 Spring Crop Season (Apr - Dec) 2022 Winter Crop Season (Sep - Aug) 2022 Spring Crop Season (Apr - Dec) 2021 Winter Crop Season (Sep - Aug) Additional Resources. Area, Yield and Production; WAP Production Briefs; Commodity Intelligence Reports; Country Summary; Geotag ...