Spreadsheets Expert
Everything about Excel & Google Sheets


How To Create Data Visualizations in Excel? A Complete Guide
T ransform your Excel sheets from simple spreadsheets to storytelling tools with beautiful and intuitive “data visualizations in Excel”. This powerful feature turns complex data into clear, engaging visuals, making it easier to spot trends, patterns, and insights.
Data visualization in Excel represents numerical value in a visual format. It is the way to organize data in a spreadsheet in a more accessible and organized format. Confidently navigate through the myriad of chart types and customization options available in Excel to effectively communicate your data’s story.
Excel templates can be used for data visualization. Excel as a data visualization tool has several charts, graphs, and maps you can use to visualize your data, like bar graphs, line charts, pivot tables, etc.
This guide will take you step-by-step through creating impactful data visualizations, ensuring your presentations and reports stand out with professional polish and clarity. Let’s dive in and bring your data to life!
What is Data Visualization in Excel?
Definition : Data visualization is the graphic representation of data that makes it easier to interpret. We can create Data visualizations using tools like Data Wrapper, Google Charts, and others. Additionally, data is organized and visualized using an Excel spreadsheet.
Let’s explore Excel’s data visualization features in many different ways. We can use different Excel charts and graphs to visualize data. Additionally, data visualization using Excel templates is possible.
Column charts, bar charts, pie charts, progress bars , line charts, area charts, scatter charts, surface charts, Sankey diagrams , and many others are available in Excel.
Different Types of Data Visualizations in Excel
Excel can be used for several data visualization techniques, including:
Column Chart
It is a simple type of graph where data is shown as vertical bars. Select the data and the required option from the Column chart menu to build a column chart. As we can see, several options exist for the Column chart; the best option must be picked.
The chart can be formatted as required.
Pie charts or diagrams display the percentage share each data type makes up. The pie chart helps us rapidly understand the proportion contribution. To create a pie chart, pick the required columns, then pick the relevant pie chart option from the Pie menu.
Horizontal bars are the only difference between this chart type and a column chart. Select the suitable bar chart from the Bar option to make a horizontal bar.
A line graph is commonly drawn to show data that changes over time. It consists of two axes: the x-axis and the y-axis. Each axis represents a different dataset. It is formed by connecting a series of points using a straight line.
It can be used to check whether the values are increasing or decreasing over time.
Pivot Table
A pivot table is a tabular representation of data used in data visualization that is used to group, sort, and summarize huge volumes of data.
Advanced Excel Charting Techniques
There are the following advanced Excel charting Techniques used for data visualization:
Combining multiple data series
When you have multiple data sets that you want to compare in a single chart, you can combine them into one chart using Excel’s capability to handle multiple data series. Here’s how to do it
- Ensure that your data is organized properly. You may have two columns or rows for categories (e.g., months and sales)
- Highlight the entire dataset, including the category labels and all the data series.
- Go to the “Insert” tab in Excel’s ribbon, and select the chart type that best suits your data. Common choices include clustered column/bar charts for comparing data in different categories or line charts for showing trends.
- Excel will create a basic chart with all the data series. You can further customize the appearance of each data series by changing colors, styles, and labels. It helps differentiate and highlight each series.

- If you have multiple data series, including a legend in your chart is crucial. The legend identifies which color or symbol corresponds to each data series.
- Enhance the visual appeal of your chart by adjusting fonts, colors, and chart elements as needed.
Creating pivot charts
Pivot charts are powerful tools for summarizing and visualizing large datasets quickly. They work with pivot tables to provide a dynamic way to analyze data. Here’s how to create a pivot chart:
- Ensure your data is organized in a tabular format, with columns for different attributes such as dates, categories, and values.
- Pick your data, go to the “Insert” tab, and click “PivotTable.” Configure the pivot table to summarize your data as desired, choosing rows, columns, and values.

- With your pivot table created, select any cell within it. Then, go to the “Insert” tab and click “PivotChart.” Choose the chart type you want to use (e.g., bar chart, line chart).

- Excel will generate a pivot chart linked to your pivot table. You can customize the chart by add the fields from the pivot table to the chart’s elements to create meaningful visualizations.
How to Make a Heat Map Visualization in Excel?
Create a geographic heat map in Excel quickly by using conditional formatting. Colors on a heat map represent the individual values.
To make a heat map, follow the procedures below:
- Choose the range
- On the Home tab, select Conditional Formatting from the Styles category.

- Under Color Scales, select a subtype.
- Format Right-clicking or hitting CTRL + 1 will choose a cell.
- Select Custom from the menu.

Excel offers data visualization tools , from basic charts to advanced mapping features. You can adapt Excel’s visualization capabilities to their specific needs, whether you are a beginner or an expert.
This article introduced the Excel data visualization concept and outlined various visualization techniques. Excel empowers users to communicate data insights, make informed decisions, and create compelling visual narratives , enhancing data analysis processes.

With over two decades of experience in writing about Microsoft Excel, Google Sheets, and various other spreadsheet tools, Muhammad Nadeem Salam is your go-to expert for all things data. Since 2004, he has been passionately sharing his knowledge and insights through engaging and informative blog posts, helping countless readers unlock the full potential of their spreadsheet tools.

Nadeem Salam
Leave a reply cancel reply.
Your email address will not be published. Required fields are marked *
Save my name, email, and website in this browser for the next time I comment.
Post Comment
Related Posts

How to Change Text Case in Excel? Upper, Lower & Proper Case

Where is the Quick Analysis Tool in Excel & How to Use it?

How to Create a Progress Bar in Excel?

How to Compare Two Columns in Excel?
Begin typing your search term above and press enter to search. Press ESC to cancel.
Excel Visualization: A Guide to Clear Data Presentation for Beginners
I once struggled with dull data tables.
Numbers clustered in rows and columns become a blur. But with Excel visualization , you can empower your audience to make informed decisions based on the data presented. Excel charts and graphs replace chaos, revealing patterns and trends.
Convey ideas efficiently with the right visual. It’s not just about creating a chart; it’s about making data understandable and engaging.
In this article, I’ll guide you step-by-step on transforming your Excel data into insightful visuals.
Let’s get started!
Table of Contents
Understanding the Basics of Excel Visualization
Excel provides various visualization options, whether 2D or 3D versions, standard, stacked, or 100% stacked options. It’s all about finding the right fit that best represents your data and message.
The Excel Charting Interface
Let’s start with creating a chart in Excel.
When you click on the Insert tab in Excel, you’ll see various chart types that you can use to visualize your data.

The Excel charting interface provides a wide range of options, from line and area charts to bar and column charts. When you click on a chart, the ‘ Chart Tools ’ contextual tab provides additional features for customizing your charts.
Types of Data for Visualization
Excel visualization data can be broadly categorized into numerical, categorical, and time-series data.
- Numerical data includes values that can be measured, such as sales figures or temperature readings.
- Categorical data includes information such as names, labels, or groups.
- Time-series data involves values measured over time, such as stock prices or website traffic.
Excel offers different chart types depending on your data type.
Selecting the Right Chart Type
Selecting the right chart type is half the battle for effective data visualization in Excel.
Pie charts are best for part-to-whole comparisons. Use line charts for time series or trends. Bar or column charts are the most suitable for categorical comparisons.
However, consider more advanced chart types for more complex data sets.
Scatter plots are excellent for correlation analysis , while histograms and box plots are ideal for distribution analysis of quantitative data.
It’s all about understanding your data and determining the best way to display it.
Steps for Visualizing Data in Excel – Creating Basic Charts
Creating basic charts in Excel is a fundamental skill for anyone looking to present data in a visual format.
Excel offers a variety of chart types, each with unique properties and use cases. The key to successful chart creation in Excel is understanding these different chart types and knowing how to present your data most effectively with them.
Organizing Your Data
Before you dive into creating Excel charts, it is crucial to organize your data correctly .
Well-organized data will make the charting process easier and the resulting charts more meaningful. Ensure your data is clean, error-free, and arranged clearly and logically.
This will make it easier to select the data for your charts and create visuals that effectively communicate your data analysis results.
Pie and Donut Chart
Pie charts are popular for showing the proportion of different categories within a whole. While visually appealing, they are often misused and can lead to misleading interpretations.
Generally, they are most effective when comparing a few categories representing parts of a whole.
On the other hand, donut charts are a variation of pie charts with a hole in the middle (as the name implies!). Like pie charts, they can display multiple data series, but they should be used sparingly.
To create a pie chart in Excel:
- Select the data you want to visualize
- From the “ Insert ” tab, choose “ Pie ” from the chart options.
- You can customize your chart by changing the colors, adding labels, and adjusting other settings in the “ Format Chart Area ” pane.
Here’s a video guide on how to create a donut chart:
Line and Area Chart
Line and area charts are handy when dealing with time-series data . These charts plot data points on a graph and connect them with a line, allowing you to see trends over time.
Check out this video for a step-by-step guide on how to create a line chart:
One of the business essentials when working with line and area charts is customizing the axis and gridlines. This can help make your chart more readable and meaningful .
The “ Format Axis ” pane allows you to customize the axis labels, adjust the scale, and add gridlines.
Column and Bar Graph
Bar and column charts are Excel’s most commonly used chart types. They are excellent for comparing different categories of data.
While bar charts and column charts are often used interchangeably, there is a difference: A bar chart presents data horizontally , while a column chart presents data vertically . This distinction can influence how easily your audience interprets the chart.
You can also choose between a stacked or clustered bar and column chart layout.
In a stacked chart , data series are stacked on each other, while in a clustered chart , they are placed side by side.
To create a bar or column chart:
- Select the data
- Then choose either “Bar” or “Column” from the chart options in the “ Insert ” tab
- Remember to format the chart and the axis labels to make the chart easier to understand
Advanced Charting Techniques
In this section, I’ll describe how to present complex data in a visually appealing and easily understandable format. Since each dataset is unique, treat these charts as ideas for meaningfully presenting your data.
Combination Charts
This type of chart combines the features of line and column charts, allowing you to present mixed data more comprehensively.
For example, when you have a target and actual data for comparison , a combination chart can be the perfect tool for visualization.
Clicking the Chart Design tab on the ribbon allows you to change the chart type and create a customized combination chart.

This allows you to have your target values in columns and the actual values marked along the line, which provides a clearer visualization of your data.
Trendlines and Data Analysis
Another essential feature of Excel charts is the ability to add trendlines. These can be linear, polynomial, or moving average trendlines.
A trendline graphically displays trends in your data , and you can extend it beyond the actual data to predict future values.
Along with trendlines, interpreting R-squared values is also crucial in data analysis. This will help you understand the relationship between your dependent and independent variables, thus enhancing your analysis results.
Check out our detailed how-to post on adding trendlines to Excel charts .
Conditional Formatting in Charts
Conditional formatting is another advanced charting technique in Excel that can enhance your data visualization. You can also add data bars, color scales, and icon sets.
These features allow you to customize your charts based on certain conditions, making it easier for your audience to understand your data. Applying these formatting options enables you to create more engaging and visually appealing charts for your data presentation.
Creating a Tornado Chart in Excel
Tornado charts are particularly effective when comparing and contrasting different variables . A well-crafted tornado chart can help you visualize how changes in several factors can impact a specific outcome – for example, the impact of inflation on NPV and IRR results.
Here’s a video showing you how to create a tornado chart:
Designing a Funnel Chart in Excel
Funnel Charts in Excel are highly effective tools for monitoring sales processes or any other process that narrows down over time.
Here are two quick methods for designing funnel charts in Excel:
Building a Waffle Chart in Excel
Waffle charts, also known as square pie or waffle bar charts, are a great way to visualize individual data points compared to the whole data set. They are a fun and engaging way to present percentages or proportions.
Here is a simple method for creating waffle charts:
Data Visualization Tips – Enhancing Chart Aesthetics
The aesthetics of your Excel chart play a significant role in how effectively your data is communicated.
A visually appealing chart is easier to understand and engages your audience. Enhancing chart aesthetics involves working with various chart elements and features, such as colors, styles, and data labels.
Adding data labels, for instance, provides additional information on your chart, making it easier to interpret.
Besides, you can customize the chart’s colors and styles to match your presentation theme or company branding.
Check out this post for more information on good dashboard design principles .
Working with Chart Elements
Working with chart elements can significantly improve the readability and effectiveness of your data visualization.
Some key chart elements you can manipulate include titles, legends, and data labels.
- Data labels provide additional context to your data and can be customized to suit your chart
- Modify axis labels and gridlines to adjust their appearance and improve readability. Check out this video on how to add gridlines to your Excel charts:
These chart elements can enhance your aesthetic appeal and make your data easier to interpret.
Customizing Chart Colors and Styles
Spicing up your Excel charts is easier than you think.
The ‘ Chart Design ‘ tab in the Excel ribbon allows you to alter your charts’ aesthetics significantly.
Navigate to the ‘ Chart Styles ‘ section, and you’ll see various styles for your chart.
Looking for a bit more customization? No problem! Simply click the ‘ Change Colors ‘ dropdown and choose a color scheme.

You can use Excel’s preset color schemes or create a custom color palette for brand consistency. Minor visual changes can significantly affect your chart’s overall look and feel.
3D Charts and Effects
Adding a third dimension to your charts can make them pop . But be careful.
While 3D effects can add a specific wow factor, they can also lead to misinterpretations of your data if they are not used properly.
To add 3D effects to your charts, click the ‘ Chart Styles ‘ and choose a style with 3D effects.
Remember, though, that 3D effects should be used sparingly and only when they can enhance the understanding of the data. Overuse of these effects can lead to cluttered, confusing charts. When it comes to 3D effects, less is often more .
Advanced Excel Graphics
Beyond the basic charts, Excel offers advanced graphics capabilities to take your data presentation to the next level.
This includes using Sparklines, shapes, and icons, among other features.
Sparklines are mini-charts within individual cells, each representing a row of data. They give a quick snapshot of trends, helping you understand your data at a glance.
Excel offers line, column, and win/loss types of Sparklines that you can add with the Quick Analysis tool.
Using Shapes and Icons

Remember to appropriately format these shapes and icons to convey the right message and not distract from the data.
Portraying a Story Through Data
Excel visualization is not just about creating charts or diagrams; it’s about telling a story with your data. This is where the concept of data storytelling comes in.
It’s about using visualization tools to highlight key points and trends in your data, making it easier for your audience to understand and absorb.
It’s not unlike creating a plot in a novel where rows and columns of data are the characters, and the chart is the narrative arc. Every element should convey your story effectively and compellingly, from simple bar charts to intricate trend analysis.
Exporting and Sharing Your Visualizations
Once you’ve created your data visualization in Excel, it’s important to know how to share it! This involves exporting the visual representation of data in a format that others can easily access.
Whether you’re sharing a simple bar graph or a complex infographic, the export method will depend on the intended use of the chart/graphic.
This process can be as simple as saving your chart as an image or embedding Excel visuals in PowerPoint presentations and documents.
Saving Charts as Images
One of the simplest ways to share visualizations is by saving them as images .
To do this, right-click the chart and select ‘Save as Picture.’ Several image formats are available, each with its uses.
For instance, JPEG is great for photographic images, while PNG is ideal for images with transparent backgrounds. However, it’s important to consider the resolution of your image. High resolution is crucial for clear, crisp images, especially if they’re intended for print.
Embedding Excel Visuals in Presentations and Documents
Embedding them in presentations and documents is another way to share your Excel visualizations.
This can be done in two ways: linking and embedding .
- Linking refers to connecting the original Excel file and the document where it’s inserted. Any changes made to the original file will automatically update in the document (assuming the link isn’t broken ).
- Embedding involves inserting a copy of the chart into the document. While this won’t update automatically, it ensures that the chart will always be available, regardless of the status of the original file.
Both methods have advantages and should be chosen based on your specific needs.
Frequently Asked Questions
What are some common mistakes for beginners to avoid in data visualization with excel.
Common mistakes include overcrowding the chart with too much data, using inappropriate chart types, neglecting to label axes or data points clearly, and choosing colors or styles that reduce readability.
What are the best practices for presenting Excel data visually to a non-technical audience?
Focus on simplicity and clarity .
Use straightforward chart types, avoid technical jargon, and highlight key takeaways. Ensure your charts are well-labeled, and use annotations or callouts to draw attention to important data points.
What are some resources to learn more about Excel visualization?
For more tips and tricks, visit my YouTube channel . Alternatively, look at Chandoo’s training, where I learned many excellent dashboard design ideas.
Can Excel visualization help in career development?
Absolutely! Proficiency in Excel visualization is a valuable skill in many industries.
It’s especially relevant in fields like data science, finance, marketing, and others involving large amounts of data. Effectively communicating data through graphical representation can give you a significant advantage in your professional journey.
Leave a Comment Cancel reply
Save my name, email, and website in this browser for the next time I comment.
- Chart Guide
- Data Makeover
0 comments
Visualizing Data in Excel: A Comprehensive Guide

By STC
July 15, 2023
Explore the diverse data visualization possibilities in Excel that aid in analyzing and interpreting your data effectively.
Introduction
Welcome to our comprehensive guide on visualizing data in Excel. In this article, we will delve into the world of data visualization and provide you with valuable insights on how to create compelling visual representations of your data using Excel. Whether you are a beginner or an experienced Excel user, this guide will equip you with the knowledge and techniques to effectively communicate your data through visually appealing charts and graphs.
Why Data Visualization Matters

Data visualization is a powerful tool that enables us to make sense of complex datasets. It allows us to identify patterns, trends, and outliers that might not be immediately apparent in raw data. Visualizing data in Excel not only enhances our understanding of the information at hand but also enables us to communicate our findings to others in a clear and concise manner.
Getting Started with Excel Charts
- Selecting the Right Chart Type Choosing the appropriate chart type is crucial for effectively representing your data. Excel offers a wide range of chart options, including bar charts, line charts, pie charts, scatter plots, and more. Consider the nature of your data and the message you want to convey when selecting the most suitable chart type.
- Formatting and Customization Excel provides extensive formatting and customization options to refine the appearance of your charts. From adjusting axis labels to modifying colors and styles, these features allow you to create visually appealing charts that align with your brand or presentation requirements.
- Adding Data Labels and Annotations To enhance the clarity of your visualizations, Excel enables you to add data labels and annotations. These labels provide additional context and make it easier for your audience to interpret the information being presented. You can include axis labels, data point labels, and explanatory text to further enrich your charts.
Advanced-Data Visualization Techniques
- Creating PivotCharts PivotCharts are a powerful feature in Excel that allows you to visualize data from pivot tables. By summarizing and aggregating data, pivot tables provide a comprehensive overview that can be transformed into dynamic and interactive charts. Utilizing PivotCharts enables you to explore and analyze complex datasets with ease.
- Utilizing Advanced Charting Features Excel offers advanced charting features that can take your visualizations to the next level. From trendlines and error bars to 3D charts and sparklines, these tools allow you to add depth and sophistication to your data representations. Experimenting with these features can help you create visually striking charts that captivate your audience.
Best Practices for Effective Data Visualization
To ensure your data visualizations have maximum impact, keep the following best practices in mind:
- Simplify and Declutter Avoid cluttering your charts with excessive information or unnecessary embellishments. Focus on the key message you want to convey and remove any elements that distract from that message. Remember, simplicity is key when it comes to effective data visualization.
- Use Color Strategically Colors can evoke emotions and draw attention to specific areas of your charts. Use color strategically to highlight important data points or to group related information. However, be mindful of accessibility considerations and ensure that your color choices are accessible to individuals with color vision deficiencies.
- Tell a Story with Your Data Data visualization is not just about presenting numbers; it’s about telling a story. Structure your visualizations in a way that guides your audience through a narrative. Start with an introduction, present the main findings, and conclude with a clear takeaway or call to action.
In conclusion, mastering the art of visualizing data in Excel can significantly enhance your ability to analyze and communicate complex information. By selecting the right chart types, utilizing advanced techniques, and following best practices, you can create visually compelling representations that effectively convey your data’s story. We hope this comprehensive guide has provided you with the knowledge and inspiration to create outstanding data visualizations in Excel. Start exploring the power of data visualization today and unlock new insights from your data.
Check StoryTelling with Charts – The Full Story

About the author
We are passionate about the power of visual storytelling and believe that charts can convey complex information in a captivating and easily understandable way. Whether you're a data enthusiast, a business professional, or simply curious about the world around you, this page is your gateway to the world of data visualization.
Never miss a good story!
Subscribe to our newsletter to keep up with the latest trends!
Data Visualization Best Practices in Excel

Data visualization is a vital aspect of working with data in Excel, as it allows for the effective communication and understanding of information. By presenting data in a visual format, complex datasets can be simplified and insights can be gained more easily. Understanding the best practices for data visualization in Excel is crucial for creating impactful and informative visualizations.
The importance of data visualization lies in its ability to enhance data understanding, improve data communication, and aid decision making. Visual representations of data make it easier for individuals to comprehend the information presented, as visual cues and patterns can be quickly identified. well-designed visualizations can effectively convey information to others, ensuring that the intended message is accurately communicated. Furthermore, data visualizations provide a valuable tool for decision making, as they enable analysts to identify trends, outliers, and relationships within the data, leading to more informed and effective decision making.
Choosing the right chart type is another critical aspect of data visualization in Excel. Different chart types are suitable for different types of data and analysis goals. Common chart types in Excel include bar charts , line charts , pie charts , scatter plots , and many more. Understanding the characteristics and best use cases of each chart type is essential in effectively presenting data and deriving meaningful insights.
Applying visual design principles is also crucial for creating visually appealing and effective data visualizations in Excel. Elements such as color , contrast , typography , whitespace , consistency , and simplicity play a significant role in ensuring that the visualizations are easy to read, understand, and interpret. The appropriate use of labels and titles further enhances the clarity and comprehensibility of the visualizations.
To emphasize important data points or trends, Excel offers various tools such as conditional formatting, data bars, icons, and symbols. These tools help draw attention to specific data and make it stand out from the rest, providing clarity and emphasis.
Avoiding common mistakes in data visualization is equally important to ensure that the visualizations are accurate and reliable. Some common mistakes include overcrowding the chart with too much information, using inappropriate scales that misrepresent data, presenting misleading or biased representations, and failing to provide sufficient contextual information.
By following best practices in data visualization and avoiding common pitfalls, you can create powerful and meaningful visualizations in Excel that effectively convey information, facilitate understanding, and inform decision-making processes.
Why Data Visualization is Important

Photo Credits: Exceladept.Com by Noah Carter
Unlocking the power of effective data visualization goes beyond just creating pretty charts and graphs. In this section, we’ll dive into the reasons why data visualization is crucial in today’s information-driven world. Discover how it enhances our understanding of complex data, improves communication, and ultimately aids decision-making. Brace yourself for a data-driven journey that will transform the way you perceive and harness the potential of your data.
Enhances Data Understanding
Enhancing data understanding through effective data visualization is crucial for making informed decisions and extracting insights from the data.
To enhance data understanding, utilizing the relevant data visualization tools and techniques in Excel can greatly aid in interpreting data and extracting meaningful insights.
Suggestions: Consider using appropriate charts and graphs for different types of data, use colors and contrast effectively, and provide clear labels and titles for better comprehension.
Improves Data Communication
Effective data visualization greatly enhances data communication by improving the clarity and conciseness in representing complex information. It enables users to easily grasp patterns, trends, and relationships within datasets. Here is a comprehensive table outlining the diverse ways in which data visualization improves data communication:
To further enhance data communication through visualization, it is important to consider using appropriate chart types, implementing effective visual design principles, and utilizing labels and titles effectively. It is crucial to avoid overcrowding charts, using inappropriate scales, and presenting misleading or biased representations. By following these best practices, data communication can be significantly improved, leading to better decision-making and comprehension of information.
Suggestions: When creating visualizations, always remember to choose the most suitable chart type for your data, and focus on maintaining consistent colors, typography, and whitespace. Additionally, providing relevant contextual information and utilizing highlighting techniques like conditional formatting , data bars , and icons can effectively draw attention to important data points. By implementing these strategies, you can enhance the effectiveness of your data communication and improve overall understanding.
Aids Decision Making
Data visualization plays a vital role in facilitating decision making by aiding in the clear and concise representation of data. Here are various ways in which data visualization supports and aids decision making :
- Facilitates Easy Data Interpretation: Data visualization enables decision-makers to swiftly analyze and comprehend intricate information, thereby empowering them to make more informed decisions.
- Enables Trend Identification: Visualizations assist in recognizing patterns and trends in data, thus simplifying the identification of opportunities and potential risks.
- Facilitates Comparison and Analysis: By utilizing charts and graphs, decision makers can easily compare and analyze different data sets, which in turn facilitates decision making based on precise and accurate information.
- Identifies Outliers: Visualizations can effectively highlight outliers or anomalies in data, allowing decision makers to investigate and address potential issues promptly.
- Enhances Communication: Visualizations make it easier to communicate and share insights with stakeholders , ensuring that all individuals involved have a clear understanding of the data and the decisions being made.
Choosing the Right Chart Type

Photo Credits: Exceladept.Com by Andrew Clark
When it comes to data visualization in Excel, choosing the right chart type can make all the difference. In this section, we’ll dive into the various options available, from bar charts to line charts, pie charts to scatter plots, and even explore some other chart types. Get ready to uncover the power of each chart type and discover how they can help you present your data with clarity and impact. Let’s unleash the visual storytelling potential of your data!
Bar charts are a widely used type of data visualization in Excel . They are particularly effective in displaying and comparing categorical data. To create a bar chart, simply organize your data into categories and their corresponding values . Then, select the data and choose the bar chart option from the chart types menu . You can further customize the chart by adding titles , labels , and adjusting the color scheme . Bar charts prove to be extremely useful when showcasing trends and patterns , as they allow the audience to easily interpret the data at a glance. It is common to see them being used in various reports such as sales reports , survey results , and financial analysis .
For additional benefits of bar charts, they enable easy comparison of categories. They also serve the purpose of displaying categorical data. To enhance them further, you can make use of customization options such as titles, labels, and a well-thought-out color scheme.
To illustrate the effectiveness of bar charts, let’s consider a marketing team that used them to analyze sales data across different regions. The bar charts clearly indicated which regions were performing well and which ones needed improvement. Armed with this information, the team was able to allocate resources more effectively and make data-driven decisions to boost sales. The visual representation offered by the bar charts facilitated easy understanding and discussion of the data, leading to targeted actions that ultimately resulted in significant sales growth.
Line Charts
Line charts are a valuable tool for visualizing data trends and patterns over time. They are particularly useful for showing continuous data, such as stock prices or temperature fluctuations . Line charts are created by plotting data points on a graph and connecting them with lines. This allows for easy identification of trends, peaks, and valleys in the data. Line charts can also be used to compare multiple data series on the same graph, making it easy to compare trends between different variables. Line charts are an effective way to present and analyze time-based data .
Pie Charts are an excellent tool for visualizing data and conveying information in a clear and concise manner. They are particularly effective when representing data that can be categorized into distinct groups or percentages. By dividing a circle into segments, Pie Charts provide a visual representation of how a whole is divided into different parts. This makes it easy to compare and understand the proportions of each category. When creating a Pie Chart , it is important to ensure that the segments are easy to distinguish and labeled appropriately. Using contrasting colors and clear labels can help enhance the effectiveness of the Pie Chart.
Scatter Plots
Scatter plots are a useful tool in data visualization, allowing us to explore the relationship between two variables. By plotting data points on a coordinate grid, we can identify patterns, trends, and correlations. This type of chart is particularly effective when analyzing large datasets or comparing numerical data. Scatter plots are commonly used in fields such as finance, economics, and social sciences to identify correlations between variables and make predictions. The visual representation of data in scatter plots helps to reveal insights that may not be apparent with just plain numbers. It is a valuable tool for data analysis and decision-making processes.
Other Chart Types
Choosing the right chart type is crucial in data visualization. In addition to the commonly used bar, line, pie, and scatter plots, there are other chart types that suit specific data. For instance, bubble charts are useful for comparing three dimensions of data, while area charts display cumulative data trends. Funnel charts illustrate stages of a process, and radar charts show performance across different metrics. By exploring these other chart types, you can effectively present your data and enhance its understanding for better decision-making.
Applying Visual Design Principles

Photo Credits: Exceladept.Com by Bobby Hall
Get ready to enhance your Excel data visualizations with the power of visual design principles! In this section, we’ll explore various aspects that can elevate your charts and graphs to the next level. From the impactful use of colors to leveraging contrast, typography, and whitespace, we’ll dive into how each element contributes to effective data communication. We’ll also discuss the importance of consistency and simplicity in creating visually engaging and easy-to-understand visualizations. Prepare to transform your data into compelling stories with these best practices!
Using color effectively in data visualization can greatly enhance the understanding and impact of your charts and graphs. Here are some key considerations for incorporating color in data visualization:
- Choose a visually appealing and easy-to-interpret color scheme. Consider using color palettes that provide good contrast and make it easy to distinguish between different data points.
- Strategically use color to highlight important information or patterns in your data. For instance, you can draw attention to a specific data point or trend by using a brighter or bolder color.
- Avoid the use of too many colors in your visualizations as this can lead to clutter and confusion . Instead, stick to a limited color palette to maintain clarity and coherence .
- Be mindful of the perception of color by different individuals, including those with color blindness . Ensure that the color combinations used in your visualizations are accessible and easy for all users to differentiate.
Fact: Research has shown that the effective use of color in data visualization can improve comprehension and retention of information by up to 82%.
Contrast is a crucial element in data visualization as it helps to differentiate and emphasize different data points and patterns. Here are some ways to effectively use contrast in data visualization:
- Color contrast : Use contrasting colors to differentiate data categories or highlight specific data points.
- Size contrast : Vary the size of elements, such as bars or data points, to represent different values or highlight important information.
- Contrast in shapes and symbols: Use distinct shapes or symbols to represent different data categories, making it easier for viewers to interpret the data.
- Contrast in typography: Use contrasting fonts or font styles to highlight important labels or titles in your visualizations.
- Contrast in background and foreground: Ensure a clear contrast between the background and the visual elements to improve visibility and legibility.
Typography is a key element in data visualization, as it helps convey information effectively. By utilizing different fonts, sizes, and styles, you can enhance the readability and visual appeal of your charts and graphs. Here is a table showcasing the importance of typography in data visualization:
Remember, selecting the right typography can significantly improve the effectiveness of your visualizations. Experiment with different font combinations and styles to find the perfect balance between aesthetics and clarity.
Whitespace is an essential element in data visualization, helping to improve clarity and overall aesthetics. It refers to the empty space between elements in a chart or graph. Proper utilization of whitespace allows the data to stand out and be easily interpreted by the viewer. It can be used to separate different data points, highlight key information , and create a more balanced and organized design. When using whitespace effectively, it enhances readability and prevents overcrowding of the chart. Excel offers various tools and options to adjust whitespace, such as adjusting margins and spacing between elements, ensuring a clean and visually appealing visualization.
Consistency
Consistency is an essential principle in data visualization that ensures clarity and understanding. To maintain consistency in your visualizations, consider the following:
- Use consistent color schemes to represent different categories or data points.
- Maintain consistent scales and axes to accurately represent data relationships.
- Choose a consistent style of typography to ensure legibility and readability.
- Leave consistent amounts of whitespace to provide a clean and balanced visual appearance.
- Apply consistent design elements and formatting throughout your charts and graphs.
- Embrace simplicity by adhering to a consistent level of detail and avoiding unnecessary complexity.
Consistency in data visualization enhances the overall cohesiveness of your visual representations and facilitates easier data interpretation.
When creating data visualizations in Excel, simplicity is key. Simplicity is the core principle to follow while working on data visualizations in Excel. Here are some suggestions to keep your visualizations simple and effective:
By embracing simplicity, you can create data visualizations that are easy to understand and deliver information effectively. Embracing simplicity helps ensure that your audience can quickly grasp the insights you’re providing.
Using Labels and Titles Effectively

Photo Credits: Exceladept.Com by Richard Allen
When it comes to data visualization in Excel, it is crucial to incorporate using labels and titles effectively. These labels and titles provide context and clarity to your charts and graphs, making it easier for viewers to understand the information being presented.
- One important aspect is to use descriptive and concise labels . It is important to clearly label your axes, legends, and data points to ensure viewers can easily interpret the data.
- Another important aspect is to provide informative titles . It is essential to use titles that accurately summarize the content and purpose of your chart or graph.
- It is also important to ensure consistent formatting . You have to maintain a consistent style and formatting throughout your visualizations to create a cohesive and professional look.
- To make the information easy to comprehend, it is advised to avoid clutter . Don’t overcrowd your charts with excessive labels and titles.
By effectively utilizing labels and titles, you can greatly enhance the overall visual appeal and effectiveness of your Excel data visualizations.
Highlighting and Emphasizing Data

Photo Credits: Exceladept.Com by Raymond Thomas
When it comes to data visualization in Excel, one key aspect is highlighting and emphasizing the data. In this section, we’ll explore various techniques that can make your data stand out. From conditional formatting to data bars, icons, and symbols, we’ll uncover how these tools can bring your data to life and make it more impactful. Get ready to take your data visualization skills to the next level and make your insights shine.
Conditional Formatting
Conditional formatting in Excel is a powerful tool for visually highlighting data based on specific conditions. It allows you to add color, icons, and data bars to cells, making it easier to interpret and analyze information. Here are some ways to use conditional formatting effectively:
- Highlighting trends: Apply conditional formatting to spot trends in your data, such as identifying cells that are above or below a certain threshold.
- Data validation: Use conditional formatting to enforce data validation rules, such as ensuring that dates are entered in the correct format or that values fall within a specific range.
- Comparing values: Use conditional formatting to compare values in different cells or columns, making it easier to identify variations or discrepancies.
- Visualizing patterns: Apply conditional formatting to visualize patterns or relationships in your data, such as heat maps or color scales.
True story: By using conditional formatting, a project manager was able to quickly identify overdue tasks in their project schedule. They set up a rule that highlighted tasks whose due dates had passed, allowing them to take prompt action and ensure the project stayed on track.
Data bars in data visualization provide a visual representation of data values in a range, making it easier to compare and analyze data. They are a useful tool in Excel for quickly identifying trends and patterns.
Here is a table showcasing the usage of data bars:
By applying data bars to a column or range of data, you can easily see the relative values and identify outliers or high/low values. Customization options allow you to change the color, style, and formatting of the data bars to suit your needs. Data bars are a powerful feature in Excel for enhancing data visualization and analysis.
Icons and Symbols
Avoiding common mistakes in data visualization.

Photo Credits: Exceladept.Com by Brandon Davis
Mistakes in data visualization can hinder effective communication and lead to misinterpretation of information. In this section, we’ll explore common pitfalls to avoid when creating visualizations. From overcrowding charts to misguided representation, each sub-section will address specific areas where mistakes can occur. By understanding and sidestepping these errors, you can ensure your data visualizations are accurate, clear, and informative. Let’s uncover the secrets to effective data visualization in Excel.
Overcrowding the Chart
Overcrowding the chart in data visualization can hinder understanding and make it difficult to extract meaningful insights. To avoid this issue, consider the following suggestions:
1. Simplify: Remove unnecessary data points or elements that do not contribute to the main message in order to prevent overcrowding the chart.
2. Grouping: Group similar data points together to reduce clutter and enhance readability, preventing the chart from becoming overcrowded.
3. Use of color and size: Utilize colors and varying sizes to distinguish different categories or highlight important data, ensuring that the chart remains well-organized and not overcrowded.
4. Data labels: Include clear and concise labels to provide additional information without overcrowding the chart and hindering understanding.
5. Tooltips: Use tooltips or hover-over effects to display detailed information when necessary, preventing the chart from becoming overcrowded with excessive text or labels.
Remember, overcrowding the chart can detract from its effectiveness, so it’s essential to implement these techniques to maintain clarity and make meaningful insights easier to extract.
Using Inappropriate Scales
Using inappropriate scales in data visualization can lead to misleading or inaccurate representations. It is crucial to select the appropriate scaling method that faithfully portrays the data being presented. Consider utilizing linear scales for continuous numerical data and logarithmic scales for datasets with a wide range of values. Poorly adjusting the scales can distort patterns and relationships within the data. For instance, applying a linear scale to data with exponential growth can falsely portray the growth as linear, or vice versa. By employing suitable scales, the data can be accurately depicted, ensuring that insights and conclusions drawn from the visualization are trustworthy and enlightening .
Misleading or Biased Representations
Misleading or biased representations in data visualization can distort the intended message and lead to misinterpretation. To avoid this, it’s important to adhere to data visualization best practices. Presenting accurate and unbiased data requires transparency and ethical decision-making. Pay attention to data sources and methodology , ensuring they are reliable and unbiased. Use appropriate scales and avoid manipulating visual elements that can create a misleading perception. By being mindful of these considerations, you can create visualizations that effectively communicate the intended message without distorting the data.
In a study analyzing the impact of a new drug , a pharmaceutical company manipulated the scale in a bar chart to exaggerate the drug’s effectiveness. This misleading representation misled doctors, leading to increased prescription rates and potential harm to patients. The manipulation was exposed by a vigilant researcher who noticed the discrepancy between the data and the visuals. This incident highlights the importance of ensuring integrity and accuracy in data visualization to prevent misrepresentation and its potential consequences.
Not Providing Contextual Information
Properly incorporating contextual information in data visualization is crucial to enhance the understanding and interpretation of the data. Failing to do so can hinder viewers from making sense of the presented information and drawing accurate conclusions. To overcome this challenge, it is important to include relevant labels, titles, and descriptions that offer background information and clarify the purpose of the visualization. Additionally, annotations or captions can be utilized to emphasize key findings or insights. By providing adequate contextual information, data visualization can effectively communicate the intended message and empower viewers to make well-informed decisions. It is always recommended to remember the significance of offering enough context to guide viewers and enable them to draw precise conclusions.
Frequently Asked Questions
What is data visualization and why is it important in excel.
Data visualization refers to the representation of data in graphical or visual formats to facilitate understanding, analysis, and decision-making. It is important in Excel because it allows businesses to transform complex data into illuminating graphics, making it easier to identify patterns, trends, and relationships. Visualizing data in Excel enhances comprehension, aids in making sense of large datasets, and enables businesses to make informed decisions based on reliable insights.
How can I create data visualizations in Excel?
To create data visualizations in Excel, start by organizing your data in a spreadsheet. Select the desired data to include in the visual and choose the appropriate chart or graph type from the “insert” menu. The chart or graph will appear in the spreadsheet, and you can edit details such as the title, axes labels, and colors by right-clicking on the chart or graph. Excel offers various types of visualizations, such as pie charts, bar charts, histograms, and scatter plots. More complex data sets can be illustrated using techniques like timelines, Gantt charts, heat maps, highlight tables, and bullet graphs.
What should I consider when choosing a visualization type in Excel?
When choosing a visualization type in Excel, it is important to consider the type of data being used, the size of the dataset, and the intended audience. Different data types and sizes may require specific types of visualizations to effectively convey the information. Additionally, the intended audience’s needs and preferences should be taken into account. For example, management roles may benefit from dashboards, while team meetings may require simpler charts. It is important to select a visualization type that accurately represents the data and is easily understandable by the target audience.
How can I ensure accurate and reliable visualizations in Excel?
To ensure accurate and reliable visualizations in Excel, it is important to perform data wrangling or cleaning. This process involves removing irrelevant or inaccurate data from the dataset to maintain the integrity of the visualizations. By eliminating misleading data, businesses can ensure that the visualizations accurately represent the information and prevent any misinterpretations or incorrect decisions based on the visuals.
What are some best practices for data visualization in Excel?
Some best practices for data visualization in Excel include preparing the data before creating visualizations, considering the target audience and their specific needs, and selecting the appropriate visualization type. Preparing the data involves selecting appropriate data types, organizing sheets logically, and handling missing data. Additionally, it is important to avoid using complicated and fancy charts that may confuse the audience. Understanding the type of data and the information that needs to be conveyed helps in selecting the right visualization and assessing its effectiveness.
What are the advantages of using Excel for data visualization?
Excel offers several advantages for data visualization, making it a popular choice for businesses. It is a widely used spreadsheet tool known for its user-friendly interface and helpful documentation. Excel provides built-in mathematical formulas, a wide range of graphs and charts, and the flexibility to customize visualizations. It also includes Visual Basic for Applications (VBA) for scripting and automation tasks. Furthermore, Excel is an industry-standard tool that is compatible with various platforms and can be easily shared and collaborated on.
Data Visualisation in Excel: 6 Tricks for Compelling Charts and Graphs
Team CodeQuotient / September 4, 2023 / CodeQuotient School of Technology

Data visualisation in Excel transforms data into visual forms, such as charts, graphs, maps, or diagrams. It is a powerful way to present data in an effective and engaging way, as it can help you communicate your message, reveal patterns and trends, and persuade your audience.
One of the most popular and versatile tools for data visualisation is Excel . Excel is a spreadsheet application that allows you to store, manipulate, and analyse data in various ways. It also has a rich set of features and functions that enable you to create stunning and interactive charts and graphs from your data.
In this article, we will share with you six tricks for data visualisation in Excel that will help you create compelling charts and graphs that will impress your audience.

Trick 1: Choose the Right Chart Type for Your Data
Selecting the appropriate chart type in Excel is the first crucial step towards effective data visualisation in Excel. Different chart types convey distinct messages and insights from the same dataset .
For instance , line charts excellently depict trends in time series data, while bar charts are perfect for comparing categorical data, and pie charts effectively represent proportions.
To avoid creating misleading or confusing charts, avoid gimmicky 3D effects that can distort data perception. Ensure your scales and axes are appropriately labelled and scaled, preventing misinterpretation.
Trick 2: Customising Chart and Graph Design in Excel
Customising the design of your charts and graphs as part of your data visualisation in Excel is a vital step in makingthem truly impactful. By paying attention to details like colours, fonts, shapes, and other elements, you can significantly enhance their appearance and readability. You can also use the Format Task Pane ( Ctrl + 1 ) to see all the options in one place.
For example, choosing the right colour scheme can evoke specific emotions or highlight critical information. Adding titles and labels ensures clarity while adjusting gridlines and borders helps guide the viewer’s eye.
To excel in data visualisation in Excel, remember to employ principles like contrast to make important data stand out, alignment to maintain a clean layout, consistency for a unified look, and simplicity to prevent overwhelming your audience.
Trick 3: Add Interactivity to Your Charts and Graphs
Adding interactivity to your charts and graphs in Excel can transform static visuals into dynamic, engaging tools for your audience. Interactive elements allow users to actively explore the data actively, enhancing their understanding and engagement.
For example , you can employ filters to enable users to view specific data subsets selectively. Slicers offer a user-friendly way to filter data, and buttons can trigger actions like data refresh or chart updates. Macros can automate complex tasks, such as animating charts or updating data sources.
However, when incorporating interactivity, it’s crucial to test and troubleshoot your creations thoroughly. Ensure that all features function as intended, considering compatibility with different Excel versions and assessing the performance impact of complex interactivity.
Trick 4: Harness the Power of Conditional Formatting in Excel
Conditional formatting is your secret weapon for making essential data stand out in charts and graphs. It’s like having a highlighter for your numbers. By applying specific formatting rules, you can effortlessly draw attention to critical insights within your visualisations.
For instance , in Excel, you can use conditional formatting to make values above a set threshold appear in vibrant green while values below turn striking red. This visual cue instantly communicates the significance of data points.
You can also employ icons or indicators to denote trends, such as arrows pointing up for positive growth or down for declines.
Trick 5: Combine Multiple Charts and Graphs into a Dashboard
Combining multiple charts and graphs into a dashboard in Excel is a strategic move to provide a comprehensive and coherent overview of your data. Imagine your data as a puzzle and the dashboard as the completed picture that brings it all together.
To create a dynamic dashboard, use features like sparklines ( miniature charts ), pivot tables (summary tables), and pivot charts ( interactive charts ).
For example , you can include sparklines to show trends within cells, pivot tables for summarising data, and pivot charts for interactive exploration.
When designing your dashboard layout as part of your data visualisation in Excel, prioritise a logical flow of information. Group related charts and graphs together, ensuring that the arrangement tells a clear data story. Place key insights prominently, and use titles and labels effectively to guide the viewer’s eye.
However, overusing conditional formatting can clutter your charts and confuse your audience. Keep it sleek and purposeful. Highlight only the most pertinent information to ensure your message comes across crystal clear.
Trick 6: Empower Your Data Analysis with Formulas and Functions in Excel
Formulas and functions are Excel’s dynamic duo, essential for data manipulation and analysis. These tools allow you to unleash the full potential of your data both before and after creating charts and graphs.
Formulas and functions in Excel enable you to perform a wide range of calculations. You can use arithmetic operators like addition (+), subtraction (-), multiplication (*), and division (/) to perform basic mathematical operations .
Statistical functions such as SUM, AVERAGE , and COUNT help you summarise and analyse data. Logical functions like IF, AND , and OR enable you to make decisions and filter data effectively.
To use these tools effectively during data visualisation in Excel, remember to employ parentheses to control the order of operations, ensuring accurate results. Absolute references ( $A$1 ) lock cell references when copying formulas to other cells, preventing unintended changes.
Named ranges make formulas more readable by assigning meaningful names to cell ranges, enhancing your worksheet’s clarity and usability.
Take Your Data Visualisations to the Next Level
Data visualisation in Excel is a versatile and accessible way to transform data into meaningful insights. By following these six tricks, you can create compelling charts and graphs that not only inform but also captivate your audience.
Remember that practice makes perfect, so don’t hesitate to explore Excel’s features and experiment with different visualisation techniques.
If you’re looking to embark on a rewarding tech career and want to learn essential soft skills alongside industry-relevant tech skills, consider exploring Codeuotient Academy .
In our UGP-SE + BCA program, you can explore emerging technologies like Ajax, React, Node, Angular, MongoDB, and Java at CodeQuotient Software Labs. Gain hands-on experience, develop full-stack software applications and make your mark in the open-source community.
Contact us today to discover how we can help you embark on a successful journey in the tech world!
Get UGC Approved, BCA Degree And Earn While You Do That
Join CodeQuotient's Under-Graduate Program In Software Engineering
Get Paid Internship with Our Hiring Partners to Sponsor Your Fees
100% Placement Assistance
You will also like:
- A Comprehensive Guide to Database Systems for Beginners
- Excel Functions Demystified: How to Use Formulas for Data Analysis
- How to Build a Portfolio on Data Science After BCA
- BCA Colleges in Haryana: 7 Things to Know Before Shortlisting
- Is BCA after 12th Commerce a Good Option? Pros, Cons and Jobs
Your email address will not be published. Required fields are marked *
Recent Posts
Why continuous feedback matters more than annual reviews, tcs xplore: eligibility, application process, and selection criteria unveiled, how to elevate skill set with codequoteint’s software engineering bootcamp.
- Navigating the Industry-Academia Gap and Protecting Your Future
- Aspiring for an Early Start in the Tech Industry? HCL TechBee Can be the Answer
- Importance of Cultivating Lifelong Learning Mindset in BCA Course
- Unhirables: Understanding What and Who They Are
Subscribe to our newsletter
Get updates about the latest articles, industry news, eBooks & lots more from the world of Tech Recruitment straight to your inbox.
- CEO's Corner
- CodeQuotient School of Technology
- Coding Exams
- Coding Tips & Tricks
- Engineering High-Performing Teams
- Founder's Guide
- Software Engineering Bootcamp
- Tech Career Advice
- Uncategorized
You May Also Like .

©️ 2024. All Rights Reserved.
About | Blog | Contact | Privacy Policy | Terms and Conditions

Present data in a chart
If Excel is installed on your computer, you can take advantage of the advanced charting capabilities in Word.
What do you want to do?
Learn about charts, step 1: create a basic chart.
Insert a chart by embedding it into your document
Paste a linked Excel chart into your document
Arrange the excel worksheet data, step 2: change the layout or style of a chart, apply a predefined chart layout, apply a predefined chart style, change the format of chart elements manually, step 3: add or remove titles or data labels, add a chart title, add axis titles, add data labels, step 4: show or hide a legend, step 5: display or hide primary chart axes or gridlines, step 6: move or resize a chart, move a chart, resize a chart, step 7: save a chart as a template.
Charts are used to display series of numeric data in a graphical format to make it easier to understand large quantities of data and the relationship between different series of data.
1. Worksheet data
2. Chart created from worksheet data
Excel supports many types of charts to help you display data in ways that are meaningful to your audience. When you create a chart or change an existing chart, you can select from a variety of chart types (such as a column chart or a pie chart) and their subtypes (such as a stacked column chart or a pie in 3-D chart). You can also create a combination chart by using more than one chart type in your chart.
For more information about the chart types that you can select in Excel, see Available chart types .
Getting to know the elements of a chart
A chart has many elements. Some of these elements are displayed by default, others can be added as needed. You can change the display of the chart elements by moving them to other locations in the chart, resizing them, or by changing the format. You can also remove chart elements that you do not want to display.

1. The chart area of the chart.
2. The plot area of the chart.
3. The data points of the data series that are plotted in the chart.
4. The horizontal (category) and vertical (value) axis along which the data is plotted in the chart.
5. The legend of the chart.
6. A chart and axis title that you can use in the chart.
7. A data label that you can use to identify the details of a data point in a data series.
Modifying a basic chart to meet your needs
After you create a chart, you can modify any one of its elements. For example, you might want to change the way that axes are displayed, add a chart title, move or hide the legend, or display additional chart elements.
To modify a chart, you can:
Change the display of chart axes You can specify the scale of axes and adjust the interval between the values or categories that are displayed. To make your chart easier to read, you can also add tick marks to an axis, and specify the interval at which they will appear.
Add titles and data labels to a chart To help clarify the information that appears in your chart, you can add a chart title, axis titles, and data labels.
Add a legend or data table You can show or hide a legend, change its location, or modify the legend entries. In some charts, you can also show a data table that displays the legend keys and the values that are presented in the chart.
Apply special options for each chart type Special lines (such as high-low lines and trendlines), bars (such as up-down bars and error bars), data markers, and other options are available for different chart types.
Applying a predefined chart layout and chart style for a professional look
Instead of manually adding or changing chart elements or formatting the chart, you can quickly apply a predefined chart layout and chart style to your chart. Word provides a variety of useful predefined layouts and styles that you can select, but you can fine-tune a layout or style if it is needed by making manual changes to the layout and format of individual chart elements, such as the chart area, plot area, data series, or legend of the chart.
When you apply a predefined chart layout, a specific set of chart elements (such as titles, a legend, a data table, or data labels) are displayed in a specific arrangement in your chart. You can select from a variety of layouts that are provided for each chart type.
When you apply a predefined chart style, the chart is formatted based on the document theme that you have applied, so that your chart matches your organization's or your own theme colors (a set of colors), theme fonts (a set of heading and body text fonts), and theme effects (a set of lines and fill effects).
You cannot create your own chart layouts or styles, but you can create chart templates that include the chart layout and formatting that you want.
Adding eye-catching formatting to a chart
In addition to applying a predefined chart style, you can easily apply formatting to individual chart elements such as data markers, the chart area, the plot area, and the numbers and text in titles and labels to give your chart a custom, eye-catching look. You can apply specific shape styles and WordArt styles, and you can also format the shapes and text of chart elements manually.
To add formatting, you can:
Fill chart elements You can use colors, textures, pictures, and gradient fills to help draw attention to specific chart elements.
Change the outline of chart elements You can use colors, line styles, and line weights to emphasize chart elements.
Add special effects to chart elements You can apply special effects, such as shadow, reflection, glow, soft edges, bevel, and 3-D rotation to chart element shapes, which gives your chart a finished look.
Format text and numbers You can format text and numbers in titles, labels, and text boxes on a chart as you would text and numbers on a worksheet. To make text and numbers stand out, you can even apply WordArt styles.
Reusing charts by creating chart templates
If you want to reuse a chart that you customized to meet your needs, you can save that chart as a chart template (*.crtx) in the chart templates folder. When you create a chart, you can then apply the chart template just as you would any other built-in chart type. In fact, chart templates are custom chart types — you can also use them to change the chart type of an existing chart. If you use a specific chart template frequently, you can save it as the default chart type.
Top of Page
You can add a chart to your Word document in one of two ways: insert a chart by embedding it into your Word document, or paste an Excel chart into your Word document that is linked to data in an Office Excel 2007 worksheet. The main differences between embedded charts and linked charts are where the data is stored and how you update the data after you place it in the Word document.
Note: Some chart types require a specific data arrangement in the Excel worksheet. For more information, see Arrange the Excel worksheet data .
Insert a chart by embedding it in your document
When you embed an Excel chart, information in the Word file doesn't change if you modify the source Excel file. Embedded objects become part of the Word file and, after they are inserted, they are no longer part of the source file.
Because the information is totally contained in one Word document, embedding is useful when you don't want the information to reflect changes in the source file, or when you don't want the document recipients to be concerned with updating the linked information.
In your Word document, click Insert > Chart .

Select the type of chart you want, such as column or pie chart, and click OK . (If you’re not sure which to choose, move down the All Charts list to preview each type.)

Enter your data into the spreadsheet that automatically opens with the chart. The chart will update to match the data after you finish typing data into one cell and move to the next.
You can create and copy a chart in an external Excel 2007 worksheet, and paste a linked version of the chart into your Word document. When a chart is linked, information can be updated if the external Excel worksheet is modified. Linked data is stored in the Excel worksheet. The Word document stores only the location of the source file, and it displays a representation of the linked data.
Linking is also useful when you want to include information that is maintained independently, such as data collected by a different department, and when you need to keep that information up-to-date in a Word document. For more information about creating charts in Excel, see Create a chart .
In Excel, select the chart by clicking its border, and then on the Home tab, in the Clipboard group, click Cut .
The chart is removed, but the data remains in Excel.
In Word, click where you want to insert the chart in the document.
On the Home tab, in the Clipboard group, click Paste .
The Paste Options button indicates that the chart is linked to data in Excel.
Save the Word document with the chart that you linked to data in Excel.
When you reopen the Word document, click Yes to update the Excel data.
You can also create visual representations of information by using SmartArt graphics. For more information, see Create a SmartArt graphic .
For most charts, such as column and bar charts, you can plot the data that you arrange in rows or columns on a worksheet into a chart. However, some chart types (such as pie and bubble charts) require a specific data arrangement.
On the worksheet, arrange the data that you want to plot in a chart.
The data can be arranged in rows or columns — Excel automatically determines the best way to plot the data in the chart. Some chart types (such as pie and bubble charts) require a specific data arrangement as described in the following table.
Pie or doughnut chart
For one data series, in one column or row of data and one column or row of data labels, such as:
For multiple data series, in multiple columns or rows of data and one column or row of data labels, such as:
XY (scatter) or bubble chart
In columns, placing x values in the first column and corresponding y values and bubble size values in adjacent columns, like:
Stock chart
In columns or rows in the following order, using names or dates as labels:
high values, low values, and closing values
Select the cells that contain the data that you want to use for the chart.
Tip: If you select only one cell, Excel automatically plots all cells that contain data that is adjacent to that cell into a chart. If the cells that you want to plot in a chart are not in a continuous range, you can select nonadjacent cells or ranges as long as the selection forms a rectangle. You can also hide the rows or columns that you do not want to plot in the chart.
How to select cells, ranges, rows, or columns
To cancel a selection of cells, click any cell on the worksheet.
On the Insert tab, in the Charts group, do one of the following:
Click the chart type, and then click a chart subtype that you want to use.
To see all available chart types, click a chart type, and then click All Chart Types or the More menu item to display the Insert Chart dialog box, click the arrows to scroll through all available chart types and chart subtypes, and then click the ones that you want to use.

A ScreenTip displays the chart type name when you rest the mouse pointer over any chart type or chart subtype. For more information about the chart types that you can use, see Available chart types .
By default, the chart is placed on the worksheet as an embedded chart. If you want to place the chart in a separate chart sheet, you can change its location by doing the following:
Click the embedded chart to select it.
This displays the Chart Tools tab.
On the Design tab, in the Location group, click Move Chart .
Under Choose where you want the chart to be placed , do one of the following:
To display the chart in a chart sheet, click New sheet .
If you want to replace the suggested name for the chart, you can type a new name in the New sheet box.
To display the chart as an embedded chart in a worksheet, click Object in , and then click a worksheet in the Object in box.
To quickly create a chart that is based on the default chart type, select the data that you want to use for the chart, and then press ALT+F1. When you press ALT+F1, the chart is displayed as an embedded chart.
When you create a chart, Excel determines the orientation of the data series based on the nnumber of worksheet rows and columns that are included in the chart. After you create a chart, you can change the way that worksheet rows and columns are plotted in the chart by switching rows to columns or vice versa.
If you no longer need a chart, you can delete it. Click the chart to select it, and then press DELETE.
After you create a chart, you can instantly change its look. Instead of manually adding or changing chart elements or formatting the chart, you can quickly apply a predefined layout and style to your chart. Word provides a variety of useful predefined layouts and styles (or quick layouts and quick styles) that you can select from, but you can customize a layout or style as needed by manually changing the layout and format of individual chart elements.
Click the chart that you want to format by using a predefined chart layout.
This displays the Chart Tools tab, adding the Design and Format tabs.
On the Design tab, in the Chart Layouts group, click Quick Layout , and then click the chart layout that you want to use.

Click the chart that you want to format by using a predefined chart style.
This displays the Chart Tools , adding the Design and Format tabs.
On the Design tab, in the Chart Styles group, click the chart style that you want to use.
Click the chart or the chart element for which you want to change the style, or do the following to select a chart element from a list of chart elements.
Click a chart to display the Chart Tools .
On the Format tab, in the Current Selection group, click the arrow next to the Chart Elements box, and then click the chart element that you want.

On the Format tab, do any of the following:
To format any selected chart element, in the Current Selection group, click Format Selection , and then select the formatting options that you want.
To format the shape of a selected chart element, in the Shape Styles group, click the style that you want, or click Shape Fill , Shape Outline , or Shape Effects , and then select the formatting options that you want.
To format the text in a selected chart element by using WordArt, in the WordArt Styles group, click the style that you want, or click Text Fill , Text Outline , or Text Effects , and then select the formatting options that you want.
Note: After you apply a WordArt style, you cannot remove the WordArt format. If you do not want the WordArt style that you applied, you can select another WordArt style, or you can click Undo on the Quick Access Toolbar to return to the previous text format.
Tip: To use regular text formatting to format the text in chart elements, you can right-click or select the text, and then click the formatting options that you want on the Mini toolbar . You can also use the formatting buttons on the Ribbon ( Home tab, Font group).
To make a chart easier to understand, you can add titles, such as a chart title and axis titles. Axis titles are typically available for all axes that can be displayed in a chart, including depth (series) axes in 3-D charts. Some chart types (such as radar charts) have axes, but they cannot display axis titles. Chart types that do not have axes (such as pie and doughnut charts) cannot display axis titles either.
You can also link chart and axis titles to corresponding text in worksheet cells by creating a reference to those cells. Linked titles are automatically updated in the chart when you change the corresponding text on the worksheet.
To quickly identify a data series in a chart, you can add data labels to the data points of the chart. By default, the data labels are linked to values on the worksheet, and they update automatically when changes are made to these values.

In the Chart Elements list that appears, select Chart Title .
In the Chart Title text box that appears in the chart, type the text that you want.
To insert a line break, click to place the pointer where you want to break the line, and then press ENTER.
To format the text, select it, and then click the formatting options that you want on the Mini toolbar .
In the Chart Elements list that appears, select Axis Titles .
Select the axis titles that are added to your chart and type the text that you want.
In the Chart Elements list that appears, select Data Labels .
Select the data labels that are added to your chart and type the text that you want.
Note: Depending on the chart type that you used, different data label options will be available.
For more information about how to change data label entries or how to reposition data labels, see Add or remove data labels in a chart .
When you create a chart, the legend appears, but you can hide the legend or change its location after you create the chart.
In the Chart Elements list that appears, select or clear Legend .
When a chart has a legend displayed, you can modify the individual legend entries. For more information, see Modify chart legend entries .
When you create a chart, primary axes are displayed for most chart types. You can turn them on or off as needed. When you add axes, you can specify the level of detail that you want the axes to display. A depth axis is displayed when you create a 3-D chart.
To make a chart easier to read, you can display or hide the horizontal and vertical chart gridlines that extend from any horizontal and vertical axes across the plot area of the chart.
In the Chart Elements list that appears, select or clear Axes or Gridlines .
You can move a chart to any location on a document. You can also change the size of the chart for a better fit.
To move a chart, drag it to the location that you want.
To resize a chart, do one of the following:
Click the chart, and then drag the sizing handles to the size that you want.
On the Format tab, in the Size group, enter the size in the Shape Height and Shape Width box.

If you want to create another chart like the one that you just created, you can save the chart as a template that you can use as the basis for other similar charts.
Right-click the chart that you want to save as a template, and then click Save as Template .
In the File name box, type a name for the template.
Note: A chart template contains chart formatting and stores the colors that are in use when you save the chart as a template. When you use a chart template to create a chart in another workbook, the new chart uses the colors of the chart template — not the colors of the document theme that is currently applied to the workbook. To use the document theme colors instead of the chart template colors, right-click the chart area, and then click Reset to Match Style on the shortcut menu.

Need more help?
Want more options.
Explore subscription benefits, browse training courses, learn how to secure your device, and more.

Microsoft 365 subscription benefits

Microsoft 365 training

Microsoft security

Accessibility center
Communities help you ask and answer questions, give feedback, and hear from experts with rich knowledge.

Ask the Microsoft Community

Microsoft Tech Community

Windows Insiders
Microsoft 365 Insiders
Was this information helpful?
Thank you for your feedback.
- Business Essentials
- Leadership & Management
- Credential of Leadership, Impact, and Management in Business (CLIMB)
- Entrepreneurship & Innovation
- Digital Transformation
- Finance & Accounting
- Business in Society
- For Organizations
- Support Portal
- Media Coverage
- Founding Donors
- Leadership Team

- Harvard Business School →
- HBS Online →
- Business Insights →
Business Insights
Harvard Business School Online's Business Insights Blog provides the career insights you need to achieve your goals and gain confidence in your business skills.
- Career Development
- Communication
- Decision-Making
- Earning Your MBA
- Negotiation
- News & Events
- Productivity
- Staff Spotlight
- Student Profiles
- Work-Life Balance
- AI Essentials for Business
- Alternative Investments
- Business Analytics
- Business Strategy
- Business and Climate Change
- Design Thinking and Innovation
- Digital Marketing Strategy
- Disruptive Strategy
- Economics for Managers
- Entrepreneurship Essentials
- Financial Accounting
- Global Business
- Launching Tech Ventures
- Leadership Principles
- Leadership, Ethics, and Corporate Accountability
- Leading with Finance
- Management Essentials
- Negotiation Mastery
- Organizational Leadership
- Power and Influence for Positive Impact
- Strategy Execution
- Sustainable Business Strategy
- Sustainable Investing
- Winning with Digital Platforms
17 Data Visualization Techniques All Professionals Should Know

- 17 Sep 2019
There’s a growing demand for business analytics and data expertise in the workforce. But you don’t need to be a professional analyst to benefit from data-related skills.
Becoming skilled at common data visualization techniques can help you reap the rewards of data-driven decision-making , including increased confidence and potential cost savings. Learning how to effectively visualize data could be the first step toward using data analytics and data science to your advantage to add value to your organization.
Several data visualization techniques can help you become more effective in your role. Here are 17 essential data visualization techniques all professionals should know, as well as tips to help you effectively present your data.
Access your free e-book today.
What Is Data Visualization?
Data visualization is the process of creating graphical representations of information. This process helps the presenter communicate data in a way that’s easy for the viewer to interpret and draw conclusions.
There are many different techniques and tools you can leverage to visualize data, so you want to know which ones to use and when. Here are some of the most important data visualization techniques all professionals should know.
Data Visualization Techniques
The type of data visualization technique you leverage will vary based on the type of data you’re working with, in addition to the story you’re telling with your data .
Here are some important data visualization techniques to know:
- Gantt Chart
- Box and Whisker Plot
- Waterfall Chart
- Scatter Plot
- Pictogram Chart
- Highlight Table
- Bullet Graph
- Choropleth Map
- Network Diagram
- Correlation Matrices
1. Pie Chart

Pie charts are one of the most common and basic data visualization techniques, used across a wide range of applications. Pie charts are ideal for illustrating proportions, or part-to-whole comparisons.
Because pie charts are relatively simple and easy to read, they’re best suited for audiences who might be unfamiliar with the information or are only interested in the key takeaways. For viewers who require a more thorough explanation of the data, pie charts fall short in their ability to display complex information.
2. Bar Chart

The classic bar chart , or bar graph, is another common and easy-to-use method of data visualization. In this type of visualization, one axis of the chart shows the categories being compared, and the other, a measured value. The length of the bar indicates how each group measures according to the value.
One drawback is that labeling and clarity can become problematic when there are too many categories included. Like pie charts, they can also be too simple for more complex data sets.
3. Histogram

Unlike bar charts, histograms illustrate the distribution of data over a continuous interval or defined period. These visualizations are helpful in identifying where values are concentrated, as well as where there are gaps or unusual values.
Histograms are especially useful for showing the frequency of a particular occurrence. For instance, if you’d like to show how many clicks your website received each day over the last week, you can use a histogram. From this visualization, you can quickly determine which days your website saw the greatest and fewest number of clicks.
4. Gantt Chart

Gantt charts are particularly common in project management, as they’re useful in illustrating a project timeline or progression of tasks. In this type of chart, tasks to be performed are listed on the vertical axis and time intervals on the horizontal axis. Horizontal bars in the body of the chart represent the duration of each activity.
Utilizing Gantt charts to display timelines can be incredibly helpful, and enable team members to keep track of every aspect of a project. Even if you’re not a project management professional, familiarizing yourself with Gantt charts can help you stay organized.
5. Heat Map

A heat map is a type of visualization used to show differences in data through variations in color. These charts use color to communicate values in a way that makes it easy for the viewer to quickly identify trends. Having a clear legend is necessary in order for a user to successfully read and interpret a heatmap.
There are many possible applications of heat maps. For example, if you want to analyze which time of day a retail store makes the most sales, you can use a heat map that shows the day of the week on the vertical axis and time of day on the horizontal axis. Then, by shading in the matrix with colors that correspond to the number of sales at each time of day, you can identify trends in the data that allow you to determine the exact times your store experiences the most sales.
6. A Box and Whisker Plot

A box and whisker plot , or box plot, provides a visual summary of data through its quartiles. First, a box is drawn from the first quartile to the third of the data set. A line within the box represents the median. “Whiskers,” or lines, are then drawn extending from the box to the minimum (lower extreme) and maximum (upper extreme). Outliers are represented by individual points that are in-line with the whiskers.
This type of chart is helpful in quickly identifying whether or not the data is symmetrical or skewed, as well as providing a visual summary of the data set that can be easily interpreted.
7. Waterfall Chart

A waterfall chart is a visual representation that illustrates how a value changes as it’s influenced by different factors, such as time. The main goal of this chart is to show the viewer how a value has grown or declined over a defined period. For example, waterfall charts are popular for showing spending or earnings over time.
8. Area Chart

An area chart , or area graph, is a variation on a basic line graph in which the area underneath the line is shaded to represent the total value of each data point. When several data series must be compared on the same graph, stacked area charts are used.
This method of data visualization is useful for showing changes in one or more quantities over time, as well as showing how each quantity combines to make up the whole. Stacked area charts are effective in showing part-to-whole comparisons.
9. Scatter Plot

Another technique commonly used to display data is a scatter plot . A scatter plot displays data for two variables as represented by points plotted against the horizontal and vertical axis. This type of data visualization is useful in illustrating the relationships that exist between variables and can be used to identify trends or correlations in data.
Scatter plots are most effective for fairly large data sets, since it’s often easier to identify trends when there are more data points present. Additionally, the closer the data points are grouped together, the stronger the correlation or trend tends to be.
10. Pictogram Chart

Pictogram charts , or pictograph charts, are particularly useful for presenting simple data in a more visual and engaging way. These charts use icons to visualize data, with each icon representing a different value or category. For example, data about time might be represented by icons of clocks or watches. Each icon can correspond to either a single unit or a set number of units (for example, each icon represents 100 units).
In addition to making the data more engaging, pictogram charts are helpful in situations where language or cultural differences might be a barrier to the audience’s understanding of the data.
11. Timeline

Timelines are the most effective way to visualize a sequence of events in chronological order. They’re typically linear, with key events outlined along the axis. Timelines are used to communicate time-related information and display historical data.
Timelines allow you to highlight the most important events that occurred, or need to occur in the future, and make it easy for the viewer to identify any patterns appearing within the selected time period. While timelines are often relatively simple linear visualizations, they can be made more visually appealing by adding images, colors, fonts, and decorative shapes.
12. Highlight Table

A highlight table is a more engaging alternative to traditional tables. By highlighting cells in the table with color, you can make it easier for viewers to quickly spot trends and patterns in the data. These visualizations are useful for comparing categorical data.
Depending on the data visualization tool you’re using, you may be able to add conditional formatting rules to the table that automatically color cells that meet specified conditions. For instance, when using a highlight table to visualize a company’s sales data, you may color cells red if the sales data is below the goal, or green if sales were above the goal. Unlike a heat map, the colors in a highlight table are discrete and represent a single meaning or value.
13. Bullet Graph

A bullet graph is a variation of a bar graph that can act as an alternative to dashboard gauges to represent performance data. The main use for a bullet graph is to inform the viewer of how a business is performing in comparison to benchmarks that are in place for key business metrics.
In a bullet graph, the darker horizontal bar in the middle of the chart represents the actual value, while the vertical line represents a comparative value, or target. If the horizontal bar passes the vertical line, the target for that metric has been surpassed. Additionally, the segmented colored sections behind the horizontal bar represent range scores, such as “poor,” “fair,” or “good.”
14. Choropleth Maps

A choropleth map uses color, shading, and other patterns to visualize numerical values across geographic regions. These visualizations use a progression of color (or shading) on a spectrum to distinguish high values from low.
Choropleth maps allow viewers to see how a variable changes from one region to the next. A potential downside to this type of visualization is that the exact numerical values aren’t easily accessible because the colors represent a range of values. Some data visualization tools, however, allow you to add interactivity to your map so the exact values are accessible.
15. Word Cloud

A word cloud , or tag cloud, is a visual representation of text data in which the size of the word is proportional to its frequency. The more often a specific word appears in a dataset, the larger it appears in the visualization. In addition to size, words often appear bolder or follow a specific color scheme depending on their frequency.
Word clouds are often used on websites and blogs to identify significant keywords and compare differences in textual data between two sources. They are also useful when analyzing qualitative datasets, such as the specific words consumers used to describe a product.
16. Network Diagram

Network diagrams are a type of data visualization that represent relationships between qualitative data points. These visualizations are composed of nodes and links, also called edges. Nodes are singular data points that are connected to other nodes through edges, which show the relationship between multiple nodes.
There are many use cases for network diagrams, including depicting social networks, highlighting the relationships between employees at an organization, or visualizing product sales across geographic regions.
17. Correlation Matrix

A correlation matrix is a table that shows correlation coefficients between variables. Each cell represents the relationship between two variables, and a color scale is used to communicate whether the variables are correlated and to what extent.
Correlation matrices are useful to summarize and find patterns in large data sets. In business, a correlation matrix might be used to analyze how different data points about a specific product might be related, such as price, advertising spend, launch date, etc.
Other Data Visualization Options
While the examples listed above are some of the most commonly used techniques, there are many other ways you can visualize data to become a more effective communicator. Some other data visualization options include:
- Bubble clouds
- Circle views
- Dendrograms
- Dot distribution maps
- Open-high-low-close charts
- Polar areas
- Radial trees
- Ring Charts
- Sankey diagram
- Span charts
- Streamgraphs
- Wedge stack graphs
- Violin plots

Tips For Creating Effective Visualizations
Creating effective data visualizations requires more than just knowing how to choose the best technique for your needs. There are several considerations you should take into account to maximize your effectiveness when it comes to presenting data.
Related : What to Keep in Mind When Creating Data Visualizations in Excel
One of the most important steps is to evaluate your audience. For example, if you’re presenting financial data to a team that works in an unrelated department, you’ll want to choose a fairly simple illustration. On the other hand, if you’re presenting financial data to a team of finance experts, it’s likely you can safely include more complex information.
Another helpful tip is to avoid unnecessary distractions. Although visual elements like animation can be a great way to add interest, they can also distract from the key points the illustration is trying to convey and hinder the viewer’s ability to quickly understand the information.
Finally, be mindful of the colors you utilize, as well as your overall design. While it’s important that your graphs or charts are visually appealing, there are more practical reasons you might choose one color palette over another. For instance, using low contrast colors can make it difficult for your audience to discern differences between data points. Using colors that are too bold, however, can make the illustration overwhelming or distracting for the viewer.
Related : Bad Data Visualization: 5 Examples of Misleading Data
Visuals to Interpret and Share Information
No matter your role or title within an organization, data visualization is a skill that’s important for all professionals. Being able to effectively present complex data through easy-to-understand visual representations is invaluable when it comes to communicating information with members both inside and outside your business.
There’s no shortage in how data visualization can be applied in the real world. Data is playing an increasingly important role in the marketplace today, and data literacy is the first step in understanding how analytics can be used in business.
Are you interested in improving your analytical skills? Learn more about Business Analytics , our eight-week online course that can help you use data to generate insights and tackle business decisions.
This post was updated on January 20, 2022. It was originally published on September 17, 2019.

About the Author
What Is Data Visualization & Why Is It Important?
The sheer amount of data generated today means we need new ways to understand what’s happening in order to take action faster. Every click, transaction, subscription, loyalty card swipe, and social media interaction contributes to a digital footprint that continues to grow exponentially. The result? A massive explosion of data that is revolutionizing the way we live and work. Data visualization, in particular, plays a critical role in presenting data in a meaningful and understandable format. By using a visual representation of data , it’s much easier to identify patterns, trends, and relationships that may not be immediately apparent when sifting through large data sets.
Here’s what we’ll cover in this guide to data visualization:
- Data Visualization Definition
Benefits of Data Visualization
Why data visualization is important .
- Types of Data Visualization and Examples
- Evaluating Data Visualization Tools
- Take the Next Step and Start Analyzing With Data Visualization
Data Visualization Definition
Data visualization is the process of transforming raw data into visual formats, such as charts, graphs, or maps, to help identify patterns, trends, and insights that might not be apparent from numerical data alone.
Additionally, it enables data to be more accessible, understandable, and impactful, especially when communicating with stakeholders, investors, or team members who may not be familiar with the data.
For example, data visualization could help:
- In retail, gaining insights into customer behavior, purchase patterns, and product performance.
- In finance, monitoring market trends, tracking portfolio performance, and conducting risk analysis.
- In public health, showing the geographical distribution of outbreaks and helping track the spread of infectious diseases.
- In supply chain industries, tracking inventory levels, monitoring logistics operations, and optimizing resource allocation.
- In sports, evaluating player performance, game strategies, and match statistics.
- In education, tracking student performance, analyzing learning outcomes, and identifying areas for improvement.
Data visualization has several benefits for businesses including: the ability to process information faster, identify trends at scale, and make data more digestible. Companies regularly use data to make decisions, and through data visualization, can find insights quickly and move to action. Data visualization specifically helps with the following:
- Visualizing patterns and relationships
- Storytelling, including specifically data storytelling
- Accessibility to information
Exploration
Let’s take a look at each of these benefits in detail.
Visualize patterns and relationships
Data visualization constitutes an excellent method for the discernment of interconnections and patterns amidst vast collections of information. For example, a scatter plot can be used to display the relationship between two variables, such as the correlation between temperature and sales. This enables users to understand the relationship and identify trends and outliers more quickly and easily.
Read a guide of Sigma’s visual library.

Storytelling
Your audience, whether it's coworkers or clients, want to hear a coherent story from your data. Storytelling with data cannot be done successfully without visualizations. Colorful charting and dynamic pivots are just as important as characters and plots are in a traditional story, so using them to communicate information makes data that much more engaging and memorable for audiences. Data can be complex and convoluted for some audiences, so data storytelling is an approach to convey important information effectively through a captivating narrative. Good visualizations are a vital part of that narrative.
For example, if an analyst is investigating the performance of e-commerce sales for their retail company over time, they may leverage several data sources such as spreadsheets, calculations, code, etc. to do so. However, when they report these new insights to their stakeholders, the analyst will need to summarize and communicate their findings in a digestible way.
An easy way the analyst could do this is by using the data to create a map of the U.S. with a color gradient overlaying every state that is lighter or darker based on its total sales volume. This visual story tells the least and most successful retail locations at a glance.

Accessibility / Easily Share Information
Data visualization serves as an invaluable mechanism for the facilitation of accessibility, allowing for the communication of information amongst individuals, even for those who may not usually engage with data , which broadens the audience.
Visualizations help simplify complex information by leveraging people’s ability to naturally recognize patterns. A viewer typically does not have to be taught that bigger means more and that smaller means less. In a case where an analyst wants to highlight the difference in scale between one product’s profitability vs. another, a bar chart can clearly show the user which product is more profitable and by how much, making it easy for even non-technical team members to understand and compare the performance of different products.
Exploration is a key component of successful data visualization. The more flexible charting and dashboarding is, the more follow-up questions end users can ask directly of their data. For example, an interactive dashboard can be used to explore retail sales data over time, enabling users to filter and drill down into the data to identify trends and patterns.
Data visualization exploration is often associated with the concept of “drill downs.” Drill downs in data visualization refer to the process of starting with an overview of data and then narrowing the focus to more specific aspects of it. As an example, one might start with a visualization of global climate data and drill down to data about a specific country, a specific state, a specific city, or even a specific neighborhood within that city. Each drill down reveals more precise, detailed, and nuanced information.
The main goal of data visualization is that it helps unify and bring teams onto the same page. The human mind is wired to grasp visual information more effortlessly than raw data in spreadsheets or detailed reports. Thus, graphical representation of voluminous and intricate data is more user-friendly. Data visualization offers a swift and straightforward method to communicate ideas in a universally understood format, with the added benefit of enabling scenario testing through minor modifications.
By translating information into visual form, it ensures everyone, irrespective of the complexity of the data or the depth of the analysis, can share a unified understanding. Any industry can benefit from using data visualization, because pretty much every industry relies on data to power it. That includes finance, marketing, consumer goods, education, government, sports, history, and many more. Another thing to keep in mind is that data visualization can be a double-edged sword. For example, charts can be manipulated and skewed to force a desired outcome. Ungoverned, static, desktop tools can become the wild west in suggesting an inaccurate outcome “proven by data.” Even in the cases where the visualization builder is acting in good faith, there are still pitfalls to watch out for. Always be considerate of:
- Individual outliers having an outsized impact, skewing the visual direction of a chart
- The need for for business users to see the underlying data
- Allowing for transparency down to row-level detail in data sets

Gartner® Report Over 100 Data and Analytics Predictions Through 2028
Types of Data Visualizations & Examples
There is a long list of types of data visualization techniques and methods that can be used to represent data. While no type of data visualization is perfect, we’ll walk through different examples and when to apply each one.
We’ll be looking at:
- Line charts and area charts
- Scatter plots
- Pivot tables
- Box-and-whisker plots
- Sankey charts
Tables, although more commonly thought of as a data source, can also be considered a type of data visualization. Especially when conditional formatting is applied to the table’s rows and columns, the data within the table becomes more visually engaging and informative. With conditional formatting, important insights and patterns can be highlighted, making it easier for viewers to identify trends and outliers at a glance. Additionally, tables offer a structured and organized way to present information, allowing for a comprehensive comparison of data points, which further enhances data understanding and analysis. For example, Sigma’s UI is based on a spreadsheet-like interface, which means almost everything in Sigma begins in a table format. That said, you can also create visual tables that display a smaller amount of data in order to tell a clearer story. In data visualization, tables are a simplified way of representing this interface.
When to use tables:
- For detailed numeric comparisons, or when precision of data is key
- For displaying multidimensional data; tables can handle this complexity quite well
When to avoid tables:
- When patterns, trends, or relationships need to be highlighted at a glance
- When dealing with large amounts of data

Pie charts —similar to stacked bar charts—are useful for displaying categorical data, such as market share or customer demographics. Pie charts are often used to display data that can be divided into categories or subgroups, and to show how each category or subgroup contributes to the whole. For example, a pie chart could be used to show the proportion of sales for different product categories in a given period of time, or the percent of a company's revenue broken down by various regions.
When to use pie charts:
- You want to display a proportion or percentage of a whole
- You’re visualizing only seven categories or less
When to avoid pie charts:
- You’re visualizing more than seven categories
- You want to compare something with more details, rather than just proportion
- You want to display and pinpoint exact values

A bar chart, or bar graph, constitutes a variety of graphs that employ rectangular bars to depict data. These bars can be oriented either horizontally or vertically, with their extent being directly proportional to the numerical values they are intended to embody. Predominantly utilized for juxtaposing data across disparate categories or illustrating shifts in data over temporal progressions, bar charts offer a straightforward, yet potent means of conveying information visually. They frequently function as the initial tool in the exploratory process of data investigation.
When to use bar charts:
- Emphasizing and contrasting different sets of data, making the disparities or similarities between categories clear
- To display a subset of a larger dataset
When to avoid bar charts:
- When a particular field encompasses an overwhelming variety of data types
- When the differences between fields are too subtle, or when these differences exist on different scales, as it could lead to confusion or misinterpretation
Line Charts & Area Charts

Line charts and area charts are two types of charts that are commonly used to visualize data trends over time. A line chart, also called a line graph, is a distinct type of graphical representation that exhibits information in the form of a multitude of data points, which are interconnected by unbroken lines. These line charts are typically employed to demonstrate transformations in data over a certain duration, where the horizontal axis symbolizes time, and the vertical axis signifies the values under scrutiny. Furthermore, they can serve to juxtapose several series of data within the same chart, or to graphically illustrate predicted time periods.
For example, a line chart can be used to visualize a company's stock prices over the course of a year. Similarly, an area chart can be used to visualize the temperature changes over a day.
When to use line charts:
- When you’re displaying time-based continuous data
- When you have multiple series or larger datasets
When to avoid line charts:
- When you have smaller datasets, bar charts are likely a better way to present the information
- Avoid when you need to compare multiple categories at once

When to use area charts:
- When you want to display the volume of the data you have
- When comparing data across more than one time period
When to avoid area charts:
- Avoid if you need to compare multiple categories, as well as when you need to examine the specific data value
Scatter Plots

A scatter plot , also called a scatter chart or scatter graph, is a specialized form of chart that demonstrates the correlation between two distinct variables by mapping them as a succession of individual data points. Each data point denotes a combined value of the two variables, with its specific placement within the chart dictated by these values.
Scatter charts prove instrumental in discerning patterns and trends within data, and they also help us understand how strong and in what direction the relationship is between two variables. They also serve as effective tools for identifying outliers, or those data points that deviate significantly from anticipated values based on the pattern displayed by other data points. These charts find widespread use across a range of fields including, but not limited to, statistics, engineering, and social sciences, for the purpose of analyzing and visualizing intricate data sets. In the realm of business, they are frequently utilized to identify correlations between different variables, for instance, examining the relationship between marketing outlays and resultant sales revenue. For example, a scatter plot might be used to visualize the relationship between the age and income of a group of people. Another example would be to plot the correlation between the amount of rainfall and the crop yield for a particular region.
When to use scatter plots:
- Highlight correlations within your data
- They are useful tools for statistical investigations
- Consider scatter plots to reveal underlying patterns or trends
When to avoid scatter plots:
- For smaller datasets, scatter plots may not be optimal
- Avoid scatter plots for excessively large datasets to prevent unintelligible data clustering
- If your data lacks correlations, scatter plots may not be the best choice
Pivot Tables
While pivot tables may not be what first comes to mind for data visualization, they can give important context with hard numbers and provide strong visual indicators through formatting. Pivot tables can also be enhanced with conditional formatting to provide color scales that make performance trends more visible. Data bars can also be added to cells to run either red or green for positive and negative values.
When to Use Pivot Tables:
- Cohort analysis performance trends or portfolio analysis with a mix of positive and negative values
What Not to Use Pivot Tables:
- When your dataset is too large to get a good understanding of the whole
- When data can easily be summarized with a bar chart instead

An example of a pivot table, where colors are used to show positive or negative progress on a company’s portfolio. The user can pivot the table to show multiple categories in different ways.
A heat map is a type of chart that uses color to represent data values. It is often used to visualize data that is organized in a matrix or table format. The color of each cell in the matrix is determined by the value of the corresponding data point. Heat maps are best used when analyzing data that is organized in a two-dimensional grid or matrix.
For example, a heat map can be used to visualize a company's website traffic, where the rows represent different pages on the website, and the columns represent different periods of time.
When to use heat maps:
- When you need to visualize the density or intensity of variables
- When you want to display patterns or trends over time or space
When to avoid heat maps:
- When precise values are needed; heat maps are better at showing relative differences rather than precise values
- When working with small data sets
A tree map is a type of chart that is used to visualize hierarchical data. It consists of a series of nested rectangles, where the size and color of each rectangle represent a different variable. Tree maps are best used when analyzing data that has a hierarchical structure.
For example, a tree map can be used to visualize the market share of different companies in an industry. The largest rectangle would represent the entire industry, with smaller rectangles representing the market share of each individual company.
When to use tree maps:
- When you want to visualize hierarchical data
- When you need to illustrate the proportion of different categories within a whole
When to avoid tree maps:
- When exact values are important
- When there are too many categories
Box-and-Whisker Plots

Box plots are useful for quickly summarizing the distribution of a dataset, particularly its central tendency and variability. For example, a box-and-whisker plot can be used to visualize the test scores of a group of students.
Colloquially recognized as a box-and-whisker plot, a box plot is a distinct form of chart that showcases the distribution of a collection of numerical data through its quartile divisions. Box plots serve as efficient tools for rapidly encapsulating the distribution of a dataset, specifically its central propensity and variability.
A box-and-whisker plot consists of a rectangle (the "box") and a pair of "whiskers" that extend from it. The box embodies the middle 50% of the data, with the lower boundary of the box signaling the first quartile (25th percentile) and the upper boundary of the box indicating the third quartile (75th percentile). The line situated within the box signifies the median value of the data. The whiskers project from the box to the minimum and maximum values of the data, or to a designated distance from the box referred to as the "fences." Any data points that reside outside the whiskers or fences are categorized as outliers and are plotted as individual points. When to use box plot charts:
- When you want to display data spread and skewness
- When showcasing the distribution of data, including the range, quartiles, and potential outliers
- When comparing multiple groups or categories side-by-side; they allow for easy comparison of different distributions.
When to avoid box plot charts:
- If you need to show more detail, since box plots focus on a high-level summary
- When individual data points are important to the story you’re telling
- When your audience isn’t familiar with them, since they can sometimes be less intuitive than other types of visualizations
A histogram is a type of chart that displays the distribution of a dataset. It consists of a series of vertical bars, where the height of each bar represents the number of observations in a particular range. Histograms are best used when analyzing continuous data. It’s used the most when you want to understand the frequency distribution of a numerical variable, like height, weight, or age. For example, a histogram can be used to visualize the distribution of heights in a population. Read more about building histograms in Sigma here.
When to Use a Histogram:
- When understanding the shape of a distribution; for example, whether it’s symmetric, skewed to the left or right, or bimodal
- When identifying outliers, like which data points are significantly different from the rest of the data
- When comparing distribution of a variable across different groups, such as males and females, or different age groups.
- To set boundaries for data ranges; for example, you might use a histogram to determine what constitutes a "normal" or "abnormal" value for a particular variable
When to Avoid a Histogram:
- When you need to look at multiple dimensions at the same time
- If your data isn’t all on the same scale
Sankey Charts

We end our guide with the controversial Sankey chart. A Sankey chart is a type of diagram that illustrates the movement or transfer of data, resources, or quantities through various stages of a system or process. Common applications of Sankey charts include visualizing complex sequences like energy usage, material distribution, or even a website's user journey. The structure of the chart includes nodes and links—with nodes representing the starting points, endpoints, or intermediate steps, and links depicting the transition of quantities or data between these nodes.
The thickness of the links in a Sankey chart directly corresponds to the volume of data or resources being moved, offering an intuitive comparison of the relative sizes of these transfers. They can be invaluable for recognizing inefficiencies, bottlenecks, or potential areas for enhancement in a system or process. These charts serve as a powerful tool for communicating complex information in a straightforward and comprehensible way. However, if there are too many nodes or links, Sankey charts can become cluttered and challenging to interpret, hence their use should be considerate and targeted.
When to use Sankey charts:
- When you want to show the data as part of a process
When to avoid Sankey charts:
- When it starts to feel too confusing, which can quickly happen when there are too many nodes or links
- When you need to see exact values, it might not be the most intuitive option.
Evaluating Data Visualization Tools
Data visualization tools have become increasingly popular in recent years, with a wide variety of options available to choose from. However, determining which tool best suits your needs can be challenging with so many options. When evaluating data visualization tools, there are several key questions to consider:
- What are your goals and needs? It's crucial to clearly understand your goals and needs before selecting a data visualization tool. Are you looking to explore your data, communicate a specific message, or both? Understanding your objectives will help you choose the right tool for your project.
- What features do you require? Different data visualization tools come with different features. Before selecting a tool, you should consider what features you need to achieve your goals. For example, do you require interactive capabilities or the ability to create custom visualizations?
- Where will your data come from? The source of your data is another critical factor to consider when selecting a data visualization tool. Some tools are better suited for specific types of data, such as structured or unstructured data, while others may require specific file formats or data storage solutions.
- Where will you need to see your data? Different data visualization tools may be more suitable for specific platforms or devices. For example, some tools may be optimized for mobile devices, while others are designed for desktop computers or specific web browsers. You may also be interested in embedding visualizations elsewhere , such as internal applications or external portals.
- Where would you like to publish your visualization? Finally, consider where you would like to publish your visualization. Some tools may provide built-in publishing capabilities, while others may require you to export your visualization to a separate platform. Selecting a tool that supports your publishing needs is important to ensure your visualization reaches your intended audience.
By considering these key questions, you can evaluate different data visualization tools and select the one that best meets your needs.
Read a side-by-side comparison of Sigma against similar BI tools.
Take the Next Step & Start Analyzing With Data Visualization
Data visualization is a powerful tool for understanding and communicating complex data. While there are many data visualization tools on the market, Sigma offers an intuitive and familiar spreadsheet interface that allows users to easily explore, analyze, and collaborate on their data.
Explore Sigma’s capabilities and start transforming your data today via a free trial of Sigma .
Related Blogs

Data Visualization Is Broken. Here’s How to Fix It
For too long, data visualization has prevented us from accessing the data that we really need, rather than helping us pursue data-driven answers more effectively. It’s time to finally complete the picture.

Sigma Now Available on AWS Europe
Sigma supports enhanced GDRP compliance with availability on AWS Europe.

Sigma on Sigma: Empower Your Stakeholders With Timely Data Projections
Learn how you can use Input Tables from Sigma to empower your business leaders to make data projections.
What Is Data Visualization in Excel? Elaborate in Detail

Introduction to Data Visualization
Data visualization In Excel is a presentation technique that uses graphical methods to reveal patterns in data. The goal is to help you see the data more clearly, understand it better and make better decisions. Data visualization differs from other forms of analysis, and it usually involves creating one or more charts or graphs to convey information rather than producing raw numbers or tables.
The visual representation of worksheet data has always been important. Still, with the growth of Big Data and its associated challenges, many people have become interested in taking another look at this form of communication.
Many different groups use data visualization in Excel, such as
- Researchers and statisticians
- Business executives who need new insights about markets and customers
- Journalists who want to present stories excitingly
- Online marketers who want their products featured on social media platforms like Facebook or Twitter
- Sports fans who watch games on TV screens
Everyone benefits from good data visualization techniques!
Excel data visualization is a way of presenting information that helps people understand and interpret data, especially when the amount of data is large or complex. Visualization can describe patterns, trends, and relationships in the data. It can also help you find outliers (data points that stand out from others) and anomalies (situations where something seems wrong).
Data visualization increases the speed of decision-making and the success of execution by 5x for companies. On average, analytics delivers a $9.01 return on investment for every dollar spent. A CAGR of 10.2% is also expected in the global data visualization industry by 2027, reaching $19.20 billion.
Types of Data Visualization in Excel
Many types of data visualizations are doable in Excel. This article will focus on the main types: bar charts, line graphs, scatter plots, dashboards, and sparklines.
Bar Charts: A bar chart is a graph showing the counts of data values in columns or rows. The bars in a bar chart usually slope downwards, indicating how much bigger the count for each category is compared to the count for the last type.
Line Graphs: A line graph is a type of graph that shows the relationship between two sets of data points over time. Lines connect points where there is a change in value. The lines may also indicate how different groups of data are related.
Scatter Plots: A scatter plot is a graph showing how different variables are related. A scatter plot point is usually randomly placed and plotted on a grid. Colors are then used to indicate how closely each point corresponds to particular values for the variables. Each type of data visualization can explore different aspects of data. For example, a bar chart can show how many people each city has, while a scatter plot can show how other variables are related.
Maps : Maps are a great way to show spatial relationships between data points. For example, a map might show how many people live in each city or how much money each city spends on various types of goods.
Dashboards: A dashboard is a data visualization showing how different data groups are related. A dashboard typically contains a set of graphs, tables, and charts. The graphs show how other data groups are related, while the tables and charts show specific information about the data. An excellent way to use a dashboard is to see how different data groups are related. For example, you might want to see how different types of customers are described or how various departments are performing.
Sparklines: These are line graph that uses colors to indicate how different variables are related. Sparklines are good for showing how other groups of data are related or how a particular variable changes over time.
The purpose of a SQL dashboard tool is to take users through a workflow of querying, exploring, and visualizing data by combining several different BI tools (or functions within a larger BI platform). As a result of this process, dashboards are created, which include dynamic and interactive graphs and charts meant to help you understand trends and insights from your data in a way you can understand and communicate.
Steps to Create Data Visualization Using Excel
This article will discuss the steps involved in creating data visualizations In Excel . We will provide an example for each step.
Step 1: Get Your Data Into a Usable Format
The first step is to get your data into a usable format. This is doable in several ways, but the most common way is to input it into a spreadsheet. Once your data is in a spreadsheet, you can begin making sense of it and create visualizations.
Step 2: Create Column Charts and Bar Charts
Column charts show information as columns and help display large amounts of data. Bar charts show information as bars and enable the display of small amounts of data. Both types of charts can be used to display trends or changes over time.
Step 3: Create Line Graphs and Scatter Plots
Line graphs show the relationship between two or more variables over time. Scatter plots show how different variables are related to one another. They can help you see patterns in your data that you wouldn’t otherwise be able to see.
Step 4: Create Pie Charts and Histograms
Pie charts show the distribution of data in categories. Histograms show the distribution of data in numerical values. They can display information such as how many people are affected by a particular event, how many different types of products are sold, or how many times a specific word is used.
Step 5: Create Charts Using Conditional Formatting
Charts can be made conditional by using the conditional formatting feature of Data Visualization in Excel. This allows you to make specific changes to the appearance of a chart based on certain conditions. For example, you could make a chart showing how many sales were made by day of the week or how many emails were sent out over a certain period.
These are just a few steps in creating data visualizations in Excel. Many other techniques can be used, and the steps outlined here introduce the process. For more detailed instructions, please visit the Microsoft website or another resource that is specifically designed for data visualization.
Tips For Creating the Best Data Visualization Using Excel
There are a few tips for creating the best data visualization in Excel that can help make your data analysis more efficient and helpful.
The first tip is to use formatting options to highlight specific data values quickly. For example, you can use a border or color to differentiate between different values in a column or row. This makes it easy to see which rows or columns contain information you’re interested in and makes it easier to focus on specific values when analyzing your data.
Another option is to use charts and graphs to visualize your data. Charts allow you to display your data in a variety of ways, including by type (horizontal vs. vertical), by value (total vs. individual), and by duration (long-term vs. short-term). Graphs are handy for showing relationships between different variables, which can be especially useful for understanding complex datasets.
Finally, don’t forget Excel’s ability to create beautiful visuals simply by formatting cells! You can create stunning visuals like flow charts and bar charts simply by adjusting the font, color, size, and alignment of cells. This allows you to create visuals that are both visually appealing and informative.
These tips are a great way to create the best data visualization in Excel . You can easily make your data analysis more efficient and helpful by using formatting options, charts and graphs, and beautiful formatting.
Conclusion
In this blog post, we have explored data visualization in Excel. We have discussed the different techniques that are available and provided some examples. We have also highlighted some of Excel’s best practices for creating effective charts and graphs.
If you want to create graphics that communicate your data effectively, Excel is a great tool to use. It has a wealth of features that make it possible to create charts and graphs that are both attractive and informative. We have started by discussing the different types of Data Visualization available in Excel. Next, we have looked at some essential elements necessary for any graph or chart: axes, labels, data points, and legends. After this, we explored some more advanced techniques, such as Data Tables and VLOOKUP/Hlookup functions. Lastly, we provided some tips for creating compelling data visualizations in Excel . To learn in detail about these Excel functions and apply the same in your everyday HR activities, People Analytics & Digital HR is the best course for you. Along with providing an IIM certification, the course helps understand and master in-depth the digital needs of new-age HR professionals.
FAQs
Q1. Is Excel good for Data Visualization?
Ans. In an examination of the data or when creating charts and drawings, it has been reported that 62% of people use Excel due to its flexibility and ease of use, which enables them to explore data or create charts and drawings. The ease and flexibility of Excel make it the first port of call when it comes to creating Data Visualizations.
Q2. What is Data Visualization in a spreadsheet?
Ans. Using Excel as a spreadsheet tool, you can visualize numerical data in a visually appealing way so that you can better understand what is happening in the data. It is possible to organize data in a clearer and more organized spreadsheet by using graphs such as line graphs, Gantt charts, or bar graphs in addition to a spreadsheet.
Fill in the details to know more
PEOPLE ALSO READ

Related Articles

Understanding the Staffing Pyramid!
May 15, 2023
From The Eyes Of Emerging Technologies: IPL Through The Ages
April 29, 2023
Understanding HR Terminologies!
April 24, 2023

How Does HR Work in an Organization?

A Brief Overview: Measurement Maturity Model!
April 20, 2023

HR Analytics: Use Cases and Examples

What Are SOC and NOC In Cyber Security? What’s the Difference?
February 27, 2023

Fundamentals of Confidence Interval in Statistics!
February 26, 2023

A Brief Introduction to Cyber Security Analytics

Cyber Safe Behaviour In Banking Systems
February 17, 2023
Everything Best Of Analytics for 2023: 7 Must Read Articles!
December 26, 2022

Best of 2022: 5 Most Popular Cybersecurity Blogs Of The Year
December 22, 2022

How To Create an HR Dashboard Using Excel?

Top 10 Emerging Technologies Blogs To Read In 2023
December 15, 2022

Key Benefits of HR Digital Transformation
November 25, 2022

How Do You Summarize Data in Excel?
November 24, 2022

Effective Digital Transformation Frameworks and Benefits
Are you ready to build your own career?
Query? Ask Us
Enter Your Details ×
This site uses cookies to store information on your computer. Some are essential to make our site work; others help us improve the user experience. By using the site, you consent to the placement of these cookies. Read our privacy policy to learn more.
- TECHNOLOGY Q&A
2 simple ways to visualize data
- Microsoft Excel
Q. Can you suggest any quick ways to help data stand out in large tables of information? Not dashboards, but something within the tables themselves to allow for quick recognition of patterns without losing access to the numbers themselves.
A. As CPAs, we are experts on compiling, understanding, and explaining financial data. We also need to be proficient at presenting data in visually compelling ways.
Supplementing spreadsheet data with visual representation aids the user in identifying trends and patterns that may not be evident otherwise. Additionally, data visualizations can make spreadsheets look more professional and aesthetically appealing.
Icon sets and sparklines are among the many ways to visually represent data in Excel, and they are easy to use. Each walkthrough below includes a video at the bottom of the page. You can also download this Excel file with separate worksheets for each visualization method. Note that the content of this item is based on Microsoft Excel 365 for PCs. Other versions of Excel may work differently.
Icon sets visually depict certain circumstances within data. For example, the illustrations below show budget variances for several departments. The second illustration contains an icon set that helps the user quickly see which departments have positive variances (green triangle pointed upward), negative variances (red triangle pointed downward), and no variances (yellow, horizontal rectangle).

To create an icon set, select the data you would like represented by icons (the variances, in this case). On the Home tab, click Conditional Formatting , Icon Sets , More Rules . This will open the dialog box shown below. Click the dropdown arrow next to Icon Style and select the icons you like.

Next, set the value for the first icon in the set. In the example above, we want any Number (selected from the Type dropdown menu) to show the green triangle if the value is ≥1, meaning the number represents a positive variance. Then, set the value for the second icon in the set. In this example, we want any Number to show the yellow rectangle if the value is <1 and ≥0, meaning the number represents no variance. Lastly, set the value for the third icon in the set. In this example, we want any Number to show the red upside - down triangle if the value is <0, meaning the number represents a negative variance. Click OK .
Sparklines show trends and patterns in data with small charts that fit in a single cell.
For example, the two screenshots below show sales performance over five months. The second screenshot contains sparklines that help the user easily and quickly see trends such as Smith's sales performance consistently declining while Adams's has consistently improved. The sparklines also make it obvious that the dip for February's sales performance is largely due to a decline in Thomas's February sales performance.

To create sparklines, select the cell or cells where you would like the sparkline(s). On the Insert tab, within the Sparklines group, choose Line , Column , or Win/Loss . This will open the dialog box shown in the screenshot below. Select the data to be included in the sparkline. Click OK .

Once you create your sparklines, you can leave them as is or modify their design. To modify the design, select the sparkline(s) you want to modify and go to the Design tab ( Sparkline tab on some Excel versions). Here, you will have many options for modifying the design of the sparklines, such as changing their color and adding points to accentuate specific data.
If your data contains empty values, you have options on how these values are included in the sparkline(s). Select the sparkline(s), go to the Design or Sparkline tab, click Edit Data , and select Hidden & Empty Cells . You will be given three options for handling empty cells: Gaps , Zero , and Connect data points with line .
Selecting Gaps will produce sparklines that look like the screenshot below .

Selecting Zero will produce Sparklines that look like the screenshot below .

Selecting Connect data points with line will produce sparklines that look like the screenshot below .

In addition to sparklines and icon sets, Excel offers several other techniques (including data bars and charts) to visually display all types of data. In fact, Excel 2016 and newer versions offer 19 categories of charts, including waterfall charts, sunburst charts, and map charts. Is there a particular type of chart you'd like to see explained in future columns? Please let us know by emailing us at [email protected] .
About the authors
Kelly L. Williams, CPA, Ph.D., MBA , is an assistant professor of accounting at Middle Tennessee State University. Byron Patrick, CPA/CITP, CGMA , is senior applications consultant at botkeeper.
Submit a question
Do you have technology questions for this column? Or, after reading an answer, do you have a better solution? Send them to [email protected] . We regret being unable to individually answer all submitted questions.
Where to find April’s flipbook issue

The Journal of Accountancy is now completely digital.
SPONSORED REPORT
Manage the talent, hand off the HR headaches
Recruiting. Onboarding. Payroll administration. Compliance. Benefits management. These are just a few of the HR functions accounting firms must provide to stay competitive in the talent game.
FEATURED ARTICLE
2023 tax software survey
CPAs assess how their return preparation products performed.
Spreadsheet Basics: A Resource for Spreadsheet Users of all Levels
Conditional formatting: guide to visualizing data in spreadsheets.
TL;DR: Conditional formatting is an essential skill for spreadsheet users, allowing you to visualize your data effectively and make your spreadsheets more engaging. Key techniques include highlighting cells based on criteria, applying color scales, using data bars, and adding icon sets. Customizing your conditional formatting with multiple rules, modifying existing rules, or creating custom formulas can help you create tailored and impactful visualizations that bring your data to life.
Spreadsheets are an incredibly versatile tool for organizing, analyzing, and presenting data. One powerful feature that can help you make sense of your data and enhance its visual appeal is conditional formatting. By applying specific formatting rules based on cell values or conditions, you can quickly identify trends, spot errors, or highlight important information. In this beginner's guide, we will explore the basics of conditional formatting and how you can use it to bring your spreadsheets to life.
Understanding Conditional Formatting
Conditional formatting is a feature in spreadsheet applications that allows you to apply specific formatting, such as font styles, colors, or borders, to cells based on their values or conditions. This can help you easily identify patterns or relationships in your data, spot outliers, or emphasize key information.
Some common uses of conditional formatting include:
- Highlighting cells with specific values or that meet certain criteria, such as values above or below a specific threshold.
- Applying color scales to visualize data distribution or trends, such as low to high values in a gradient of colors.
- Adding data bars or icons to represent values graphically, making it easier to compare data points or identify trends.
Getting Started with Conditional Formatting
To start using conditional formatting, follow these basic steps:
- Select the cells or range of cells you want to apply conditional formatting to.
- In your spreadsheet application, navigate to the conditional formatting menu or toolbar. This is typically located under the "Home" or "Format" tab.
- Choose the type of conditional formatting you want to apply, such as "Highlight Cells Rules," "Color Scales," or "Data Bars."
- Configure the specific formatting rules or conditions you want to apply. Depending on the type of conditional formatting you selected, this may involve setting value thresholds, selecting colors or styles, or choosing icons.
- Preview and apply the conditional formatting to your selected cells.
Popular Conditional Formatting Techniques
Here are some popular conditional formatting techniques that can help you visualize your data effectively:
- Highlighting Cells Based on Criteria: Use this technique to emphasize cells that meet specific conditions, such as values above or below a certain threshold or that contain a specific text string. This can help you quickly identify important data points or spot potential issues.
Example: Highlight all cells in a column that have a value greater than 100. To do this, select the cells, choose "Highlight Cells Rules" from the conditional formatting menu, and then select "Greater Than." Enter the value 100 and choose a formatting style, such as a background color or font style.
- Applying Color Scales: Color scales are a great way to visualize data distribution or trends by applying a gradient of colors to your cells based on their values. This can help you identify patterns, spot outliers, or track changes over time.
Example: Apply a color scale to a range of cells containing sales data. Select the cells, choose "Color Scales" from the conditional formatting menu, and then pick a color gradient. The colors will be applied to the cells based on their values, with the lowest value in one color and the highest value in another color.
- Using Data Bars: Data bars are horizontal bars that fill the background of a cell based on its value, providing a visual representation of the data that makes it easier to compare data points or identify trends.
Example: Add data bars to a column of cells containing monthly expenses. Select the cells, choose "Data Bars" from the conditional formatting menu, and then select a color for the bars. The bars will be proportionally sized based on the values in the cells, allowing you to quickly see which months had the highest or lowest expenses.
- Adding Icon Sets: Icon sets are a collection of symbols, such as arrows or traffic lights, that can be used to represent cell values graphically. This can help you quickly assess the status of your data or draw attention to important information.
Example: Apply an icon set to a range of cells containing performance ratings. Select the cells, choose "Icon Sets" from the conditional formatting menu, and then pick an appropriate set of icons, such as arrows or traffic lights. The icons will be assigned to the cells based on their values, with higher values receiving more favorable icons.
Customizing Conditional Formatting
While the built-in conditional formatting options in most spreadsheet applications offer a wide range of possibilities, you may occasionally want to create your own custom rules to better suit your needs. Here are a few tips for customizing your conditional formatting:
- Combine multiple rules: Apply multiple conditional formatting rules to the same cells to create more complex visualizations or highlight multiple aspects of your data.
Example: Highlight cells in a sales column that are both above the monthly target and have increased compared to the previous month. To do this, create two separate conditional formatting rules, one for cells above the target and another for cells with positive month-over-month growth.
- Modify existing rules: If the default conditional formatting options don't quite fit your needs, you can often modify them to better suit your data or preferences. This might involve changing the value thresholds, colors, or styles used in the formatting.
Example: Adjust the color scale in a range of cells to use a different set of colors or to emphasize specific value ranges more prominently.
- Create custom formulas: Some spreadsheet applications allow you to create custom formulas for your conditional formatting rules. This can provide even greater flexibility in visualizing your data and can help you create highly tailored formatting based on specific conditions or calculations.
Example: Highlight cells in a column that are within 10% of the highest value in the column. To do this, create a custom formula-based conditional formatting rule that compares each cell's value to the maximum value in the column.
Conditional formatting is a powerful tool for visualizing data and enhancing the readability of your spreadsheets. By mastering the various techniques and options available, you can create dynamic and informative visualizations that help you better understand your data and communicate your insights. With a little practice and creativity, you can transform your spreadsheets into engaging and informative data-driven stories.
More in Tips and Tricks
- Privacy Policy
- Cookie Policy
- Terms of Service
Use of this website is under the conditions of the Spreadsheet Basics Terms of Service .
All rights reserved. Contact us to discuss content use.
Text and images Copyright © Spreadsheet Basics.
Privacy is important and our policy is detailed in our Privacy Policy .
See the Cookie Information and Policy for our use of cookies and the user options available.
Data Visualization with SpreadsheetWeb: Turning Numbers into Insights
by Olivia | Aug 1, 2023 | Blog

Data visualization is a powerful tool in data analysis, enabling us to unravel the hidden patterns, trends, and correlations that often elude our grasp when presented in mere tabular form. While spreadsheets may offer much information, their dense rows and columns can overwhelm and obscure valuable insights. On the other hand, visualizing data presents information in a visual format that is easily digestible and helps users discern meaningful connections with remarkable clarity.
Visual representations of data, such as charts, graphs, and interactive dashboards, transcend the limitations of traditional spreadsheets by transforming intricate datasets into clear and concise visuals. For instance, a complex spreadsheet detailing sales figures for a given period might be perplexing at first glance, but when presented as a line chart or bar graph, patterns of growth or decline become immediately apparent. Visuals break down complex concepts into intuitive and straightforward presentations, saving time and effort while improving comprehension. With over a billion people worldwide using Excel , it is evident that spreadsheets play a central role in data analysis for individuals and businesses alike. According to a recent study on 1,000 office workers across various industries, 66% of them use Excel at least once per hour, dedicating 38% of their time to Excel-related tasks. These statistics demonstrate the widespread use and importance of Excel in business and highlight the significance of adopting tools like SpreadsheetWeb that enhance the use of spreadsheets and make it accessible to a broader audience.
Moreover, data visualization fuels quicker and more confident decision-making by empowering users to identify critical insights at a glance. Essential patterns or anomalies might be overlooked when vital information is hidden within dense columns of numbers. However, visual representations expose these nuances, allowing decision-makers to grasp the bigger picture rapidly and make well-informed choices promptly.
Data visualization plays a crucial role in presenting complex data to stakeholders and team members, bridging the gap between technical and non-technical audiences. By using compelling visuals, data becomes more accessible and engaging, fostering a shared understanding of the data's implications and promoting effective collaboration. Microsoft Excel, a widely used spreadsheet software, excels in data visualization with a diverse range of chart types, including waterfall charts, treemaps, and sunburst charts, enabling users to depict complex data relationships with precision.
Additionally, Excel's dynamic array formulas, like SORT, FILTER, and UNIQUE, streamline data aggregation and analysis by automatically expanding results to fit the size of the data. The integration of powerful data analysis formulas, such as SUMIFS, AVERAGEIFS, and COUNTIFS, further enhances the generation of accurate and meaningful visuals, effectively communicating complex data patterns and empowering users to derive deeper insights from their datasets.In today's fast-paced and data-centric landscape, extracting valuable insights from complex datasets has become a critical aspect of effective decision-making. Yet, the challenge lies in interpreting raw numbers and statistics, mainly when dealing with extensive spreadsheets that can overwhelm even the most seasoned analysts.
Here comes the transformative power of SpreadsheetWeb, a dynamic platform that converts spreadsheets into web applications and empowers users to create visually captivating representations of their data. In this blog post, we embark on a journey to unravel the immense potential of SpreadsheetWeb's data visualization capabilities, showing you how it can effortlessly transform intricate data into easily understandable visual narratives and, thus, revolutionize how you derive actionable insights from your datasets.
Introducing SpreadsheetWeb's Data Visualization Features
SpreadsheetWeb's data visualization features bring an exciting dimension to web applications by enabling users to unleash the true power of their data. Seamlessly integrated with converted web applications, these robust tools transform mundane spreadsheets into dynamic, interactive visual representations that captivate and inform users. Whether you're a business analyst, project manager, or data enthusiast, SpreadsheetWeb's data visualization capabilities cater to all, making data analysis an engaging and intuitive experience.
Within SpreadsheetWeb, a diverse array of chart types awaits users, ensuring they have the right visual representation for every dataset. The platform offers a comprehensive range of charting options, from the simplicity of line charts that illustrate trends over time to the comprehensiveness of bar graphs comparing various categories and the clarity of pie charts for displaying proportions. SpreadsheetWeb's data visualization arsenal includes heatmaps, scatter plots, area charts, and more, each designed to showcase specific data relationships and insights with precision.
Integrating these data visualization tools is seamless, making it effortless for users to convert static spreadsheets into dynamic web applications with interactive visuals. Users can create eye-catching dashboards that breathe life into their data with just a few clicks. These dashboards can be easily customized to match branding or tailored to specific data requirements, resulting in a polished and professional appearance.
Moreover, SpreadsheetWeb's data visualization features extend beyond mere charting capabilities. Users can leverage interactive elements like drill-downs and filtering options to delve deeper into their data, interactively exploring various facets and dimensions. This empowers users to uncover finer details and connections that might not be immediately apparent in a conventional spreadsheet view, enriching the analysis and decision-making process.
Customizing Visual Elements
SpreadsheetWeb empowers users with various customization options, enabling them to tailor visual elements to their unique preferences and branding. With the ability to customize colours, labels, and legends, users can create visually stunning data visualizations that align with their organization's aesthetics and effectively communicate specific information. This level of customization elevates the data visualization experience, transforming it into an engaging and insightful journey.
One of the primary customization options offered by SpreadsheetWeb is the ability to select custom colours for charts, graphs, and other visual elements. Users can effortlessly match these colours with their brand's colour palette or choose shades that resonate with their target audience. This branding consistency reinforces brand identity and creates a professional and cohesive look for the web applications. Moreover, distinct colours can be employed to highlight specific data points, drawing attention to critical insights and trends.
Furthermore, customising labels in data visualizations enhance clarity and understanding. Users can modify axis labels, data point labels, and chart titles to convey precise information and context. This level of customization allows users to create clear and descriptive labels that enrich the data visualization, enabling viewers to grasp the critical takeaways without confusion. Whether adjusting font sizes or employing strategic label placement, SpreadsheetWeb puts the power of data storytelling firmly in the users' hands.
Additionally, users can customize charts' legends, providing a valuable way to give context and meaning to the presented data. By assigning meaningful labels to different series or data categories, users can effectively convey the significance of each element. This not only improves the visual appeal but also aids in better comprehension, as the legend acts as a guide to interpreting the data. With the ability to hide or show specific legend items, users can control the focus of their data visualization, making it more relevant and compelling for their target audience.
Creating Interactive Dashboards
With SpreadsheetWeb's intuitive interface, creating interactive dashboards becomes seamless and enjoyable. Users can transform their converted web applications into dynamic dashboards that showcase multiple data visualizations, offering a comprehensive view of their data landscape. The platform's user-friendly design allows non-technical users to design and customize interactive dashboards to suit their data analysis needs. You can see an example of this in action with the COVID-19 Dashboard created with SpreadsheetWeb, which presents data and insights on the global pandemic.
Users can choose from various data visualizations, including charts, graphs, and tables, to add to their dashboard. By simply dragging and dropping these elements onto the canvas, users can arrange them in a way that best represents their data relationships and insights. SpreadsheetWeb's interface ensures that the dashboard remains interactive, with data updates automatically reflecting in the visualizations as underlying data changes.
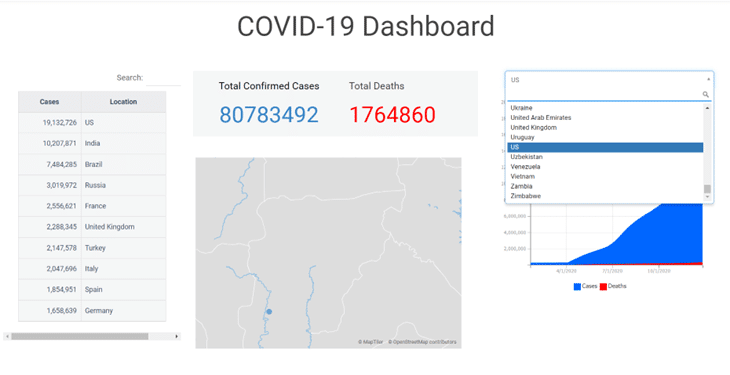
Furthermore, users can configure interactive elements such as dropdown menus, filters, and slicers to empower viewers to control the displayed data. By integrating these features, users allow their audience to explore the data according to their preferences, uncovering meaningful trends and patterns in the process. This interactivity promotes engagement and fosters a deeper understanding of the data's implications, empowering decision-makers to make data-driven choices confidently.
Additionally, users can customize the layout and design of the dashboard to create a visually appealing and cohesive presentation. Options to adjust colors, fonts, and labels ensure that the dashboard aligns with branding guidelines and creates a professional and impactful visual experience. Whether a sales performance overview or an analytics dashboard, SpreadsheetWeb's flexibility allows users to craft dashboards that cater precisely to their data communication needs.
In today's fast-paced and data-centric landscape, extracting valuable insights from complex datasets has become a critical aspect of effective decision-making. Yet, the challenge lies in interpreting raw numbers and statistics, mainly when dealing with extensive spreadsheets that can overwhelm even the most seasoned analysts. Here comes the transformative power of SpreadsheetWeb, a dynamic platform that converts spreadsheets into web applications and empowers users to create visually captivating representations of their data. In this blog post, we embarked on a journey to unravel the immense potential of SpreadsheetWeb's data visualization capabilities, showing you how it can effortlessly transform intricate data into easily understandable visual narratives and, thus, revolutionize how you derive actionable insights from your datasets.
Related posts

Recent Posts
- What's New in SpreadsheetWeb Hub? - April 2024
- How to Generate Code for SpreadsheetWeb API using Postman
- Ditch the Madness: A Smarter Way to Manage Price Lists
- What's New in SpreadsheetWEB? - March 2024
- Integrate an External Drawing Library With SpreadsheetWeb to Draw 2-D Objects

Guide To What Is The Pictorial Representation Of Worksheet Data
Introduction.
When dealing with a large amount of data, it can be overwhelming to make sense of it all. This is where the pictorial representation of worksheet data comes into play. It is a visual way of representing data using graphs, charts, and other visual elements. This method helps in presenting complex data in a simplified and easy-to-understand format, making it easier for anyone to analyze and interpret the information.
Using pictorial representation in data analysis is crucial as it allows for quick and easy identification of patterns, trends, and outliers at a glance. This visual aid helps in making informed decisions and presenting findings effectively to stakeholders.
Key Takeaways
- Pictorial representation of worksheet data uses graphs, charts, and visual elements to simplify complex data and make it easier to analyze.
- Using pictorial representation allows for quick identification of patterns, trends, and outliers, aiding in making informed decisions.
- When choosing the right pictorial representation, consider the type of data, the message you want to convey, and the audience's familiarity with different types of graphs.
- Best practices for creating pictorial representation include using appropriate scaling, labeling axes, using consistent colors and symbols, and avoiding data distortion.
- Benefits of using pictorial representation include making data easier to understand, highlighting trends and patterns, simplifying complex information, and engaging the audience.
Types of Pictorial Representation
When it comes to representing worksheet data in a visual format, there are several types of pictorial representations to choose from. Each type has its own unique characteristics and is best suited for displaying specific types of data. Let's take a closer look at some of the most commonly used types of pictorial representation:
Bar graphs are one of the most popular and widely used forms of pictorial representation. They are ideal for comparing the values of different categories or groups. The length of the bars represents the value of each category, making it easy to visualize and compare the data.
Pie charts are circular graphs that are divided into slices to represent the proportion of each category within the data set. They are useful for illustrating the breakdown of a whole into its constituent parts and are particularly effective for showing percentages.
- Line graphs
Line graphs are used to display data points connected by straight lines, making it easy to see trends and patterns over time. They are especially useful for showing changes and fluctuations in data over a continuous period.
- Scatter plots
Scatter plots are used to display the relationship between two variables. Each data point is represented by a dot on the graph, and the pattern of the dots can reveal the nature of the relationship between the variables, such as correlation or clustering.
How to Choose the Right Pictorial Representation
When it comes to representing worksheet data visually, selecting the right pictorial representation is essential for effectively communicating information. Here are some key factors to consider when making this decision:
A. Consider the type of data being represented
- 1. Numerical data: If your data consists of numerical values, bar graphs, line graphs, and pie charts are commonly used to depict this type of information. Bar graphs are ideal for comparing values across different categories, while line graphs show trends over time. Pie charts can be used to illustrate the proportion of each category within a whole.
- 2. Categorical data: When dealing with categorical data, bar graphs, pie charts, and stacked bar graphs can effectively showcase this type of information. Bar graphs and stacked bar graphs can compare values within categories, while pie charts display the distribution of each category.
- 3. Relationships between variables: For showing relationships between variables, scatter plots and line graphs are often utilized. These types of graphs can reveal patterns and correlations within the data.
B. Determine the message you want to convey
- 1. Trends: If the goal is to highlight trends or patterns within the data, a line graph or scatter plot may be the most suitable choice. These representations can effectively showcase changes over time or relationships between variables.
- 2. Comparisons: When the objective is to compare different categories or values, bar graphs and pie charts can clearly illustrate these comparisons. Stacked bar graphs are particularly useful for simultaneously comparing subcategories within larger categories.
- 3. Distribution: If you need to display the distribution of categorical data, a pie chart or stacked bar graph can visually represent the proportions of each category within the dataset.
C. Assess the audience's familiarity with different types of graphs
- 1. General audience: If the intended audience is not familiar with complex data representations, it may be best to opt for simpler graphs such as bar graphs and pie charts. These are commonly understood and can effectively convey the information to a broad audience.
- 2. Data-savvy audience: For an audience well-versed in data analysis, more advanced representations like scatter plots and stacked bar graphs may be appropriate. These individuals can interpret and derive insights from more intricate visualizations.
Best Practices for Creating Pictorial Representation
When creating pictorial representations of worksheet data, it's important to follow best practices to ensure that the visualizations accurately and effectively communicate the information. The following are some key best practices to keep in mind:
- Use appropriate scaling
It's important to choose the right scale for your pictorial representation to ensure that the data is accurately represented. Be mindful of the range of the data and choose a scale that effectively captures the variations without distorting the overall picture.
- Label axes and provide a clear title
Labeling the axes and providing a clear title for your pictorial representation is essential for helping the audience understand the context and meaning of the data. Make sure the labels and title are clear, concise, and informative.
- Use consistent colors and symbols
Consistency in the use of colors and symbols in your pictorial representation is crucial for clarity and coherence. Choose a color palette and set of symbols that are easily distinguishable and use them consistently throughout the visualization.
- Avoid distorting the data
It's important to avoid distorting the data in your pictorial representation. Be cautious of various visual techniques such as skewed scales, exaggerated proportions, and manipulated axes that can misrepresent the data.
Tools for Creating Pictorial Representation
When it comes to visualizing data from a worksheet, there are several tools available that can help you create pictorial representations. Here are some of the most popular ones:
Excel is a widely used spreadsheet software that offers various chart and graph options to visually represent data. You can easily create bar graphs, pie charts, line graphs, and more to effectively showcase your worksheet data.
Google Sheets also provides a range of chart types to visually depict your data. With its intuitive interface and built-in chart tools, you can quickly create appealing visual representations of your worksheet data.
Tableau is a powerful data visualization tool that allows you to create interactive and dynamic visualizations. It offers advanced features for creating dashboards, maps, and other complex visual representations of worksheet data.
Infogram is a user-friendly tool for creating infographics, charts, and maps. It provides a range of templates and customization options to easily transform your worksheet data into engaging visual content.
Benefits of Using Pictorial Representation
When it comes to presenting worksheet data, using pictorial representation can offer several benefits that can enhance understanding, highlight key trends, simplify complex information, and engage the audience.
Pictorial representation such as graphs, charts, and diagrams can make it easier for individuals to comprehend the data presented. Visualizing the data can help in clarifying the information and making it more accessible.
By using visual representations, it becomes easier to identify trends and patterns within the data. Whether it's a fluctuation in sales over time or a correlation between different variables, pictorial representation can make these insights more apparent.
For datasets that contain complex information, using visuals can simplify the presentation of the data. Instead of overwhelming the audience with raw numbers and figures, creating a visual representation can simplify the message and make it more digestible.
Visuals are inherently more engaging than plain text or tables of data. Pictorial representation can capture the audience's attention and make the information more memorable. This can be particularly effective when presenting to a diverse audience with varying levels of data literacy.
As we wrap up this discussion on the pictorial representation of worksheet data, it's important to emphasize the significance of using graphs and charts to visually represent data. Not only do they make complex data more understandable, but they also facilitate quick and easy analysis. I encourage all readers to incorporate various types of graphs, such as bar graphs, pie charts, and line graphs, in their data analysis to gain deeper insights into their data.

Immediate Download
MAC & PC Compatible
Free Email Support
Related aticles

The Benefits of Excel Dashboards for Data Analysts

Unlock the Power of Real-Time Data Visualization with Excel Dashboards

Unlocking the Potential of Excel's Data Dashboard

Unleashing the Benefits of a Dashboard with Maximum Impact in Excel

Exploring Data Easily and Securely: Essential Features for Excel Dashboards

Unlock the Benefits of Real-Time Dashboard Updates in Excel

Unleashing the Power of Excel Dashboards

Understanding the Benefits and Challenges of Excel Dashboard Design and Development

Leverage Your Data with Excel Dashboards

Crafting the Perfect Dashboard for Excel

An Introduction to Excel Dashboards

How to Create an Effective Excel Dashboard
- Choosing a selection results in a full page refresh.
IMAGES
VIDEO
COMMENTS
Select Your Data: Click on a cell within your data range or table, or manually select the entire range of cells that you want to visualize. Insert a Chart: In the toolbar, navigate to the "Insert" tab and click on the "Chart" button or select the specific chart type you want to create. This will open a "Chart" window, where you can preview and ...
To create a column chart in Excel: Select the data range A1:D13. Click the "Insert" tab in the Excel ribbon. Click on the columns icon dropdown, and under the "2-D Column" category, choose "Clustered Column". You can now see a column chart that displays the number of units sold for each product category by the month.
Then, go to the "Insert" tab and click "PivotChart.". Choose the chart type you want to use (e.g., bar chart, line chart). Excel will generate a pivot chart linked to your pivot table. You can customize the chart by add the fields from the pivot table to the chart's elements to create meaningful visualizations.
To create a pie chart in Excel: Select the data you want to visualize. From the " Insert " tab, choose " Pie " from the chart options. You can customize your chart by changing the colors, adding labels, and adjusting other settings in the " Format Chart Area " pane. Here's a video guide on how to create a donut chart:
Introduction. Visual representation of worksheet data is crucial for effectively conveying information in a way that is easy to understand and analyze. Whether for business reports, presentations, or personal use, presenting data in a visual format can enhance comprehension and decision-making.In this blog post, we will explore the importance of visual representation of worksheet data and ...
Explore the diverse data visualization possibilities in Excel that aid in analyzing and interpreting your data effectively.. Introduction. Welcome to our comprehensive guide on visualizing data in Excel. In this article, we will delve into the world of data visualization and provide you with valuable insights on how to create compelling visual representations of your data using Excel.
By creating a dynamic dashboard with Excel, the manager can quickly assess which products are performing well, identify sales trends, and make informed decisions. 2. Visualizing Geographic Data ...
The importance of data visualization lies in its ability to enhance data understanding, improve data communication, and aid decision making. Visual representations of data make it easier for individuals to comprehend the information presented, as visual cues and patterns can be quickly identified. well-designed visualizations can effectively convey information to others, ensuring that the ...
Trick 1: Choose the Right Chart Type for Your Data. Selecting the appropriate chart type in Excel is the first crucial step towards effective data visualisation in Excel. Different chart types convey distinct messages and insights from the same dataset. For instance, line charts excellently depict trends in time series data, while bar charts ...
Data visualization is the representation of information and data using charts, graphs, maps, and other visual tools. These visualizations allow us to easily understand any patterns, trends, or outliers in a data set. Data visualization also presents data to the general public or specific audiences without technical knowledge in an accessible ...
Introduction. Data visualization plays a crucial role in effectively conveying information and insights in Excel. When it comes to presenting data series, graphics are a game-changer. They go beyond the traditional numerical representation, helping to enhance understanding and provide a more intuitive view of complex data. In this blog post, we will explore the importance of data visualization ...
In Excel, select the chart by clicking its border, and then on the Home tab, in the Clipboard group, click Cut. The chart is removed, but the data remains in Excel. In Word, click where you want to insert the chart in the document. On the Home tab, in the Clipboard group, click Paste.
Navigate to the Insert tab: Once your data is selected, go to the Insert tab in the Excel ribbon. Choose a chart type: From the Charts group, select the type of chart you want to create. For a basic chart, you can choose from options like a column, line, or pie chart. B. Instructions on inserting and customizing a basic chart.
An Excel Data Flow Diagram (DFD) is a visual representation of the flow of data within a Microsoft Excel worksheet or workbook. It illustrates how data moves from one cell or worksheet to another, showing the inputs, outputs, and processes involved in the data flow. The DFD is a valuable tool for understanding and documenting complex data flows ...
Some data visualization tools, however, allow you to add interactivity to your map so the exact values are accessible. 15. Word Cloud. A word cloud, or tag cloud, is a visual representation of text data in which the size of the word is proportional to its frequency. The more often a specific word appears in a dataset, the larger it appears in ...
The main goal of data visualization is that it helps unify and bring teams onto the same page. The human mind is wired to grasp visual information more effortlessly than raw data in spreadsheets or detailed reports. Thus, graphical representation of voluminous and intricate data is more user-friendly.
The visual representation of worksheet data has always been important. Still, with the growth of Big Data and its associated challenges, many people have become interested in taking another look at this form of communication. ... and visualizing data by combining several different BI tools (or functions within a larger BI platform). As a result ...
Supplementing spreadsheet data with visual representation aids the user in identifying trends and patterns that may not be evident otherwise. ... Icon sets visually depict certain circumstances within data. For example, the illustrations below show budget variances for several departments. The second illustration contains an icon set that helps ...
In your spreadsheet application, navigate to the conditional formatting menu or toolbar. This is typically located under the "Home" or "Format" tab. Choose the type of conditional formatting you want to apply, such as "Highlight Cells Rules," "Color Scales," or "Data Bars." Configure the specific formatting rules or conditions you want to apply.
Visual representations of data, such as charts, graphs, and interactive dashboards, transcend the limitations of traditional spreadsheets by transforming intricate datasets into clear and concise visuals. ... Essential patterns or anomalies might be overlooked when vital information is hidden within dense columns of numbers. However, visual ...
This is where the pictorial representation of worksheet data comes into play. It is a visual way of representing data using graphs, charts, and other visual elements. This method helps in presenting complex data in a simplified and easy-to-understand format, making it easier for anyone to analyze and interpret the information.
Study with Quizlet and memorize flashcards containing terms like 1. You can see how far each numbervaries, on average, from the averagevalue of the list. 2. Calculates the average of the twonumbers in the middle of a set ofeven count of numbers. 3. This function shows the most frequentlyoccurring number in a set of numbers. 4. With this function, you can determinethe position of a number in ...
Question: Microsoft Excel _____ give a visual representation of data that can make the data easier to understand. Choices: - worksheets - workbooks - spreadsheets - charts Answer: charts
Seeing is believing. Virtual twins enable the entire enterprise and value chain to focus on a common goal. More importantly, having a holistic, end-to-end view of a product can prevent many issues ...