Creating a Word Cloud in PowerPoint on Windows 11: A Step-by-Step Guide
Creating a word cloud in PowerPoint on Windows 11 is a piece of cake! First, you’ll need to have your list of words ready to go. Then, simply open up PowerPoint, choose a blank slide, and insert a word cloud using a text box or WordArt. Customize it to your liking, and voilà, you’ve got yourself a visually appealing word cloud to enhance your presentation.

Step by Step Tutorial: Creating a Word Cloud in PowerPoint on Windows 11
Before diving into the steps, let’s understand that a word cloud is a visual representation of text data, especially useful in displaying keyword metadata on websites, or to visualize free form text. Tags are usually single words, and the importance of each tag is shown with font size or color. Now let’s create one in PowerPoint on Windows 11.
Step 1: Prepare Your Text Content
Prepare a list of words you’d like to include in your word cloud.
Making a word cloud starts with text. Gather the words or phrases you want to display. This could be anything from a speech transcript to customer feedback responses. The more times a certain word appears in your source text, the bigger it will appear in the cloud.
Step 2: Open PowerPoint
Open PowerPoint and select a blank slide for your word cloud.
PowerPoint doesn’t have a built-in word cloud generator, but that doesn’t mean you can’t create one! Pick a blank slide to start with a clean slate.
Step 3: Insert a Text Box or WordArt
Insert a text box or WordArt into your slide and paste your list of words.
Navigate to the “Insert” tab on the PowerPoint ribbon and choose “Text Box” or “WordArt”. This is where you’ll put your prepared text. Remember, you can change the font style, size, and color to make it look more like a traditional word cloud.
Step 4: Customize Your Word Cloud
Customize the font size, color, and placement of words to mimic a word cloud layout.
Arrange the words in a random, scattered format, varying the size based on importance or frequency. You can make more important words bigger and bolder, and less important ones smaller and lighter.
Step 5: Finalize and Save Your Slide
Review your word cloud for accuracy, then save your PowerPoint slide.
Once you’re happy with the design, save your PowerPoint slide. You can also save it as an image if you want to use it outside of PowerPoint.
After completing these steps, you’ll have a beautiful word cloud that you can use in your PowerPoint presentation or elsewhere. It’s a simple yet effective way to visualize text data and make your presentation pop!
Tips: Creating a Word Cloud in PowerPoint on Windows 11
- Always start with a blank slide to avoid any unwanted formatting or design elements.
- If you don’t have a list of words ready, consider using a word cloud generator online and then taking a screenshot to insert into PowerPoint.
- Experiment with different fonts and colors to make your word cloud stand out.
- You can use shapes and lines to connect related words or phrases.
- Remember that readability is key. Don’t overcrowd your slide with too many words.
Frequently Asked Questions
Can i create a word cloud directly in powerpoint.
No, PowerPoint does not have a built-in feature for creating word clouds, but you can manually create one using Text Box or WordArt.
Is there a limit to the number of words I can include?
It’s best to limit your word cloud to key terms and phrases, as too many words can make it look cluttered and hard to read.
Can I use a screenshot of a word cloud created online in my PowerPoint presentation?
Yes, you can create a word cloud using an online generator, take a screenshot, and then insert it into your PowerPoint slide.
Do I have to use WordArt to create a word cloud?
No, you can also use standard text boxes, although WordArt may give you more creative control over the look of the words.
How can I save my word cloud as an image?
Once you’re happy with your word cloud, right-click on the slide and select “Save as Picture” to save it as an image file.
- Prepare your text content.
- Open PowerPoint and select a blank slide.
- Insert a Text Box or WordArt.
- Customize the font size, color, and placement of words.
- Finalize and save your slide.
Creating a word cloud in PowerPoint on Windows 11 is a straightforward and fun process. It adds a creative touch to presentations, making them more engaging and visually appealing. Remember, the key to a great word cloud is choosing the right words and presenting them in a way that’s easy to digest. Don’t shy away from playing with colors, sizes, and placement. With a bit of patience and creativity, you can transform a plain list of words into a work of art that conveys your message powerfully. So, next time you’re looking to spice up your presentation, give it a go – your audience will surely be impressed!

Matt Jacobs has been working as an IT consultant for small businesses since receiving his Master’s degree in 2003. While he still does some consulting work, his primary focus now is on creating technology support content for SupportYourTech.com.
His work can be found on many websites and focuses on topics such as Microsoft Office, Apple devices, Android devices, Photoshop, and more.
Share this:
- Click to share on Twitter (Opens in new window)
- Click to share on Facebook (Opens in new window)
Related Posts
- How to Make Curved Text in Powerpoint 2013: A Step-by-Step Guide
- How to Rotate a Powerpoint Slide Presentation
- How to Download a Google Slides Presentation as a Powerpoint File
- How to End Powerpoint on Last Slide in Powerpoint 2010: A Step-by-Step Guide
- How to Delete a Slide in Powerpoint 2010: Step-by-Step Guide
- How to Check Word Count on Powerpoint 2010: A Step-by-Step Guide
- How to Hide a Slide in Powerpoint 2010: A Step-by-Step Guide
- How Do I Access My Google Cloud? A Step-by-Step Guide
- Can You Save a Powerpoint as a Video in Powerpoint 2013? Find Out Here!
- How to Remove Slide Numbers in Powerpoint 2019: Easy Steps
- How to Delete a Blank Page in Google Docs
- How to Change Slide Size in Powerpoint 2016
- How to Put Embedded Youtube Video in Powerpoint 2010: A Step-by-Step Guide
- How to Add a New Slide in Google Slides: A Step-by-Step Guide
- Troubleshooting Powerpoint Designer Not Working on Windows 11: Fixes and Tips
- How to Make Text Vertical in Google Docs
- How to Mirror Image in PPT Files (An Easy 6 Step Guide)
- How to Loop a Powerpoint Office 365 Slideshow
- How to Embed a YouTube Video in Powerpoint 2013: A Step-by-Step Guide
- How to Make a Powerpoint Slide Vertical in Powerpoint 2013: A Step-by-Step Guide
Get Our Free Newsletter
How-to guides and tech deals
You may opt out at any time. Read our Privacy Policy

- Onsite training
3,000,000+ delegates
15,000+ clients
1,000+ locations
- KnowledgePass
- Log a ticket
01344203999 Available 24/7
What is PowerPoint: A Comprehensive Guide for Beginners
What is PowerPoint? This blog provides the essence of PowerPoint, a versatile presentation software by Microsoft. Discover its features, uses, and the art of crafting compelling slideshows. Whether you're a student, professional, or simply curious, explore the power of PowerPoint and learn how to create impactful presentations effortlessly.

Exclusive 40% OFF
Training Outcomes Within Your Budget!
We ensure quality, budget-alignment, and timely delivery by our expert instructors.
Share this Resource
- Microsoft Dynamics 365 Fundamentals (ERP) MB920
- Microsoft Access Training
- Microsoft Dynamics 365 Fundamentals (CRM) MB910
- Microsoft Word Course
- Microsoft Dynamics 365 Marketing MB220

According to Glassdoor , a PowerPoint designer's average salary in the UK is about £37,811 annually. In this blog, you will learn What is PowerPoint, its key features, its benefits, and how to use it, as well as learn some tips for creating effective presentations.
Table of contents
1) What is PowerPoint?
2) Understanding the PowerPoint Interface
3) Key Features of PowerPoint
4) How to use PowerPoint to create a presentation?
5) Benefits of PowerPoint
6) Tips for Creating Effective PowerPoint Presentations
7) Conclusion
What is PowerPoint?
PowerPoint is a versatile and popular presentation software developed by Microsoft (MS). It is a part of the Microsoft Office Suite and offers various features and tools to create visually appealing and engaging presentations. MS PowerPoint allows users to combine text, graphics, multimedia elements, and animations to convey information effectively .
Evolution of PowerPoint

Understanding the PowerPoint Interface
The PowerPoint interface provides a user-friendly environment for creating and editing presentations. Familiarising yourself with its essential components will help you navigate the software efficiently. Here's a breakdown of the MS PowerPoint interface:
1) Ribbon : The Ribbon is located at the top of the MS PowerPoint window and consists of multiple tabs, such as Home, Insert, Design, Transitions, and more.
2) Slides pane : The Slides pane is on the left side of the PowerPoint window. It displays thumbnail images of your presentation slides, allowing you to navigate and rearrange them easily. You can add, delete, duplicate, or hide slides from this pane.
3) Notes pane : The Notes pane is located below the Slides pane. It provides space for adding speaker notes or additional information related to each slide.
4) Slide area : The Slide area occupies the central part of the PowerPoint window. It displays the selected slide, where you can add and arrange content such as text, images, charts, and multimedia elements .
5) Task panes : Task panes are additional panels on the PowerPoint window's right side. They offer various functionalities such as formatting options, slide layouts, animations, etc. Task panes can be opened or closed based on your specific needs.
Understanding the MS PowerPoint interface will help you navigate the software effectively and make the most of its features. Whether you are creating slides, adding content, or applying formatting, having a good grasp of the interface ensures a smooth and productive experience .
Key Features of PowerPoint
When it comes to creating captivating and professional presentations, MS PowerPoint stands out as versatile and feature-rich software. Its array of tools and functionalities enables users to bring their imagination and ideas to life. Moreover, it also helps engage their audience effectively .

1) Slide Templates : PowerPoint provides a collection of pre-designed templates that make it easy to create visually appealing slides.
2) Slide Master : The Slide Master feature allows users to define the overall layout, font styles, and colour scheme for the entire presentation .
3) Animations and transitions : PowerPoint offers various animation effects and slide transitions to add visual interest and captivate the audience .
4) Multimedia integration : Users can embed images, videos, and audio files directly into their presentations, enhancing the overall impact .
5) Collaboration tools : MS PowerPoint allows multiple users to work on a presentation simultaneously, making it ideal for team projects and remote collaboration .
6) Presenter View : The Presenter View feature gives presenters access to speaker notes, a timer, and a preview of upcoming slides, enabling a seamless presentation experience .
These features collectively contribute to PowerPoint's versatility and make it a powerful tool for developing engaging and impactful presentations.
How to use PowerPoint to create a presentation?
Creating a presentation in PowerPoint is a straightforward process. Whether it's simple animations or explainer videos learning H ow to use PowerPoint is an extremely valuable skill. Here's a step-by-step guide on how to create a presentation:
1) Launch PowerPoint and choose a template or start with a blank slide.
2) Add slides by clicking "New Slide" or using the shortcut key (Ctrl + M).
3) Customise slide content by entering text and inserting visuals.
4) Rearrange slides for a logical flow by dragging them in the slide navigation pane.
5) Apply slide transitions for visual effects in the "Transitions" tab.
6) Add animations to objects in the "Animations" tab.
7) Preview your presentation by clicking "Slide Show".
8) Save your presentation and choose a format (.pptx or .pdf).
9) Share your presentation via email, cloud storage, or collaboration tools.
By following these steps, you can create a well-structured and visually appealing presentation in Microsoft PowerPoint. Remember to keep your content concise, use engaging visuals, and practice your presentation skills to deliver an impactful presentation .
Benefits of PowerPoint

1) Visual appeal : Microsoft PowerPoint allows you to create visually appealing presentations with its wide range of design tools and features. You can use templates, themes, and customisable layouts to make your slides visually engaging and professional .
2) Easy to use : PowerPoint has a user-friendly interface, making it accessible to users of all levels. The intuitive tools and straightforward navigation make it easy to create, edit, and deliver presentations efficiently .
3) Flexibility : PowerPoint provides flexibility in terms of content creation. You can include various types of content, such as text, images, charts, graphs, videos, and audio files, to enhance your message and engage your audience effectively.
4) Organisation and structure : PowerPoint offers features to help you organise and structure your content. You can create multiple slides, use slide masters for consistent formatting, and arrange the sequence of slides to create a logical flow .
5) Presenter tools : PowerPoint includes built-in presenter tools that aid in delivering presentations smoothly. You can use presenter view to see your notes and upcoming slides while your audience sees only the presentation. Additionally, features like slide transitions and animations add visual interest and help you control the flow of information .
6) Collaboration and sharing : PowerPoint allows for easy collaboration and sharing of presentations. Several users can simultaneously work on the same presentation, making it convenient for team projects. You can also share your presentations via email, cloud storage, or online platforms, ensuring easy access for viewers .
7) Integration with other tools : PowerPoint can seamlessly integrate with other Microsoft Office applications, such as Word and Excel. You can import data and charts from Excel or copy and paste content between different Office applications, saving time and effort .
8) Presenter-audience interaction : PowerPoint provides features that facilitate interaction between the presenter and the audience. You can include interactive elements like hyperlinks, buttons, and quizzes to engage your audience and make your presentations more dynamic.
9) Portable and accessible : PowerPoint presentations can be saved in various formats, such as .pptx or .pdf, making them easily accessible on different devices. This portability allows you to deliver presentations on laptops, tablets, or even projectors without compatibility issues .
10) Time and effort savings : PowerPoint simplifies the process of creating presentations, saving you time and effort. The pre-designed templates, slide layouts, and formatting options enable you to create professional-looking presentations efficiently .
Unleash your creativity to deliver captivating presentations that leave a lasting impact with our Microsoft PowerPoint Masterclass – Sign up now!
Tips for Creating Effective PowerPoint Presentations

1) Simplicity is key : Keep your slides clean and uncluttered. Use concise bullet points and simple visuals to convey your message effectively .
2) Visuals matter : Incorporate relevant, high-quality visuals such as images, charts, and diagrams to enhance understanding and engagement .
3) Limit text : Avoid overwhelming your audience with excessive text on slides. Use brief phrases or keywords to communicate key points .
4) Choose legible fonts : Opt for clear and readable fonts that are easy to read, even from a distance. Maintain consistency in font styles throughout your presentation .
5) Consistent design : Maintain a consistent design theme, including colours, fonts, and layout, to create a visually appealing and professional presentation.
6) Emphasise important points : Use visual hierarchy techniques, such as font size, colour, and formatting, to draw attention to essential information .
7) Use transitions and animations sparingly : Incorporate slide transitions and animations thoughtfully, focusing on enhancing content and transitions without distracting the audience .
8) S lide notes for guidance : Utilise the slide notes feature to include additional details, explanations, or reminders for a well-prepared and confident presentation.
9) Practice and time yourself : Rehearse your presentation to ensure smooth delivery and stay within the allocated time. Practice helps you refine your content and delivery.
10) Engage the audience : Encourage audience participation through interactive elements, questions, or discussions to foster engagement and make your presentation more memorable.
By implementing these tips, you can create effective MS PowerPoint presentations that capture attention, communicate information clearly, and engage your audience effectively.
Conclusion
We hope this blog has helped you understand What is PowerPoint and how it can help you. It offers powerful features with a user-friendly interface for creating visually appealing presentations. With its tools for organising information, incorporating text and visuals, and delivering impactful content, PowerPoint is a valuable tool for beginners to communicate their ideas effectively .
Master the art of effective communication and productivity and unlock your potential with our comprehensive Microsoft Office Training – Sign up now!
Frequently Asked Questions
Upcoming office applications resources batches & dates.
Thu 16th May 2024
Thu 6th Jun 2024
Thu 4th Jul 2024
Thu 8th Aug 2024
Thu 5th Sep 2024
Thu 10th Oct 2024
Thu 7th Nov 2024
Thu 5th Dec 2024
Get A Quote
WHO WILL BE FUNDING THE COURSE?
My employer
By submitting your details you agree to be contacted in order to respond to your enquiry
- Business Analysis
- Lean Six Sigma Certification
Share this course
Our biggest spring sale.

We cannot process your enquiry without contacting you, please tick to confirm your consent to us for contacting you about your enquiry.
By submitting your details you agree to be contacted in order to respond to your enquiry.
We may not have the course you’re looking for. If you enquire or give us a call on 01344203999 and speak to our training experts, we may still be able to help with your training requirements.
Or select from our popular topics
- ITIL® Certification
- Scrum Certification
- Change Management Certification
- Business Analysis Courses
- Microsoft Azure Certification
- Microsoft Excel Courses
- Microsoft Project
- Explore more courses
Press esc to close
Fill out your contact details below and our training experts will be in touch.
Fill out your contact details below
Thank you for your enquiry!
One of our training experts will be in touch shortly to go over your training requirements.
Back to Course Information
Fill out your contact details below so we can get in touch with you regarding your training requirements.
* WHO WILL BE FUNDING THE COURSE?
Preferred Contact Method
No preference
Back to course information
Fill out your training details below
Fill out your training details below so we have a better idea of what your training requirements are.
HOW MANY DELEGATES NEED TRAINING?
HOW DO YOU WANT THE COURSE DELIVERED?
Online Instructor-led
Online Self-paced
WHEN WOULD YOU LIKE TO TAKE THIS COURSE?
Next 2 - 4 months
WHAT IS YOUR REASON FOR ENQUIRING?
Looking for some information
Looking for a discount
I want to book but have questions
One of our training experts will be in touch shortly to go overy your training requirements.
Your privacy & cookies!
Like many websites we use cookies. We care about your data and experience, so to give you the best possible experience using our site, we store a very limited amount of your data. Continuing to use this site or clicking “Accept & close” means that you agree to our use of cookies. Learn more about our privacy policy and cookie policy cookie policy .
We use cookies that are essential for our site to work. Please visit our cookie policy for more information. To accept all cookies click 'Accept & close'.
How-To Geek
6 ways to create more interactive powerpoint presentations.
Engage your audience with cool, actionable features.
Quick Links
- Add a QR code
- Embed Microsoft Forms (Education or Business Only)
- Embed a Live Web Page
- Add Links and Menus
- Add Clickable Images to Give More Info
- Add a Countdown Timer
We've all been to a presentation where the speaker bores you to death with a mundane PowerPoint presentation. Actually, the speaker could have kept you much more engaged by adding some interactive features to their slideshow. Let's look into some of these options.
1. Add a QR code
Adding a QR code can be particularly useful if you want to direct your audience to an online form, website, or video.
Some websites have in-built ways to create a QR code. For example, on Microsoft Forms , when you click "Collect Responses," you'll see the QR code option via the icon highlighted in the screenshot below. You can either right-click the QR code to copy and paste it into your presentation, or click "Download" to add it to your device gallery to insert the QR code as a picture.
In fact, you can easily add a QR code to take your viewer to any website. On Microsoft Edge, right-click anywhere on a web page where there isn't already a link, and left-click "Create QR Code For This Page."
You can also create QR codes in other browsers, such as Chrome.
You can then copy or download the QR code to use wherever you like in your presentation.
2. Embed Microsoft Forms (Education or Business Only)
If you plan to send your PPT presentation to others—for example, if you're a trainer sending step-by-step instruction presentation, a teacher sending an independent learning task to your students, or a campaigner for your local councilor sending a persuasive PPT to constituents—you might want to embed a quiz, questionnaire, pole, or feedback survey in your presentation.
In PowerPoint, open the "Insert" tab on the ribbon, and in the Forms group, click "Forms". If you cannot see this option, you can add new buttons to the ribbon .
As at April 2024, this feature is only available for those using their work or school account. We're using a Microsoft 365 Personal account in the screenshot below, which is why the Forms icon is grayed out.
Then, a sidebar will appear on the right-hand side of your screen, where you can either choose a form you have already created or opt to craft a new form.
Now, you can share your PPT presentation with others , who can click the fields and submit their responses when they view the presentation.
3. Embed a Live Web Page
You could always screenshot a web page and paste that into your PPT, but that's not a very interactive addition to your presentation. Instead, you can embed a live web page into your PPT so that people with access to your presentation can interact actively with its contents.
To do this, we will need to add an add-in to our PPT account .
Add-ins are not always reliable or secure. Before installing an add-in to your Microsoft account, check that the author is a reputable company, and type the add-in's name into a search engine to read reviews and other users' experiences.
To embed a web page, add the Web Viewer add-in ( this is an add-in created by Microsoft ).
Go to the relevant slide and open the Web Viewer add-in. Then, copy and paste the secure URL into the field box, and remove https:// from the start of the address. In our example, we will add a selector wheel to our slide. Click "Preview" to see a sample of the web page's appearance in your presentation.
This is how ours will look.
When you or someone with access to your presentation views the slideshow, this web page will be live and interactive.
4. Add Links and Menus
As well as moving from one slide to the next through a keyboard action or mouse click, you can create links within your presentation to direct the audience to specific locations.
To create a link, right-click the outline of the clickable object, and click "Link."
In the Insert Hyperlink dialog box, click "Place In This Document," choose the landing destination, and click "OK."
What's more, to make it clear that an object is clickable, you can use action buttons. Open the "Insert" tab on the ribbon, click "Shape," and then choose an appropriate action button. Usefully, PPT will automatically prompt you to add a link to these shapes.
You might also want a menu that displays on every slide. Once you have created the menu, add the links using the method outlined above. Then, select all the items, press Ctrl+C (copy), and then use Ctrl+V to paste them in your other slides.
5. Add Clickable Images to Give More Info
Through PowerPoint's animations, you can give your viewer the power to choose what they see and when they see it. This works nicely whether you're planning to send your presentation to others to run through independently or whether you're presenting in front of a group and want your audience to decide which action they want to take.
Start by creating the objects that will be clickable (trigger) and the items that will appear (pop-up).
Then, select all the pop-ups together. When you click "Animations" on the ribbon and choose an appropriate animation for the effect you want to achieve, this will be applied to all objects you have selected.
The next step is to rename the triggers in your presentation. To do this, open the "Home" tab, and in the Editing group, click "Select", and then "Selection Pane."
With the Selection Pane open, select each trigger on your slide individually, and rename them in the Selection Pane, so that they can be easily linked to in the next step.
Finally, go back to the first pop-up. Open the "Animations" tab, and in the Advanced Animation group, click the "Trigger" drop-down arrow. Then, you can set the item to appear when a trigger is clicked in your presentation.
If you want your item to disappear when the trigger is clicked again, select the pop-up, click "Add Animation" in the Advanced Animation group, choose an Exit animation, and follow the same step to link that animation to the trigger button.
6. Add a Countdown Timer
A great way to get your audience to engage with your PPT presentation is to keep them on edge by adding a countdown timer. Whether you're leading a presentation and want to let your audience stop to discuss a topic, or running an online quiz with time-limit questions, having a countdown timer means your audience will keep their eye on your slide throughout.
To do this, you need to animate text boxes or shapes containing your countdown numbers. Choose and format a shape and type the highest number that your countdown clock will need. In our case, we're creating a 10-second timer.
Now, with your shape selected, open the "Animations" tab on the ribbon and click the animation drop-down arrow. Then, in the Exit menu, click "Disappear."
Open the Animation Pane, and click the drop-down arrow next to the animation you've just added. From there, choose "Timing."
Make sure "On Click" is selected in the Start menu, and change the Delay option to "1 second," before clicking "OK."
Then, with this shape still selected, press Ctrl+C (copy), and then Ctrl+V (paste). In the second box, type 9 . With the Animation Pane still open and this second shape selected, click the drop-down arrow and choose "Timing" again. Change the Start option to "After Previous," and make sure the Delay option is 1 second. Then, click "OK."
We can now use this second shape as our template, as when we copy and paste it again, the animations will also duplicate. With this second shape selected, press Ctrl+C and Ctrl+V, type 8 into the box, and continue to do the same until you get to 0 .
Next, remove the animations from the "0" box, as you don't want this to disappear. To do this, click the shape, and in the Animation Pane drop-down, click "Remove."
You now need to layer them in order. Right-click the box containing number 1, and click "Bring To Front." You will now see that box on the top. Do the same with the other numbers in ascending order.
Finally, you need to align the objects together. Click anywhere on your slide and press Ctrl+A. Then, in the Home tab on the ribbon, click "Arrange." First click "Align Center," and then bring the menu up again, so that you can click "Align Middle."
Press Ctrl+A again to select your timer, and you can then move your timer or copy and paste it elsewhere.
Press F5 to see the presentation in action, and when you get to the slide containing the timer, click anywhere on the slide to see your countdown timer in action!
Now that your PPT presentation is more interactive, make sure you've avoided these eight common presentational mistakes before you present your slides.
Microsoft Presenter+ review: Become a Teams and PowerPoint presenting pro with THIS
A necessity for presenters who live in teams and powerpoint.

Windows Central Verdict
The Microsoft Presenter+ is an excellent peripheral for public speakers or team members who find themselves on stage (in person or virtually) in front of a PowerPoint presentation on a regular basis. With deep integration with Teams, it's a no brainer for managers and other roles that require presenting.
Sleek and discreet
Good battery life
Cool virtual laser feature
Limited amount of buttons
Can't click on things with the laser
Mute button only works in Teams
Why you can trust Windows Central Our expert reviewers spend hours testing and comparing products and services so you can choose the best for you. Find out more about how we test .
- Availability
- Customization
- Competition
- Should you buy
These days, Microsoft is all about enhancing your workflow with handy productivity-focused software and accessories, and its new Presenter+ remote embodies that philosophy very much so. I love gadgets are that designed for specific use cases, and while it’s certainly not the first of its kind, the Presenter+ is elegant, sleek, and easy to set up and use.
I've been using the Presenter+ for a little over two weeks to conduct presentations and enhance Teams meetings. Here's my review!
Microsoft Presenter+: Price & Availability

The Microsoft Presenter+ is available directly from the Microsoft Store or Amazon and has a retail price of $80. Here are the specs of the product:
Microsoft Presenter+: Design

The Presenter+ features a clean, elegant design that looks good on your desk and discreet in your hand. It's small, lightweight, and feels great to hold thanks to its premium smooth plastic enclosure. The buttons are tactile and easy to press and have a satisfying click to them.
The buttons themselves consist of a large circular mute button at the top, followed by two smaller left and right navigation buttons below it, a pill-shaped "presenting laser" button below those, and a large circular Teams button at the bottom. On the back are a power toggle and Bluetooth pair button.
The back of the remote is covered in a slightly grippy texture, which makes it slightly easier to hold and reduces its ability to slide around on your desk when not in the charging dock. There's also a small Microsoft logo on the back, just below an indented area to rest your finger in as you hold the device.
On the bottom is a USB-C port flanked by two silver prongs, used for charging with the included charging dock. The charging dock itself is a nice inclusion, connected to a USB-A cable that plugs into your computer to supply power. The USB-C port on the remote can also be used for charging.
Microsoft Presenter+: Features

The Presenter+ includes several different features and modes, all designed to enhance your experience when presenting PowerPoint presentations or partaking in Teams meetings. We'll start with the presentation features, which unsurprisingly are a highlight for this remote.
This remote includes a built-in virtual laser function, which can be used to point at and highlight areas of a screen being used to present content. The virtual laser can be used anywhere, in any app by simply holding the laser button and pointing at your screen.
It uses a built-in gyroscope to track the location of the remote, and relatively accurately display the laser where you'd expect it to be. It works very similarly to how LG's Magic Remote works on its TVs, with the ability to point the remote at the screen and use it as a mouse.
The laser button, when paired with the navigation buttons above it, makes for an all-in-one solution for presenting PowerPoint slides on a stage, or even virtually in Microsoft Teams. The only frustrating thing about the laser pointer is that you can't actually click on things with it. Within Windows, you can use it to highlight things, but if you want to click OK on a prompt, you can't.

The remote can also be used as a microphone toggle with the dedicated mute button along the top. This is great for scenarios where you might find yourself walking around a small office while in a meeting, with other colleagues interrupting you in person every so often.
Now, there's no microphone built-in to the remote, so you can't use it as an on-the-go toggle mic, but the mute button will act as a toggle for whatever mic is built-in to the device you have it connected to.
Lastly, the Presenter+ features a vibration motor for tactile signals, which buzz when a Teams meeting starts, you mute or unmute your mic, when the battery is low, and even when you raise and lower your hand. Yes, the remote also functions as a way of raising your hand virtually in Teams meetings. Pretty cool.
Microsoft Presenter+: Customization
Many of the functions and features of the Presenter+ remote can be configured, which means you can dial in how you want to use the remote to your personal taste. For example, you can choose to use the microphone button as a toggle, switching between muted and unmuted states with a click, or use it as a push-to-talk button, only unmuting the mic when the button is held down.
The laser feature can also be customized, including the ability to change the size and color of the laser pointer itself. You can also configure the sensitivity of the gyro, which is great if you find the remote isn't doing a good job of tracking the laser pointer on the screen out of the box.
You can even customize the strength of the tactility motor, increasing or decreasing its strength to suit your preference. You can also turn on and off which features present tactile signals, so if you didn't want it to vibrate when you mute or unmute your mic, you can turn that off.
All of these features can be customized using Microsoft's well-put-together Accessory Center app, which is automatically installed when you pair the remote to a Windows 10 or Windows 11 PC for the first time. The app also includes the ability to "find my remote" by buzzing the vibration motor inside it if you ever lose it.
Microsoft Presenter+: Competition

There are countless clicker devices out there on the market that allow you to control a PowerPoint presentation, and some of them even have actual laser point pointers built in. Peripherals such as the Logitech Presenter R400 , which uses its own wireless receiver for functionality, can be had for just $32. But it doesn't come with any customization software or integration with Microsoft Teams.
There's also the DinoFire Wireless Presenter , which just like the Logitech, uses its own RF receiver for functionality, and a built-in level 2 laser. But again, no Microsoft Teams integration. And that's going to be the big differentiator between other clickers and the Microsoft Presenter+.
The Microsoft Presenter+ offers a virtual laser, in-depth Microsoft Teams integration, a wide array of customizable settings, and even a haptic motor. You're not going to find those things on other clickers on the market.
Microsoft Presenter+ Should you buy

The Microsoft Presenter+ is an excellent peripheral, but only if you find yourself presenting PowerPoint presentations on a regular basis. For everyone else, I don't think it's a necessary investment, as it's pretty easy to navigate a PowerPoint slide without a dedicated accessory.
With that said, the Presenter+ is really only for the people who want or need to look professional on a stage or virtually. They won't want to be seen walking back to a laptop on the corner of the stage to advance to the next slide. They want to stay in their flow and present the next slide as they talk to their audience.
If that's you, then you simply can't go wrong with the Presenter+. The other integrations with Teams are a nice addition, such as raising the remote to raise your hand in the meeting and using the mic button as a toggle.

The Microsoft Presenter+ is an excellent peripheral for public speakers or team members who find themselves on stage (in person or virtually) in front of a PowerPoint presentation on a regular basis.

Zac Bowden is a Senior Editor at Windows Central. Bringing you exclusive coverage into the world of Windows on PCs, tablets, phones, and more. Also an avid collector of rare Microsoft prototype devices! Keep in touch on Twitter and Threads
How to View Pictures as Slideshow on Windows 11
Windows 11 offers several convenient ways to view and enjoy your photos, including the ability to create and view picture slideshows. Whether you want to showcase a collection of vacation photos, create a digital photo album, or simply enjoy a slideshow of your favorite images, Windows 11 provides intuitive tools to make it happen. In this detailed guide, we’ll explore various methods to view pictures as a slideshow on Windows 11, covering both built-in features and third-party options for a seamless viewing experience.
Using the Photos App in Windows 11
The Photos app in Windows 11 is a versatile tool for managing and viewing your image collections. It offers a simple and user-friendly interface, making it easy to create and play picture slideshows. Here’s how to do it:
Method 1: Creating and Playing a Slideshow
- Open the Photos App: Click on the Start button and search for “Photos” to open the Photos app.
- Navigate to Your Pictures: In the Photos app, navigate to the folder containing the pictures you want to include in the slideshow.
- Select Multiple Pictures: Hold down the Ctrl key on your keyboard and click on each picture you want to include in the slideshow. Alternatively, you can select all pictures in a folder by pressing Ctrl + A.
- Create Slideshow: With the pictures selected, click on the “Slideshow” button in the top-right corner of the Photos app window. This action will start the slideshow with the selected pictures.
Method 2: Customizing Slideshow Settings
The Photos app allows you to customize various settings for your slideshow to enhance your viewing experience. Here’s how to do it:
- Open the Slideshow Settings: While the slideshow is playing, move your mouse cursor to the bottom of the screen to reveal the playback controls.
- Access Slideshow Options: Click on the three dots (…) icon to access additional options for the slideshow.
- Adjust Slideshow Settings: In the options menu, you can adjust settings such as slideshow speed, shuffle mode, and transition effects.
- Play Background Music: If desired, you can also add background music to your slideshow by clicking on the music note icon and selecting a music file from your computer.
Method 3: Full-Screen Slideshow
To view your slideshow in full-screen mode for an immersive experience, follow these steps:
- Enter Full-Screen Mode: While the slideshow is playing, click on the full-screen icon (square with arrows) in the bottom-right corner of the Photos app window.
- Navigate Slides: Use the left and right arrow keys on your keyboard or click on the arrows in the slideshow interface to navigate between slides.
- Exit Full-Screen Mode: To exit full-screen mode and return to the Photos app interface, press the Esc key on your keyboard or click on the “Exit Full Screen” button.
Using File Explorer in Windows 11
In addition to the Photos app, you can also view pictures as a slideshow directly from File Explorer in Windows 11. This method is convenient when you want to view pictures stored in specific folders or locations. Here’s how to do it:
Method 1: Selecting Pictures for Slideshow
- Open File Explorer: Click on the File Explorer icon in the taskbar or search for “File Explorer” in the Start menu to open it.
- Navigate to Your Pictures: In File Explorer, navigate to the folder containing the pictures you want to include in the slideshow.
- Select Pictures: Click and drag to select multiple pictures or hold down the Ctrl key and click on each picture you want to include.
- Start Slideshow: With the pictures selected, click on the “Slide show” button in the File Explorer toolbar. This action will start the slideshow with the selected pictures.
While viewing the slideshow in File Explorer, you can customize settings such as slideshow speed and transition effects. Here’s how to do it:
- Access Slideshow Options: While the slideshow is playing, move your mouse cursor to the top of the screen to reveal the playback controls.
- Adjust Slideshow Settings: Click on the “Options” button to access slideshow settings.
- Customize Settings: In the options menu, you can adjust settings such as slideshow speed, shuffle mode, and transition effects.
- Play Background Music: If desired, you can play background music during the slideshow by clicking on the music note icon and selecting a music file.
Using Third-Party Software for Advanced Slideshows
While Windows 11 provides built-in tools for viewing picture slideshows, you may also consider using third-party software for more advanced slideshow features and customization options. Here are some popular third-party slideshow software options for Windows 11:
Option 1: Adobe Lightroom
Adobe Lightroom is a powerful photo editing and management software that includes advanced slideshow creation features. You can create customized slideshows with transitions, music, captions, and more. Here’s how to create a slideshow in Adobe Lightroom:
- Import Photos: Open Adobe Lightroom and import the photos you want to include in the slideshow.
- Create Slideshow: Go to the Slideshow module and arrange your photos in the desired order.
- Customize Settings: Customize slideshow settings such as transitions, music, captions, and timing.
- Export Slideshow: Once you’re satisfied with the slideshow, export it as a video file or share it directly from Lightroom.
Option 2: Microsoft PowerPoint
Microsoft PowerPoint is not only a presentation software but also a versatile tool for creating photo slideshows. Here’s how to create a slideshow in Microsoft PowerPoint:
- Open PowerPoint: Launch Microsoft PowerPoint and start a new presentation.
- Insert Photos: Insert the photos you want to include in the slideshow onto individual slides.
- Customize Slides: Customize each slide with transitions, animations, captions, and timing.
- Add Background Music: Insert audio files to play background music during the slideshow.
- Play Slideshow: Once your slideshow is ready, click on the “Slide Show” tab and choose “From Beginning” to play the slideshow.
Option 3: Photostage Slideshow Software
Photostage Slideshow Software is a dedicated tool for creating professional-looking photo slideshows with ease. It offers various features such as transitions, music, effects, and more. Here’s how to create a slideshow using Photostage:
- Import Photos: Open Photostage and import the photos you want to include in the slideshow.
- Arrange Slides: Arrange your photos in the desired order and customize each slide with transitions and effects.
- Add Music: Import audio files to add background music to the slideshow.
- Preview and Export: Preview the slideshow to ensure everything looks as desired, then export it as a video file or share it directly from Photostage.
Tips for Creating Engaging Slideshows
Whether you’re using built-in tools or third-party software, here are some tips to create engaging and captivating photo slideshows:
- Choose High-Quality Photos: Use high-resolution and clear photos for a professional look.
- Organize Photos: Arrange photos in a logical sequence to tell a story or create a theme.
- Use Transitions Wisely: Choose transitions that complement the mood and style of your slideshow.
- Add Background Music: Select appropriate music that enhances the viewing experience without overpowering the visuals.
- Include Captions or Titles: Add captions, titles, or descriptions to provide context or information about the photos.
- Keep it Concise: Avoid overcrowding slides with too many photos or text. Keep the slideshow concise and focused.
- Preview and Test: Preview the slideshow before sharing it to ensure everything looks and sounds as intended.
- Share and Enjoy: Once your slideshow is ready, share it with friends, family, or colleagues and enjoy the experience together.
Viewing pictures as a slideshow on Windows 11 is a delightful way to relive memories, showcase your photography skills, or create engaging presentations. Whether you prefer using the built-in Photos app, File Explorer, or third-party software, Windows 11 offers versatile options for creating and enjoying picture slideshows. By following the methods and tips outlined in this guide, you’ll be able to create captivating slideshows that impress and inspire your audience. Happy slideshow viewing!
Leave a Comment Cancel reply
Save my name, email, and website in this browser for the next time I comment.

Software, Tutorials, Reviews, Guides for Windows 10 & 11
7 creative ways to use PowerPoint
- PowerPoint needs no introduction, being the go-to app for making beautiful or not so beautiful presentations.
- But PowerPoint can be used for much more than presentations, as the experts we’ve interviewed will tell us.
- Read on and find out seven cool ways you can use Microsoft PowerPoint.

We’re continuing our “Ask the Experts” series, which is not the official name, just yet, with this piece that aims to uncover the most creative uses of Microsoft PowerPoint
For this, we’ve gathered again insights from seven professionals, including CEOs and Managing Directors. From crafting visual project plans to storyboarding marketing campaigns, we get to explore the diverse and interesting ways these experts leverage PowerPoint in their daily work.
Craft Visual Project Plans
Create interactive data dashboards, use powerpoint for efficient note-taking, incorporate 3d models for dynamic presentations, utilize storytelling for customer engagement, generate mind maps using powerpoint, produce storyboard marketing campaigns.
- 1 Craft Visual Project Plans
- 2 Create Interactive Data Dashboards
- 3 Use PowerPoint for Efficient Note-Taking
- 4 Incorporate 3D Models for Dynamic Presentations
- 5 Utilize Storytelling for Customer Engagement
- 6 Generate Mind Maps Using PowerPoint
- 7 Produce Storyboard Marketing Campaigns
As a handyman, I find that one of the most interesting ways to use Microsoft PowerPoint is for creating visual project plans and tutorials. While PowerPoint is often associated with business presentations, it can be a powerful tool for breaking down complex DIY projects into easy-to-follow steps.
For example, when planning a room renovation, I might create a PowerPoint presentation that includes slides for each stage of the project, from demolition to finishing touches. Each slide can feature images, diagrams, and bullet points that outline the necessary tools, materials, and techniques for completing that stage of the project.
John Cammidge , PPC Consultant, John the Handyman
One of the most interesting and impactful ways we’ve leveraged Microsoft PowerPoint is not just for standard presentations, but for creating dynamic, interactive dashboards for our clients. This approach transforms PowerPoint from a mere presentation tool into an interactive platform for data visualization and strategic analysis.
For example, during a comprehensive market analysis project, we used PowerPoint to develop a dashboard that allowed the client to interact with various data sets directly within the slides. By embedding Excel sheets and utilizing active hyperlinks, we enabled the client to toggle between different views and drill down into specific metrics, such as market share, demographic breakdowns, and competitive landscapes. This interactive functionality was further enhanced with the integration of graphics and animations that dynamically updated as the client interacted with the embedded data.
This use of PowerPoint as an interactive tool significantly improved the client’s engagement with the presented data, making complex information more accessible and understandable. It also allowed for a more flexible presentation format where the client could navigate the information at their own pace, exploring different data points as they saw fit during our meetings.
Niclas Schlopsna , Managing Consultant and CEO, spectup
I use PowerPoint for note-taking. I’ve found it to be the best note-taking software so far. It’s easy to draw when I try to explain something to my colleagues. When I read a paper or an article, I take a screenshot of it, put it on a page in my slide, and annotate it there. A drawback is that the slide cannot be too large; otherwise, it will take a long time to open.
Jugnu Nagar , SEO Specialist, GREAT Guest Posts
One of the most interesting ways I’ve used Microsoft PowerPoint is by incorporating 3D models into my presentations. Instead of sticking with flat, 2D images, I add depth and dynamism by using 3D graphics.
For instance, when explaining complex concepts, I can rotate a 3D model for a full 360-degree view, which really captures the audience’s attention. Plus, using the Morph transition, these models can smoothly animate from one slide to the next, making the entire presentation feel like a seamless journey. It’s a fantastic way to make any presentation stand out.
James McNally , Managing Director, SDVH [Self Drive Vehicle Hire]
We’ve taken Microsoft PowerPoint beyond its conventional use for presentations and leveraged it as a powerful tool for storytelling and customer engagement. One of the most interesting ways we utilize PowerPoint is by crafting interactive, visually appealing stories that detail the before-and-after experiences of our mobile car detailing services.
These stories not only demonstrate the transformations we achieve but also allow us to embed videos, testimonials, and real-time feedback forms directly into the presentations. This creative approach has not only enhanced our pitches to corporate clients but also significantly improved our engagement rates at trade shows and on social media platforms.
David Bui , Director and Business Specialist – Automotive & Automations, Schmicko
One of the most interesting ways I’ve used Microsoft PowerPoint is by creating mind maps directly within the program. Mind maps are invaluable for brainstorming and fleshing out new ideas. Normally, you might use specialized software, but doing it in PowerPoint is surprisingly straightforward and integrates seamlessly into my workflow.
I just use the SmartArt feature, which is incredibly adaptable. Whether organizing thoughts in a hierarchical format or connecting ideas in a process flow, SmartArt automatically adjusts the layout and text sizes, making everything fit perfectly on a single slide. It’s a creative and effective tool to visually map out concepts.
Danilo Miranda , Managing Director, Presenteverso
The most interesting way we use Microsoft PowerPoint goes beyond traditional presentations; we harness its capabilities to craft storyboards for our marketing campaigns and client proposals.
This unique approach allows us to visually narrate the essence of our personalized handwritten note service, enabling both our team and clients to visualize the impact of our offerings in a compelling, easily digestible format.
Through this innovative use of PowerPoint, we not only streamline our creative process but also enhance our communication, making complex concepts more accessible and engaging.
Rick Elmore , CEO, Simply Noted
Want 5 cool ways to use Excel? We’ve got you covered .
If I may, I’ll end with my own example. As you may know, Word is terrible when it comes to using tables, and Excel is very limited outside tables.
This is how I got to use PowerPoint to create my first digital stationary, the Windows 11 Essentials Cheat Sheet , a 2-page PDF with the most important shortcuts to get around the Windows desktop operating system.
By the way, if you subscribe to our free newsletter, you can download this cheat sheet for free. I would really appreciate it if you did and let me know if you like my tips for getting back your time when you work.

5 cool ways to use Excel for more than just spreadsheets according to experts

Why isn’t Linux popular among desktop users? We asked the experts

Keyboard shortcuts to speed through text editing in a document

Zoom In and Out keyboard shortcuts for (almost) any application

How to secure your important files in OneDrive’s Personal Vault

Wintoys review: a free Windows tweaker, optimizer, debloater tool

The keyboard shortcut to insert a link in a document

Microsoft Privacy Dashboard: only a bit useful
Your email address will not be published. Required fields are marked *
Our readers appreciate heated debates, as long as they remain polite, so they ask for your respect, even if you don't completely agree with them. Thanks!
Post comment

Upgrade from PowerPoint 2013 to Microsoft 365
Still using PowerPoint 2013? Design professional-looking presentations easily with PowerPoint in Microsoft 365. Enjoy premium features like Designer, Inking, and more.

What’s new with PowerPoint in Microsoft 365?

Make your presentations stand out
Convey your ideas with cinematic motion, rich animation, and beautiful design. Enhance slides with 3D models and icons. Bring your presentation to life with intelligent technology in just a few steps.
Present with confidence
Tell your story like a pro with notes on every slide only visible to you. Easily translate slides into other languages. Use the accessibility checker to make sure no one misses a thing.

Do your best work together
Collaborate with your team on your presentation. Use real-time coauthoring and commenting with Microsoft 365. Save your work to the cloud to easily share it and access it on any device, from anywhere, any time.
Compare PowerPoint 2013 and PowerPoint with Microsoft 365
Ready for microsoft 365, top questions, what’s the difference between office 2013 and microsoft 365.
Office 2013 include essential applications such as Word, Excel, PowerPoint, and Outlook. They’re available as a one-time purchase for use on a single PC.
Microsoft 365 plans include premium versions of these applications plus other services that are enabled over the Internet, including online storage with OneDrive and Skype minutes for home use. With Microsoft 365 you get the full, installed Office experience on PCs, Macs, tablets (including iPad® and Android™ tablet) and phones. Microsoft 365 plans are available as a monthly or annual subscription. Learn more .
How do I know if my computer can run Microsoft 365?
See system requirements for compatible versions of Windows and macOS, and for other feature requirements.
Is internet access required for Microsoft 365?
You don’t need to be connected to the Internet to use Office applications, such as Word, Excel, and PowerPoint, because the applications are fully installed on your computer.
However, Internet access is required to install and activate all the latest releases of Office suites and all Microsoft 365 subscription plans. For Microsoft 365 plans, Internet access is also needed to manage your subscription account, for example to install Office on other PCs or to change billing options. Internet access is also required to access documents stored on OneDrive, unless you install the OneDrive desktop app.
You should also connect to the Internet regularly to keep your version of Office up to date and benefit from automatic upgrades. If you don’t connect to the Internet at least every 31 days, your applications will go into reduced functionality mode, which means that you can view or print your documents but cannot edit the documents or create new ones. To reactivate your Office applications, reconnect to the Internet.
Will I still have control of my documents with Microsoft 365?
Yes. Documents that you have created belong fully to you. You can choose to store them online on OneDrive or locally on your PC or Mac.
If you cancel your subscription or it expires, you can still access and download all your files by signing in to OneDrive directly using the Microsoft account you used to set up Microsoft 365. You do lose the additional storage that comes with your subscription, so you must save your files elsewhere or buy more OneDrive storage if your OneDrive account exceeds the free storage quota.
When would my subscription start?
If you purchase an auto-renew subscription, your subscription starts when you complete your purchase. You can purchase auto-renew subscriptions from Office365.com, MicrosoftStore.com, iTunes®, and some other retailers. If you purchase a pre-paid subscription, your subscription starts when you activate your subscription and land on your My Account page. You can purchase pre-paid subscriptions from a retailer or reseller, or a Microsoft support agent.
How do I share Microsoft 365 with other people?
If you have an active Microsoft 365 Family subscription, you can share it with up to five other people (six total). Each person you share your subscription with can use any of your available installs on their PCs, Macs, iPads, Android tablets, Windows tablets, iPhones® or Android phones, get an additional 1 TB of cloud storage, and manage their own installs from www.account.microsoft.com .
To add someone to your subscription, visit www.office.com/myaccount and follow the onscreen instructions to add a user. Each person you add will receive an email with the steps they need to follow. Once they have accepted and completed the steps, their information, including the installs they are using, will appear on your My Account page. You can stop sharing your subscription with someone or remove a device they are using at www.office.com/myaccount .
What is “the cloud”?
“The cloud” is a friendly way of describing web-based computing services that are hosted outside of your home or organization. When you use cloud-based services, your IT infrastructure resides off your property (off-premises), and is maintained by a third party (hosted), instead of residing on a server at your home or business (on-premises) that you maintain. With Microsoft 365, for example, information storage, computation, and software are located and managed remotely on servers owned by Microsoft. Many services you use every day are a part of the cloud—everything from web-based email to mobile banking and online photo storage. Because this infrastructure is located online or “in the cloud,” you can access it virtually anywhere, from a PC, tablet, smartphone, or other device with an Internet connection.
PowerPoint 2013 resources
Powerpoint 2013 help topics.
Updates are required for support. Please update to Microsoft 365 to get product support.
Other versions of Office
Learn about other versions of Office and how you can upgrade to the new Microsoft 365.
Download Office 2013
Download and install Office 2013 using an existing product key.
- A Microsoft 365 subscription unlocks the most up-to-date premium version of PowerPoint on all your devices. Previous versions include PowerPoint 2013 , PowerPoint 2010 , PowerPoint 2007 , and PowerPoint 2003.
- iTunes, iPhone, and iPad are registered trademarks of Apple Inc., registered in the U.S. and other countries. Android is a trademark of Google Inc.
Follow Microsoft 365

- Web Development
How to Insert Hyperlinks in Microsoft PowerPoint on Windows 11
Posted on 18th june 2023.
Microsoft PowerPoint is a presentation program that is part of the Microsoft Office suite of productivity applications. PowerPoint is used to create slideshows that can be presented on a projector or a large screen. PowerPoint slides can also be included in a Microsoft Word document or exported to a PDF.
Instructions
1. open microsoft powerpoint., 2. click on the “insert” tab., 3. click on the “hyperlink” button., 4. enter the url of the website that you want to link to in the “address” field., 5. enter the text that you want to use for the hyperlink in the “text to display” field., 6. click on the “ok” button., 7. save your powerpoint presentation..
- You can also insert hyperlinks to other PowerPoint slides. To do this, click on the “Slide” button in the “Link to” field.
- If you want to link to a specific place on a webpage, you can enter the anchor name in the “Anchor” field.
Microsoft PowerPoint is a presentation program that helps you create professional-looking slideshows. You can insert hyperlinks in Microsoft PowerPoint to link to other slides in your presentation, or to link to a website.
To insert a hyperlink in Microsoft PowerPoint:
1. Select the text or object that you want to hyperlink.
2. Click the Insert tab.
3. Click the Hyperlink button.
4. In the Insert Hyperlink dialog box, type the URL of the website that you want to link to, or click the Browse button to select a file.
5. Click the OK button.
Your hyperlink will now be inserted into your PowerPoint presentation.
If you want to insert a hyperlink in Microsoft PowerPoint on Windows 11, there are a few different ways to do it. You can either use the Insert Hyperlink tool on the Insert tab, or you can select the text or object you want to hyperlink and use the Ctrl+K keyboard shortcut.
To use the Insert Hyperlink tool:
1. On the Insert tab, in the Links group, click Hyperlink.
2. In the Insert Hyperlink dialog box, do one of the following:
– To link to a file, under Link to, click Existing File or Web Page. Then, under Link to, click Browse the Web, and enter the URL of the page you want to link to.
– To link to a slide in another presentation, under Link to, click Place in This Document. Then, in the Slide pane, click the slide that you want to link to.
– To link to an e-mail address, under Link to, click E-mail Address. Then, in the E-mail Address box, type the e-mail address you want to link to.
– To link to a new document, under Link to, click Create New Document. Then, in the File name box, type the name of the new document.
3. If you want to display a different text when you rest the mouse pointer over the hyperlink, in the Text to display box, type the text.
4. If you want to change the color or style of the hyperlink text, under Display options, click the options you want.
5. To specify how the linked document or file will open when you click the hyperlink, under Actions, click the options you want.
6. Click OK.
To use the Ctrl+K keyboard shortcut:
1. Select the text or object you want to hyperlink.
2. Press Ctrl+K.
3. In the Insert Hyperlink dialog box, do one of the following:
4. If you want to display a different text when you rest the mouse pointer over the hyperlink, in the Text to display box, type the text.
5. If you want to change the color or style of the hyperlink text, under Display options, click the options you want.
6. To specify how the linked document or file will open when you click the hyperlink, under Actions, click the options you want.
7. Click OK.
Before you can insert a hyperlink in PowerPoint, you need to have your presentation open and have selected the text or object that you want to turn into a link.
Once you have your presentation open and have selected the text or object you want to turn into a link, do the following:
If you want to link to a file that’s stored on your computer or on a network, click Existing File or Web Page under Link to, and then locate and click the file you want to link to.
If you want to link to a new document that you’re creating now, click Create New Document under Link to, and then type a name for the new document.
If you want to link to an existing webpage, click Existing Web Page under Link to, and then type or paste the URL of the page in the Address box.
If you want to link to an email address, click E-mail Address under Link to, and then type the email address in the Address box.
3. If you want the link to open in a new browser window, select the Open this link in a new window check box.
4. Click OK.

Previous Post - How to Implement Chat-based User Authentication in a Custom WordPress Plugin using ChatGPT PHP

Next Post - How to Remove Blemishes and Imperfections in Affinity Photo
- Uncategorized
Search for: Search Button
Make a self-running or kiosk display in PowerPoint
PowerPoint can show slides on a screen as a high-tech signboard, using a self-running presentation known as Kiosk display. Here’s how to do it plus all the settings and tricks available.
We’ve all seen screens displaying information on a series of slides – maybe in a shop or conference. Maybe as a prelude or postscript to a presentation. These days it’s easy to setup a laptop with an external screen almost anywhere to make a high-tech signboard.
At a party or celebration you can use Powerpoint to display photos (with or without captions) of the guest of honor.
There’s various ways to do it but the main one is PowerPoint. Many of us have PowerPoint but never use it because we think of it as being for speeches. In fact there’s plenty of other uses.
PowerPoint Kiosk mode
At its basic level, PowerPoint’s Kiosk mode is merely a different way to display a presentation. Instead of clicking to move between slides, PowerPoint will automatically display the slides going in an infinite loop … until someone presses Escape.
Go to the Slide Show tab, Set up Slide Show … it’s a PowerPoint dialog that hasn’t changed for many years/versions.
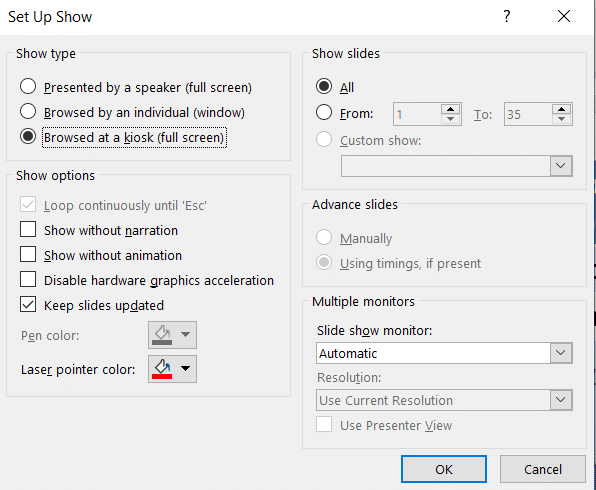
Choose ‘ Browsed at a kiosk (full screen) ‘ and click OK.
That’s as far as most people go in explaining Kiosk mode but, as usual with Office, there’s a lot more going on and Office-Watch.com is here to help.
Browsed by Individual
The Browsed by individual (window) option lets someone use a mouse or keyboard to move through the slides at their own pace. In this case the slides can change automatically (if no human intervention) or only when asked – see the Advance slide options on the Set Up Show dialog.
To make the self-guided presentation more accessible, you should add action buttons (forward / back etc) to the slide master so the buttons appear on all slides. Make the mouse available to users and they can click to their heart’s content.
Show without narration
PowerPoint presentations can have an audio track or narration included. This option lets you let that audio be heard as the slides progress or not. The default is for the narration to be heard (i.e selection unchecked).
Show without animation
Slides can have animations or motions on them – for example bullet points appearing one by one. Check this box if you don’t want the animations – in other words, the slide appears all at once.
Disable hardware graphics acceleration
Usually you’d leave this off, but if there are problems with the display this might help.
Show slides
Show all the slides or just a range from a larger presentation.
Advance slides
In kiosk mode, PowerPoint lets each slide appear for a few seconds unless there’s a slide timing set (at Transitions | Timing | Advance slide | After:
Multiple Monitors
Very useful if you have a second monitor. Use the pull down list to select the screen to display the presentation.
Why won’t the slide/s move?
If your kiosk presentation is stuck on a slide, or the first slide, make sure the Advance Slide timing is set higher than zero at Transitions | Timing | Advance slide | After:
After setting a value (in seconds) click Apply to All to set that as the default display time for all slides.
Sometimes the Advance Slide After: value is set to zero. If that happens PowerPoint will obey the zero timing set and never move past that slide, even though it makes no sense in Kiosk mode.
How to wait longer or shorter on one slide
Some slides deserve more time to read while others you might want to whizz by. After setting the default timing (see ‘Why won’t the slides move?’) go to individual slides and change the Transitions | Timing | Advance slide | After: for that slide only.
You can also select multiple slides from the slide sorter and apply a timing to all the selected slides in one go.
Starting Kiosk Mode
To start a kiosk presentation, just click the Slide Show | From Beginning or From Current Slide buttons.
Stopping Kiosk Mode
Stopping the presentation by just pressing the Escape button. If you don’t want people to do that, hide the keyboard out of sight.
Blocking the ESCape route
There’s always some smartie who will try to bypass the automatic presentation and get access to an unattended computer. To make things more difficult for them, use the No ESCape add-in for PowerPoint 2000-2007. This will disable the Escape key option in Powerpoint. We’ve not found an equivalent for PowerPoint 2010 and beyond.
If you use this add-in make sure you add your own escape route. Add an invisible shape to a slide (probably the last) with the on click action set to End show.
Self running presentation packages
Another option is to create a self-contained PowerPoint Show (.ppsx) that can be run on another computer without additional software.
Simple Self-running Presentations
The simplest self-running presentations are just a collection of photos . You can add captions or headings if you like or just put each photo, full size, on a slide.
A new Kiosk presentation
Aside from the setup mentioned above, there’s nothing special about presentation used in kiosk mode.
You can make a presentation that has just photos – a traditional photo album on the screen. It can be a point of discussion or derision at a party or meeting.
Below is the step-by-step to make a presentation with photos, or … you can use the easy way … PowerPoint Photo Album .
Choose a background color (probably black or white) at Design | Customize | Format Backround. The background is necessary because some images won’t be the same proportions as the screen, leaving edges where the background will appear.
Change the slide layout to one that suit you. For full screen photos, choose ‘Blank’ layout.
Then add your photos. On each new slide click Insert | Picture then adjust the image to fit the slide.
There are ‘photo only’ presentation software programs out there, just search for then. Some have the advantage of working with all the photos in a nominated folder. It’s easy to change the presentation by simply changing the images in that folder. At a pinch, a photo screen saver can be used.
Videos in PowerPoint Kiosk mode
PowerPoint Photo Album
About this author

Office-Watch.com
Office 2021 - all you need to know . Facts & prices for the new Microsoft Office. Do you need it? Office LTSC is the enterprise licence version of Office 2021.
Office 2024 what's known so far plus educated guesses. Microsoft Office upcoming support end date checklist.
Latest from Office Watch
- All about Office 2024 for Windows and Mac (so far)
- Microsoft Office font spacing mystery and how to fix
- Steganography used to hide Word and Excel attack
- Microsoft Office support end dates checklist
- Recycling – good. Paper shredding – good. Together – not so good.
- Microsoft 365 instant account switching
- Faster Office File management on the fly
- Making pictures smaller - some more options.
- Smaller images make smaller documents in Word and Office
- Microsoft (again) announces 365 Basic plan extras
- Paper Sizing tricks in Microsoft Word
- Coin 🪙 emoji in Word, Excel, PowerPoint and Outlook
- Share a link to a specific PowerPoint slide
- Translate automatic or manual in Outlook
- Microsoft Mesh makes “magical” online meetings
- Why are Teams and Office divorcing?
- Pivotby – Excel’s new faster PivotTables
- More Excel on the web improvements
- All about editing an incoming Outlook message
- What “Update License” means on Microsoft 365 menus
- Get One: Tornado Alert Apps
- The Best Tech Gifts Under $100
The 8 Best Free PowerPoint Alternatives
Professional results for tight budgets
:max_bytes(150000):strip_icc():format(webp)/JenAllen-214879-65542c15d7fa42b6ba2c61cc14c4a8b8.jpg "powerpoint presentation windows 11")
- Swansea University, Staffordshire University
Microsoft PowerPoint is a great tool for creating professional-looking slideshows and presentations. However, the home version requires a Microsoft 365 subscription, and the free mobile app locks some features behind the sub as well. Fortunately, there are plenty of free PowerPoint software alternatives out there. Here's a look at some of the best options and how they compare to PowerPoint.
Best Direct PowerPoint Replacement: Google Slides
Very similar to PowerPoint.
Free to use.
Compatible with PowerPoint.
An internet connection is strongly recommended.
Where there's a need for an app, Google seems to have it covered. Google Slides is its PowerPoint equivalent and it's a lot like Microsoft's app. Very simple to use and offering full compatible with the alternative, you can access Google Slides via your browser and easily create custom presentations with audio and your own images, all entirely for free. It also offers great live collaboration features for teamwork purposes.
The only minor downside is you need an internet connection to at least get started but the service does also work offline with presentations syncing once you're back online.
Best for Designers: Prezi
Video editing included.
Can easily make data visualizations.
Stylish user interface.
Free option is pretty basic.
No support.
Presentations viewable by all.
Prezi is a great option for designers who have a vision but aren't technically proficient at achieving it. Its simple drag and drop interface makes it a breeze to organize your presentation just how you want it. Backed up with other Prezi apps that mean you can create videos or more stylish data visualizations than simple graphs, it's ideal for industries that are more visual than others. A series of pre-made templates makes it all the more attractive.
Prezi isn't as free as it seems though. To get the full wealth of features like advanced image editing, offline access, and narration, you'll need to pay a subscription fee.
Best for Quick Results: Zoho Show
A theme for every occasion.
Quick to create something.
Intuitive interface.
Need to be online to use it.
Simple to use yet highly effective is the sweet spot for quick results, and that's certainly the case with Zoho Show. You might need to be online to use it, but it's worth the connection with an intuitive user interface that adapts to what you need to do. You can easily embed videos, tweets, and images into your presentations with some neat transition effects making things more interesting.
Collaboration tools further sweeten the deal with annotation features meaning you can work together well as a team and fast.
Best for Animations: Powtoon
Great animation tools.
Easy to use.
Can export to social media platforms.
Branding applied on free presentations.
More about animations than slideshows.
PowToon tackles PowerPoint presentations from a slightly different angle than a lot of its competitors. It's primarily great for creating full animations and videos rather than presentations that you would click through and present yourself. That lends itself perfectly to the internet which is why it's so useful that you can export your presentations to various forms of social media.
With a drag and drop template, you can create something within about 20 minutes from your browser. The free version bundles in branding logos so viewers will always know you've used PowToon to create them but that's a small price to pay for an otherwise very accessible and simple to use piece of software.
Best for Mass Branding: Renderforest
Plenty of options for expanding branding.
300MB cloud storage for free.
Unlimited exports.
Exports can be low in quality.
Content is watermarked.
RenderForest thinks of itself as more than just a PowerPoint alternative. It tackles everything you might need from creating logos to designing promo videos, music visualizations, landing pages, and websites. That's on top of its extensive animations and intro creation. That might sound intimidating but the service keeps things simple, so it won't take you long to mock something up and develop it.
Stick to the free version and there are some restrictions such as branding on your videos, lower quality logos, and so forth, but it's a solid start for an otherwise entirely free service. In particular, if you just need to concoct a quick 3-minute video for a presentation, RenderForest has you covered.
Best for Non-Designers: Visme
Plenty of templates to choose from.
Can set up five projects at once.
Charts and widgets support.
Limited cloud storage.
Visme branding on free plan.
Been asked to make a presentation and you don't know where to start? Visme is perfect for those that aren't well versed with graphics as it offers an extensive template library. The free plan limits your options a little but there are still some decent choices here. In addition, the service provides cool ways to make stats and data look exciting thanks to chart and widget support. It's all done through a simple drag and drop interface too that makes it super simple to add video and embed other content.
Just bear in mind that storage options are a little limited and everything on the free plan will contain Visme branding.
Best for Office Replacement: LibreOffice Impress
Full program rather than browser-based.
Extensive support.
Similar experience to Microsoft Office.
Requires installation.
Not quite as intuitive as alternatives.
LibreOffice is a popular free alternative to Microsoft Office, so it makes sense to use LibreOffice Impress if you want the closest experience to Microsoft's package. Unlike most of the others here, you need to install LibreOffice on your PC or Mac which means it's no good for Chromebooks or moving between different systems. However, in exchange, you get an intuitive experience that makes it simple to create slideshows, whether you're handing them out to a class or conference afterwards, or simply projecting them on screen.
Bear in mind you have to seek out templates yourself though which may be off-putting for the least technically minded user out there.
Download for:
Best for Apple Users: Keynote
Simple to use.
Apple Pencil support.
Cloud based as well as app based.
App is only on Apple devices.
Keynote is Apple's direct competitor to Microsoft PowerPoint and it's a great alternative, especially if you're a Mac user. With app support for iOS and Mac, it takes seconds to get started. Alternatively, PC users can use Keynote via the iCloud website and easily work across multiple devices.
One of the best features is the ability to use the Apple Pencil on an iPad to create diagrams or illustrations making it great for skilled artists. As well as that, Apple provides plenty of convenient templates for personal and professional projects.
Get the Latest Tech News Delivered Every Day
- Best Free Family Feud PowerPoint Templates
- How to Use Microsoft's Free PowerPoint Viewers
- The 8 Best Slideshow Apps of 2024
- The 8 Best Spotify Alternatives in 2024
- 10 Free PowerPoint Game Templates
- The 8 Best Google Drive Add-ons for 2024
- The 8 Best Gmail Alternatives of 2024
- 5 Best Free PowerPoint Background Sites
- 5 Best Free Online Word Processors for 2024
- The 10 Best Note Taking Apps of 2024
- The 8 Best Android Productivity Apps of 2024
- 19 Best Free Cloud Storage Services for Backup in 2024
- 5 Best Free Presentation Software Programs
- The 8 Best Video Mergers of 2024
- The Best Free Skype Alternatives of 2024
- The 8 Best Pedometer Apps for iPhone in 2024

Cloud Storage

Custom Business Email

Video and voice conferencing

Shared Calendars

Word Processing

Spreadsheets
Presentation Builder

Survey builder

Google Workspace
An integrated suit of secure, cloud-native collaboration and productivity apps powered by Google AI.
Tell impactful stories, with Google Slides
Create, present, and collaborate on online presentations in real-time and from any device.
- For my personal use
- For work or my business

Jeffery Clark
T h i s c h a r t h e l p s b r i d g i n g t h e s t o r y !

E s t i m a t e d b u d g e t

Make beautiful presentations, together
Stay in sync in your slides, with easy sharing and real-time editing. Use comments and assign action items to build your ideas together.

Present slideshows with confidence
With easy-to-use presenter view, speaker notes, and live captions, Slides makes presenting your ideas a breeze. You can even present to Google Meet video calls directly from Slides.

Seamlessly connect to your other Google apps
Slides is thoughtfully connected to other Google apps you love, saving you time. Embed charts from Google Sheets or reply to comments directly from Gmail. You can even search the web and Google Drive for relevant content and images directly from Slides.

Extend collaboration and intelligence to PowerPoint files
Easily edit Microsoft PowerPoint presentations online without converting them, and layer on Slides’ enhanced collaborative and assistive features like comments, action items, and Smart Compose.

Work on fresh content
With Slides, everyone’s working on the latest version of a presentation. And with edits automatically saved in version history, it’s easy to track or undo changes.

Make slides faster, with built-in intelligence
Assistive features like Smart Compose and autocorrect help you build slides faster with fewer errors.

Stay productive, even offline
You can access, create, and edit Slides even without an internet connection, helping you stay productive from anywhere.
Security, compliance, and privacy

Secure by default
We use industry-leading security measures to keep your data safe, including advanced malware protections. Slides is also cloud-native, eliminating the need for local files and minimizing risk to your devices.
Encryption in transit and at rest
All files uploaded to Google Drive or created in Slides are encrypted in transit and at rest.
Compliance to support regulatory requirements
Our products, including Slides, regularly undergo independent verification of their security, privacy, and compliance controls .
Private by design
Slides adheres to the same robust privacy commitments and data protections as the rest of Google Cloud’s enterprise services .

You control your data.
We never use your slides content for ad purposes., we never sell your personal information to third parties., find the plan that’s right for you, google slides is a part of google workspace.
Every plan includes

Collaborate from anywhere, on any device
Access, create, and edit your presentations wherever you are — from any mobile device, tablet, or computer — even when offline.

Get a head start with templates
Choose from a variety of presentations, reports, and other professionally-designed templates to kick things off quickly..

Photo Album

Book Report

Visit the Slides Template Gallery for more.
Ready to get started?
IT Services
Cybersecurity services, it consulting, cloud solutions, microsoft & apple services, digital transformation services.

Managed Services
Knowledge center, work with us.
- Client Support
5 Things to Know About Microsoft Windows 11

Microsoft Windows 11 is designed to boost employee productivity and encourage team collaboration. It’s also built to be more secure than previous versions of Windows, and to deliver a more consistent experience for users on the front end and IT staff on the back end.
But what does all that look like? Here are five things to note about Microsoft Windows 11.
Don't want to read the article? Watch the full recording below. Be sure to register here for the "Microsoft and You" webinar series!
1. A New, But Consistent, Experience
Windows 11 is not a simple rebranding … or a complete rebuild. It's more of an evolution of Windows 10. Featuring a fresh look (and a different look at startup), Windows 11 is still consistent with Windows 10 to give users and IT a predictable experience.
Windows 11 also delivers the security and management features needed for hybrid work. It can be deployed alongside Windows 10 devices without interrupting business operations.
2. Increased Productivity
Windows 11 has a little bit of a Mac look and feel. It features the Start Menus in the middle of the screen instead of off to the left-hand side, and has an elegant look and focus right in the middle of the screen.
Snap Assist
The Snap Assist button lets you select from multiple styles options for how information looks on your screen. This is great if you have one big monitor or only one monitor to work from: It lets you slice and dice your monitor in ways that make the most sense to you, instead of having all windows appear side by side.
Another new feature is Widgets. These allow you to personalize your operating system. You can have it show you the latest weather, for example, or the latest stock market figures.
Integrated voice typing
Windows 11 offers integrated voice typing. This is essentially built-in dictating software that you use to speak right into your Outlook documents without having to buy third-party products, such as Dragon Dictation.
3. Easier Collaboration
Windows 11 offers greater collaboration functionality by embedding Microsoft Teams into the operating system. You no longer have install Microsoft Teams—it’s included during the basic install of Windows 11. This helps you and your team members to share applications more easily within Teams meetings.
Share a window while in a meeting : If you're on a Teams call, for example, and you want to share your PowerPoint presentation, Word document or Excel document, you simply click the “Share this Window” button at the bottom of your screen. This shares your application window so that everybody on your Team call sees it at the same time.
Obvious mute button : Have you participated in an online meeting where someone was on mute when they didn't want to be, or someone else was not muted when they should have been? Windows 11 makes it easier to know when you're muted and when you’re not: The mute button is now prominently displayed on the bottom-right-corner of your screen.
4. Better Security
One of the primary benefits of the new Windows 11 operating system is the improved security. Microsoft has built security into the functionality right at the ground level by developing baseline systems to help you mitigate threats and block them before they become a risk to your company.
Trusted Platform Module
Windows 11 systems come with a Trusted Platform Module right out of the box. This means chips are integrated into the PC motherboard or added separately to the CPU. This protects encryption keys, user credentials, and other sensitive data behind hardware barriers so malware and attackers can't access or tamper with valuable or sensitive data.
Virtualization-Based Security
Windows 11 takes Virtualization-Based Security and enhances it to make it more secure. This involves Kernel Data Protection that makes Kernel Memory read-only. This protects Windows Kernel Drivers from being tampered with. This ensures the multitude of events that happen at startup happen the way they should—you boot up in a correct state because nothing has been tampered with beforehand.
Application Guard
Another security feature of Windows 11 is Application Guard, a protection sandbox for Edge in Microsoft 365 that uses virtualization, isolation, untrusted website classifications, and untrusted document classifications to limit the damage that malicious websites and documents cause. The separation and isolation that Windows 11 delivers makes this OS more secure than Windows 10 and other operating systems.
Credential Guard
Credential Guard is the local security authenticator authority subsystem and a virtual container. It stops attackers from dumping credentials and using them to conduct Pass-the-Hash attacks. It enables password-less access by incorporating biometric features (such as face or thumbprint) to authenticate users.
5. Greater Consistency
Windows 11 offers the same functionality that you're used to with Windows 10, so you and your users aren’t going to face a steep learning curve. You won’t have to get used to new workflows or processes when moving to this new operating system.
For example, the applications that you're running for your business line of applications on Windows 10 will also work 98% of the time on Windows 11. At Ntiva, we haven’t come across any applications that have not worked just as well or if not better than they did on Windows 10.
Best Practices for Upgrading to Windows 11

Whether you are upgrading a few PCs or an entire enterprise to Windows 11, you should follow some tested and proven best practices.
- Conduct a hardware inventory : Gather information on your current fleet of laptops and desktops to make sure they meet the minimum requirements for Windows 11. With the new security features in Windows 11, some older PCs and CPUs cannot be upgraded to this new OS.
- Refresh hardware : When needed, upgrade old hardware with Windows 11-ready devices.
- Run a test group : Run your first batch of upgrades in a small test environment to ensure that your applications that worked in Windows 10 work as expected on the new OS. Then rollout to the rest of your fleet.
- Spread out the rollout : Have your Windows 10 and Windows 11 systems running side by side over the space of a month or two as you rollout. Pick a timeframe that’s convenient for your organization so that you don’t do the rollout all at once.
Windows 11 Is a Great Fit for Today’s Business Needs
Microsoft launched Windows 11 to help employees and teams focus on what’s important: communicating, collaborating and getting the job done efficiently.
This latest OS from Microsoft delivers the security and management tools you need to enable hybrid work. Best of all, you can deploy Windows 11 alongside Windows 10 devices without interrupting your business operations. If you need help upgrading your enterprise to Windows 11, let’s talk. Or, review our Microsoft 365 Consulting & Managed Services .

Tags: Microsoft
You May Also Like These Articles

Securing Remote Work: Microsoft 365's Essential Security Tools
Topics: Microsoft

Microsoft Copilot In-Depth: 10 Takeaways Business Leaders Need To Know

Microsoft Office 365 Updates: New Features for 2024
Subscribe to the ntiva blog.
Subscribe to our blog to stay informed!
Contribute to the Microsoft 365 and Office forum! Click here to learn more 💡
April 9, 2024
Contribute to the Microsoft 365 and Office forum!
Click here to learn more 💡
PowerPoint Top Forum Contributors: Steve Rindsberg - John Korchok 👍✅
April 17, 2024
PowerPoint Top Forum Contributors:
Steve Rindsberg - John Korchok 👍✅
- Search the community and support articles
- Microsoft 365 and Office
- Search Community member
Ask a new question
Connectin Windows 11 laptop to older Powerpoint projector
I connected an OLDER powerpoint projector (MT 1030 by NEC) to HDM1 port on my supported Windows 11 laptop. Then I took laptop display to 1024 x 768. I opened my Powwrpoint on my laptop but do not see it on my projection screen. What is the problem? I was am able to connect my Windows 10 computer to the old NEC with ease. Like i said, that simply required display to be changed to 1024 × 768 . (Normal display on my laptop is 1920 x 1200).
Report abuse
Replies (3) .
- Volunteer Moderator
On most laptops, there's a function key that lets you choose whether to duplicate or extend your windows desktop to the projector/second monitor. F7 is common on e.g. Lenovo laptops, for example.
Or click the icon at the far right of the taskbar and choose Project to get the same set of options.
You might have to click Expand before Project appears. Try choosing Duplicate for starters.
Was this reply helpful? Yes No
Sorry this didn't help.
Great! Thanks for your feedback.
How satisfied are you with this reply?
Thanks for your feedback, it helps us improve the site.
Thanks for your feedback.
Thank you Steve for your suggestions; I just tried all of them to no avail. It is definitely a software issue b/c I connected the projector to the Windows 10 laptop. Everything worked fine. However, that computer is a beater and hopelessly slow; I can't take it places.
****AGAIN the computer that is failing to work with the older Powerpoint projector has Windows 11 and is a little over a year old. This issue has all te experts stumped. I am going to try to find someone more knowledgeable in short order, no easy task. Meanwhile, it would be so appreciated if you or someone on the forum could reach out to those with extremely advanced knowledge.
I don't have any other ideas so far, I'm afraid.
A question, though: does this only occur with PowerPoint, or are you unable even to get Windows to display e.g. the Windows desktop on the projector? If the latter, it might be worth asking in the Windows forum as well.
Question Info
- Norsk Bokmål
- Ελληνικά
- Русский
- עברית
- العربية
- ไทย
- 한국어
- 中文(简体)
- 中文(繁體)
- 日本語
View, manage, and install add-ins for Excel, PowerPoint, and Word
When you enable an add-in, it adds custom commands and new features to Microsoft 365 programs that help increase your productivity. Because add-ins can be used by attackers to do harm to your computer, you can use add-in security settings to help protect yourself.
Note: This article only applies to Microsoft 365 applications running on Windows.
View installed add-ins

You can directly install add-ins from this page or select More Add-ins to explore.
In the Office Add-ins dialog, select My Add-ins tab.
Select an add-in you want to view the details for and right-click to select Add-in details option.
Click a heading below for more information .
Add-in categories explained
Active Application Add-ins Add-ins registered and currently running on your Microsoft 365 program.
Inactive Application Add-ins These are present on your computer but not currently loaded. For example, XML schemas are active when the document that refers to them is open. Another example is the COM add-in: if a COM add-in is selected, the add-in is active. If the check box is cleared, the add-in is inactive.
Document Related Add-ins Template files referred to by open documents.
Disabled Application Add-ins These add-ins are automatically disabled because they are causing Microsoft 365 programs to crash.
Add-in The title of the add-in.
Publisher The software developer or organization responsible for creating the add-in.
Compatibility Look here for any compatibility issues.
Location This file path indicates where the add-in is installed on your computer.
Description This text explains the add-in function.
Note: Microsoft Outlook has one add-in option in the Trust Center: Apply macro security settings to installed add-ins . InfoPath has no security settings for add-ins.
Permanently disable or remove an add-in
To disable or remove an add-in follow these steps:
Select File > Get Add-ins . Alternatively, you can select Home > Add-ins .
In the Office Add-ins dialog, select My Add-ins tab.
Select an add-in you want to remove and right click to select Remove option.
View or change add-in settings
You can see and change add-in settings in the Trust Center, descriptions of which are in the following section. Add-in security settings may have been determined by your organization so not all options may be available to change.
Select File > Get Add-ins .
Select More Add-ins > Manage My Add-ins.
Select Trust Center > Trust Center Settings > Add-ins.
Check or uncheck the boxes you want.
Add-in settings explained
Require Application Add-ins to be signed by Trusted Publisher Check this box to have the Trust Center check that the add-in uses a publisher's trusted signature. If the publisher's signature hasn’t been trusted, the Microsoft 365 program doesn’t load the add-in, and the Trust Bar displays a notification that the add-in has been disabled.
Disable notification for unsigned add-ins (code will remain disabled) When you check the Require Application Extensions to be signed by Trusted Publisher box, this option is no longer grayed out. Add-ins signed by a trusted publisher are enabled, but unsigned add-ins are disabled.
Disable all Application Add-ins (may impair functionality) Check this box if you don't trust any add-ins. All add-ins are disabled without any notification, and the other add-in boxes are grayed out.
Note: This setting takes effect after you exit and restart your Microsoft 365 program.
While working with add-ins, you may need to learn more about digital signatures and certificates , which authenticate an add-in, and trusted publishers , the software developers who often create add-ins.
Manage and install add-ins
Use the following instruction to manage and install add-ins.
To install a new add-in:
You can directly install popular add-ins on the page or go to More Add-ins to explore.
Select the add-in and select Add . Or browse by selecting Store tab in the Office add-in dialog to find other add-ins to install and select Add for that add-in.
To manage your add-ins:
Select File > Get Add-ins and from the bottom, select More Add-ins. Or select Home > Add-ins > More add-ins.
In the Office dialog, select My Add-ins tab. If you are not able to see your add-ins, select Refresh to reload your add-ins.
Select Manage My Add-in to manage and select Upload to browse and add an add-in from your device.
How to cancel a purchased add-in
If you've subscribed to an add-in through the Microsoft 365 Store that you don't want to continue, you can cancel that subscription.
Open the Microsoft 365 application and go to the Home tab of the ribbon.
Select Add-ins and then select More Add-ins > My Add-ins tab to view your existing add-ins.
Select the app you want to cancel and select Manage My Add-ins .
Under the Payment and Billing section choose Cancel Subscription .
Select OK and then Continue .
Once that's complete you should see a message that says "You have cancelled your app subscription" in the comments field of your apps list.
Why is my add-in crashing?
Some add-ins might not be compatible with your organization's IT department policies. If that is the case with add-ins recently installed on your Microsoft 365 program, Data Execution Prevention (DEP) will disable the add-in and the program might crash.
Learn more about DEP
Get a Microsoft 365 Add-in for Outlook
Get a Microsoft 365 Add-in for Project
Taking linked notes
If you're looking for Help on linking notes in OneNote to a Word or PowerPoint document, see Take linked notes .
Excel Windows Add-ins
If you're looking for Help on specific Excel Add-ins, such as Solver or Inquire, see Help for Excel for Windows add-ins .
If you're looking for additional help with Excel add-ins using the COM Add-ins dialog box, see Add or remove add-ins in Excel .
Get a Microsoft 365 Add-in for Excel

Need more help?
Want more options.
Explore subscription benefits, browse training courses, learn how to secure your device, and more.

Microsoft 365 subscription benefits

Microsoft 365 training

Microsoft security

Accessibility center
Communities help you ask and answer questions, give feedback, and hear from experts with rich knowledge.

Ask the Microsoft Community

Microsoft Tech Community

Windows Insiders
Microsoft 365 Insiders
Find solutions to common problems or get help from a support agent.

Online support
Was this information helpful?
Thank you for your feedback.
Advertisement
Microsoft PowerPoint 2016 for Windows
- V 2016
Softonic review
Important note: Microsoft PowerPoint 2016 is no longer available
The Download button for this program will redirect you to the latest PowerPoint version. Also you can find the Premium version and create your best work with Office 365 .
Presentation software gets an update with Microsoft PowerPoint 2016
Microsoft PowerPoint 2016 adds a range of new feature to the most popular presentation software on the market. A variety of new features make design and presentation recording easier (although some of these are available only to Office 365 subscribers). Like the other Microsoft Office apps, PowerPoint has also had its Help feature significantly upgraded -- finding out how to achieve a particular task is much simpler than in previous versions .
More of the same with a few tweaks
If you've used PowerPoint 2013 , you won't see a lot of changes in Microsoft PowerPoint 2016. The interface is essentially the same, with the only changes being a few small additions such as the Help menu. Some design processes are now streamlined or automated : for instance, if you start entering a list of bullet points, PowerPoint will now offer to turn your list into an eye-catching SmartArt graphic. If you want to make your slides the old-fashioned way, of course, that's still possible.
Still the standard for presentation design
Microsoft PowerPoint 2016 is essentially a slightly improved version of its predecessor, with a few new features and some overall improvements in Office 2016 . If you need to create presentations for work or school, it remains the go-to tool. If you didn't like the old version, however, there isn't a lot here to change your mind. In case you are looking for free alternatives, you may want to download Prezi or Free Slideshow Maker . If you need help, on the Microsoft Support website you will find support and tutorials.
- Improved help menu
- New design features
- Simple, easy-to-use basic tools
- Some users find design suggestions intrusive
Microsoft PowerPoint 2016 for PC
User reviews about microsoft powerpoint 2016.
by ronald antinor
yes, because its very nice app and i compatable when i used it
by Phumlani Xavi
it helped me on my presentation, and I recommend it for everyone for their presentations
by maxine keza
i think its the best way to carry out a presentation. i think its good for presentations plus it updates every year so thats a bonus Pros: the quick updations Cons: more backgrounds More
by Anonymous
I want to ues it help me my education and use it for my job... For ECE class. I am a student in VCC school learn about early childhood educatio n, there are many information need to show the class and teacher, and Power point can help me easy to show the pictures and explain about the photos. More
by Deepansh Jain
need forpresentation. daily time project need its inportance like presentation etc made me to require it
- Read all reviews
Free PowerPoint Password Recovery
A free program for Windows, by Amazing-Share.
Microsoft PowerPoint 2010
The software par excellence for creating digital presentations.
Microsoft PowerPoint Viewer 2007
Open PowerPoint PPT files without Powerpoint
Microsoft PowerPoint
Microsoft PowerPoint: Create attractive presentations without complicating your life
PowerPoint Viewer 2010
PowerPoint Viewer 2010 - Saving you an upgrade
Alternatives to Microsoft PowerPoint 2016
Explore more.
Elephant Office
The Elephant Office - The Perfect Place to Promote Your Business
Office Editor
Grammar checker for Microsoft users
PDF Reader for Windows 7
A PDF Reader Tool That Does More Than Just Reading
Microsoft Project Professional 2016
A Comprehensive Management Tool That Means Business
Excel Online
Use Excel from anywhere.
MyIPTV Player
Play IPTV channels
Microsoft Office 2024
The next-generation office software
EXFileDialog
The perfect tool for your Office
My Office App
Business and Productivity
Project Viewer
Project Viewer for Windows 10 is a powerful tool for viewing, editing and converting Microsoft Office documents.
Microsoft 365
Cloud-based productivity suite for all
LibreOffice
A free open-source office suite for PC
Related Articles

Dragon’s Dogma 2 has been a success (luckily for Capcom)

It may not seem like it, but Threads has already surpassed Twitter: Bad times are coming for Elon Musk

Could the cancellation of Blizzcon 2024 have consequences for Blizzard?

This application could expose your precise location without you knowing it.
Breaking news.

What has happened to the price of Bitcoin after its fourth “halving”?

Star Wars Jedi: Fallen Order joins EA Play and Xbox Game Pass

This underrated Quentin Tarantino film will soon leave Netflix: watch it before they remove it.

Baldur’s Gate 3 offers fans the opportunity to continue expanding it thanks to its new patch.

Null's Brawl: How to Download and Play Brawl Stars Server

The Guinness Book of Records has declared which is the most popular animated series in the world… and it’s an anime
Laws concerning the use of this software vary from country to country. We do not encourage or condone the use of this program if it is in violation of these laws. Softonic may receive a referral fee if you click or buy any of the products featured here.
Your review for Microsoft PowerPoint 2016
Thank you for rating!
What do you think about Microsoft PowerPoint 2016? Do you recommend it? Why?
OOPS! This is embarrassing...
Something’s gone terribly wrong. Try this instead
Récupérer les données supprimées & perdues suite à tout sinistre sous Windows.
PC & serveurs Windows

- MyRecover >
- Récupération de données Windows >
Comment récupérer des fichiers PowerPoint (PPT) supprimés définitivement ?
Comment récupérer des fichiers PowerPoint (PPT) supprimés définitivement ? Pour récupérer gratuitement des fichiers PowerPoint, vous pouvez vous référer aux deux méthodes dans cet article.
Par Pauline / Mis à jour le 25/04/2024
Windows File Recovery
Puis-je récupérer un fichier powerpoint supprimé de manière permanente .
J'ai supprimé accidentellement ma présentation en essayant de la partager avec quelqu'un. Puis-je la récupérer quelque part ?
La suppression accidentelle de fichiers PowerPoint est une situation courante pour de nombreux utilisateurs. Malheureusement, une fois qu'un fichier a été supprimé de manière permanente, il peut sembler impossible à récupérer. Cependant, il existe des méthodes pour restaurer ces fichiers, à condition que certaines précautions soient prises.
Lorsque vous supprimez un fichier PowerPoint, il est important de ne pas effectuer d'autres opérations sur le disque où se trouvaient les fichiers PowerPoint supprimés. Cela évite d'écraser l'espace libre avec de nouvelles données, ce qui rendrait la récupération plus difficile.
Comment récupérer un fichier PowerPoint supprimé ? La première étape consiste à vérifier la Corbeille pour voir si les fichiers y ont été déplacés. Si ce n'est pas le cas, il existe des logiciels de récupération de données qui peuvent être utilisés pour analyser le disque dur et récupérer les fichiers supprimés. Voir ci-dessous pour plus de détails.
Récupérer un fichier PowerPoint supprimé définitivement dans Windows 11/10/8/7 ?
Pour récupérer un fichier PowerPoint supprimé de manière permanente, vous pouvez envisager d'utiliser des logiciels de récupération de données tels que MyRecover et Windows File Recovery. Ces deux outils sont conçus pour analyser votre disque dur et récupérer les fichiers supprimés, y compris les fichiers PowerPoint.
MyRecover Free est un logiciel convivial qui offre une interface intuitive et des fonctionnalités puissantes pour récupérer une variété de types de fichiers, y compris les fichiers PowerPoint.
Il prend en charge différents types de stockage, y compris les disques durs internes et externes, ainsi que les clés USB. Et ses caractéristiques incluent :
Téléchargez gratuitement le logiciel MyRecover sur votre ordinateur Windows pour profiter de ses fonctionnalités de récupération de données. Assurez-vous de ne pas l'installer sur le disque où vous souhaitez récupérer vos fichiers supprimés.
Étape 1. Ouvrez le logiciel de récupération de données et sélectionnez le disque où vos fichiers PowerPoint étaient stockés > cliquez sur Analyser .
Étape 2. Le programme explorera toutes les zones du disque pour retrouver les fichiers PowerPoint supprimés et d'autres données récupérables. Pendant le processus d'analyse, vous pouvez filtrer les fichiers spécifiques à récupérer.
Étape 3. Sélectionnez ceux que vous souhaitez restaurer et cliquez sur Récupérer x fichiers . Assurez-vous de choisir un emplacement de sauvegarde différent pour éviter d'écraser d'autres données.
- Après avoir confirmé le dossier de destination, le processus de récupération démarrera. Une fois terminé, accédez au dossier de destination pour afficher les fichiers récupérés.
- Votre fichier source pourrait être renommé par le système pour diverses raisons, comme une défaillance du disque, ce qui rendrait difficile de le retrouver en utilisant son nom d'origine.
- Pour récupérer des fichiers de taille inférieure ou égale à 500 Mo, vous pouvez le faire gratuitement. Cependant, si vous avez besoin de récupérer une quantité illimitée de données, vous devriez envisager d'utiliser MyRecover Pro .
Windows File Recovery , quant à lui, est un outil en ligne de commande fourni avec Windows qui offre des fonctionnalités de récupération de données avancées.
Bien qu'il puisse être moins convivial que MyRecover en raison de son interface en ligne de commande, Windows File Recovery est également efficace pour récupérer les fichiers supprimés, y compris les fichiers PowerPoint.
Étape 1. Tout d'abord, déterminez votre système de fichiers. Accédez à Ce PC > cliquez avec le bouton droit sur le disque contenant les fichiers supprimés > cliquez sur Propriétés .
Étape 2. Décidez ensuite du mode de récupération à utiliser en fonction de votre système de fichiers et du scénario de perte de données :
Si vous avez besoin d'affiner l'analyse, utilisez ces commutateurs :
Étape 3. Accédez au Microsoft Store > recherchez Windows File Recovery > cliquez sur Obtenir pour télécharger l'application sur votre ordinateur (uniquement compatible avec Windows 10 version 2004 et ultérieure).
Étape 4. Démarrez Windows File Recovery et entrez la commande pour la récupération de fichier PowerPoint supprimés :
winfr source-drive: destination-drive: [/mode] [/switches]
Supposons que vous ayez utilisé NTFS et supprimé vos fichiers PowerPoint du disque C: il y a quelques jours. Si vous ne connaissez pas le nom spécifique des fichiers et que vous souhaitez les récupérer sur le disque E:, voici la commande :
winfr C: E: /Extensive /n *.ppt
Étape 5. Saisissez ensuite y pour continuer. Attendez ensuite que le processus de récupération se termine. Une fois cette étape achevée, vous trouverez un dossier de récupération à l'emplacement que vous avez spécifié. Allez-y pour visualiser les fichiers récupérés.
Astuce : comment éviter la perte de fichiers PowerPoint ?
Il est toujours préférable de prendre des précautions avant qu'une catastrophe ne survienne plutôt que de se retrouver dans une situation difficile. Pour éviter toute perte de fichiers à l'avenir, il est fortement recommandé à tous les utilisateurs de prendre des mesures préventives.
Si vous utilisez fréquemment PowerPoint et que vous dépendez beaucoup des fichiers PPT, pensez à les sauvegarder régulièrement. Utiliser un disque dur externe pour les sauvegardes est une excellente pratique.
Parfois, en raison d'une panne de batterie ou d'un arrêt accidentel, vous pourriez fermer vos fichiers PPT sans les enregistrer. Dans ce cas, une fonctionnalité d'Enregistrement automatique peut être très utile.
Voici comment l'activer :
Étape 1. Lancez PowerPoint > cliquez sur "Fichier" dans le coin supérieur gauche de la fenêtre > "Options".
Étape 2. "Enregistrer" > cochez "Enregistrer les informations de récupération automatique toutes les _ minutes" > cochez "Conserver la dernière version récupérée automatiquement si je ferme sans enregistrer". Vous pouvez personnaliser la fréquence d'enregistrement automatique selon vos besoins.
En résumé, ce guide vise à aider les utilisateurs à résoudre le problème de récupération de fichiers PowerPoint supprimés de manière permanente. Pour cela, nous recommandons l'utilisation de deux outils : Windows File Recovery, qui est l'outil officiel de récupération de Windows, et MyRecover, une application efficace et conviviale. En suivant ces étapes simples, vous pouvez récupérer vos fichiers PowerPoint perdus et retrouver la tranquillité d'esprit.

Autres articles connexes
Comment récupérer des fichiers pdf supprimés ou non enregistrés .
Comment récupérer un fichier PDF ? Trouvez des solutions sur cette page pour récupérer des fichiers PDF non enregistrés et des fichiers PDF supprimés sur PC Windows.
Résolu : 5 façons de récupérer un fichier Excel perdu dans Windows 10
Il existe plusieurs façons possibles de récupérer des fichiers Excel perdus, et les étapes spécifiques peuvent varier en fonction de la raison de la perte. Ici, vous pouvez apprendre à récupérer des fichiers Excel non enregistrés, des fichiers Excel supprimés et des fichiers Excel endommagés.
10 façons efficaces de récupérer un document Word non enregistré et supprimé
Comment récupérer un document Word non enregistré ou supprimé sous Windows 10, 11 ? 10 façons simples ici pour la récupération de votre document Word.
Guide pour récupérer un document perdu sur PC portable
Comment récupérer des documents perdus sur un PC portable ? La perte de fichiers peut survenir en raison d'une suppression accidentelle, d'un formatage ou d'autres raisons. Dans cet article, vous pouvez obtenir des suggestions et des étapes utiles pour vous aider à récupérer avec succès vos fichiers.
Obtenez gratuitement MyRecover


PPTX Viewer
Pptx viewer is a freeware that you can use to open, view microsoft office powerpoint(pptx) document. it's a quick and convenient way to view powerpoint files on your computer. pptx viewer does not require microsoft office powerpoint to be installed on your computer, if you need to view powerpoint files without microsoft powerpoint, pptx viewer is your best option., 1/9/2019 11:21:23 am.
IMAGES
VIDEO
COMMENTS
Step 1: Prepare Your Text Content. Prepare a list of words you'd like to include in your word cloud. Making a word cloud starts with text. Gather the words or phrases you want to display. This could be anything from a speech transcript to customer feedback responses. The more times a certain word appears in your source text, the bigger it ...
How to start PowerPoint. To start PowerPoint, click on the Start button and scroll down or search for PowerPoint. Click on the result to open it. Then further select a Blank Presentation. A new ...
To use a master slide, open PowerPoint and click on the "New Slide" button in the toolbar. Then, click on the "Master Slide" button in the drop-down menu. This will open the "Master Slide" pane on the right side of the screen. Here, you'll see a list of all the available master slides. To use a master slide, simply click on it and ...
PowerPoint is a versatile and popular presentation software developed by Microsoft (MS). It is a part of the Microsoft Office Suite and offers various features and tools to create visually appealing and engaging presentations. MS PowerPoint allows users to combine text, graphics, multimedia elements, and animations to convey information ...
2. Embed Microsoft Forms (Education or Business Only) If you plan to send your PPT presentation to others—for example, if you're a trainer sending step-by-step instruction presentation, a teacher sending an independent learning task to your students, or a campaigner for your local councilor sending a persuasive PPT to constituents—you might want to embed a quiz, questionnaire, pole, or ...
1] Focusky. Focusky is a free slide presentation maker software for Windows 11/10. Its free version comes with a number of templates, using which you can create beautiful presentations. You can ...
PowerPoint 2021 for Windows gives you new ways to create compelling content. This article provides an overview of the new features you can discover.
Learn how to use Microsoft 365 online for free and access Word, Excel, PowerPoint, and other Office apps and save your files on OneDrive free! ... TheWindowsClub covers authentic Windows 11 ...
The Microsoft Presenter+ is an excellent peripheral for public speakers or team members who find themselves on stage (in person or virtually) in front of a PowerPoint presentation on a regular basis.
Learn everything you need to know to get started using Microsoft PowerPoint! You'll learn all the basics plus more, including: how to choose a design theme...
Windows 11 offers several convenient ways to view and enjoy your photos, including the ability to create and view picture slideshows. ... Open PowerPoint: Launch Microsoft PowerPoint and start a new presentation. Insert Photos: Insert the photos you want to include in the slideshow onto individual slides. Customize Slides: ...
This is how I got to use PowerPoint to create my first digital stationary, the Windows 11 Essentials Cheat Sheet, a 2-page PDF with the most important shortcuts to get around the Windows desktop operating system. By the way, if you subscribe to our free newsletter, you can download this cheat sheet for free.
Download Office 2013. Download and install Office 2013 using an existing product key. Download now. A Microsoft 365 subscription unlocks the most up-to-date premium version of PowerPoint on all your devices. Previous versions include PowerPoint 2013 , PowerPoint 2010 , PowerPoint 2007, and PowerPoint 2003.
Open Microsoft PowerPoint. 2. Click on the "Insert" tab. 3. Click on the "Hyperlink" button. 4. Enter the URL of the website that you want to link to in the "Address" field. 5. Enter the text that you want to use for the hyperlink in the "Text to display" field.
How To Fix PowerPoint Is Not Responding, Starting Or Opening On Windows 11 [Tutorial]Microsoft's PowerPoint is one of the most widely used apps from the Offi...
Instead of clicking to move between slides, PowerPoint will automatically display the slides going in an infinite loop … until someone presses Escape. Go to the Slide Show tab, Set up Slide Show … it's a PowerPoint dialog that hasn't changed for many years/versions. Choose ' Browsed at a kiosk (full screen) ' and click OK.
Microsoft PowerPoint is a great tool for creating professional-looking slideshows and presentations. However, the home version requires a Microsoft 365 subscription, and the free mobile app locks some features behind the sub as well. Fortunately, there are plenty of free PowerPoint software alternatives out there.
Present slideshows with confidence. With easy-to-use presenter view, speaker notes, and live captions, Slides makes presenting your ideas a breeze. You can even present to Google Meet video calls ...
Learn how and where to download Microsoft Word, Excel, PowerPoint, etc. for Windows 11/10. Download the online and offline installer of Office.
Windows 11 also delivers the security and management features needed for hybrid work. It can be deployed alongside Windows 10 devices without interrupting business operations. 2. Increased Productivity. Windows 11 has a little bit of a Mac look and feel. It features the Start Menus in the middle of the screen instead of off to the left-hand ...
On most laptops, there's a function key that lets you choose whether to duplicate or extend your windows desktop to the projector/second monitor. F7 is common on e.g. Lenovo laptops, for example. Or click the icon at the far right of the taskbar and choose Project to get the same set of options.
Note: This article only applies to add-ins in Excel, PowerPoint, and Word.For guidance on how to view, install, and manage add-ins in Outlook, see Use add-ins in Outlook.
1. Set the Media Compatibility. Go to the File menu, and select Info. PowerPoint will detect if your media is incompatible with the program, and the Optimize Media Compatibility option will appear. So, select that option, and PowerPoint will optimize the embedded media. Let the wizard scan the embedded media.
The Download button for this program will redirect you to the latest PowerPoint version. Also you can find the Premium version and create your best work with Office 365. Presentation software gets an update with Microsoft PowerPoint 2016. Microsoft PowerPoint 2016 adds a range of new feature to the most popular presentation software on the
Récupérer un fichier PowerPoint supprimé définitivement dans Windows 11/10/8/7 ? Pour récupérer un fichier PowerPoint supprimé de manière permanente, vous pouvez envisager d'utiliser des logiciels de récupération de données tels que MyRecover et Windows File Recovery.
PPTX Viewer is a freeware that you can use to Open, view Microsoft Office PowerPoint(PPTX) document. It's a quick and convenient way to view PowerPoint files on your computer.
Do you want to use Microsoft Office for free? Explore the GitHub topics related to microsoft-office-crack and find out how to activate the software without paying. Learn from the projects and issues shared by other users and developers.