
PowerPoint: How to Launch a Presentation Automatically as a Slide Show

What is a PowerPoint Show?
By default, PowerPoint saves your slide presentation as a PowerPoint presentation file with the .pptx file extension which, when double-clicked, launches PowerPoint. The presentation opens in whatever view was open when you saved it, such as the Normal view or Slide Sorter view. If you want your slide show to immediately launch in the Slide Show view, however, you need to save your file as a PowerPoint Show. In this article, find out how to create a PowerPoint slide show file and learn 2 bonus tips .
To Save a PowerPoint Presentation as a PowerPoint Show:
- Choose the File tab.
- Select Save As .
- Pick the Save as type as PowerPoint Show .
- Type a name for your slide show in the File name text box (you can use the same name and location as your .pptx/presentation file) and click Save . Your PowerPoint slide show file is saved with a .ppsx extension.
Now, the next time you or anyone else opens your presentation from outside of PowerPoint, your slide show immediately launches in Slide Show view. When you navigate past the last slide, the file automatically closes. To open the file for editing, launch PowerPoint first and open it as you would a standard presentation. If you have access to the original presentation, you may prefer to open the .pptx file to edit and save it again as a slide show file. Most importantly, make sure to manage your files, so you are working with the most current version.
PowerPoint Presentation Tips
BONUS TIP: When I save my presentations as a PowerPoint Show, I save the file to my desktop for easy access during speaking and training engagements. If needed, I can also quickly close and re-open the file without launching PowerPoint and without showing everyone all of my slides. Working with a PowerPoint Show also saves a number of steps because it automatically launches with a simple double-click of the mouse.
To move to a specific slide in a presentation while in the slide show view (as either a presentation or show format), just type the slide number and press [Enter] . To make these moves easier, print out a handout of your presentation, which includes slide numbers of each slide for quick navigation. Or, create a simple manual cheat sheet to reference when you want to jump to different slides.
BONUS TIP #2: In addition to saving PowerPoint shows to my desktop, I also add a generic slide to the beginning. For instance, a slide with your organization logo or simply a black slide. Although this may not apply to your presentations, I often navigate in and out of my slide show as I am also demonstrating software features and facilitating discussions within my training classes and conference sessions. With a generic or simple slide at the start, I can launch the slide show with a neutral, blank slide and then use the keyboard shortcut to type the slide number and press [Enter] to move to a specific slide within the presentation.
Were these PowerPoint tips helpful? Grab your handout of other quick and easy PowerPoint shortcuts and discover more PowerPoint techniques here .
© Dawn Bjork, MCT, MOSM, CSP®, The Software Pro® Microsoft Certified Trainer, Productivity Speaker, Certified Speaking Professional

Related Posts
Rulers, Gridlines & Guides: 3 Ways to Simplify PowerPoint Slide Layout June 16, 2022
Adding Interest with the PowerPoint Morph Transition November 3, 2023
PowerPoint Presentation Tips: 7 Steps to Banish Bloated Bullets June 13, 2023
Join Our Tips Newsletter
Receive 477+ shortcuts & more!
Stack Exchange Network
Stack Exchange network consists of 183 Q&A communities including Stack Overflow , the largest, most trusted online community for developers to learn, share their knowledge, and build their careers.
Q&A for work
Connect and share knowledge within a single location that is structured and easy to search.
Automatically open Powerpoint in presenter mode, on correct screens
We have a laptop that we only use to present an induction course which is just a powerpoint presentation.
We have a second screen hooked up and when the presentation opens up someone has to navigate to and hit the start presentation button, at that point and it opens in presenter view with the notes on the laptop and the presentation on the second screen.
What I'd like to be able to do is avoid that on element of interaction.
Is it possible to launch a power point directly into presentation mode with no additional user interaction?
- microsoft-powerpoint
3 Answers 3
Save the file in PowerPoint Show (*.ppsx) format . It will open automatically in presentation mode.
From Microsoft's site :
PowerPoint Show .ppsx A presentation that always opens in Slide Show view rather than in Normal view. Tip: To open this file format in Normal view so that you can edit the presentation, open PowerPoint. On the File menu, click Open, and then choose the file.
Note: If you need macros enabled save as a .ppsm. If you're in PowerPoint 2003 the older format you need is .pps.
- it opens the presentation on screen 2 correctly but you don't get the presenters view on screen 1. Can't see an option for configuring it... – Patrick Jul 7, 2017 at 14:59
- 1 Hmmm. Seems you're right, there's no way to force visibility of the Presenter View in .ppsx files. That's annoying, and weird. So, my next method would be to save as a .pptm (macro-enabled .pptx) and use VBA to launch the slideshow, which would bring up Presenter View. But irritatingly, PowerPoint doesn't allow you to execute macros on open - so we need another workaround. You could download an auto_open PowerPoint add-in to give this functionality, or you could use something like a macro-enabled Excel file to call the .pptx on open. Bit painful but it can be done. – Andi Mohr Jul 7, 2017 at 15:51
- Frustrating, so close and yet so far. I think I'll just leave an instruction on screen 'open powerpoint, click these two buttons' and be done with it. There is only so much you can automate away :) Thanks for you help. – Patrick Jul 10, 2017 at 8:38
I achieved this by the following
I Added a macro to the Powerpoint presentation
Then start the powerpoint presentation from the command line with
I used a 2003 presentation in 2016 - so the extension for presentations containing macros is ppt not pptm.
The remaining issue I have is that when I close the presentation it prompts to save - it does not do this if I load and run it using the GUI.
I think I'm a bit late, but this might be helpful to others.
The best way I could find to start in presenter mode is by pressing Alt F5 . It will start from the first slide, though. If you want to start from the current slide, you might need to use the sequence Alt S C . But it doesn't work if you press each individually, they have to be pressed at the same time. Also, this second metho does a weird error sound and I couldn't figure out why.
Anyway, if you are ok about starting on the first slide, Alt S will do just fine.
Source: https://support.office.com/en-ie/article/use-keyboard-shortcuts-to-deliver-powerpoint-presentations-1524ffce-bd2a-45f4-9a7f-f18b992b93a0
- (1) The question says “with no additional user interaction”. It sounds like you’re just offering a different form of user interaction. (2) Or rather, three different forms. What’s the relationship between Alt+F5 and Alt+S? – Scott - Слава Україні Jun 27, 2019 at 23:38
You must log in to answer this question.
Not the answer you're looking for browse other questions tagged microsoft-powerpoint ..
- The Overflow Blog
- What a year building AI has taught Stack Overflow
- Want to be a great software engineer? Don’t be a jerk.
- Featured on Meta
- New Focus Styles & Updated Styling for Button Groups
- Upcoming initiatives on Stack Overflow and across the Stack Exchange network
- Google Cloud will be Sponsoring Super User SE
Hot Network Questions
- Separate frames for overlays in handout mode
- In which case can the term "singularity" and "isolated singularity" be used interchangeably?
- First mention of Einstein in Science Fiction?
- What caused pink flares during the eclipse
- poly-filler in this particular sentence
- Does the “aim for the middle” game admit a Nash equilibrium?
- Outlining Rivers in a Tikz Picture
- Meaning of 出来 in 妥協することは出来かねます。
- Why did Jesus say He wouldn’t drink of the vine when it seems like He did?
- Why infinite spheres and not just two?
- Making shortcrust pastry ahead of time
- Right censoring deaths in length of stay studies
- Frozen World Atmosphere?
- What is the most efficient way to find the area of a circle given three points on the rim
- How to add an interval to a tsrange?
- Colorbar to illustrate the change of a specific parameter
- Will Israeli Military Service Affect My Chances of a Physics Master's Program?
- Steering wheel rotation
- Perplexing Chimera leaves battlefield
- Are the subjective experience of the "inner witness of the Holy Spirit" and the subjective experience of an external world of equal epistemic value?
- Do batteries have capacitance?
- Can You Train A Neural Network By Simply Giving It Ratings Each Time It Runs?
- What is this glyph on Feb 23 1940 in a Finnish military calendar?
- Why were medium bombers so low in numbers in Allied air forces?
How to Save a PowerPoint Presentation? [PPT & Other Formats!]
By: Author Shrot Katewa
![How to Save a PowerPoint Presentation? [PPT & Other Formats!]](https://artofpresentations.com/wp-content/uploads/2022/03/Featured-Image-How-to-Save-a-PowerPoint-Presentation.webp "save powerpoint in presentation mode")
Saving a PowerPoint presentation is one of the most important things that you need to do when you are creating a presentation using PowerPoint. Unlike some of the modern web-based presentation applications, you need to make sure that you save a PowerPoint presentation when you are using an offline version!
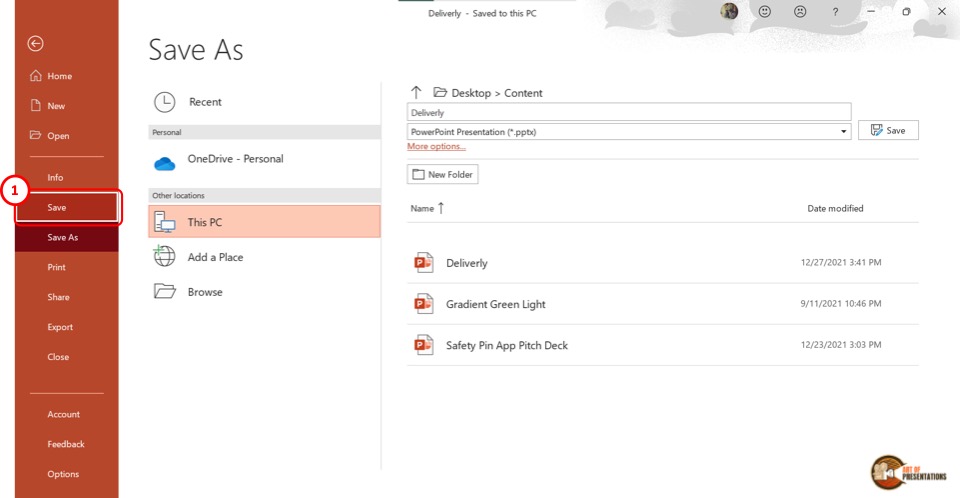
To save a PowerPoint presentation, click on the “File” tab. Then, from the backstage view, click on the “Save” option from the left panel. Choose the location or the folder where you want to save the presentation on your computer, and click on “Save”.
In this article, we shall not only understand how to save a standard PPT or PPTx file, but we shall also take a look at how to save a PowerPoint presentation in different file formats such as a PDF, video or an image!
So, let’s get started!
1. How to Save a PowerPoint Presentation?
Once you have saved a PowerPoint presentation, you can easily save it again with just one click. Furthermore, you can also save a PowerPoint presentation in other formats. However, the process of saving a PowerPoint presentation is slightly different on Windows and on Mac.
Let’s understand the process in further detail.
1a. Saving a PowerPoint Presentation on Windows
To save a PowerPoint Presentation on Windows PC, you can follow either of the 2 simple methods.
Method-1: Using the “Save” button on Quick Access Toolbar
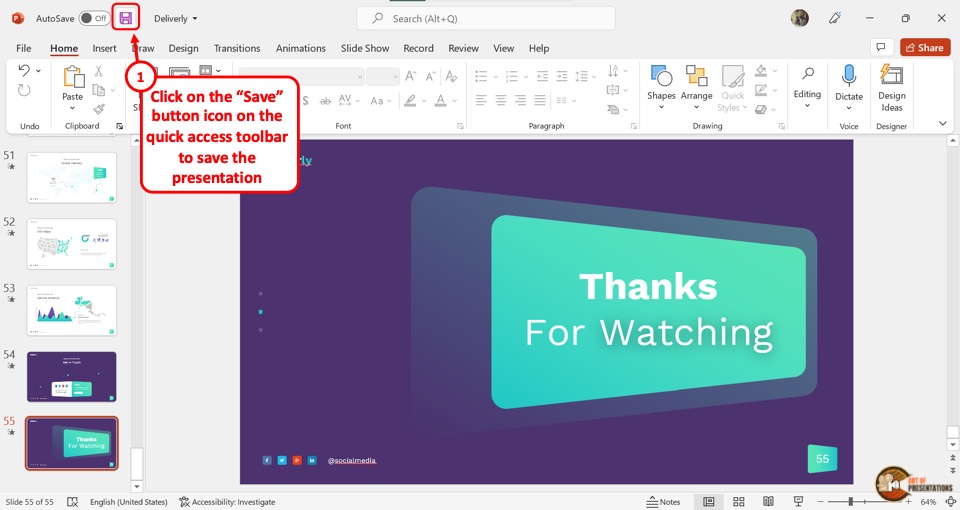
In the Quick Access Toolbar located at the very top of the screen, click on the “Save” icon.
The “Save” icon is located on the left side in the Quick Access Toolbar and looks like a floppy disk. Clicking on the “Save” button will immediately save the PowerPoint presentation in its current location as a “.pptx” file.
If you have opened a new presentation and you are saving it for the first time, clicking on the “Save” button will open a new explorer window. Simply navigate to the folder where you wish to save the new presentation on your computer, and click on “ Save “.
Method-2: Using the “File” tab
Another, more common method is to use the “File” tab in PowerPoint to save your PowerPoint presentation.
Here’s what you need to do –
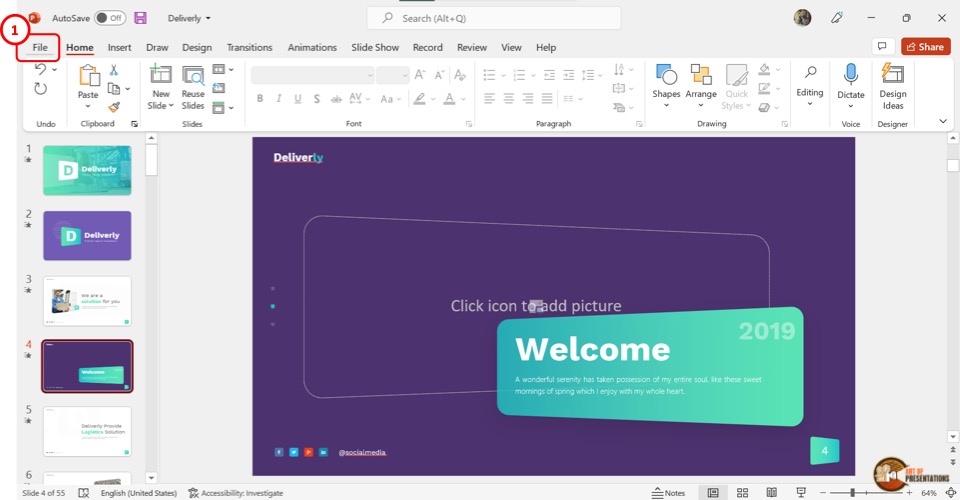
Step 1 – Click on the “File” Tab
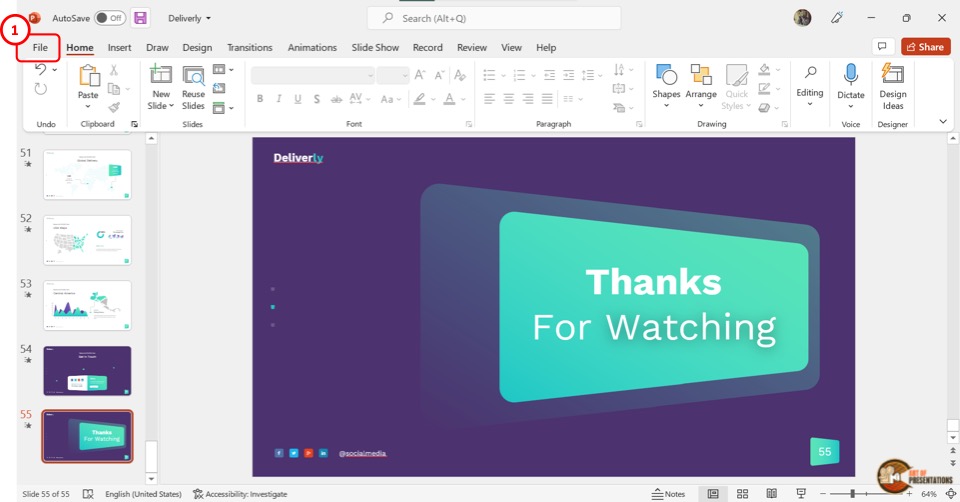
Another way to save a PowerPoint presentation is to use the “File” menu. You have to first click on the “File” tab located at the left corner of the menu ribbon at the top of the screen.
Step 2 – Click on the “Save” option
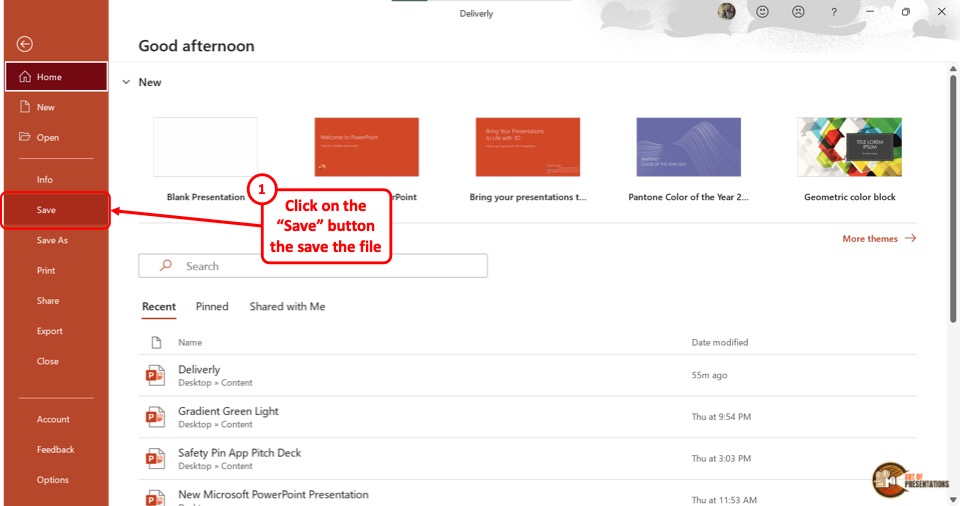
This will open the backstage view in PowerPoint. Now, click on the “Save” option from the sidebar on the left side of the screen. This will save the Microsoft PowerPoint as a “.pptx” file in the current location.
1b. Saving a PowerPoint Presentation on Mac
On a Mac computer, you can use the “File” menu as well to save the PowerPoint presentation.
The first step is to click on the “File” menu in the menu bar located at the top of the screen (above the PowerPoint window). This will open a dropdown menu. Click on the “Save” option from the dropdown menu to save the presentation as a “.pptx” file which is the standard format for presentations.
1c. Shortcut Keys to Save a PowerPoint Presentation
Microsoft PowerPoint also allows you to save a presentation with keyboard shortcuts. All you have to do is press the “Ctrl+S” keys on your keyboard in an open PowerPoint file. This will save the PowerPoint presentation.
1d. Best Format to Save a PowerPoint Presentation?
PowerPoint allows you to save a presentation in various different file formats! For instance, you can use the .ppt format if you wish to open the presentation file using PowerPoint 2007 or earlier. You can use .ppsx to open presentation directly as a PowerPoint Show file that opens it in the presentation mode.
In fact, there are several other formats you can save a presentation in. We shall explore how to save a PowerPoint presentation in several different formats later in the article.
However, the best format to save a PowerPoint Presentation is a “.pptx” file. This type can support all the latest as well as the older features of the PowerPoint presentation.
If you will be opening the presentation using a different software other than Microsoft PowerPoint, “.odp” is the best format. For printing, make sure to save the PowerPoint presentation as a PDF. That said, .pptx file format can help serve these purposes too.
2. How to Save a PowerPoint Presentation as PDF
Saving a PowerPoint presentation in PDF format is the suitable method for printing out your presentation. To save the PowerPoint presentation as a PDF file, follow the 4 easy steps.
Step-1: Click on the “File” Tab
First, click on the “ File ” tab in PowerPoint to open the back stage view of PowerPoint.
Step 2 – Click on the “Save As” option
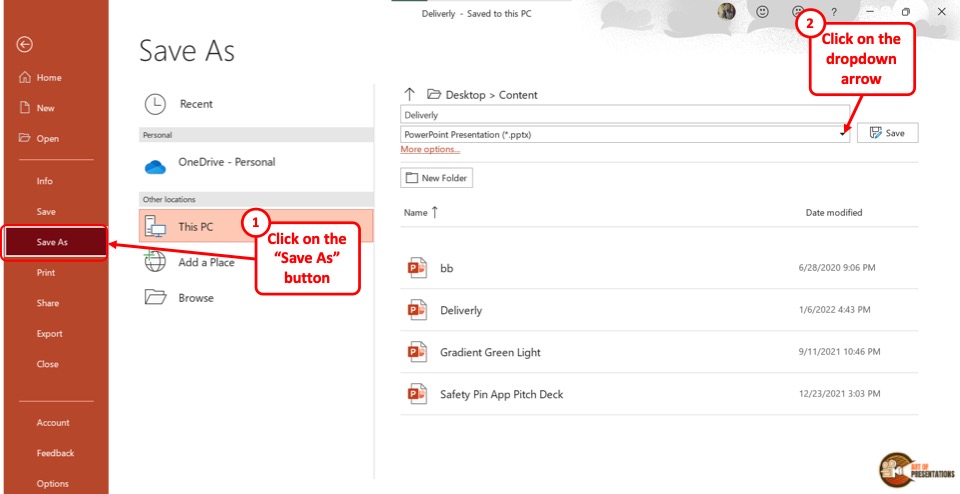
In the menu ribbon located at the top of the screen, click on the “File” tab. In the “File” menu, click on the “Save As” option from the sidebar on the left side of the screen.
Step-3: Click on the “PDF (*.pdf)” option
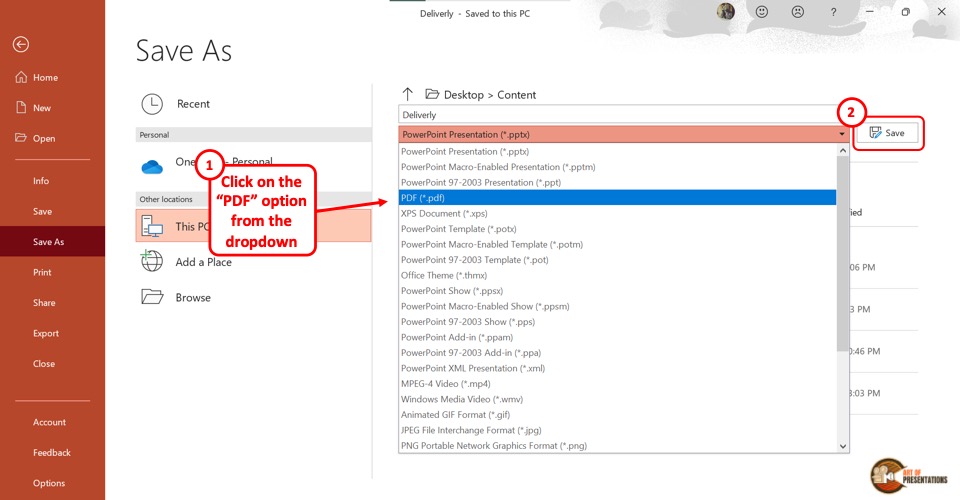
In the “Save As” screen, click on the box that shows “PowerPoint Presentation (*.pptx)” . This will open a dropdown menu. Click on the “PDF (*.pdf)” option from the dropdown menu.
Step-4: Click on the “Save” button
Now all you have to do is click on the “Save” button beside the box to save the PowerPoint presentation as a PDF file (as shown in the image in step 2).
3. How to Save a PowerPoint Presentation as a Video?
In Microsoft PowerPoint, you can also save a presentation as a video. This allows you to play the presentation slides as a video rather than a slide show.
3a. On Windows
To save a PowerPoint presentation as a video on a Windows PC, follow the 3 easy steps.
Step-1: Click on the “File” tab
The first step is to open the “Save As” screen. To do so, click on the “File” tab in the menu ribbon. In the “File” menu, click on the “Save As” option.
Step-2: Choose the “.mp4” file format from the “Save As” tab
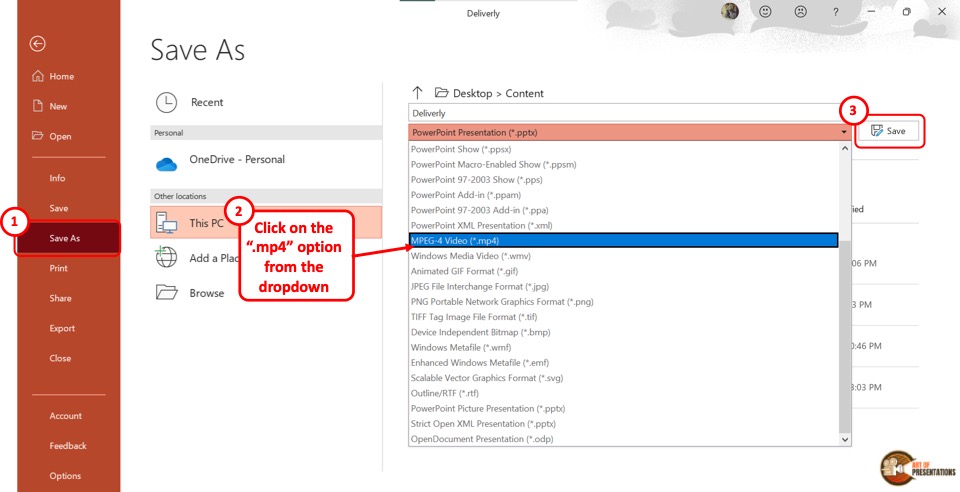
The next step is to click on the “Save As Options” box. It is the second box on the right side of the “Save As” screen. In the dropdown menu, click on either the “MPEG-4 Video (*.mp4)” option or the “Windows Media Video (*.wmv)” option.
Step-3: Click on the “Save” button
The final step is to click on the “Save” button (as indicated in step 2 above). It is located on the right side of the “Save As Options” box. This will save your PowerPoint presentation as a video.
To save a PowerPoint presentation as a video on a Mac device, follow the 3 simple steps.
Step-1: Click on the “Export” option
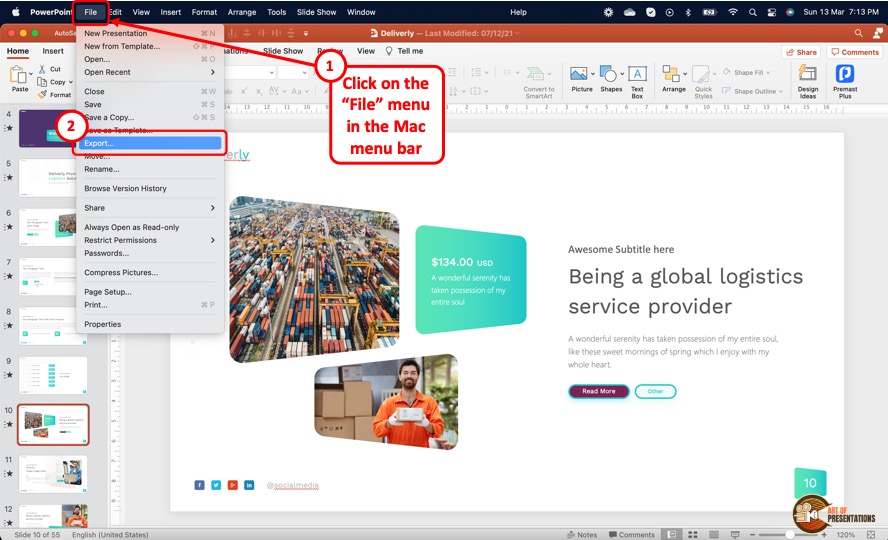
In the menu bar at the top of the screen, click on the “File” option. In the “File” dropdown menu, click on the “Export” option. This will open a dialog box.
Step-2: Click on the “File Format” box
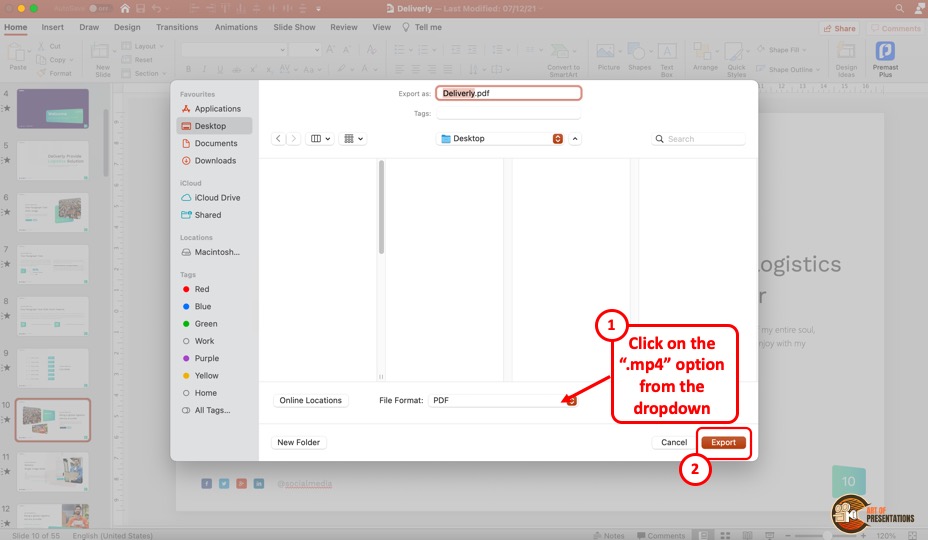
In the dialog box, click on the “File Format” box. This will open a dropdown menu. You can click on either the “MP4” option or the “MOV” option as you prefer.
Step-3: Click on the “Export” button
In the dialog box, you can also click on the “Quality” option to select the quality of the video. Once you are satisfied with the selections in the dialog box, click on the “Export” button at the bottom (as shown in the image in the previous step). This will save the presentation as a video.
4. How to Save a PowerPoint Presentation to Open in Slideshow Mode?
Microsoft PowerPoint allows you to save the PowerPoint presentation as a “PowerPoint Show” file. This opens directly as a slideshow. To save a PowerPoint presentation to open in slideshow mode, follow the 2 easy steps.
In the open PowerPoint file, click on the “File” tab from the menu ribbon which is located at the top of the screen. In the “File” menu, click on the “Save As” option.
Step-2: Click on the “PowerPoint Show (*.ppsx)” option
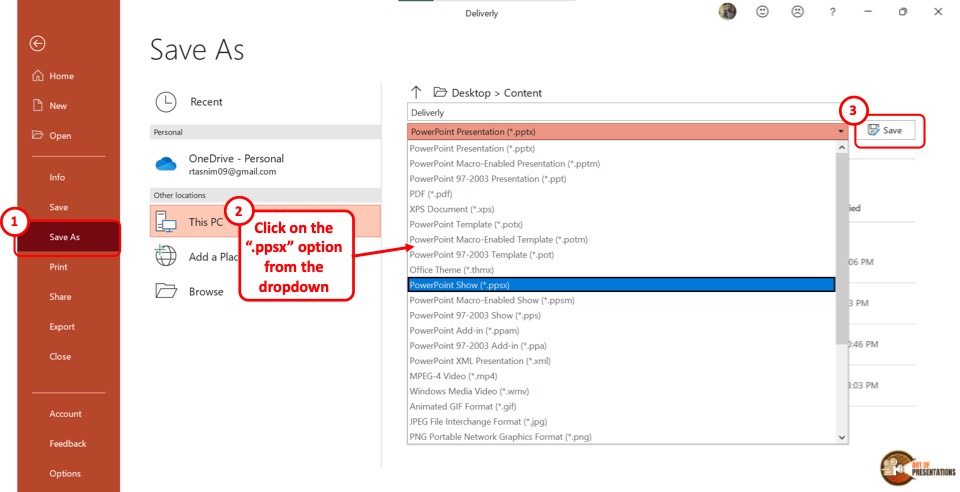
In the “Save As” screen, click on the “Save As Options” box which shows “PowerPoint Presentation (*.pptx)” . This will open a dropdown menu. Click on the “PowerPoint Show (*.ppsx)” option.
Now all you have to do is click on the “Save” button to save the PowerPoint presentation to open as a slideshow.
5. How to Save a PowerPoint Presentation as an Image?
In Microsoft PowerPoint, you can save the presentation as an image in five different formats: “Animated GIF Format (*.gif)” , “JPEG File Interchange Format (*.jpeg)” , “PNG Portable Network Graphics Format (*.png)” , “TIFF Tag Image File Format (*.tif)”, and “Scalable Vector Graphics Format (*.svg)” .
To save your presentation as an image, follow the 3 simple steps.
Step-1: Click on the “Save As” option from the “File” tab
The first step is to click on the “File” tab in the menu ribbon. Then click on the “Save As” option from the “File” menu.
Step-2: Select your preferred image format
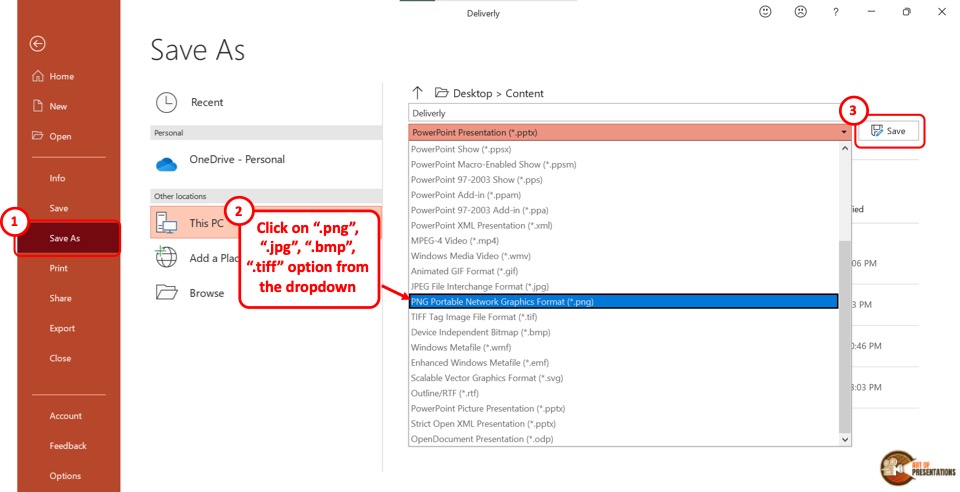
In the “Save As” screen, click on the “Save As Type” box which is the second box in the right column. From the dropdown menu, click on your preferred image format from the five available formats.
Now all you have to do is click on the “Save” button (as shown in the image in step 2) beside the “Save As Type” box. This will save your presentation in a folder containing each slide as a separate image file.
6. How to Save a PowerPoint Presentation as a Template?
A PowerPoint template is a predesigned presentation that you can edit to add your own content. To save a presentation as a template, follow the 3 easy steps.
The first step is to click on the “File” tab in the menu ribbon. Then click on the “Export” option from the sidebar in the “File” menu.
Step-2: Click on “Change File Type”
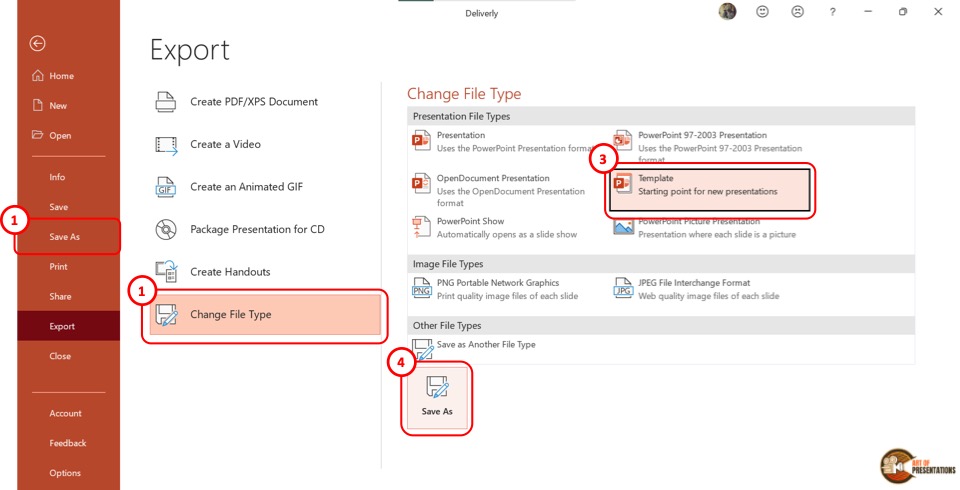
Now you have to click on the “Change File Type” option. Under the “Presentation File Types” group in the right column, click on the “Templates” option. Then click on the “Save As” button at the bottom of the screen.
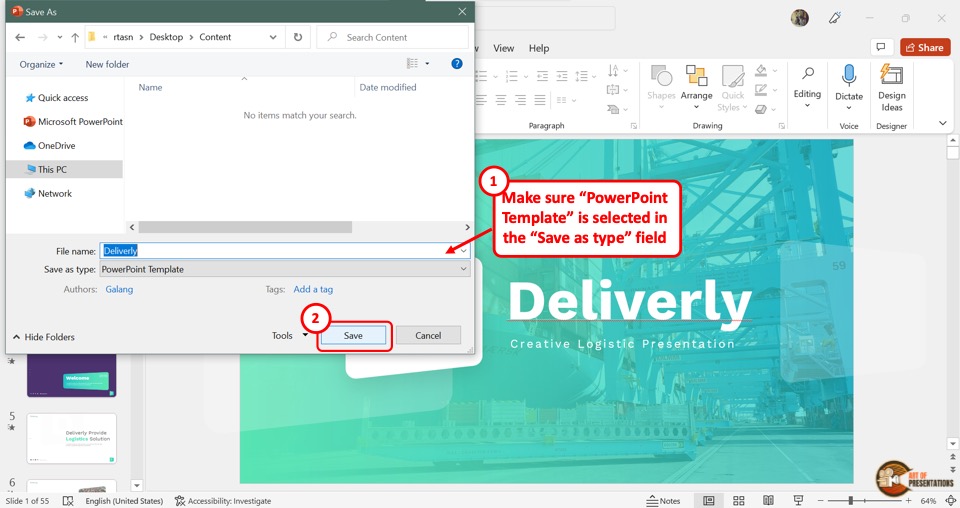
In the “Save As” dialog box, you will see that the “Save as type” box shows the “PowerPoint Template” format. Now all you have to do is click on the “Save” button.
7. How to Save PowerPoint Presentation as Google Slides?
Microsoft PowerPoint does not offer any feature to upload a presentation to Google Slides directly. However, Google Slides does offer you an option to upload your PowerPoint presentation and save it in Google Slides!
Step-1: Save Your PowerPoint Presentation
The first step is to save your PowerPoint presentation using any method described in the section 1 of this article.
Make sure that you note down the location of the folder in which you have save the PowerPoint file.
Step-2: Click on the “Open file picker” option in Google Slides
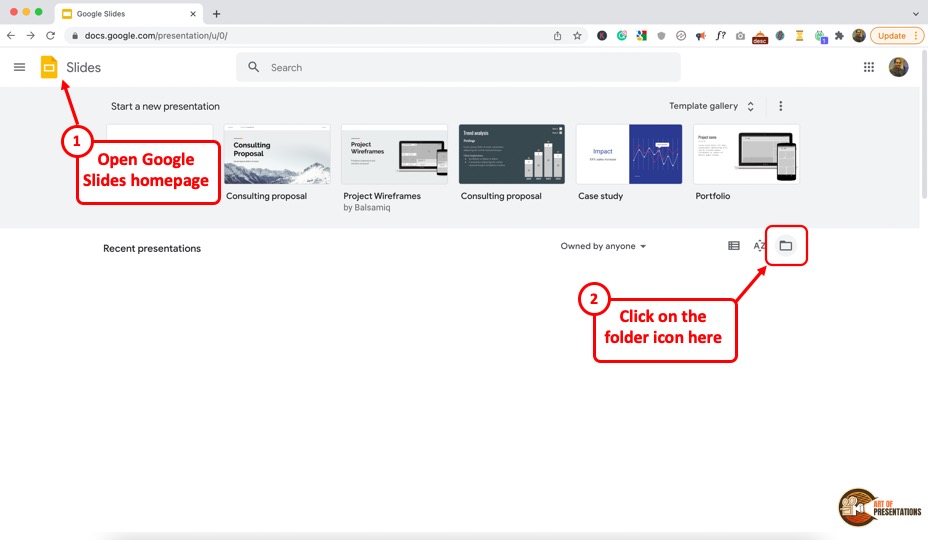
Now, the next thing you need to do is open your Google Slides account by visiting slides.google.com . If you aren’t logged in, make sure you sign in with your account credentials.
Next, you will be presented with Google Slides home screen (as shown in the image above). In Google Slides, click on the “Open file picker” icon which looks like a folder. This will open the “Open a file” dialog box.
Step-2: Click on “Upload”

In the “Open a file” dialog box, click on the “Upload” tab.
From your “File Explorer” window, drag and drop the PowerPoint presentation in the dialog box. Now the presentation will automatically open in Google Slides.
Also Read – How to “ Make a Copy of a Google Slides Presentation ” and how to “ Share a Google Slides Presentation Correctly ” with others!
You can also click on the “ Select a file from your device ” button (blue button in the center of the screen). This will open the file explorer window. Navigate to the folder in which you have saved your PowerPoint presentation, and click on “OK”. This will open and save the presentation file in Google Slides.
8. How to Save a PowerPoint Presentation to a Flash Drive?
To save a PowerPoint presentation on a flash drive or any external device, follow the 3 simple steps.
In the menu ribbon located at the top of the screen, click on the “File” tab. In the “File” menu, click on the “Save As” option.
Step-2: Click on “Browse”
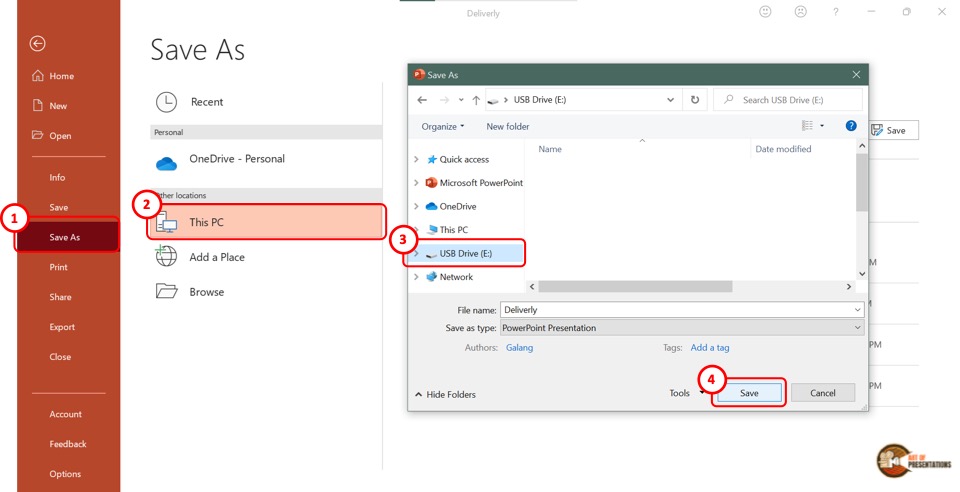
In the “Save As” screen, click on the “Browse” option which is the last option in the left column. This will open the “Save As” dialog box. In the sidebar on the left of the dialog box, click on the external disc.
Now all you have to do is click on the “Save” button at the bottom of the dialog box to save the PowerPoint presentation on the flash drive (as shown in the image in step 2).
9. How to Save a Copy of a PowerPoint Presentation?
The “Save A Copy” feature of Microsoft PowerPoint allows you to save changes in your presentation in a copied file without changing the original file.
Check out my article to learn detailed steps on how to save a copy of a PowerPoint presentation .
10. How to Save a Read-Only PowerPoint Presentation?
The “Read-Only” feature of Microsoft PowerPoint allows you to protect your PowerPoint presentation .
Using this feature, you can share your presentation with others without giving them the access to change your presentation. To save a read-only PowerPoint presentation, follow the steps mentioned below –
The first step is to click on the “File” tab in the menu ribbon. From the sidebar in the “File” menu, click on the “Info” option.
Step-2: Click on the “Protect Presentation” button

The next step is to click on the “Protect Presentation” option in the “Info” screen. This will open a dropdown menu. Click on the “Always Open Read-Only” option from the dropdown menu.
Step-3: Click on the “Save” option
Now all you have to do is save the presentation. To do so, click on the “Save” option in the sidebar right under the “Info” option. Alternatively, you can press the “Ctrl+S” keys on your keyboard.
If you have received a presentation that opens only in the read-only mode, but you don’t know how to work with it, check out my other article on “ How to Edit a Presentation in Read-Only Mode “.
11. How to Save a PowerPoint Presentation Without Notes?
When saving a PowerPoint presentation, you might want to remove the speaker notes. To do so, all you have to do is follow the 5 quick steps.
In the menu ribbon, click on the “File” tab. Then click on the “Info” option from the “File” menu.
Step-2: Click on “Check for Issues” on the “Info” tab
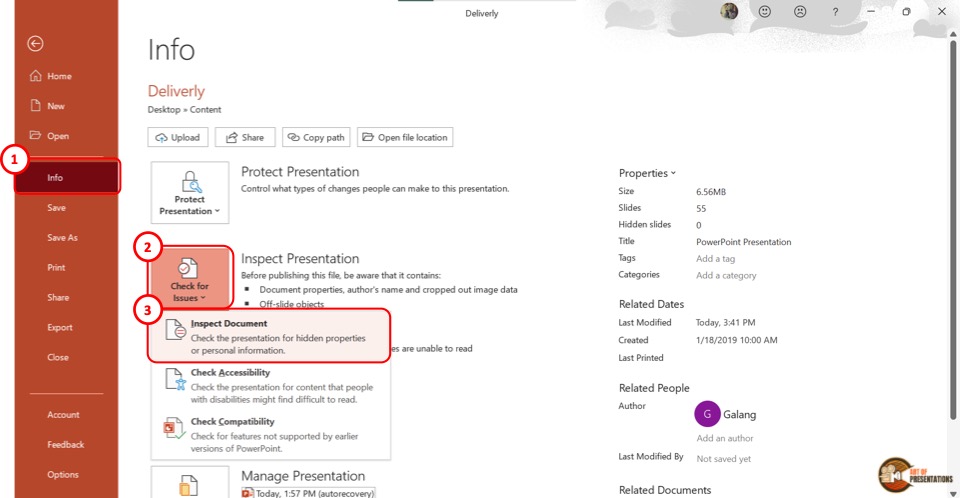
In the “Info” option, click on the “Check for Issues” button. Then click on the “Inspect Document” option from the dropdown menu. This will prompt a dialog box.
Step-3: Click on the “Inspect” option
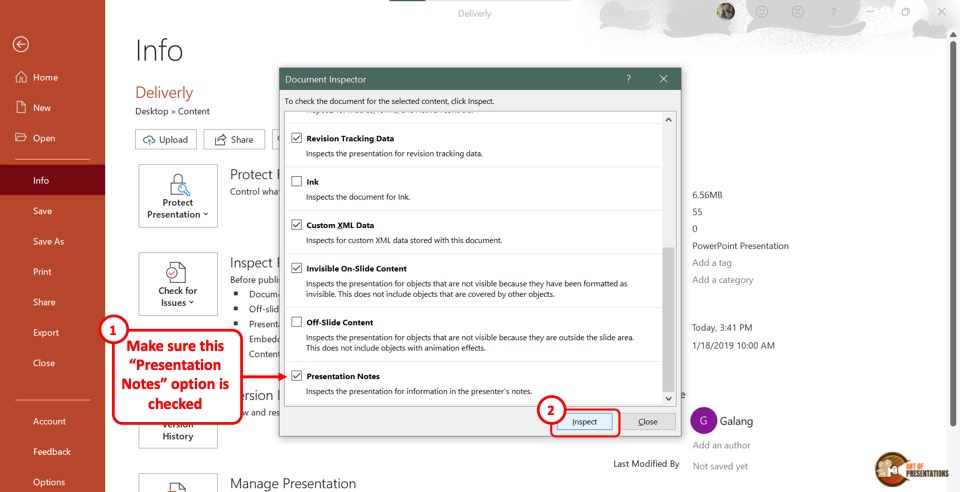
In the “Document Inspector” dialog box, scroll all the way to the bottom and make sure the “Presentation Notes” option is selected. Then click on the “Inspect” button at the bottom of the dialog box.
Step-4: Click on the “Remove All” option
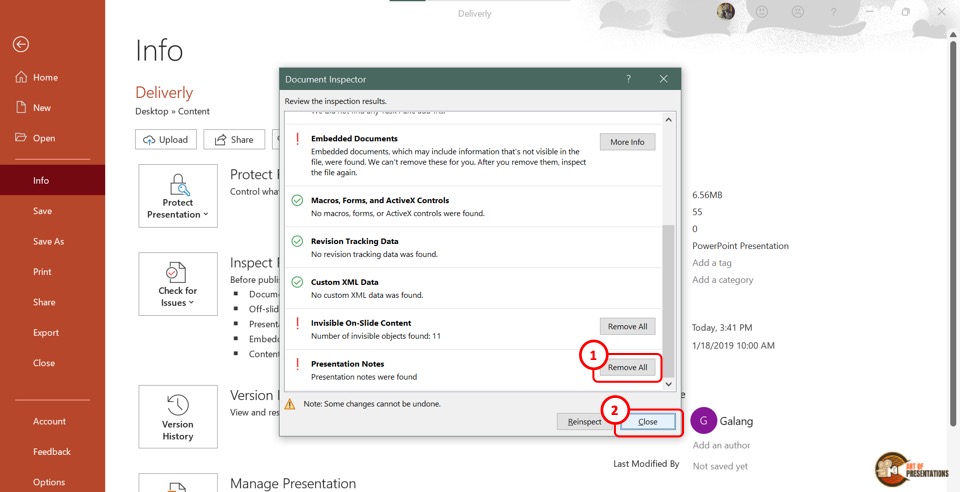
Once the inspection results are shown in the “Document Inspector” dialog, scroll to the bottom again to find the “Presentation Notes” option. Then click on the “Remove All” button at the right side of the “Presentation Notes” option.
Now all you have to do is click on the “Close” button at the bottom of the dialog box to finish the process.
Step-5: Click on the “Save” option
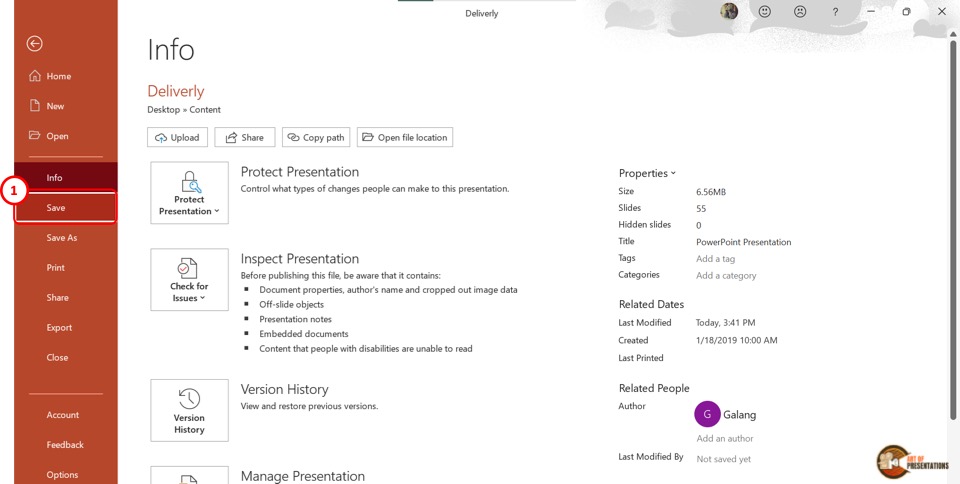
The final step is to click on the “ Save ” option in the sidebar of the “File” menu to save the presentation without notes. You can alternatively press the “Ctrl+S” keys on your keyboard.
12. How to Save PowerPoint Presentation Directly in Microsoft Teams?
If you are delivering a PowerPoint presentation to an audience using Microsoft teams, you can easily share a PowerPoint deck with your audience in the following steps –
- First, open the Microsoft Teams application and login to the meeting.
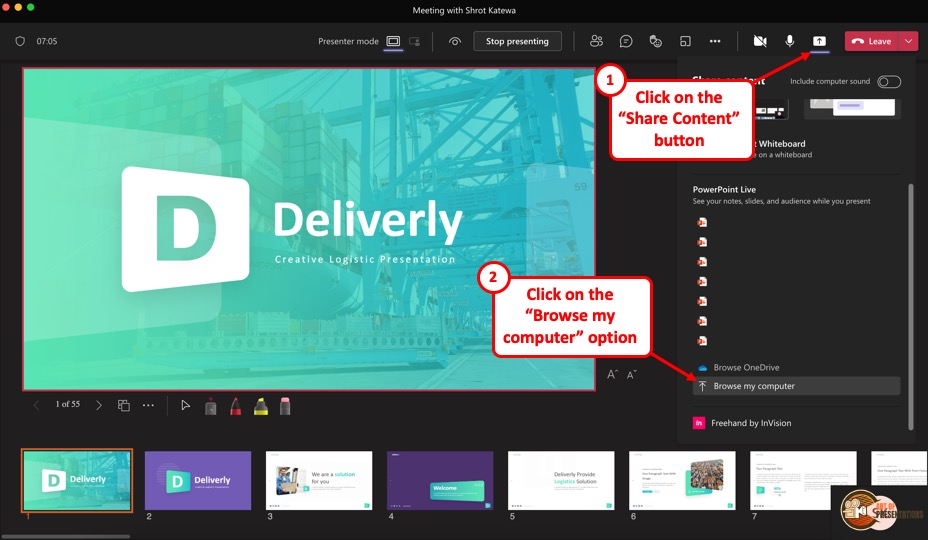
- On the “ Meeting Controls ” menu available in the top part of your meeting screen, locate the “ Share Content ” option.
- Click on the share content button. This will show the most recent PowerPoint files that you opened. You can either choose to click on one of the files visible. Alternatively, scroll down on the right panel and click on the “ Browse my computer ” option.
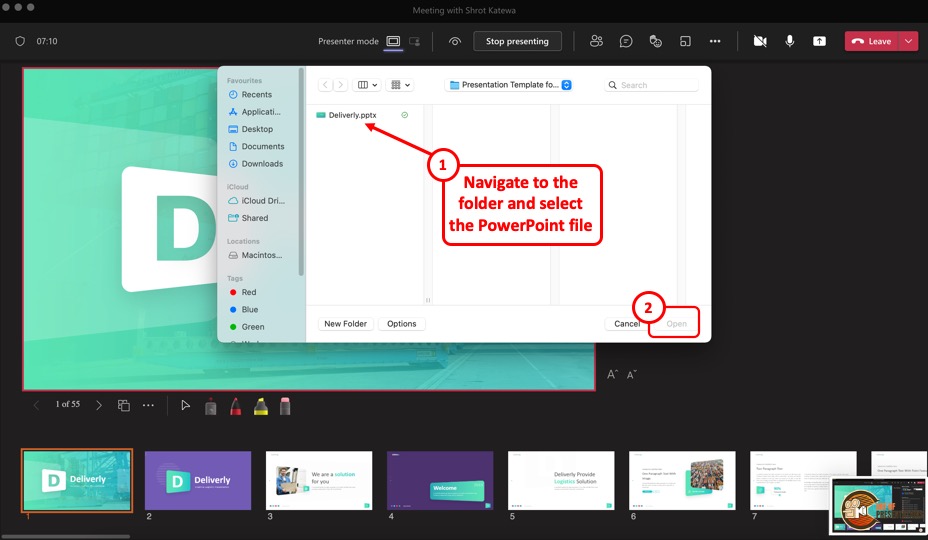
- This will open a new file browser window. Navigate to the respective location where your PowerPoint presentation is saved, click on it to select it. Then, click on “Open” to open the presentation in Microsoft Teams.
- The presentation will open by default in the presenter mode and shared with the audience of the meeting.
13. How to Enable Autosave in PowerPoint Presentation?
The autosave option is only available if you are using the Microsoft Office 365 version of PowerPoint . Other than that, you will have to manually save the PowerPoint file in all other versions.
You can autosave the PowerPoint presentation to the OneDrive cloud, and also autosave recovery files. To enable autosave in PowerPoint presentation, follow the 4 simple steps.
Step-1: Click on the “AutoSave” button
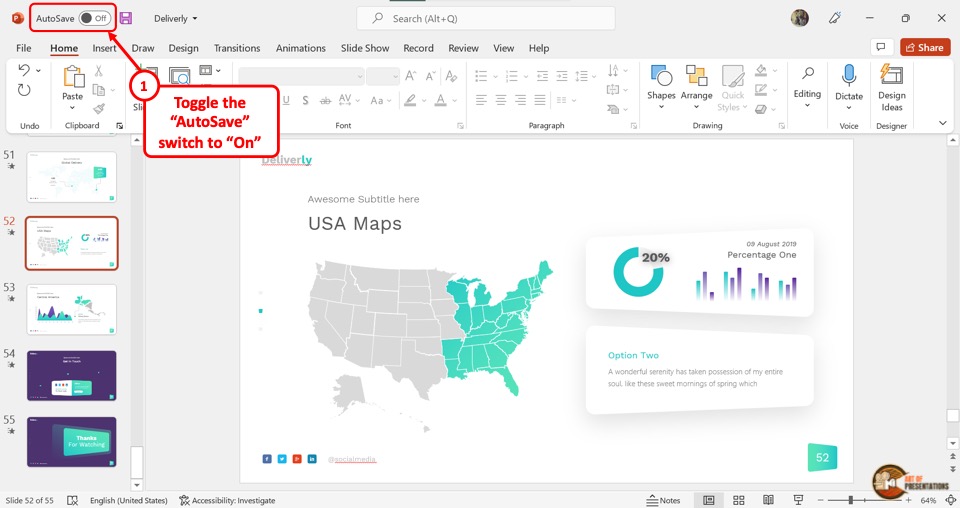
To simply turn on autosave in the OneDrive cloud for the PowerPoint presentation, all you have to do is click on the slider beside the “Autosave” option.
It is located in the left corner of the Quick Access Toolbar at the top of the screen.
Step-2: Click on “Options”
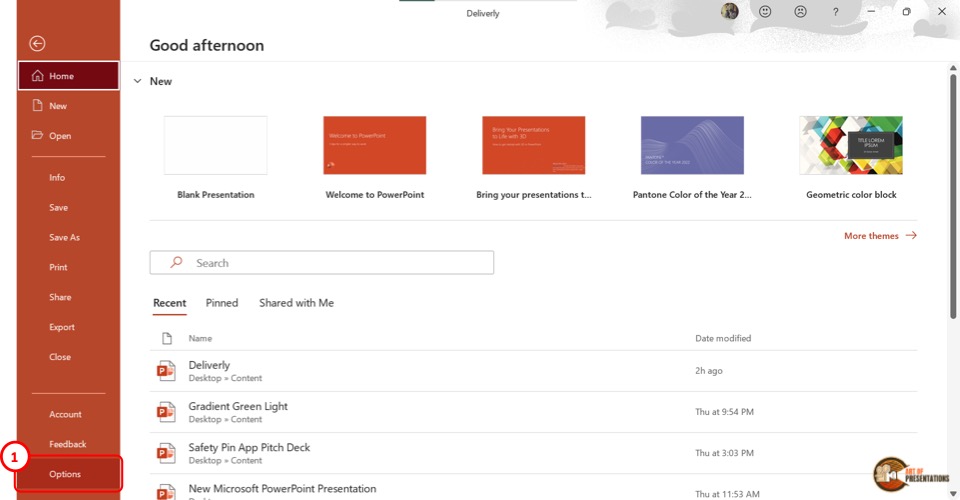
To access more autosave options, click on the “File” tab in the menu ribbon. Then click on the “Options” option which is the last option in the sidebar in the “File” menu. It will open a dialog box.
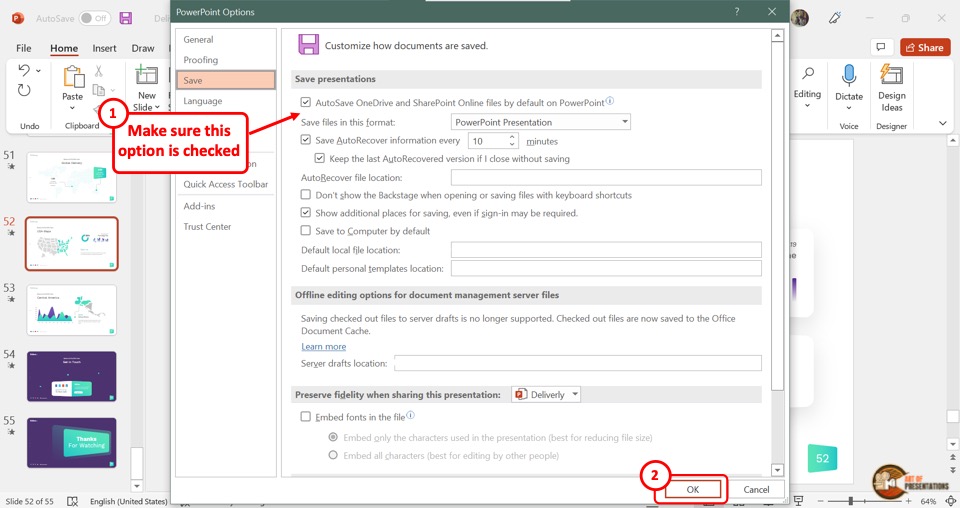
In the “PowerPoint Options” dialog, click on the “Save” option from the sidebar located on the left side. Now you can enable your preferred autosave options in the “Save presentations” section.
Click on the “Autosave OneDrive and SharePoint Online files by default on PowerPoint” for auto-saving on the cloud. You can also select how often the auto-recovery copy is saved by clicking on the box at the right side of the “Save Autorecover information” option.
Step-4: Click on the “OK” button
Now all you have to do is click on the “OK” button at the bottom of the “PowerPoint Options” dialog box to enable your autosave preference (as shown in the image in step 2).
Credit to Cookie_studio (on Freepik) for the featured image of this article (further edited).
- Slidesgo School
- PowerPoint Tutorials
How to Use the Presentation Modes and the Screen Recording Features in PowerPoint

After designing all the slides for your presentation, the next and last step is presenting in front of your audience. In this new Slidesgo School tutorial, you’ll see how the presenter view works and how you can record your presentation .
Presentation Modes
Presentation modes — set up slide show, presentation modes — record slide show.
- There are different presentation modes in PowerPoint, besides the one you can find at the bottom of the screen.
- To access the presentation modes, go to the Slide Show tab.
- The first two options allow you to start the presentation from the beginning or from the currently selected slide.

- If you choose Present Online, an URL will be generated, which you can then share with your potential online viewers. After clicking this button, a new window will open, displaying info about the Microsoft Office online presentation service and a checkbox to enable remote download for your online audience. To enjoy this service, you need an Office 365 account. When you’re ready, click Connect to generate the URL.
- If you choose Custom Slide Show, you can select which slides to display in your presentation. First, create a new custom slide show and select the slides that you want to display. Then, click Add, enter the name of the presentation and click OK. This new custom presentation will appear on the list. Select it and click Show to begin the presentation.
- In the Set Up group you’ll find options to set up the presentation, hide slides, rehearse your presentation and even record it.
- Click Set Up Slide Show to adjust several settings regarding your presentation. You’ll find more information in the next section of this tutorial .
- If you click Hide Slide, the selected slide won’t show up during your presentation. Hidden slides will appear faded out on the list and their numbers will be crossed out.
- If you click Record Slide Show, you’ll be able to record your presentation from the beginning or from the current slide. We’ll go into detail in the last section of this tutorial.
- There are several checkboxes regarding whether to play narrations, use timings and show media controls.

- In the Monitors group you can choose which screen to display your presentation.
- The last group, Captions & Subtitles, is only available in Office 365. You’ll find options to enable subtitles, which will be generated out of your speech (so you’ll need to have a mic). There are settings to change the language and the position of the subtitles.
- Open your presentation in PowerPoint.
- Go to the Slide Show tab.
- In the Set Up group, click Set Up Slide Show. A new window will open, where you’ll find several options.
- In the top-left corner, under “Show type”, you can choose whether the presentation will be in fullscreen with speaker notes, windowed, or in fullscreen without speaker notes or the menu bar.

- Under “Show options” you can choose whether to show the presentation without narration or animations, or disable the hardware graphics acceleration (for better performance). You can also set the pen and laser pointer color.

- Under “Show slides”, you can choose which slides to show in your presentation. You can select all of them, a specific range or a custom slideshow.
- There are other settings to determine how to advance slides (manually or using timings), what the resolution will be and whether to use the presenter view.
- Click Record Slide Show. From the drop-down menu, select From the Current Slide or From the Beginning.
- A new window will open, along with the presentation in fullscreen mode. At the top-left you’ll find a button to start recording.
Do you find this article useful?
Related tutorials.

How to Use the Presenter View in Google Slides
Google Slides, like PowerPoint, has different presentation modes that can come in handy when you’re presenting and you want your slideshow to look smooth. Whether you’re looking for slides only, speaker notes or the Q&A feature, in this new Google Slides tutorial, you’ll learn about these and their respective settings. Ready? Then let’s explore the presenter view!

How to Download Google Slides Templates
When preparing a presentation, many people start panicking because they realize how much time it will take to edit each and every slide. Creating them from scratch, filling them in, looking for pictures, moving the elements...How stressful! But there is a solution that saves you a lot of time. We're sure that you've browsed the internet for templates, or basically, pre-established designs and elements, that can be downloaded for free and can be edited to your liking. Are we right? Then, we have some good news for you!

Discover our collection of printable templates
With the advance of technology, printing has become something that is no longer a necessity. Smartphones have made the paper format less and less frequent, but there are still certain cases in which having physical resources is much more convenient. Whether it's for taking notes, handing out assignments, making worksheets or handing out business cards or invitations, it's necessary to print your customized designs.From now on, in every Slidesgo printable presentation that you download, you will find the instructions for printing on the third slide. Depending on the style, colors or format of each presentation, we will tell you if you can...

How to Add Superscript and Subscript in Google Slides
Let’s take the most famous formula: E=mc^2, Einstein’s relativity equation. It wouldn’t be the same if it was E=mc2, right? Okay, yes, some people write it like that because it’s very famous and it won’t be misunderstood. But technically… It can! This is where the sophistication of superscript or subscript enters the room! Do you know how to write them in equations, copyright brands or even footnotes in your presentations? Let’s figure out how.
- PRO Courses Guides New Tech Help Pro Expert Videos About wikiHow Pro Upgrade Sign In
- EXPLORE Tech Help Pro About Us Random Article Quizzes Request a New Article Community Dashboard This Or That Game Popular Categories Arts and Entertainment Artwork Books Movies Computers and Electronics Computers Phone Skills Technology Hacks Health Men's Health Mental Health Women's Health Relationships Dating Love Relationship Issues Hobbies and Crafts Crafts Drawing Games Education & Communication Communication Skills Personal Development Studying Personal Care and Style Fashion Hair Care Personal Hygiene Youth Personal Care School Stuff Dating All Categories Arts and Entertainment Finance and Business Home and Garden Relationship Quizzes Cars & Other Vehicles Food and Entertaining Personal Care and Style Sports and Fitness Computers and Electronics Health Pets and Animals Travel Education & Communication Hobbies and Crafts Philosophy and Religion Work World Family Life Holidays and Traditions Relationships Youth
- Browse Articles
- Learn Something New
- Quizzes Hot
- This Or That Game New
- Train Your Brain
- Explore More
- Support wikiHow
- About wikiHow
- Log in / Sign up
- Computers and Electronics
- Presentation Software
- PowerPoint Presentations
How to Save a PowerPoint Presentation
Last Updated: May 26, 2022
wikiHow is a “wiki,” similar to Wikipedia, which means that many of our articles are co-written by multiple authors. To create this article, volunteer authors worked to edit and improve it over time. This article has been viewed 50,072 times. Learn more...
A PowerPoint presentation is an excellent way of presenting information or ideas to an audience. The software is easy to use and offers a lot of cool effects for your slideshows, too. But, what's all the use of this if you don't even know how to save your finished PowerPoint? This wikiHow will teach you how to save your file.
Design your PowerPoint presentation.

- You don't have to wait until you're totally finished to save your work. It can help to save along the way, too, to ensure you don't lose any progress.
Open the File menu when you're ready to save.

Choose the Save or Save As option.

Decide where to save the presentation.

Name and save your presentation.

Expert Q&A
You might also like.

About This Article
- Send fan mail to authors
Is this article up to date?

Featured Articles

Trending Articles

Watch Articles

- Terms of Use
- Privacy Policy
- Do Not Sell or Share My Info
- Not Selling Info
wikiHow Tech Help Pro:
Level up your tech skills and stay ahead of the curve
How-To Geek
How to change a powerpoint show (ppsx) to a work file (pptx).
You can convert a PowerPoint Show presentation file to an editable PowerPoint Work file. Here's how.
Quick Links
Changing the file extension, saving the file as a pptx.
PowerPoint files come in two formats: PPTX files are editable PowerPoint presentations and PPSX files are a view-only format intended for presentations. You can edit a PPSX file, but you must first convert it back to a PPTX format.
Before trying anything else, it’s always worth seeing if you can just change the file extension. This works sometimes, although it depends on the version of Office you and your colleagues are using.
To change the file extension, right-click the file and choose “Rename.”
Change the file extension (if it exists in the file name) from .ppsx to .pptx.
Double-click the file to open as normal in PowerPoint.
In our case, that didn’t work. The file still opens as a PPSX presentation. So, we’ll move on and try another way.
PowerPoint can convert a PPSX file to a PPTX one. Here's how.
First, open "PowerPoint" and choose File > Open to find the file you want to edit.
Go to File > Save As to save the file.
From the drop-down menu at the top right, choose "PowerPoint Presentation (*.pptx)" to save the file as an editable file you can share with colleagues. Be sure to hit the "Save" button when you're done.
Now, when colleagues click to open the file, they’ll be taken to the PowerPoint editor to make quick edits and revisions.
- Start using PowerPoint Video
- Save a PowerPoint presentation Video
- Insert items Video
- Finalize and review Video
- Prepare and run Video

Save a PowerPoint presentation

Save your presentation, so you don't lose all your hard work. Then, print it to share it with others.
Save your presentation
Click FILE > Save , pick or browse to a folder, type a name for your presentation in the File name box, and click Save .
Save your work as you go. Hit Ctrl+S often.
Basic tasks for creating a PowerPoint 2013 presentation
What's new in PowerPoint 2013
Probably the most important part of creating a presentation, other than writing it is, of course, saving it.
For example, if the power were to go out right now, all of our hard work would be gone, unless we'd saved it to a file.
Here is an easy way to do that. Move up here to this set of commands called the Quick Access Toolbar , and click Save .
The first time you save a presentation, you come to this area, called the backstage.
You won’t find any formatting commands here.
The backstage is all about opening, saving, printing, sharing, exporting, and modifying PowerPoint options.
In other words, all that behind-the-scene stuff.
Save As is selected when you first save a presentation.
Here, you choose whether you want to save it to your Computer , or to the cloud using Microsoft 365 or OneDrive .
I have already signed in to my online account, so now I can click here, and browse for a location on my OneDrive.
Enter a filename and click Save .
It is just like saving to a computer, except that now I can access the file on any computer connected to the Internet.
Or, I can share it with others by sending an email message containing a link to the online file.
After you save your presentation, you can keep working on it, if you want.
But, remember to save it often, so you don’t lose any new work.
If you want to print your presentation, click the FILE tab to go to the backstage, and click Print .
You can see a preview of how it will look after it is printed. Select a printer here. Then, click Print .
However, before we do any printing, we need to finish the slides.
Up next, we’ll insert some things in the presentation.

Need more help?
Want more options.
Explore subscription benefits, browse training courses, learn how to secure your device, and more.

Microsoft 365 subscription benefits

Microsoft 365 training

Microsoft security

Accessibility center
Communities help you ask and answer questions, give feedback, and hear from experts with rich knowledge.

Ask the Microsoft Community

Microsoft Tech Community

Windows Insiders
Microsoft 365 Insiders
Was this information helpful?
Thank you for your feedback.
- Hot Tech Deals at Target Right Now
- The Best Noise-Canceling Headphones to Buy
Change a PowerPoint Show File to a Work File
- Brock University
When you receive a PowerPoint file, whether over a company network or as an email attachment, the file extension indicates whether it's a show file (meant for viewing only) or a working presentation file. The show file has the file extension .ppsx, while the presentation working file uses the file extension of .pptx on the end of the file name. Changing this extension changes the file type.
Instructions in this article apply to PowerPoint 2019, 2016, 2010; PowerPoint for Microsoft 365, and PowerPoint for Mac.
PPTX vs. PPSX
A PowerPoint show is the actual presentation that you view when you are a member of the audience. A PowerPoint presentation file is a working file in the creation stage. They differ only in their extension and the PowerPoint format they in which they open.
PPTX is the extension for a PowerPoint presentation.
PPSX is the extension for a PowerPoint show. This format saves presentations as a slideshow. It is the same as the PPTX file but when you double-click it, it opens in Slide Show view rather than Normal view.
Editing a PowerPoint Show File
Sometimes, you want to make a few changes to the finished product, but all you received from your colleague is the show file with the .ppsx extension. There are a couple of ways to make edits to a .ppsx file.
Open the File in PowerPoint
Open PowerPoint.
Select File > Open and locate the show file with the .ppsx extension on your computer.
Edit the presentation as usual in PowerPoint.
Go to File .
Select Save As .
In the Save As Type box, choose PowerPoint Presentation (.*pptx) to save the file as a regular working presentation file.
Change the File Extension
In some cases, you can just change the extension before opening the file in PowerPoint.
Right-click the show file with the .ppsx extension and choose Open file location .
Right-click on the file name and choose Rename .
Change the file extension from .ppsx to .pptx .
Double-click on the newly named file to open it in PowerPoint as a working presentation file.
Get the Latest Tech News Delivered Every Day
- Print Slides From a PowerPoint Show File for PC
- How to Use Microsoft's Free PowerPoint Viewers
- How to Save Sounds From PowerPoint Slideshows
- What Is a PPTM File?
- What Is a PPTX File?
- What Is a PPSM File?
- What Is a PPSX File?
- Create Pictures From PowerPoint Slides
- What Is a POTX File?
- 4 Ways to Change a File Extension in Windows 11
- What Is a PPT File?
- How to Convert PowerPoint to Video
- What Is a PPS File?
- Create a Default Presentation Template in PowerPoint
- How to Insert PDF Files Into PowerPoint Presentations
- How to Save PowerPoint Presentations as PDF Files
How to Change PowerPoint to Portrait? A Step-by-Step Guide
Table of contents.
PowerPoint slides typically use a landscape orientation, where the width of the slide is wider than its height. This layout has become the norm for presentations because it matches the shape of many projectors and computer screens, ensuring that your content looks its best when displayed to your audience.
Landscape and Portrait Slide Sizes?
In PowerPoint, slides are typically set to Landscape orientation by default, coming in two sizes:
- Standard : 4:3 ratio (10×7.5 inches)
- Widescreen : 16:9 ratio (13.33×7.5 inches)
For Portrait slides, the default size is 10×5.626 inches.
Landscape orientation provides a wider space for your content, making it great for including visuals like images, charts, graphs, and tables. The text flows naturally from left to right, which is easier for viewers to read and understand.
On the other hand, Portrait orientation has a taller, narrower layout, with the height exceeding the width. While it’s not as common in presentations, Portrait orientation might be useful for specific situations where a different layout is needed.
How to Change PowerPoint to Portrait
On windows:.
Step 1 – Open your presentation: Launch Microsoft PowerPoint and open the presentation you want to modify.
Step 2 – Access the Design tab: Locate the ribbon at the top of the PowerPoint window. Click on the “Design” tab.
Step 3 – Find the Slide Size options: Within the “Design” tab, look for the “Customize” group on the right-hand side. Click the dropdown menu under the label “Slide Size.”
Step 4 – Choose “Custom Slide Size”: Several pre-defined sizes will appear. Instead of selecting one of those, choose the option at the very bottom: “Custom Slide Size.”
Step 5 – Set Orientation to Portrait: A new window titled “Slide Size” will pop up. Under the “Orientation” section, you’ll see two radio buttons: “Landscape” (which is the default) and “Portrait.” Click the radio button next to “Portrait” to switch the orientation.
Step 6 – Click “OK”: Once you’ve chosen “Portrait,” simply click the “OK” button at the bottom of the “Slide Size” window.
Step 7 – Choosing Between “Maximize” and “Ensure Fit”
After clicking “OK” in the previous step, PowerPoint might prompt you with a choice between two options:
- Maximize: This option enlarges your existing slide content to fill the entire portrait space. However, this may cause some elements to appear distorted or cut off.
- Ensure Fit: This option shrinks your slide content to fit proportionally within the portrait layout. This ensures everything stays visible but may leave extra blank space around the edges.
- Open your PowerPoint presentation.
- Go to the File menu and select Page Setup.
- In the “Page Setup” dialog box, under Orientation, choose Portrait. You can also adjust the width and height values here if needed.
Recommendations:
- For presentations intended to be shown on a screen: Choose “Maximize” to utilize the full portrait area. Text and images might need slight adjustments to avoid being cropped.
- For printing handouts or notes: Opt for “Ensure Fit” to guarantee all content remains visible on the printed page, even if there’s extra space.
Are you a Google Slides user? Check our guide on How To Make Google Slides Vertical here !
How to Make a Single Slide Portrait in PowerPoint?
While PowerPoint doesn’t directly support both orientations within a single file, you can achieve this by linking separate presentations. Here’s how:
Step 1: Open your landscape presentation.
Step 2: Navigate to the slide where you want to insert the link.
Step 3: Add a text box or select existing text to act as the link.
Step 4: Go to Insert > Action.
Step 5: Choose between “Mouse Click” (triggers when you click the text) or “Mouse Over” (triggers when you hover over the text).
Step 6: Select “Hyperlink to:” and choose “Other PowerPoint Presentation” from the dropdown.
Step 7: Locate and select your portrait presentation. Then in “Hyperlink to Slide”, select the slide you want to start from.
Step 8: Click “OK.”
Now, during your presentation, clicking (or hovering, if you chose Mouse Over) the designated text will seamlessly switch to your portrait presentation.
Remember these things while linking the presentation :
- Ensure both presentations are saved in the same folder to avoid broken links.
- Consider using a clear call to action on the linked text, like “Click here for details” or “View data in portrait mode.”
Benefits of Portrait Orientation
There are several reasons why you might need to change the orientation to portrait:
1. Enhanced Viewing Experience
- Vertical Content Suitability : Documents, articles, and social media feeds primarily consist of text, making portrait orientation more efficient in utilizing the screen’s height. This allows for better readability with fewer scrolls needed to view content.
- Focused Viewing : Portrait orientation gives a better view of vertical content like portraits or tall buildings, allowing you to focus on the details without distractions.
2. Considering Device Limits
- Comfortable Handheld Use : Holding a phone or tablet in portrait orientation is often more comfortable for long periods.
- Optimized Screen Space : On smaller screens, portrait orientation might be the only way to see everything without zooming or scrolling sideways.
3. Tailoring to Application Needs
- App-Specific Design : Certain applications are primarily designed for portrait orientation, and using them in landscape mode may result in functionality or display issues.
- Seamless Reading Experience : Many ebooks and webcomics are formatted for vertical scrolling, making portrait orientation preferable for a smooth and uninterrupted reading experience.
Tips for Creating Visually Appealing Portrait Slides
Choosing the Right Images:
- Pick clear, well-lit portraits without blurriness or pixelation.
- Make sure the images match the slide content, avoiding generic stock photos.
- Select portraits that convey emotions and resonate with the audience, considering facial expressions and mood.
- Aim for diversity by including various genders, ethnicities, ages, and backgrounds.
Composition and Design:
- Crop images strategically to highlight the subject’s face and remove distracting background elements.
- Position portraits carefully within the slide layout for balance.
- Use empty space effectively to avoid clutter and draw attention to the portrait.
- Coordinate the color scheme of the portrait with other slide elements.
Text and Content:
- Keep text brief on the portrait slide to avoid overshadowing the image.
- Choose a clear, readable font that matches the overall style.
- Place text thoughtfully to ensure important parts of the portrait are visible.
Additional Considerations:
- Use filters sparingly to enhance the mood without compromising image quality.
- Consider adding subtle overlays or textures for visual interest.
- Maintain a consistent visual style for a professional look.
Closing Thoughts
Changing PowerPoint to portrait orientation is a straightforward process that lets you customize your presentations to fit different purposes. Whether you’re making a vertical infographic or getting slides ready for a poster presentation, these steps will help you easily switch between landscape and portrait orientations in Microsoft PowerPoint.
Frequently Asked Questions
Why change slide orientation in powerpoint.
While landscape dominates presentations, switching to portrait in PowerPoint can be beneficial for showcasing tall content like portraits and infographics, creating handouts, adapting to specific screens, or adding visual variety. However, this format has limitations – you can’t mix orientations and content might require adjustments. Choose the orientation that best suits your content and presentation goals.
Can I mix Portrait and Landscape slides in one presentation?
While directly combining them isn’t possible, you can achieve a similar effect. Here’s how:
Create two separate presentations: One in landscape and another in portrait.
Link the presentations: Insert hyperlinks in your main presentation (landscape) to specific slides in the portrait presentation.
Does changing one slide’s orientation affect the whole presentation?
Yes. By default, all slides in a presentation share the same orientation (landscape or portrait). Changing one slide’s orientation will automatically adjust the entire presentation to match.
Can I revert my portrait PowerPoint back to landscape?
Yes, you can easily revert to landscape by adjusting the slide size settings.
Are there specific templates designed for portrait presentations?
Some templates are optimized for portrait mode, or you can customize existing ones.
Is there a quick way to switch between Landscape and Portrait in PowerPoint?
Unfortunately, there’s no single shortcut key to change the entire presentation’s orientation. However, you can access the orientation settings through the following methods:
- Go to the “Design” tab. In the “Customize” section, you’ll find the “Slide Size” option. Clicking the dropdown menu allows you to choose between Landscape and Portrait.
- Right-click on any slide. Select “Size and Layout” from the context menu. A window will appear where you can choose the desired orientation.
How to put PowerPoint in portrait mode for handouts?
In Print settings under “Handouts,” choose a portrait layout option like “2 Slides per Page (Portrait)” to display your slides in portrait on printed handouts.
What happens to my existing content if I change the orientation to portrait?
PowerPoint will attempt to scale your existing content to fit the new orientation. However, depending on the amount of content and its layout, adjustments might be necessary to ensure everything displays correctly.
Will my presentation work on all projectors if it’s in portrait orientation?
While most modern projectors can handle portrait presentations, some older models might have limitations. It’s recommended to test your presentation on the specific projector beforehand if unsure.
Save Time and Effortlessly Create Presentations with SlidesAI

IMAGES
VIDEO
COMMENTS
Make a slide show that starts automatically when opened. Select File > Save as (or Save a Copy ). Click More options. Browse to the folder where you want to save your presentation. In the File name box, type a name for your presentation. Under Save as type, select PowerPoint Show. The file is saved as a .ppsx file.
To Save a PowerPoint Presentation as a PowerPoint Show: Choose the File tab. Select Save As. Pick the Save as type as PowerPoint Show. Type a name for your slide show in the File name text box (you can use the same name and location as your .pptx/presentation file) and click Save. Your PowerPoint slide show file is saved with a .ppsx extension.
PowerPoint Show .ppsx. A presentation that always opens in Slide Show view rather than in Normal view. Tip: To open this file format in Normal view so that you can edit the presentation, open PowerPoint. On the File menu, click Open, and then choose the file. Note: If you need macros enabled save as a .ppsm. If you're in PowerPoint 2003 the ...
This http://OneMinuteGeek.com video tutorial shows you how to save your PowerPoint presentations as an automatic slideshow when you open the file. Visit http...
Next, once we have managed to open the PowerPoint Show file in edit mode, all we have to do is save it as a video file format. To do that, navigate to the "File" tab, click on "Save as", select the "MP4" file format from the dropdown and click "Save". Now, PowerPoint will automatically convert the presentation into a video format.
To save the PowerPoint presentation as a PDF file, follow the 4 easy steps. Step-1: Click on the "File" Tab. First, click on the " File " tab in PowerPoint to open the back stage view of PowerPoint. Step 2 - Click on the "Save As" option. In the menu ribbon located at the top of the screen, click on the "File" tab.
When you're ready, click Connect to generate the URL. Present Online option. If you choose Custom Slide Show, you can select which slides to display in your presentation. First, create a new custom slide show and select the slides that you want to display. Then, click Add, enter the name of the presentation and click OK.
0:00 Intro0:15 Difference in .pptx and .ppsx0:49 opening a .ppsx in Teams2:35 How to save as .ppsx3:06 Changing access in sharepoint3:53 Adding .ppsx in Chat...
Keep reading to find out more about using Presenter View in PowerPoint and the best features to try out.. Turn On PowerPoint Presenter View. In PowerPoint for macOS, simply click on Presenter View on the Slide Show tab to kick off the presentation in Presenter view. Turn on Presenter View by clicking on Presenter View on the Slide Show tab.. You'll see the Presenter View interface on one screen.
Learn how to send Microsoft PowerPoint in Presentation ModeFollow our presenters/host on Twitter: https://twitter.com/educatoralexHIT THE RED SUBSCRIBE BUTTO...
It's by no means un-editable. Open the presentation that you want to make read-only, then click the "File" tab. Next, in the left-hand pane, select "Info." You'll now see a "Protect Presentation" section, which lets you (to an extent) protect against any editing of your presentation. Click "Protect Presentation."
With OneDrive set up, open Microsoft PowerPoint and select the "File" menu at the top. Click "New" on the left pane. Select "Blank Presentation" or any template that you like. Hit the toggle next to AutoSave and make sure that it's set to "On." You'll see a pop-up message where you'll need to select "OneDrive."
Choose the Save or Save As option. Download Article. Click Save to save to the current file, or Save as to create a new file. If you've already saved the file at some point, you'll have the option to click Save, which simply saves your changes to that file. Otherwise, choose Save as to create a brand new file. 4.
Here's how. First, open "PowerPoint" and choose File > Open to find the file you want to edit. Go to File > Save As to save the file. From the drop-down menu at the top right, choose "PowerPoint Presentation (*.pptx)" to save the file as an editable file you can share with colleagues. Be sure to hit the "Save" button when you're done.
Transcript. Save your presentation, so you don't lose all your hard work. Then, print it to share it with others. Save your presentation. Click FILE > Save, pick or browse to a folder, type a name for your presentation in the File name box, and click Save. Save your work as you go. Hit Ctrl+S often.
Open the File in PowerPoint. Open PowerPoint. Select File > Open and locate the show file with the .ppsx extension on your computer. Edit the presentation as usual in PowerPoint. Go to File . Select Save As . In the Save As Type box, choose PowerPoint Presentation (.*pptx) to save the file as a regular working presentation file.
How to Change PowerPoint to Portrait. On Windows: Step 1 - Open your presentation: Launch Microsoft PowerPoint and open the presentation you want to modify. Step 2 - Access the Design tab: Locate the ribbon at the top of the PowerPoint window. Click on the "Design" tab. Step 3 - Find the Slide Size options: Within the "Design" tab ...