

How to Create a Professional Interior Design Presentation in 6 Steps – Cedreo
Interior designers love coming up with fun and interesting ideas for their clients’ homes. However, it’s important not just to have those ideas in mind, but to clearly communicate them to clients through an interior design presentation. When your clients see a detailed representation of the completed project, it’s easier for them to get excited about it and make better design decisions. Better interior design presentations reduce back-and-forth, streamline communication, and help you close more deals. Fortunately, with design software like Cedreo, it’s easier than ever to create professional interior design presentations that wow your clients. Ready to take your interior design projects to the next level and start landing more clients? Check out this 5-minute read with some pro tips for your next interior design presentation.
What’s Included in an Interior Design Presentation?
Depending on your client’s needs, an interior design presentation could include several different elements. Here are a few you should consider adding to your next presentation:
3D floor plan
While 2D floor plans are traditionally included in most interior design projects, they can be hard for a lot of clients to understand. 3D floor plans , on the other hand, remove the guesswork and help bring your ideas to life. With Cedreo home design software , you can draw in 2D while instantly seeing the 3D plan view.

Showing your clients 3D plans will help them understand the size, layout, and flow of the space. This is especially helpful once you add furnishings.
Furniture plan
A furniture plan includes furniture with accurate measurements that show the exact space around each piece. Adding furniture to your 3D plans helps clients visualize the actual shape, color, and texture of each piece in combination with the rest of the decor. With Cedreo design software, you can quickly switch out furniture pieces based on feedback from your clients.
Material samples
Samples are an important part of design presentations. Try adding them to a mood board so your clients can see, touch, and feel the different materials. Most clients appreciate seeing physical samples ofs tile, paint swatches, furniture fabric, and wood finishes.
Before even starting a project, you should have gotten a target budget from your clients. If it’s a large project, it’s best to break down the cost per room and/or each aspect of the design. You can also show the different costs based on what options they choose.
Realistic 3D renderings are becoming more and more important in modern interior design presentations. These show a 3D view of your project complete with details like interior lighting, sunlight, shadows, and textures.

Although they used to be expensive and complicated to create, with Cedreo, you can get photorealistic renderings of your design with just one click.
3 Types of Interior Design Presentations
Depending on what stage of the project you’re in, presentations can take on a variety of forms. Here are some of the most common types of project presentations:
Mood Boards
Mood boards are a collage of images, samples, and plans that show certain design ideas for your client’s project. They’re a great place to start, as they give you an easy way to present the style and “flow” of your ideas. You can create a physical mood board with a simple foam board and samples, clippings, or images of ideas you’d like to pursue. Alternatively, you can use basic graphic design software to make a digital mood board. Although you might be tempted to fill the mood board with every option available, it’s best to keep it simple and uncluttered. If needed, you can create several complete mood boards and let your clients choose which they like best. This type of presentation is an important step that helps you determine your client’s preferences before moving on to sketching the design in detail.
Hand-drawn sketches used to be the cornerstone of interior design presentations. However, they are quickly being replaced by more advanced 3D renderings (see the next section). If you’re able to create professional sketches to showcase specific details of the project, that can be a nice way to impress your clients with your skills and attention to detail. Just keep in mind that a poorly drawn sketch can actually lead to clients feeling more confused than enlightened. That’s why most modern designers use a digital tool like Cedreo to create realistic 3D renderings.
3D Renderings
Photorealistic 3D rendering presentations are how you really seal the deal. Presentations like these help you stand out as a design professional. They’re a big step towards making clients happy, because you can show them exactly what the finished project will look like. This gives your clients clear expectations and saves you both from unnecessary frustration. To create high quality renderings you need a program like Cedreo 3D design software . Fortunately, Cedreo is easy to use. That means even with no previous experience you can quickly create top-quality renderings.
Of all the types of interior design presentations, 3D renderings are the most powerful, because they:
- Show your client exactly how the end project will look
- Lead to faster design decisions
- Are easy to create and present thanks to Cedreo interior design software
Learn more about how to use Cedreo to create interior design renderings .
6 Steps to Create a Professional Interior Design Presentation
Whether you’re new to the design business or you’re a design pro looking to expand your portfolio, you can create a professional interior design presentation in just six steps. Pro Advice! These steps are easiest with an interior design tool like Cedreo.
1. Sketch your initial design concept
Start by putting some of your initial design concepts down on paper. Draw a basic layout of the space and make note of its dimensions (this will help you in step 2). Sketch out ideas you might have for each area. Then add any other comments that you should keep in mind while creating the rest of your presentation.
2. Draw a 3D floor plan
The next part of the design process is to create the floor plan. A floor plan is essentially the container for all your creative ideas, so this is an important step.

Most design programs make you follow extra steps in order to produce 3D home plans. But with Cedreo, as you draw your layout in 2D, you instantly see the 3D view of the plan. This gives you immediate design feedback that comes in handy as you start to decorate the space.
3. Choose a design atmosphere
At this point, you’ve already spoken with your client to determine their tastes and styles. Before you start furnishing a space, it’s important to have this clearly in mind. You can select a pre-made design atmosphere that lets you “set the mood” for a particular design. Choose from visual styles like contemporary, modern, or charming. Then, instead of having to sift through thousands of pieces of furniture, decor, and materials, you’ll only see the ones that fall under your selected style.
4. Furnish and decorate each room
Whether you’re going with a specific design atmosphere or want the flexibility to choose each piece yourself, Cedreo has what you need. Cedreo’s extensive design library gives you 7,000+ pieces of furniture and decorations to choose from. That means you have the flexibility to find the right combination of pieces to fit your client’s tastes. And if you’re running short on time, Cedreo also gives you pre-made product packs for different rooms types. Choose one of these and you can decorate a room with the click of a button.
5. Customize surfacing and materials
Now it’s time to fine-tune the details. If you already presented your clients with a mood board, you probably have an idea of what textures, colors, and materials they like. Customize your 3D plans with those materials. Use Cedreo, and you’ll be able to choose from thousands of different surface materials like fabrics, wood, tile, paint, and more. Then just drag-and-drop the materials to virtually any surface of the home. This gives you more power to customize every aspect of the space from flooring to furniture.
6. Adjust light settings
Now that you’ve got all the details of your design concept in place, it’s time to prepare for the 3D renderings. An important part of that is controlling the lighting. Showing a space with an accurate mix of both artificial and natural light is essential for providing clients with a realistic visual of their space. But doing something like this in a normal CAD program is highly technical and difficult.

If you’re using Cedreo for this step, you can let the software manage the interior lighting and sun orientation automatically. And if you want to control the lighting manually, it takes just a few seconds. Once the lighting and point of view are set, submit your design for rendering and in just 5 minutes, it’ll be ready for your client.
Share and collect feedback
Once you’ve got your renderings, it’s time to share them with your team and clients. Just download the 2D plans, 3D plans, and 3D renderings in popular image formats. These are easy to send to your clients or even add to a digital mood board. Choose the Enterprise Plan with Cedreo for streamlined collaboration, and you can share designs with your team inside the platform. Once you receive feedback, make any final adjustments to the design. Since Cedreo is cloud-based, anywhere you have a laptop and internet connection you can quickly update the plans online and download the latest version for your clients.
Ready to Create Better Interior Design Presentations?
Ready to take your interior design presentation to the next level? There’s no better place to start than with Cedreo home design software. It’s engineered to save designers like you loads of time. Make your clients happy and close more deals. Start using Cedreo today !
These articles might be of interest to you:
Explore the articles covering the latest Cedreo’s features, keep up-to-date on 3D home design news, and hear more about what our clients have to say.

How to create successful architecture presentation boards

The Most Popular Residential Roof Styles for Your Designs

A Comprehensive Guide to Design-Build Construction
Academia.edu no longer supports Internet Explorer.
To browse Academia.edu and the wider internet faster and more securely, please take a few seconds to upgrade your browser .
Enter the email address you signed up with and we'll email you a reset link.
- We're Hiring!
- Help Center

The Fundamentals of Interior Design

Related Papers
Thinking inside the Box: a Reader in Interior Design for the 21st Century
Andy Milligan
Interiors is an evolving yet slippery discipline. Whilst the interior is everywhere, it is nevertheless ephemeral and difficult to define. The interior domain is itself saturated with the everyday artefacts of consumption; it's a platform in which to project lifestyle; a place to benchmark fashionable social mores, to test patterns of behaviour and ritual; and the place of dwelling, sanctuary, memory and association. Interiors is becoming an increasingly diverse field of spatial design enquiry which - through education at least - operates without that familiar artefactual framework so common to partner disciplines of art, product and fashion. Interiors education operates within, and is limited by, paper space abstraction of visualising rather than doing. Whilst others have identifiable notions of disciplinary craft, what is the craft of interiors? Within education and practice, interiors occupy multiple identities, yet its historical, theoretical and contextual framework remains patchy, and is frequently contested and unclaimed territory in comparison to those of other disciplines. How, therefore, might we speculate about the role, validity and purpose of interiors in the twenty-first century? Thinking Inside the Box: A Reader in Interior Design for the 21st Century is an interior theory reader designed to enable students, academics, researchers and practitioners access to the broad and evolving nature of interiors thinking today. This collection of essays, by prominent thinkers, practitioners and key authors in the field from Australia, the UK, Italy, New Zealand, Turkey, Canada and the USA addresses an eclectic range of issues: the theoretical and conceptual nature of ‘doubleness’ between an interiors choreographed image and its actuality in the emergence of the interior; the slow home; textiles and feminism; branding the discipline; the relationship between the interior and the enclave in the contemporary age of terror; the regulation of the profession of interiors and deregulation of education; rereading theories of interior space; Hertzian interior space describing the lived traces of use, occupation and environment, amongst many others. This publication emerged initially from the international interiors conference and exhibition `Thinking Inside the Box: Interior Design Education in the 21st Century: New Visions, New Horizons & New Challenges' at the Lighthouse, Scotland's Centre for Architecture and Design held in March 2007, and organized by the Interiors Forum Scotland. Established in May 2005, the IFS comprise the leading Scottish interior programmes at Duncan of Jordanstone College of Art (University of Dundee), Edinburgh College of Art, the Glasgow School of Art, Glasgow Metropolitan College (incl. City of Glasgow College) and Napier University in Edinburgh. This reader resulted from continued discussion and a shared concern and passion for the field of interior design. Like the earlier conference and exhibition, this reader is designed to provoke within the international community of interior designers and interior architects a desire to rediscover, reframe and perhaps reclaim the field of interior design; and, through the IFS, to establish an annual conference platform which places interior design / interior architecture firmly at the centre of critical debate, rather than on the margins of other design disciplines. In reading this publication one may sense that interiors, for all its diversity and indeed doubt, is re-emerging as a dynamic spatial activity with shared concerns and challenges: identity, anxiety over unregulated expansion, challenging perceptions, sharing good practice across an international interior community, advocacy, philosophy, reflecting and rethinking our discipline and issues of gender, amongst others. Very early on the IFS explored thinking inside rather than outside the metaphorical box as a vehicle for an event for the interiors community. Thus, began a number of free-ranging discussions about the nature, theory and practice of interior design, about the educational vision driving our institutions, the international dimension, the impact radical practice may have on visionary teaching, the emerging of recent interior research communities and theories, and how we might best promote, support and advocate excellence within this unique discipline. What we all shared, to some extent, was a feeling that, when compared to many design disciplines, interiors is somewhat hazily defined, perhaps undervalued and yet, as a result, full of possibilities. What has made both the IFS and Thinking Inside the Box possible is the relative intimacy of scale of the higher education interiors sector within Scotland, within which there exists a surprising diversity of programmes. At the time of writing, Scotland supported six honours degree courses in interiors, compared to some two hundred in England and Wales combined. This meant that it was relatively easy for the Interiors Forum Scotland to get started, to get talking and to get doing. However, it would be wrong to mistake small numbers for uniformity. The interiors degree courses of Scotland, situated as they are in different institutions and different cities, represent a wide range of viewpoints on the discipline. Post-industrial, style-conscious Glasgow, where interiors is driven by retail and hospitality, is a world (and fifty minutes on the train) away from staid, bourgeois Edinburgh, where museology, conservation and heritage are only now giving way to other disciplines. The Fine Art traditions of Duncan of Jordanstone, Glasgow School of Art, and Edinburgh College of Art have a very different pedigree to the more practical and professional focus of the former polytechnics. And of course, staff and students, attracted by these combinations of place and ethos, serve to reinforce and exaggerate these characteristics.
Interior: A State of Becoming 2012 IDEA Symposium
Suzie Attiwill
This paper addresses the question of becoming in relation to interior design as a practice of designing interiors both physical and mental. An understanding of ‘interior’ in a substantive way shapes current interior design practice. This is evident in the frequent use of the term ‘the interior’ which suggests some thing – a space or a subject – which exists as an independent entity. The proposition of becoming invites different ways of thinking about interior making – a shift from things to processes, from the individual to the process of individuation, from form to information, from space to time and movement. The focus of this paper is a research project conducted through undergraduate design studios and PhD research. The project addresses the environments (physical, psychological and situational) of young people living in residential care houses. The studios explore how the production of interior designs might affect, transform and/or benefit the physical and emotional wellbeing of adolescents living in these houses. Called Beyond Building, the project invites students to consider the question of interior design as a practice not confined to/contained by the inside of a building. Instead the invitation is to think about interior design as an interior-making; as a process of interiorization. Relational conditions – between people, programs, different times of day and night, schedules, colour, light, tactility, psychological and affective qualities of design and interiors – were highlighted. This also shifts design as practice from one concerned with structures and physical form to one that takes into account temporal as well as spatial conditions. Through the projects, the practice of interior design becomes apparent in relation to the production of subjectivities – from fixed subjectivities based on identity and being to ones that attempt to enable subjectivities to move, change, become. This research contributes to the growing focus of interior design in relation to wellbeing. It has the potential to offer up a different way of understanding interior design through posing the question of interior as ?interior and posing the potential ‘to inspire new modes of subjectivization’ (Deleuze 2006, 260). Key Words: interior design, interiorization, subjectivity, individuation, becoming, Deleuze, Simondon, interior-exterior, self-.
Conference Chair Wendy Beckwith La Roche College …
Sally Stone
What is Interior Design? is a handbook for students, scholars, and practitioners who have an interest in interior design and architecture. This book examines the fundamental characteristics of interior space—the analysis and understanding of existing buildings, the nature and qualities of organizing an interior space, and an understanding of the material and surface qualities of found and applied textures. What is Interior Design? contextualizes current issues around education and practice, examines both historical and contemporary concerns in design, and looks at the work of key practitioners in the field. The study and practice of designing interior spaces is a constantly evolving subject. However, despite the popularity of interior design at both undergraduate and postgraduate level, there is still very little legislation or definition available.
Raymund Konigk
The cultural role of the interior artefact, through the representation and interpretation of meaning, is considered in this article. This follows Umberto Eco’s moderate hypothesis of culture in which all cultural phenomena can be studied as contents of a semiotic activity and in accordance with Jeff Lewis’s construct of culture as a collection of meanings. The ‘interior artefact’ that is considered here is the physical manifestation of interior design as a professional practice in the built environment and not a general product of human activity. It is assumed that successful interior artefacts are dependent on the generation of meaningful images and their appropriate spatial interpretation. The interior artefact is a material artefact that creates and communicates meaning; it offers the framework for situated meaning and is the result of that meaning. The interior artefact is the spatial embodiment of the visual identity imagined by the interior designer on behalf of the client. In this context, interior design is considered as a cultural activity with importance for human development, which includes the utilisation and development of identity. The article considers identity to involve more complexity than merely expressing categories of belonging (such as race and gender). In interior design the generation and interpretation of meaning is dependent on the visual presence of cultural discourses; the article concludes with a brief discussion of some of these.
Elena Dellapiana
Interior Architectural Issues - Design, Theory & Philosophy
Hande Eyüboğlu
The International Journal of Architectonic, Spatial, and Environmental Design
nilufer saglar onay
Journal of Interior Design
julieanna preston
Varsha Bodani
There is presently no body of literature comprising the theory of interior design. There are, however, many theoretical approaches from related fields that have application to the field of interior design. In response to the need stated by others for a body of interior design theory, this paper reviews four theoretical approaches and gives examples of existing literature within each approach. This paper focuses on theory as an organizational tool and is limited to theories that are relevant to “concept” and “form”. Examples of each theory point toward a potential area of exploration in the development of interior design theory, with the intention that such a body of literature would hold meaning for both students and practitioners of interior design.
Internet Archive Audio

- This Just In
- Grateful Dead
- Old Time Radio
- 78 RPMs and Cylinder Recordings
- Audio Books & Poetry
- Computers, Technology and Science
- Music, Arts & Culture
- News & Public Affairs
- Spirituality & Religion
- Radio News Archive

- Flickr Commons
- Occupy Wall Street Flickr
- NASA Images
- Solar System Collection
- Ames Research Center

- All Software
- Old School Emulation
- MS-DOS Games
- Historical Software
- Classic PC Games
- Software Library
- Kodi Archive and Support File
- Vintage Software
- CD-ROM Software
- CD-ROM Software Library
- Software Sites
- Tucows Software Library
- Shareware CD-ROMs
- Software Capsules Compilation
- CD-ROM Images
- ZX Spectrum
- DOOM Level CD

- Smithsonian Libraries
- FEDLINK (US)
- Lincoln Collection
- American Libraries
- Canadian Libraries
- Universal Library
- Project Gutenberg
- Children's Library
- Biodiversity Heritage Library
- Books by Language
- Additional Collections

- Prelinger Archives
- Democracy Now!
- Occupy Wall Street
- TV NSA Clip Library
- Animation & Cartoons
- Arts & Music
- Computers & Technology
- Cultural & Academic Films
- Ephemeral Films
- Sports Videos
- Videogame Videos
- Youth Media
Search the history of over 866 billion web pages on the Internet.
Mobile Apps
- Wayback Machine (iOS)
- Wayback Machine (Android)
Browser Extensions
Archive-it subscription.
- Explore the Collections
- Build Collections
Save Page Now
Capture a web page as it appears now for use as a trusted citation in the future.
Please enter a valid web address
- Donate Donate icon An illustration of a heart shape
Interior design visual presentation : a guide to graphics, models and presentation techniques
Bookreader item preview, share or embed this item, flag this item for.
- Graphic Violence
- Explicit Sexual Content
- Hate Speech
- Misinformation/Disinformation
- Marketing/Phishing/Advertising
- Misleading/Inaccurate/Missing Metadata
![[WorldCat (this item)]](https://archive.org/images/worldcat-small.png "[WorldCat (this item)]")
plus-circle Add Review comment Reviews
28 Favorites
Better World Books
DOWNLOAD OPTIONS
No suitable files to display here.
IN COLLECTIONS
Uploaded by ttscribe3.hongkong on November 26, 2018
SIMILAR ITEMS (based on metadata)
How to Create a Winning Interior Design Presentation
We see them every day. Beautifully sketched interiors artistically finished off with watercolors, stunning 3D renders that immerse you into an interior designer’s vision for a space. Instagram is overflowing with rows of striking interior design plans to scroll through, while animated walkthroughs in TV makeovers hint at the big reveal that’s yet to come. Impressive as they are, being able to create such stunning visuals is not as hard as you might think. Yes, it takes practice and effort to master these skills, but the benefits are more than worth it. Our team over in Dubai have put together a great guide to help you master interior design presentation skills. You’re welcome!
Interior Design Presentation Techniques & Skills
As an interior designer, creating a stunning presentation can be the difference between you winning a job or it going to someone else. But you might ask yourself “Isn’t it all about the end-result and not impressive artistic skills?” In any design field, first impressions count for everything. In lieu of a physical representation of your ideas, you’ll need strong visual presentation skills to convince your client or interviewer that you’re the right person for the job. This guide can help those already out there pitching for work as well as those of you who are just starting out. Applying these tips to your portfolio, as well as to client presentations will help you to stand out from the crowd from the off.
There are heaps of advantages to having strong visual presentation skills. These tips will stand you in good stead throughout your career working in interior design. Good visual communication skills help designers sell their ideas to clients more easily, clearly and professionally. They ensure that designers and clients are on the same page and seeing the same thing. They also speed up designers’ work and simplify making changes as needed. In addition, they make
With all these benefits, it’s no wonder that designers are flocking to add these tools to their skillset. There are a wide variety of visual communication and presentation techniques for interior designers. Here, we’ve chosen three key skills and tools to use for the concept development and planning stages of the interior design process.
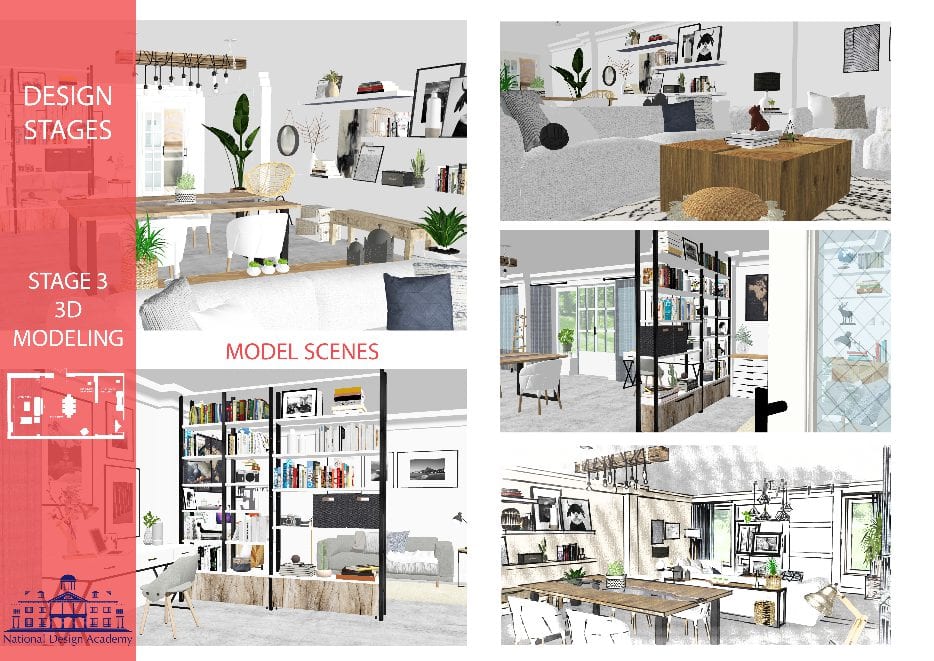
Stage 1 – Sketch for Initial Concept

So you’ve just signed on a new client! You’ve met with them, taken some photos and dimensions of the living room they want designed, and if needed, you have your survey plan ready. You’ve already discussed conceptual options, what trends and colours they prefer, and gone over examples of designs they like. Your client is now waiting for an initial concept from you. What do you do?
You’re excited to start working on your design, but it’s important to first ask yourself: what level of detail in the design is required at this stage? Your focus here should be on communicating a general direction for the plan, and using that to initiate feedback and more detailed discussions.

One of the best ways for you to quickly express an initial idea is to use the age-old reliable technique of hand drawing. A hand-drawn sketch will take you minutes to do. Not all interior design presentations have to be perfect. It’s allowed to look a little messy, and proportions and accuracy don’t need to be spot on. The bare bones are there to build on, but it hasn’t fully taken an exact shape yet.
At this point, you will have a rough idea of your floor-plan, and the amount and type of furniture that fits the space, but haven’t yet defined the exact items and their measurements. The loose style of the sketch reflects the fluidity of the design at this early stage.
The three types of sketches you can use are:
- Floor-plans to give an idea of space distribution, zones and traffic flow
- Perspective drawings to show specific zones
- Elevations to show specific walls and furniture in that view.
This handy blog will teach you the basics of room planning.
What sophisticated tools will you need for this? Mainly, the humble pencil… as well as an eraser, good quality art paper, a pen to finish off the sketch with. And if you want to add colour at this stage, then either colouring pencils, watercolours, or pastels. You can also go the digital route and use tablets or smart phones with sketching features that make it really easy to add colour and make changes.
As a designer, you’re not required to show off exceptional artistry, but it is recommended that you develop good skills in sketching and perspective drawing. The better you sketch, the clearer you’re able to communicate your ideas. This creates a more professional impression as well as a more impactful interior design presentation that you can share with your client.
If you’re lucky, your client will approve the idea right away. But if you find that your design direction is off-track, then it’s back to the drawing-board for a revised concept. If your client agrees with your concept but wants minor changes, you can either send a revised sketch, or the same draft can be signed off, with notes added on the amendments.
Stage 2 – Line Drawings for Layouts & Materials
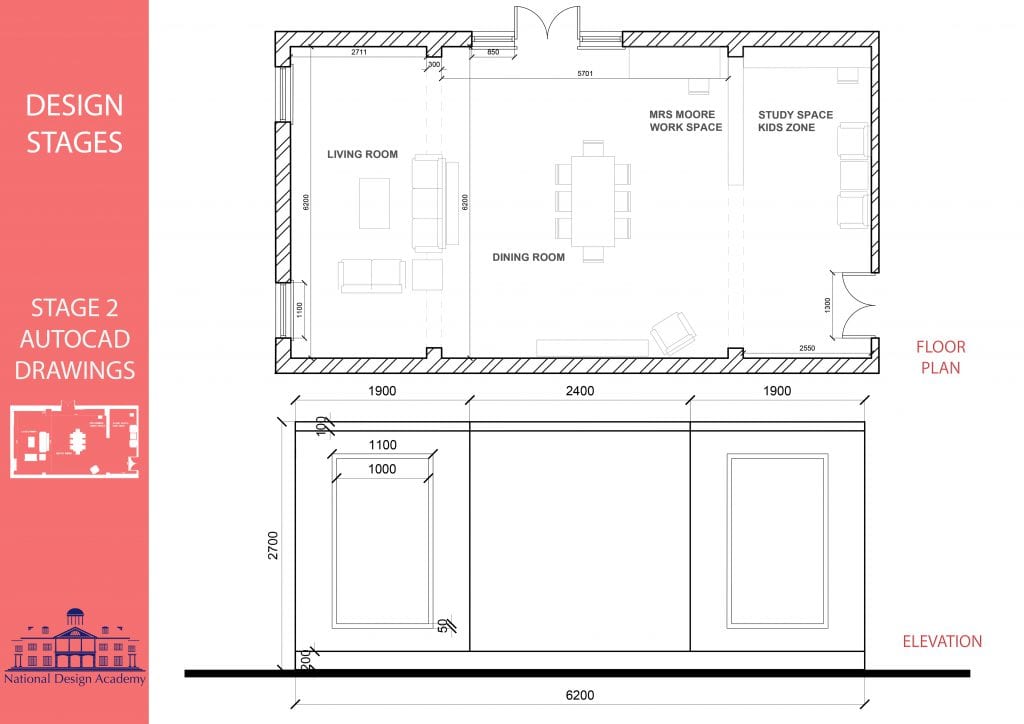
Now’s it’s time to fine-tune! The basic concept you’ve presented needs to become more accurate, and your measurements need double-checking. You’re also starting to identify specific options for furniture and get their measurements.
Creating accurate floor-plans at this stage will give you a clear idea whether you’re overloading your space with pieces or still have plenty of room left. Along with these, you’ll also create detailed elevations showing the different heights and openings. All of this will help determine the nature of your shopping list.
What should be your tool of choice? AutoCAD , naturally! This software has been the industry standard to draft floorplans and elevations for decades, and for good reason. Using AutoCAD will ensure that your interior design presentations look slick, professional and jump off the page.
With AutoCAD, it will take you just a few hours to create your drawings. You can also draw your furniture items as per exact dimensions, or easily add them from the program’s furniture library. This will ensure that all the furniture you’ll order or custom-make will fit in its designated areas, and help you make quick calculations for quantities of materials needed for all types of wall and floor finishes.
In our imaginary scenario, your AutoCAD 2D plans are now done and shared with the client. They reply informing you that after thinking about it, they’ll need to add a reading corner, and they’re not a big fan of the L-shaped sofa. No problem! Because you have a digital file that can be easily edited. It takes minutes to make the changes and send the revised drawings, which get approved this time around. Imagine this using hand-drawn sketches which need to be done from scratch each time a change in made?
To use AutoCAD, you’ll need to subscribe to a software license and install the software on your computer. AutoCAD is free for students studying with the NDA. All you have to do is download the software and upload proof of your student ID or confirmation letter. Find out more here on the Autodesk website.
There are plenty of video tutorials on the dedicated AutoCAD website as well as on YouTube. Or you could sign up for a short online course with a provider like Udemy to master these skills quicker.
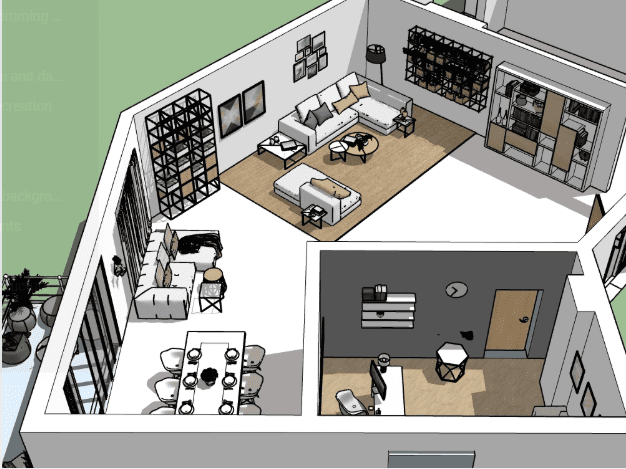
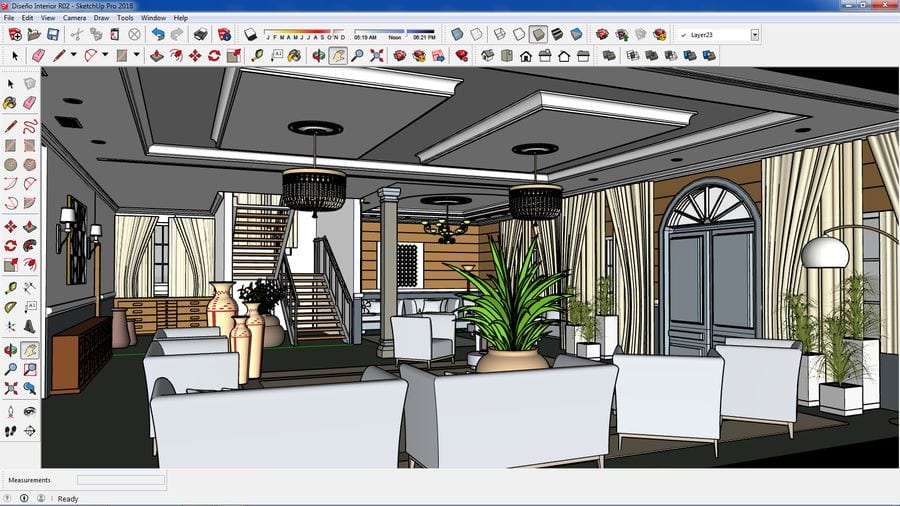
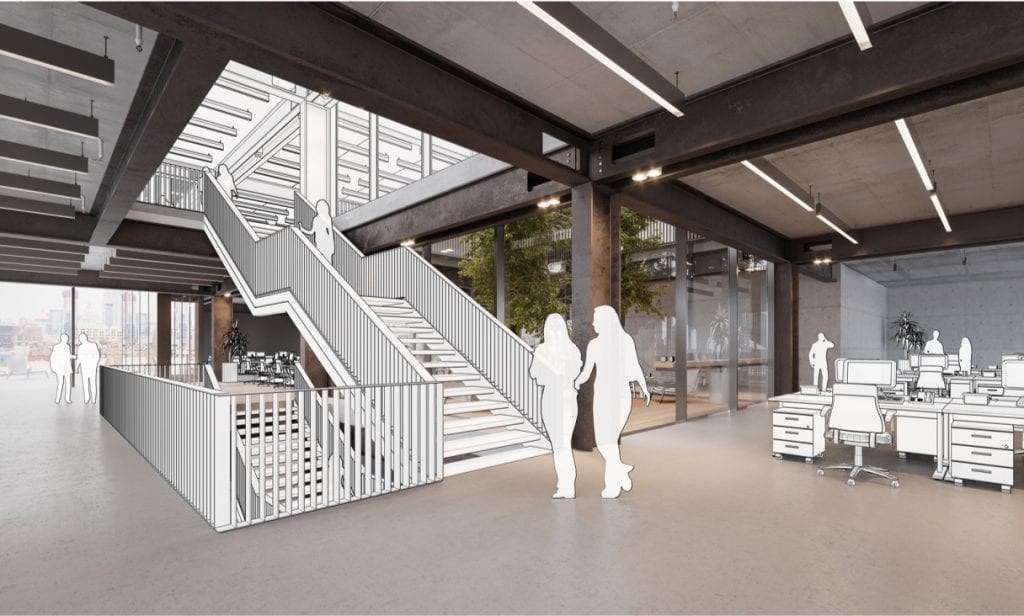
Stage 3 – 3D Models to Illustrate Zones, Furniture & Accessories
You’re now progressing fast with the design development. This is one of the best bits of putting together an interior design presentation for a client. You get to go shopping for everything from flooring, paint, wallpaper and fabrics, curtains, cushions, and furniture pieces all on someone else’s budget!
Because there are many decisions that will be based on this stage, your client will now want a clear idea of the exact finishes you’ve chosen and how they go together. It’s critical that you present this stage with confidence and clarity.
What’s the best way to show all these different finishes and styling choices? You’ll need to make sure that you create a realistic feeling of the layout and different zones as well as represent your colour, texture and furniture choices with accuracy and to the best of your ability. This is the big one!
SketchUp Pro is the most popular and easiest way to achieve a professional presentation which shows your scheme in its best light. This 3D modeling software not only helps clients visualize the finished design, but it’s also invaluable to help designers audit their concepts before final decisions are made.
You can create a 3D model for the project by inputting your AutoCAD drawings and incorporating all of your selections. When you see your scheme in 3D, say you find that the walls look too dark and the flooring doesn’t quite work. SketchUp will enable you to mockup different ideas and test different materials so that you can either present the choices to your client or work out which fits before presenting.
But now that your client has a clearer idea of what the space will feel like, they ask if it’s possible to add a custom-made piece of furniture as a semi partition. So it’s back to SketchUp again, where you easily calculate the space you have and digitally design a bookcase to fit. Easy peasy!
As with AutoCAD, you’ll need to subscribe to SketchUp Pro and download the software on your computer. There is a web-only version that’s free, but it’s not recommended if you want to use the program for interior design projects as it’s just too limited in functionality. Again, students at the NDA get a special deal on SketchUp Studio which includes SketchUp Pro, LayOut and StleBuilder. CadSoft Solutions currently have a student offer for £46.80 for an annual subscription . Tutorials are easily found on the website and YouTube , or again you can sign up for a short course.
Stage 4 – Animated Walkthrough for Final Sign-off
So what’s next? You’ve done all of your plans; your interior design presentation is complete, and your client has made all the changes they want. Surely now you just need to make the concepts into reality? Wrong. Changing things past this point will cause serious issues for you and your suppliers so it’s best to make sure that your client is 100% happy and can visualize the entire scheme and how they will live in the space.
Using SketchUp again, you can create a few simulation scenes to help your client visualize each zone as well as the full space. When you finally meet with your client with the full and final presentation, they will be able to walk through each room or area and fully immerse themselves in the room of their dreams. There’s nothing quite like that level of realism to prove that you’re a pro at this game! It’ll be at this stage the you get the green light and can finally move things from dream to reality.
Because you’ve invested in learning practical skills and helpful tools, you’ve saved lots of time, presented your vision clearly, and left little room for miscommunication.
Study Interior Design Online
Here at the NDA, we’ve been teaching Interior Design for over 30 years. Our courses don’t just teach you the basics of styling your home, they lead to a fully accredited professional qualification. Whether you study an Interior Design Diploma or one of our specially created interior design degrees, you’ll be trained by experts in the field.
All of our qualifications are taught via our Virtual Learning Studio so you can fit your studies in at a tine to suit you. Click the link in the box below to find out more.
Want to Learn to Create Professional Interior Design Presentations?
From Diplomas to Degrees, we offer the best interior design courses to fit in with your busy life! Take a look at our courses.
Share this Blog
7 responses.
Such a detailed post on how to create an interior design presentation!? That is interesting! Thanks for writing and sharing this post with us.
Thank you for posting this wonderful knowledge about interior designs.
Interesting and insightful post on interior design. Thanks for writing and sharing this post with us.
It was very informative .Thank you
Awesome It is really very informative.
Nice it is very informative ,thank you for sharing this blog
It very informative blog ,thank you for sharing this information.
Leave a Reply Cancel reply
Your email address will not be published. Required fields are marked *
Save my name and email to use for future comments.
Recent Blogs

Student Spotlight: Ashley Dawkins, Professional Interior Design

Spring 2024 Trend Report

Student Spotlight: Denisa Jusic, MA Interior Design
Questions request a call back.
Our admissions team will be happy to discuss your options.
COPYRIGHT © NATIONAL DESIGN ACADEMY
Terms of Use
Privacy Policy
INTERNATIONAL
Got any suggestions?
We want to hear from you! Send us a message and help improve Slidesgo
Top searches
Trending searches

46 templates

suicide prevention
8 templates

49 templates

18 templates

41 templates

29 templates
Interior Design Project Proposal
Interior design project proposal presentation, free google slides theme and powerpoint template.
Interior design is in fashion! These decoration professionals help us to create the perfect environment depending on the needs of our home. It's a bit like what we do at Slidesgo, offering you amazing designs according to your needs to decorate and present your information in a wonderful way. Let's combine the talent of both: your proposal for a project about interior design and this creative template specially dedicated to it. The minimalistic and elegant style together with the images of beautiful home interiors will help you to let the world know about your project.
Features of this template
- 100% editable and easy to modify
- 25 different slides to impress your audience
- Contains easy-to-edit graphics such as graphs, maps, tables, timelines and mockups
- Includes 500+ icons and Flaticon’s extension for customizing your slides
- Designed to be used in Google Slides and Microsoft PowerPoint
- 16:9 widescreen format suitable for all types of screens
- Includes information about fonts, colors, and credits of the free resources used
How can I use the template?
Am I free to use the templates?
How to attribute?
Attribution required If you are a free user, you must attribute Slidesgo by keeping the slide where the credits appear. How to attribute?
Related posts on our blog.

How to Add, Duplicate, Move, Delete or Hide Slides in Google Slides

How to Change Layouts in PowerPoint

How to Change the Slide Size in Google Slides
Related presentations.

Premium template
Unlock this template and gain unlimited access


The Interior Design Reference & Specification Book Updated & Revised: Everything Interior Designers Need to Know Every Day (PDF)
Chris grimley, mimi love, explore pdf.
- Convert to EPUB
- Convert to MOBI
- Convert to AZW3
- Convert to FB2
Read PDF online
Leave a comment.
Your email address will not be published. Required fields are marked *
Summary The Interior Design Reference & Specification Book Updated & Revised: Everything Interior Designers Need to Know Every Day
Job:10-700696 Title:RP - Interior Design Reference and Specification Dtp:225 Page:1 700696_001-017.indd 1 10/10/17 4:02 pm Interior Design Reference + Specification Book The Updated + Revised (Text) Job:10-700696 Title:RP - Interior Design Reference and Specification Dtp:225 Page:1 700696_001-017.indd 1 10/10/17 4:10 pm © 2007, 2013, 2018 by Rockport Publishers, Inc. This edition published in 2018 First published in 2013 by Rockport Publishers, an imprint of The Quarto Group, 100 Cummings Center, Suite 265-D, Beverly, MA 01915, USA. T (978) 282-9590 F (978) 283-2742 QuartoKnows.com All rights reserved. No part of this book may be reproduced in any form without written permission of the copy- right owners. All images in this book have been reproduced with the knowledge and prior consent of the artists concerned, and no responsibility is accepted by producer, publisher, or printer for any infringement of copyright or otherwise, arising from the contents of this publication. Every effort has been made to ensure that credits accurately comply with information supplied. We apologize for any inaccuracies that may have occurred and will resolve inaccurate or missing information in a subsequent reprinting of the book. Rockport Publishers titles are also available at discount for retail, wholesale, promotional, and bulk purchase. For details, contact the Special Sales Manager by email at [email protected] or by mail at The Quarto Group, Attn: Special Sales Manager, 401 Second Avenue North, Suite 310, Minneapolis, MN 55401, USA. Originally found under the following Library of Congress Cataloging-in-Publication Data Grimley, Chris. Color, space, and style : all the details interior designers need to know but can never find / Chris Grimley, Mimi Love. p. cm. Includes index. ISBN 1-59253-227-6 1. Interior decoration--Handbooks, manuals, etc. I. Love, Mimi. II. Title. NK2115.G75 2007 747--dc22 2007015924 ISBN: 978-1-63159-380-2 10 9 8 7 6 5 4 3 2 1 The orignial edition of this book, Color Space, and Style, was published by Rockport Publishers in 2007. The content of this book is for general information purposes only and has been obtained from many sources, including professional organizations, manufacturers’ literature, and national codes and guidelines. The authors and publisher have made every reasonable effort to assure that this work is accurate and current, but do not warrant, and assume no liability for, the accuracy or completeness of the text or illustrations, or their fitness for any particular purpose. It is the responsibility of the users of this book to apply their professional knowledge to the content, to consult sources referenced, when appropriate, and to consult a professional interior designer for expert advice if necessary. Editor and Art Director: Alicia Kennedy Additional Content: Linda O’Shea Cover Image: Knoll, Inc. Graphic Design: Chris Grimley and Shannon McLean for over,under Printed in China Digital edition: 978-1-63159-579-0 Softcover edition: 978-1-63159-380-2 Job:10-700696 Title:RP - Interior Design Reference and Specification Dtp:225 Page:2 700696_001-017.indd 2 10/10/17 4:02 pm Job:10-700696 Title:RP - Interior Design Reference and Specification Dtp:225 Page:3 Job:10-700696 Title:RP - Interior Design Reference and Specification Dtp:225 Page:2 700696_001-017.indd 3 10/10/17 4:02 pm © 2007, 2013, 2018 by Rockport Publishers, Inc. This edition published in 2018 First published in 2013 by Rockport Publishers, an imprint of The Quarto Group, 100 Cummings Center, Suite 265-D, Beverly, MA 01915, USA. T (978) 282-9590 F (978) 283-2742 QuartoKnows.com All rights reserved. No part of this book may be reproduced in any form without written permission of the copy- right owners. All images in this book have been reproduced with the knowledge and prior consent of the artists concerned, and no responsibility is accepted by producer, publisher, or printer for any infringement of copyright or otherwise, arising from the contents of this publication. Every effort has been made to ensure that credits accurately comply with information supplied. We apologize for any inaccuracies that may have occurred and will resolve inaccurate or missing information in a subsequent reprinting of the book. Rockport Publishers titles are also available at discount for retail, wholesale, promotional, and bulk purchase. For details, contact the Special Sales Manager by email at [email protected] or by mail at The Quarto Group, Attn: Special Sales Manager, 401 Second Avenue North, Suite 310, Minneapolis, MN 55401, USA. Originally found under the following Library of Congress Cataloging-in-Publication Data Grimley, Chris. Color, space, and style : all the details interior designers need to know but can never find / Chris Grimley, Mimi Love. p. cm. Includes index. ISBN 1-59253-227-6 1. Interior decoration--Handbooks, manuals, etc. I. Love, Mimi. II. Title. NK2115.G75 2007 747--dc22 2007015924 ISBN: 978-1-63159-380-2 10 9 8 7 6 5 4 3 2 1 The orignial edition of this book, Color Space, and Style, was published by Rockport Publishers in 2007. The content of this book is for general information purposes only and has been obtained from many sources, including professional organizations, manufacturers’ literature, and national codes and guidelines. The authors and publisher have made every reasonable effort to assure that this work is accurate and current, but do not warrant, and assume no liability for, the accuracy or completeness of the text or illustrations, or their fitness for any particular purpose. It is the responsibility of the users of this book to apply their professional knowledge to the content, to consult sources referenced, when appropriate, and to consult a professional interior designer for expert advice if necessary. Editor and Art Director: Alicia Kennedy Additional Content: Linda O’Shea Cover Image: Knoll, Inc. Graphic Design: Chris Grimley and Shannon McLean for over,under Printed in China Brimming with creative inspiration, how-to projects, and useful information to enrich your everyday life, Quarto Knows is a favorite destination for those pursuing their interests and passions. Visit our site and dig deeper with our books into your area of interest: Quarto Creates, Quarto Cooks, Quarto Homes, Quarto Lives, Quarto Drives, Quarto Explores, Quarto Gifts, or Quarto Kids. (Text) Job:10-700696 Title:RP - Interior Design Reference and Specification Dtp:225 Page:2 700696_001-017.indd 2 10/10/17 4:10 pm Everything Interior Designers Need to Know Every Day Chris Grimley + Mimi Love Interior Design Reference + Specification Book The Updated + Revised (Text) Job:10-700696 Title:RP - Interior Design Reference and Specification Dtp:225 Page:3 Job:10-700696 Title:RP - Interior Design Reference and Specification Dtp:225 Page:2 700696_001-017.indd 3 10/10/17 4:10 pm Job:10-700696 Title:RP - Interior Design Reference and Specification Dtp:225 Page:4 700696_001-017.indd 4 10/10/17 4:02 pm Job:10-700696 Title:RP - Interior Design Reference and Specification Dtp:225 Page:4 700696_001-017.indd 5 10/10/17 4:02 pm CONTENTS Introduction 6 Perspective on Fundamentals Deborah Berke 70 Perspectives on Space Michael Gabellini 128 Perspectives on Surface Annabelle Selldorf 206 Perspectives on Environments Yabu Pushelberg 230 Perspectives on Elements Calvin Tsao 260 Perspectives on Resources Shashi Caan 276 Index 282 Acknowledgments 287 About the Authors 288 (Text) Job:10-700696 Title:RP - Interior Design Reference and Specification Dtp:225 Page:4 700696_001-017.indd 4 10/10/17 4:10 pm 1 5 3 4 6 2 Introduction Job:10-700696 Title:RP - Interior Design Reference and Specification Dtp:225 Page:4 700696_001-017.indd 5 10/10/17 4:10 pm Job:10-700696 Title:RP - Interior Design Reference and Specification Dtp:225 Page:4 700696_001-017.indd 4 10/10/17 4:02 pm Job:10-700696 Title:RP - Interior Design Reference and Specification Dtp:225 Page:5 Job:10-700696 Title:RP - Interior Design Reference and Specification Dtp:225 Page:4 700696_001-017.indd 5 10/10/17 4:02 pm Introduction 6 Perspective on Fundamentals Deborah Berke 70 Perspectives on Space Michael Gabellini 128 Perspectives on Surface Annabelle Selldorf 206 Perspectives on Environments Yabu Pushelberg 230 Perspectives on Elements Calvin Tsao 260 Perspectives on Resources Shashi Caan 276 Index 282 Acknowledgments 287 About the Authors 288 (Text) Job:10-700696 Title:RP - Interior Design Reference and Specification Dtp:225 Page:4 700696_001-017.indd 4 10/10/17 4:10 pm Chapter 1 Starting an Interior Project 10 Chapter 2 Project Management 18 Chapter 3 Drawing Basics 24 Chapter 4 Presentation and Communication 58 FUNDAMENTALS Chapter 5 Proportions of a Room 78 Chapter 6 Sequencing Spaces 84 Chapter 7 Types of Rooms 92 Chapter 8 Code and Accessibility 112 1 5 Chapter 16 Details 238 Chapter 17 Furniture 250 Chapter 18 Elements and Display 256 3 Chapter 9 Color 136 Chapter 10 Material 154 Chapter 11 Texture 190 Chapter 12 Pattern 200 Chapter 13 Natural Light 214 Chapter 14 Artificial Light 218 Chapter 15 Invisible Systems 224 4 SPACE SURFACE ENVIRONMENTS ELEMENTS Chapter 19 Sustainability Guidelines 268 Chapter 20 Manual Resources 271 Chapter 21 Digital Resources 274 6 RESOURCES 2 Introduction (Text) Job:10-700696 Title:RP - Interior Design Reference and Specification Dtp:225 Page:5 Job:10-700696 Title:RP - Interior Design Reference and Specification Dtp:225 Page:4 700696_001-017.indd 5 10/10/17 4:10 pm Job:10-700696 Title:RP - Interior Design Reference and Specification Dtp:225 Page:6 Job:10-700696 Title:RP - Interior Design Reference and Specification Dtp:225 Page:6 700696_001-017.indd 6 10/10/17 4:02 pm Job:10-700696 Title:RP - Interior Design Reference and Specification Dtp:225 Page:6 700696_001-017.indd 7 10/10/17 4:02 pm (Text) This book was conceived as a resource for a wide readership, whether in answer- ing specific questions for established interior designers or providing an overview of the design process for the layperson. It is compact and easy to slip into a shoulder bag, but precisely because of its handy size, it cannot address every issue related to interior design. Instead, we believe that by distilling the essential principles of interior design and clarifying steps and goals of the design process itself, higher quality design will reach the broadest possible audience. Guides to interior design generally fall into two categories. The first type is the beau- tiful coffee table book by style mavens. These books are full of personality and style, but lack an overall structure that describes the fundamental principles for making design decisions. The second type is the design manual. These volumes are full of useful information, but eschew a specific attitude about design strategies. Our goal is to create the classic textbook for interior design, yet with more inspiring design theory and better visual taste. We hope this book presents a fresher approach that represents the cultural preoccupations of a younger generation of designers. The book has been organized thematically into six sections: Section 1, “Fundamentals,” provides a step-by-step examination of an interior project. It describes the scope of professional services, the project schedule, and drawing and presentation techniques. INTRODUCTION i. (Text) Job:10-700696 Title:RP - Interior Design Reference and Specification Dtp:225 Page:6 Job:10-700696 Title:RP - Interior Design Reference and Specification Dtp:225 Page:6 700696_001-017.indd 6 10/10/17 4:10 pm Section 2, “Space,” offers an overview of the design of rooms and larger sequences of spaces, while addressing functional and life-safety issues. Section 3, “Surface,” details specific tactics for designing with color, materials, textures, and patterns. It also considers performance and maintenance issues. Section 4, “Environments,” looks at aspects of interior design that help to create a specific mood or character, such as natural and artificial lighting, and the invisible systems that impact the comforts of a space. Section 5, “Elements,” identifies useful details for a range of interior applications. It also includes a chart of canonical twentieth-century furniture—pieces every inte- rior designer should know. In addition, it outlines ideas for the display of artwork, collectibles, and accessories. Section 6, “Resources,” provides a wealth of useful information, from a summary of sustainable design strategies to lists of recommended books, blogs, and websites. Finally, we have interspersed throughout the book interviews with our favorite prac- titioners to demonstrate how the topics covered in each section can be creatively interpreted in practice. (Text) Job:10-700696 Title:RP - Interior Design Reference and Specification Dtp:225 Page:6 700696_001-017.indd 7 10/10/17 4:10 pm Job:10-700696 Title:RP - Interior Design Reference and Specification Dtp:225 Page:6 Job:10-700696 Title:RP - Interior Design Reference and Specification Dtp:225 Page:6 700696_001-017.indd 6 10/10/17 4:02 pm Job:10-700696 Title:RP - Interior Design Reference and Specification Dtp:225 Page:7 Job:10-700696 Title:RP - Interior Design Reference and Specification Dtp:225 Page:6 700696_001-017.indd 7 10/10/17 4:02 pm This book was conceived as a resource for a wide readership, whether in answer- ing specific questions for established interior designers or providing an overview of the design process for the layperson. It is compact and easy to slip into a shoulder bag, but precisely because of its handy size, it cannot address every issue related to interior design. Instead, we believe that by distilling the essential principles of interior design and clarifying steps and goals of the design process itself, higher quality design will reach the broadest possible audience. Guides to interior design generally fall into two categories. The first type is the beau- tiful coffee table book by style mavens. These books are full of personality and style, but lack an overall structure that describes the fundamental principles for making design decisions. The second type is the design manual. These volumes are full of useful information, but eschew a specific attitude about design strategies. Our goal is to create the classic textbook for interior design, yet with more inspiring design theory and better visual taste. We hope this book presents a fresher approach that represents the cultural preoccupations of a younger generation of designers. The book has been organized thematically into six sections: Section 1, “Fundamentals,” provides a step-by-step examination of an interior project. It describes the scope of professional services, the project schedule, and drawing and presentation techniques. Job:10-700696 Title:RP - Interior Design Reference and Specification Dtp:225 Page:6 Job:10-700696 Title:RP - Interior Design Reference and Specification Dtp:225 Page:6 700696_001-017.indd 6 10/10/17 4:10 pm Section 2, “Space,” offers an overview of the design of rooms and larger sequences of spaces, while addressing functional and life-safety issues. Section 3, “Surface,” details specific tactics for designing with color, materials, textures, and patterns. It also considers performance and maintenance issues. Section 4, “Environments,” looks at aspects of interior design that help to create a specific mood or character, such as natural and artificial lighting, and the invisible systems that impact the comforts of a space. Section 5, “Elements,” identifies useful details for a range of interior applications. It also includes a chart of canonical twentieth-century furniture—pieces every inte- rior designer should know. In addition, it outlines ideas for the display of artwork, collectibles, and accessories. Section 6, “Resources,” provides a wealth of useful information, from a summary of sustainable design strategies to lists of recommended books, blogs, and websites. Finally, we have interspersed throughout the book interviews with our favorite prac- titioners to demonstrate how the topics covered in each section can be creatively interpreted in practice. (Text) Job:10-700696 Title:RP - Interior Design Reference and Specification Dtp:225 Page:7 Job:10-700696 Title:RP - Interior Design Reference and Specification Dtp:225 Page:6 700696_001-017.indd 7 10/10/17 4:10 pm Job:10-700696 Title:RP - Interior Design Reference and Specification Dtp:225 Page:8 700696_001-017.indd 8 10/10/17 4:02 pm Job:10-700696 Title:RP - Interior Design Reference and Specification Dtp:225 Page:8 700696_001-017.indd 9 10/10/17 4:02 pm FUNDAMENTALS 1. 8 (Text) Job:10-700696 Title:RP - Interior Design Reference and Specification Dtp:225 Page:8 700696_001-017.indd 8 10/10/17 4:10 pm Job:10-700696 Title:RP - Interior Design Reference and Specification Dtp:225 Page:8 700696_001-017.indd 9 10/10/17 4:10 pm Job:10-700696 Title:RP - Interior Design Reference and Specification Dtp:225 Page:8 700696_001-017.indd 8 10/10/17 4:02 pm Job:10-700696 Title:RP - Interior Design Reference and Specification Dtp:225 Page:9 Job:10-700696 Title:RP - Interior Design Reference and Specification Dtp:225 Page:8 700696_001-017.indd 9 10/10/17 4:02 pm FUNDAMENTALS 1. 8 (Text) Job:10-700696 Title:RP - Interior Design Reference and Specification Dtp:225 Page:8 700696_001-017.indd 8 10/10/17 4:10 pm Managing an interior design project requires as much creative thought- fulness as the design itself, and the best projects begin with a carefully planned project schedule. Typically, a project process is broken down into distinct phases to establish decision-making milestones, both within the design team and with the client. At the beginning of the design process, innumerable options present themselves, but as the design progresses, the number of options gradually reduces as the project gels around spe- cific themes and configurations. Drawings are the primary format through which design choices are explored and communicated. The mode of drawing changes as the project is refined and finessed. At the beginning of the design, freehand sketches are the best way to test concepts, while later in the process, computer-aided design (CAD) is necessary to fine-tune dimensional decisions and coordinate with consulting engineers. New technologies are making it easier to explore design concepts in three dimensions at several stages of the design process. 9 (Text) Job:10-700696 Title:RP - Interior Design Reference and Specification Dtp:225 Page:9 Job:10-700696 Title:RP - Interior Design Reference and Specification Dtp:225 Page:8 700696_001-017.indd 9 10/10/17 4:10 pm Job:10-700696 Title:RP - Interior Design Reference and Specification Dtp:225 Page:10 700696_001-017.indd 10 10/10/17 4:02 pm Job:10-700696 Title:RP - Interior Design Reference and Specification Dtp:225 Page:10 700696_001-017.indd 11 10/10/17 4:02 pm 10 THE INTERIOR DESIGN REFERENCE + SPECIFICATION BOOK 01 (Text) Chapter 1: Starting an Interior Project The thought of starting an interior project can be daunting; however, with a bit of strategic planning, a project can be launched smoothly and effectively. What- ever the scale of the project, four basic elements must be considered from the beginning: project site, program, schedule, and budget. These four items are seldom determined exclusively by the client or the designer, but usually by both in collaboration. The fewer the variables, the more efficient the process will be. PROJECT SITE In general, a client engages a designer once a site or space is in hand. It is then the designer’s task to analyze the space to ensure that it will meet the client’s needs. Sometimes, a client may not have a single space in mind, but rather a few options that the designer will test to ascertain which one best suits the client’s needs. Both of these scenarios suggest that the client is work- ing toward a particular program; however, sometimes the physical space generates the program. In this case, the designer’s task is to decide the best layout for the space and design a program within those constraints. PROGRAMMING Programming is the process of defining the needs of those who will use the space, in advance of creating the design. Whether for a home kitchen renovation or for a newly constructed restaurant, this exercise should evaluate the functional performance, opportunities, and constraints of the existing space. Furthermore, the program should articulate what spaces, features, or attributes must be added to improve functionality and give an appropriate and compelling character to a space. The programmatic goals should be precisely qualified in a brief, the written document that outlines all functional, dimensional, and relational require- ments. This list of objectives will form the basis for evaluating design solutions in subsequent phases of the project. SITE PROGRAMMING SCHEDULE BUDGET Job:10-700696 Title:RP - Interior Design Reference and Specification Dtp:225 Page:10 700696_001-017.indd 10 10/10/17 4:10 pm Programming can be broken down into three central types of activities: gathering, analyzing, and documenting information. Within this framework, the process for establishing the project goals and the format of the program wish list can vary widely. For small projects, gathering data and analyzing the client’s needs are essential; providing a written report is less so. That said, to avoid miscommunication, some record of the process must be made. Thus, program- ming might consist of a filled-in questionnaire, a detailed interview, or a inventory that defines the microdeterministic issues, such as the number and type of shoes within a closet or the amount of cupboard space needed to accommodate everyday dishes and fine china. For large corporate and institutional projects, the designer will need to listen to and put in order criteria from a broad range of stakeholders. Often, the interior designer must synthesize conflicting information and make recommendations to the client that can have policy implications beyond physical planning. Documentation is essential. In all cases, the designer is required to priori- tize wish lists to make meaningful and finite design decisions. Although this step might at times seem extraneous, programming is critical to the design pro- cess because it is here that the client’s problems and goals are clearly identified. Good commu- nication is key to articulating the program and managing expectations for the design phase. A lack of understanding the goals at this stage may result in cost overruns during the construc- tion phase or, even more detrimental, a project that does not meet the client’s basic needs. Ideally, the program serves as a core map from which design objectives, spatial adjacencies, and building constraints are elaborated. PROGRAMMING ACTIVITIES Gathering Information Analyzing Information Documenting Information • Collect floor plans. • Visit site with client. • Report field observations. • Determine client structure and end users (Who makes the decisions? Who uses the spaces?). • Compile information on client (client’s mission, structure of organization, future goals, etc.). • Interview client representa- tives and end users. • Analyze interview notes. • Create bubble diagrams of ideal spatial relationships. • Determine staff counts and future projections. • Develop lists of type and quantity of spaces. • Define specific needs within a given space (i.e., storage for a specific number of files). • List issues that need clarifi- cation or resolution. • Document client’s mission and project goals. • Summarize program for current needs and future growth. • Include meeting notes from interviews. • Obtain client approval on program and projections. • Compile report. Job:10-700696 Title:RP - Interior Design Reference and Specification Dtp:225 Page:10 700696_001-017.indd 11 10/10/17 4:10 pm Job:10-700696 Title:RP - Interior Design Reference and Specification Dtp:225 Page:10 700696_001-017.indd 10 10/10/17 4:02 pm Job:10-700696 Title:RP - Interior Design Reference and Specification Dtp:225 Page:11 Job:10-700696 Title:RP - Interior Design Reference and Specification Dtp:225 Page:10 700696_001-017.indd 11 10/10/17 4:02 pm Chapter 1: Starting an Interior Project The thought of starting an interior project can be daunting; however, with a bit of strategic planning, a project can be launched smoothly and effectively. What- ever the scale of the project, four basic elements must be considered from the beginning: project site, program, schedule, and budget. These four items are seldom determined exclusively by the client or the designer, but usually by both in collaboration. The fewer the variables, the more efficient the process will be. PROJECT SITE In general, a client engages a designer once a site or space is in hand. It is then the designer’s task to analyze the space to ensure that it will meet the client’s needs. Sometimes, a client may not have a single space in mind, but rather a few options that the designer will test to ascertain which one best suits the client’s needs. Both of these scenarios suggest that the client is work- ing toward a particular program; however, sometimes the physical space generates the program. In this case, the designer’s task is to decide the best layout for the space and design a program within those constraints. PROGRAMMING Programming is the process of defining the needs of those who will use the space, in advance of creating the design. Whether for a home kitchen renovation or for a newly constructed restaurant, this exercise should evaluate the functional performance, opportunities, and constraints of the existing space. Furthermore, the program should articulate what spaces, features, or attributes must be added to improve functionality and give an appropriate and compelling character to a space. The programmatic goals should be precisely qualified in a brief, the written document that outlines all functional, dimensional, and relational require- ments. This list of objectives will form the basis for evaluating design solutions in subsequent phases of the project. Job:10-700696 Title:RP - Interior Design Reference and Specification Dtp:225 Page:10 700696_001-017.indd 10 10/10/17 4:10 pm 11 Starting an Interior Project 01 (Text) Programming can be broken down into three central types of activities: gathering, analyzing, and documenting information. Within this framework, the process for establishing the project goals and the format of the program wish list can vary widely. For small projects, gathering data and analyzing the client’s needs are essential; providing a written report is less so. That said, to avoid miscommunication, some record of the process must be made. Thus, program- ming might consist of a filled-in questionnaire, a detailed interview, or a inventory that defines the microdeterministic issues, such as the number and type of shoes within a closet or the amount of cupboard space needed to accommodate everyday dishes and fine china. For large corporate and institutional projects, the designer will need to listen to and put in order criteria from a broad range of stakeholders. Often, the interior designer must synthesize conflicting information and make recommendations to the client that can have policy implications beyond physical planning. Documentation is essential. In all cases, the designer is required to priori- tize wish lists to make meaningful and finite design decisions. Although this step might at times seem extraneous, programming is critical to the design pro- cess because it is here that the client’s problems and goals are clearly identified. Good commu- nication is key to articulating the program and managing expectations for the design phase. A lack of understanding the goals at this stage may result in cost overruns during the construc- tion phase or, even more detrimental, a project that does not meet the client’s basic needs. Ideally, the program serves as a core map from which design objectives, spatial adjacencies, and building constraints are elaborated. PROGRAMMING ACTIVITIES Gathering Information Analyzing Information Documenting Information • Collect floor plans. • Visit site with client. • Report field observations. • Determine client structure and end users (Who makes the decisions? Who uses the spaces?). • Compile information on client (client’s mission, structure of organization, future goals, etc.). • Interview client representa- tives and end users. • Analyze interview notes. • Create bubble diagrams of ideal spatial relationships. • Determine staff counts and future projections. • Develop lists of type and quantity of spaces. • Define specific needs within a given space (i.e., storage for a specific number of files). • List issues that need clarifi- cation or resolution. • Document client’s mission and project goals. • Summarize program for current needs and future growth. • Include meeting notes from interviews. • Obtain client approval on program and projections. • Compile report. Job:10-700696 Title:RP - Interior Design Reference and Specification Dtp:225 Page:11 Job:10-700696 Title:RP - Interior Design Reference and Specification Dtp:225 Page:10 700696_001-017.indd 11 10/10/17 4:10 pm Job:10-700696 Title:RP - Interior Design Reference and Specification Dtp:225 Page:12 700696_001-017.indd 12 10/10/17 4:02 pm Job:10-700696 Title:RP - Interior Design Reference and Specification Dtp:225 Page:12 700696_001-017.indd 13 10/10/17 4:02 pm 12 THE INTERIOR DESIGN REFERENCE + SPECIFICATION BOOK 01 (Text) SCHEDULE An ideal project schedule specifies not only the designer’s responsibilities, but also the impor- tant decisions to be made by the client, as well as the critical role of the contractor as a member of the project team. As a result, the schedule should address all of the project milestones, in the form of a checklist, and assign to a team member the primary responsibility for oversight. Schedules include, but are not limited to, establishing the timeframe for executing contracts and acquiring existing condition surveys; defining the length of design phases; receiving concept design and budget sign-off; bidding and negotiating with contractors; obtaining permits; defining construction duration; and fixing a move-in date. If the date for moving in is already known, it is best to work backward from this date to determine the duration of each milestone. Reviewing the overall timeframe against the checklist of activities will determine its reasonableness. It is also important to research the duration of the regulatory and approvals processes in the local area because they often consume more time than expected. Week 1 2 3 4 5 6 7 8 9 10 11 12 13 14 15 16 17 18 19 CHECKLIST Contract Negotiations Programming / Pre-Design Interior Survey Presentation of Design Concepts Approval of Design Concept Schematic Design Conceptual Price Estimate Review and Approval of Budget Estimate Design Development Review and Approval / Design Sign-Off Construction Documents Bids and Negotiations Award Contract Acquisition of Permits Mobilization of Site Construction Administration Installation of Furnishings Job:10-700696 Title:RP - Interior Design Reference and Specification Dtp:225 Page:12 700696_001-017.indd 12 10/10/17 4:10 pm 15 16 17 18 19 20 21 22 23 24 25 26 27 28 29 30 31 32 33 34 35 36 1 2 3 4 5 6 Job:10-700696 Title:RP - Interior Design Reference and Specification Dtp:225 Page:12 700696_001-017.indd 13 10/10/17 4:10 pm Job:10-700696 Title:RP - Interior Design Reference and Specification Dtp:225 Page:12 700696_001-017.indd 12 10/10/17 4:02 pm Job:10-700696 Title:RP - Interior Design Reference and Specification Dtp:225 Page:13 Job:10-700696 Title:RP - Interior Design Reference and Specification Dtp:225 Page:12 700696_001-017.indd 13 10/10/17 4:02 pm SCHEDULE An ideal project schedule specifies not only the designer’s responsibilities, but also the impor- tant decisions to be made by the client, as well as the critical role of the contractor as a member of the project team. As a result, the schedule should address all of the project milestones, in the form of a checklist, and assign to a team member the primary responsibility for oversight. Schedules include, but are not limited to, establishing the timeframe for executing contracts and acquiring existing condition surveys; defining the length of design phases; receiving concept design and budget sign-off; bidding and negotiating with contractors; obtaining permits; defining construction duration; and fixing a move-in date. If the date for moving in is already known, it is best to work backward from this date to determine the duration of each milestone. Reviewing the overall timeframe against the checklist of activities will determine its reasonableness. It is also important to research the duration of the regulatory and approvals processes in the local area because they often consume more time than expected. Week 1 2 3 4 5 6 7 8 9 10 11 12 13 14 15 16 17 18 19 Job:10-700696 Title:RP - Interior Design Reference and Specification Dtp:225 Page:12 700696_001-017.indd 12 10/10/17 4:10 pm 13 Starting an Interior Project 01 (Text) Month 15 16 17 18 19 20 21 22 23 24 25 26 27 28 29 30 31 32 33 34 35 36 1 2 3 4 5 6 Job:10-700696 Title:RP - Interior Design Reference and Specification Dtp:225 Page:13 Job:10-700696 Title:RP - Interior Design Reference and Specification Dtp:225 Page:12 700696_001-017.indd 13 10/10/17 4:10 pm
Advertisement
Related books

2016 • 91 Pages • 8.49 MB

2006 • 194 Pages • 5.29 MB

2009 • 338 Pages • 71.54 MB

2006 • 194 Pages • 3.28 MB

2010 • 254 Pages • 5.11 MB

2012 • 193 Pages • 22.96 MB

2013 • 155 Pages • 9.76 MB

2012 • 285 Pages • 12.56 MB

2014 • 209 Pages • 14.27 MB

2016 • 289 Pages • 4.24 MB

2012 • 337 Pages • 10.49 MB

2015 • 229 Pages • 4.76 MB

2001 • 40 Pages • 969 KB

2005 • 133 Pages • 378 KB

- Most Popular
- Explore all categories
interior design and visual presentation
- Interior Design and Visual Presentation
Upload: dwellswithin5220
Post on 24-Oct-2015
15 download
Embed Size (px): 344 x 292 429 x 357 514 x 422 599 x 487
DESCRIPTION
INTERIOR DESIGN VISUAL
PRESENTATION
A Guide to Graphics, Models, and Presentation Techniques
SECOND EDITION
Maureen Mitton
JOHN WILEY & SONS, INC.
IDVP 1 12/15/03 3:40 PM Page i
File AttachmentC1.jpg
IDVP 1 12/15/03 3:40 PM Page iv
This book is printed on acid-free paper. O
Copyright 2004 by John Wiley & Sons, Inc. All rights reserved
Published by John Wiley & Sons, Inc., Hoboken, New JerseyPublished simultaneously in Canada
No part of this publication may be reproduced, stored in a retrieval system, or transmitted in any formor by any means, electronic, mechanical, photocopying, recording, scanning, or otherwise, except aspermitted under Section 107 or 108 of the 1976 United States Copyright Act, without either the priorwritten permission of the Publisher, or authorization through payment of the appropriate per-copy fee tothe Copyright Clearance Center, Inc., 222 Rosewood Drive, Danvers, MA 01923, (978) 750-8400, fax(978) 750-4470, or on the web at www.copyright.com. Requests to the Publisher for permission shouldbe addressed to the Permissions Department, John Wiley & Sons, Inc., 111 River Street, Hoboken, NJ07030, (201) 748-6011, fax (201) 748-6008, e-mail: [email protected] .
Limit of Liability/Disclaimer of Warranty: While the publisher and author have used their best efforts inpreparing this book, they make no representations or warranties with respect to the accuracy or com-pleteness of the contents of this book and specifically disclaim any implied warranties of merchantabil-ity or fitness for a particular purpose. No warranty may be created or extended by sales representa-tives or written sales materials. The advice and strategies contained herein may not be suitable foryour situation. You should consult with a professional where appropriate. Neither the publisher norauthor shall be liable for any loss of profit or any other commercial damages, including but not limitedto special, incidental, consequential, or other damages.
For general information on our other products and services or for technical support, please contact ourCustomer Care Department within the United States at (800) 762-2974, outside the United States at(317) 572-3993 or fax (317) 572-4002.
Wiley also publishes its books in a variety of electronic formats. Some content that appears in print maynot be available in electronic books. For more information about Wiley products, visit our web site atwww.wiley.com.
Library of Congress Cataloging-in-Publication Data:Mitton, Maureen.
Interior design visual presentation : a guide to graphics, models, andpresentation techniques /Maureen Mitton.-- 2nd ed.
p. cm.ISBN 0-471-22552-51. Interior decoration rendering. 2. Interior decoration--Design. 3. Graphic arts. I. Title.NK2113.5.M58 2003729'.028--dc21
Printed in the United States of America
10 9 8 7 6 5 4 3 2 1
IDVP 1 12/15/03 3:40 PM Page ii
ForRoger, Anna, and Luc
IDVP 1 12/15/03 3:40 PM Page iii
CONTENTSACKNOWLEDGMENTS vii
INTRODUCTION ix
ORTHOGRAPHIC DRAWINGS 1Introduction to Drawing 1Materials, Tools, and Equipment 2Understanding Orthographic Projection Drawings 5Orthographic Projection Drawings for Interior Environments 6
THE DESIGN PROCESS AND RELATED GRAPHICS 21Introduction to the Design Process 21Programming 23Schematic Design 26Design Development 42
PARALINE AND PERSPECTIVE DRAWINGS 44Introduction to Three-Dimensional Views 44Paraline Drawings 45Perspective Drawings 50Developing Visual Skills 55
DRAWING AND SKETCHING INTERIOR ENVIRONMENTS 64Estimated One-Point Interior Perspective Drawings 64Estimated Two-Point Interior Perspective Drawings 70Refined Linear Perspective Methods 75Two-Point Plan Projection Method 75Prepared Perspective Grid Charts 83Perspectives Traced from Photographs 85Computer-Generated Imagery 88
RENDERING 92Introduction to Rendering 92Materials, Media, and Tools 93Rendering Orthographic Projection Drawings 99Rendering Perspective Drawings 106
IDVP 1 12/15/03 3:40 PM Page v
COLOR PLATES 119
SCALE MODELS 159Introduction to Scale Models 159Materials and Tools 160Construction and Use of Models 171
PRESENTING MATERIALS AND FINISHES 181Introduction to Materials Presentations 181Materials and Media 183Organization and Composition 186Techniques and Methods of Presentation 191
PORTFOLIOS AND RESUMES 199Graphic Design Components 199The Resume 202The Portfolio 220The Digital Portfolio 222
APPENDIX ONE
DIRECTORY OF PROFESSIONALS FEATURED 227
APPENDIX TWO
DRAWING ELEVATIONS: A RESIDENTIAL CASE STUDY 228
APPENDIX THREE
COLOR THEORY FOR RENDERING 230
APPENDIX FOUR
SCALE FIGURES AND ENTOURAGE 231
APPENDIX FIVE
TWO-POINT PERSPECTIVE GRID 234
APPENDIX SIX
FLOOR PLANS OF PROFESSIONAL CASE STUDY: SCIENCE MUSEUM OF MINNESOTA 235
IDVP 1 12/15/03 3:40 PM Page vi
This book, just like the first edition, compilesthe work of many hands (and keyboards) andconversations. It has been made possible by thegenerous contributions of numerous people, towhom I would like to express my gratitude.
First, I must acknowledge my current andformer students, who have taught me volumesand who continue give me the energy to keepgoing. I must thank all of the former studentswho contributed work to the first edition espe-cially, including Theresa Isaacson, Leanne Lar-son, Ardella Pieper, Cory Sherman, and JustinThomson. Denise Haertl, Dan Effenheim, Anne(Cleary) Olsen, and Angela Ska, now profes-sional designers, all willingly handed overportfolios for inclusion in this edition. Currentstudents who contributed work and help in-clude Kristy Bokelman, Anne Harmer, andRandi Steinbrecher. And I thank former ex-change students Elke Kalvelage, JessicaTebbe, and Dirk Olbrich for allowing me to in-clude some of their fine work.
I have been amazed and touched by thegenerosity of members of the design commu-nity who shared time and contributed projects:my friend Lynn Barnhouse at Meyer, Scherer& Rockcastle Architects, who contributed a
great deal of work and gave hours of her time;Jane Rademacher, Lisa Miller, and Bob Al-bachten; and Thom Lasley, of RSP Architects.
Others who took time out of very busy sched-ules to contribute include Thomas Oliphant;Jim Smart, of Smart Associates; Jim Moeller, atArthur Shuster Inc.; Craig Beddow, of BeddowDesign; Deborah Kucera, of TKDA; Janet Law-son, of Janet Lawson Architectural Illustration;and Robert Lownes, of Design Visualizations;Harris Birkeland; and Aj Dumas.
I must acknowledge and thank my col-leagues at the University of WisconsinStout.Courtney Nystuen, a wonderful teacher and ar-chitect, contributed in many ways. Bill Wikrent,who is talented, knowledgeable, and very gener-ous, deserves special thanks. And this editionwould not have been finished in this decadewithout the gift of a sabbatical: thank you to theSabbatical Committee. Jack Zellner and KristineRecker Simpson deserve thanks for willinglycontributing their fine work.
This project would not have been possiblewithout the help of my husband, Roger Par-enteau, support from our daughter, Anna, anda fair amount of terror generated by youngLuc to keep things interesting.
ACKNOWLEDGMENTS
IDVP 1 12/15/03 3:40 PM Page vii
IDVP 1 12/15/03 3:40 PM Page viii
The practice of interior design is complex andcontinues to evolve. Technological and societalchanges fueled by the industrial revolution andcontinued by more recent advancements intechnology have shaped the profession in deci-sive ways. In a world that requires increasingprofessional specialization, interior design hasgained recognition as an independent disci-pline. Work done by groundbreaking interiordesigners in the twentieth century has en-hanced the built environment and increasedthe visibility of the profession. The develop-ment of educational standards, professionalorganizations, a qualifying exam, and legisla-tive certification has increased the quality andcredibility of practitioners and fostered designexcellence.
The design of interior environments re-quires specialized methods of presentation,which are often omitted in standard architec-ture texts. This book identifies methods usedin the visual presentation of interior spacesand articulates them in written and visual lan-guage. Various phases of the design processare discussed in order to reveal the connectionbetween process and presentation. Some oftenoverlooked basic principles of graphic designand portfolio design are also discussed.
Intended as a primer on interior design vi-
sual communication, this book presents arange of styles and techniques. The goal is toprovide students and practitioners with infor-mation on visual presentation techniques anda variety of methods and materials. It is im-portant to note that this book is not intended toimpart ways of camouflaging poorly con-ceived design work with tricky techniques.This is not a rendering book; it is instead aportfolio of methods of communication. Gooddesign requires, and deserves, adequate andappropriate presentation.
My desire to write the first edition of thisbook grew from an ongoing pedagogical need:to show students a range of examples of pres-entation techniques and styles. Often designstudents look for the right way to create apresentation, and this is a mistake becausethere are many ways of creating successfulpresentations. Interior design education hassuffered from a lack of documentation of themany possible modes of presentation and alack of specialized information for students. Ihave found that students exposed to a varietyof methods and specific examples create ap-propriate and useful presentations, whereasstudents left uninformed about the possibilitiesoften repeat the same lackluster or inappropri-ate type of presentation project after project.
INTRODUCTION
IDVP 1 12/15/03 3:40 PM Page ix
Unlike those found in many books on ren-dering and presentation, many of the exam-ples included here were executed by under-graduate design students. Ive included thesebecause I want students to see real examplesof developing skills. It is important for all de-signers to develop drawing and sketchingskills. Drawing and model building should notbe reserved for the final presentation of fullydeveloped designs. Instead, sketching, draw-ing, and model building must be seen as waysof seeing and exploring throughout the designprocess from beginning to final presenta-tion. I admit my desire to get interior designersto draw (and draw and draw). It is the best wayto learn to visualize and develop good work.
Research for this edition made clear the sig-nificant role computer-generated imageryplays in current practice and in the academicworld. Most designers use computers in creat-ing visual presentations. Despite this, handdrawing continues to be a useful tool, particu-larly in producing perspective drawings.Quickly created perspective drawings offer thebenefit of providing designers a visualizationtool early in the design process, prior to thetime finalized design drawings are complete.In addition, skills learned in drawing by handtransfer directly to computer modeling. Theability to create quick perspective sketches inclient conferences and in team meetings is ahighly useful tool; this is something that I haveheard many times from those hiring designers.For these reasons, numerous examples ofquick sketching techniques are included. Ex-amples of computer-generated three-dimen-sional views are also provided because somedesigners create these after refining the designby hand sketching. I believe hand drawing andcomputer-generated imagery can sit side byside in the designers tool kit.
I have included some examples of workdone by professional illustrators, digital illus-trators, and model makers to demonstratewhat is being done in current practice by spe-
cialists. The work is beautiful and highly pro-fessional, and it depicts what top professionalscan produce. We can learn from this work andallow it to influence our design drawings andin-process presentations.
Most chapters begin with informationabout specific materials and tools. Each pro-vides written instruction in the text as well asstep-by-step illustrated instructions. In teach-ing Ive found that some students learn best byreading and others by following brief graphicguides. My goal is to provide instruction for avariety of learning styles.
For the most part this book covers conven-tional methods of drawing and presentation.The one exception is the material on perspec-tive, where I have focused on estimated per-spective sketching. Estimated sketching re-quires eyeballing perspectives, a methodthat I have found works well for students, al-though many educators find it horrifying. Inaddition to estimated sketching, informationon more traditional methods of perspectivedrawing is included.
The examples and projects presented hererange in scope from small residential studentprojects to huge public interior spaces de-signed by professionals. The projects rangefrom purely decorative treatment of interior el-ements to space planning and interior architec-ture. It is important to note that some of theprofessional projects presented here are thework of architects involved in the design of in-terior space and exhibitions. This points to theoverlap of the two professions, the breadth ofcurrent design practice, and some confusionover what the design of interior space shouldbe called. When is it appropriate to use theterm interior architecture? When interior de-sign? Certainly that debate cannot be ad-dressed in a book on presentation methods. Forthe books title, I chose to use the term interiordesign because it describes the design of inte-rior space, which is clearly a distinct area ofspecialization.
I N T E R I O R D E S I G N V I S U A L P R E S E N TAT I O Nx
IDVP 1 12/15/03 3:40 PM Page x
INTRODUCTION TO DRAWINGInterior design is a multifaceted and ever-changing discipline. The practice of interiordesign continues to evolve due to technologicalas well as societal changes. Computers, the In-ternet, and fax machines have deeply influ-enced and changed its practice. For example,use of computer-aided drafting and design(CADD) is standard operating procedure incurrent design practice, whereas 15 years agoit was just beginning to gain in popularity.
In addition to undergoing rapid technologi-cal advancement, the profession of interior de-sign has grown in terms of scope of work, spe-cialization, and the range of design practiced.The growth of the profession, combined withefforts toward standards and licensing, haveincreased its legitimacy as a serious profes-sional discipline.
Constant change in society and in ones pro-fession can be overwhelming and a bit frighten-ing, and for that reason it is useful to considerthe elements that remain constant in an evolvingprofession. In many ways, the design process it-self remains constant whether practiced witha stick in the sand, a technical pen, or a power-ful computer. There are many stories about de-signers drawing preliminary sketches on cock-
tail napkins or cheeseburger wrappers, andthese stories lead us to a simple truth.
Professional designers conduct research,take piles of information, inspiration, and hardwork, and wrap them all together in what is re-ferred to as the design process, to create mean-ingful and useful environments. A constantand key factor in interior design is the fact thathuman beings and other living creatures occupy and move within interior spaces. Tocreate interior environments, professional de-signers must engage in a process that involvesresearch, understanding, idea generation, eval-uation, and documentation. These are signifi-cant constants that exist in a changing world.
For the most part this book covers theprocess designers engage in and the relatedpresentation techniques used in design commu-nication. These processes and basic conceptsare consistent, whether generated manually orby computer. Some examples included herewere created manually, whereas others werecomputer generated. Regardless of how draw-ings and graphics are generated, they are partof a process of discovery, exploration, andcreation.
This chapter covers what is often referredto as drafting, as well as other forms of two-di-mensional graphics. The term DRAFTING refers
O R T H O G R A P H I C D R AW I N G S 1
ORTHOGRAPHICDRAWINGS
IDVP 1 12/15/03 3:40 PM Page 1
to measured drawings done with specializedtools and equipment. The truth is that not alldrawings used in the process of interior designare drawn with the aid of tools. Often thosedrawings created in the preliminary stages ofthe design process are rough sketches and in-volve little use of drafting tools or equipment.As designs are refined, there is clearly a needfor highly accurate, measured, and detaileddrawings, and these are drafted with tools.
This chapter presents the materials, equip-ment, and tools used for manually drafted andfreehand design drawings, as well as anoverview of the most common drawings usedin interior design practice. The informationpresented in this chapter is meant as anoverview, not a definitive drawing or draftingreference.
MATERIALS, TOOLS, AND EQUIPMENTThe graphics and drawings used in interior de-sign practice vary, ranging from conceptualsketches and rough layouts to measured tech-nical drawings. The materials, tools, and
equipment used to create the variety of draw-ings and graphics are numerous and ever pro-liferating. The media and tools selected mustbe appropriate to the task at hand. This meansthat their proper selection requires careful con-sideration of the drawing type and use, as wellas an understanding of the available products.Currently many schools and most firms createthe majority of design drawings digitally,using CADD programs. However, some stu-dents begin the study of drafting by creatingdrawings manually; for that reason a descrip-tion of manual drawing tools and equipmentfollows. Figure 1-1 illustrates commonly usedmanual drafting and drawing materials andequipment, which are discussed as follows.
DRAWING SURFACESThe type of drawing surface selected directlyaffects the quality of the drawn image. Somesurfaces accept pencil and ink readily andallow for clear, consistent imagery. Transparentpapers allow for diazo reproduction (blue-printing) and can be used as an overlay to con-tinue a drawing by transferring details fromone sheet to another. Drawings produced on
I N T E R I O R D E S I G N V I S U A L P R E S E N TAT I O N2
2. Architectural scales
3. Drafting film
4. Template
5. T square
6. Lettering triangle
7. Triangle
8. Appliqu film
10. Tracing paper (roll)
11. Cork-backed ruler
12. Flexible curve
13. Drafting tape
14. Drafting dots
15. French curve
16. French curve
17. Adjustable triangle
18. Electric eraser
19. Eraser shield
20. Erasers
21. Dry-cleaning pad
22. Disposable ink pens
23. Technical pen
24. Lead holder
25. Lead pointer
26. Mechanical pencil
27. Wooden graphite pencils
28. Layout pencils
29. Drafting brush 1 - 1
IDVP 1 12/15/03 3:40 PM Page 2
nontransparent surfaces must be reproducedby photocopying, photographic processes, orcomputer reproduction (scanning).
TRACING PAPER is the most common papersurface for sketching in-process design draw-ings and graphics. Known in various parts ofthe country as trace, flimsy, andbumwad, this paper is highly transparentand relatively inexpensive. Tracing paper isavailable in cut sheets and in rolls in a varietyof sizes. Rolls of tracing paper are best for in-terior design drawing because of the varyingsizes of drawings required. Tracing paper isavailable in white, buff, and canary (yellow).Most designers have a personal color prefer-ence based on previous experience.
Because it is relatively inexpensive, tracingpaper can be used to develop preliminarysketches and for in-process drawings. This al-lows for exploration through the creation ofmany sketches and the generation of manyideas. Tracing paper also works very well over-laid on drawings for transfer and refinement ofimages. Often many layers of tracing paper areoverlaid as a design is refined or as a compli-cated perspective drawing is constructed.
Images on tracing paper can be reproducedwith the use of a diazo print machine and canbe easily photocopied. However, it is very deli-cate and subject to tearing and crumpling. Forthis reason, it is not the best surface for adrawing that is to be extensively reproduced.
Most final design drawings created manu-ally are drawn on DRAFTING VELLUM, a transpar-ent paper available in a variety of finishes andweights (thicknesses) and most often white.Drafting vellum should have a high rag or cot-ton content, giving it a rich finish, strength, andgood stability. It is excellent for line work gen-erated with graphite pencils. Good-qualitydiazo prints can be run from drafting vellumoriginals. Vellum is also photocopied, scanned,and photographed with excellent results.
In addition to vellum, PLASTIC DRAFTINGFILMS are used for final drawings and for somedesign presentations. Plastic (and polyester)
drafting films are expensive, tear resistant,and generally do not react to fluctuations intemperature or humidity (as do many papersurfaces). They accept ink beautifully andallow for easy ink erasure. These films requirethe use of special pencils. Drafting film origi-nals produce excellent diazo prints and photo-copies. For years prior to the use of CADD,plastic film and ink drawings were consideredthe finest for reproduction.
ADHESIVE REPRODUCTION FILM, also calledappliqu film and often referred to genericallyas sticky back, is used on vellum or bonddrawings. Typed or printed images can bedrawn or photocopied onto adhesive reproduc-tion film. The film is then carefully measuredand cut and applied to the vellum or bondpaper. Matte appliqu films accept pencil well;some types are repositionable, but others arenot. High-heat photocopiers may cause buck-ling of certain appliqu films; however,Rayven produces a variety of films for low-,medium-, and high-heat copiers.
Tracing paper, drafting vellum, and draft-ing film are commonly used in manual draw-ing. Nontransparent papers such as fine artdrawing papers can be used with excellent re-sults, yet they cannot be overlaid and do notreproduce well. The nature of the designprocess requires constant exploration andchange, and transparent papers are wellsuited to this requirement.
Currently design drawings are reproducedon large-format photocopying machines. Inmany firms and studios large bond papercopies have replaced blueprints as the pre-ferred method of reproduction.
LINE- AND MARK-MAKINGIMPLEMENTSLines and marks record spatial information ininterior design drawings and graphics. Controlof line thickness and the type of stroke usedare important and convey specific information.Thus, the implement used to create lines andmarks is a key factor in design drawing.
O R T H O G R A P H I C D R AW I N G S 3
IDVP 1 12/15/03 3:40 PM Page 3
GRAPHITE is mixed with clay and other ele-ments to produce what are commonly calledlead pencils. Graphite pencils, used in designdrawing, are available in a range of hardnessesbased on the mixture of clay to graphite.Graphite pencils and replaceable leads arecoded with a standard rating system: H standsfor hard, B stands for black (the softer leads).The number found next to the H or B refers tothe level of hardness. For example, a 6B issofter than a 2B; an 8H is very hard. F-ratedleads are at the center of the range, and HBleads are slightly harder than Bs. The softerleads are used in sketching and rendering,whereas H, 2H, and sometimes F leads aremost commonly used in drafting. Polymer-based leads, which are used on plastic andpolyester drafting films, are often graded dif-ferently than graphite leads.
The graphite described above is used in avariety of mark-making implements. WOODENDRAWING PENCILS involve a graphite mixture en-cased in wood and are sharpened like standardwooden writing pencils. MECHANICAL PENCILSare hollow instruments that hold very finegraphite leads. These are sold in a variety oflead widths to create a range of line weights.LEAD HOLDERS are hollow implements that ac-cept thicker leads than mechanical pencils. Al-though lead holders do not allow for any vari-ety in lead widths, they do accept a range oflead types in terms of softness. Lead holdersrequire the use of a specialized sharpener,known as a LEAD POINTER.
Specialized colored drafting pencils andleads can be used to develop drawings prior tohard-lining them. NON-PHOTO-BLUE colored pen-cils do not reproduce when photographed;however, they sometimes reproduce when pho-tocopied. NONPRINT colored pencils do not re-produce in diazo prints. When appropriate,both types of pencil can be used to lay outdrawings prior to completion.
One of the significant advantages of usinggraphite pencils is the ease of erasing. Harderleads are often the most difficult to erase,
whereas soft pencil marks are easily lifted withgray kneaded erasers or pink erasers. Plasticand film erasers can be used to remove marksmade with harder leads. A metal ERASER SHIELDis used to protect the drawing surface from un-wanted erasing. DRY CLEANING PADS, containingart gum powder that sifts onto drawing sur-faces, are available to keep drawings clean.
TECHNICAL PENS have tubular points and re-fillable ink reservoirs. They are available in arange of point sizes that allow for absolutecontrol of line weight. Because they employblack ink and metal points, technical pens cre-ate the finest line work of any drawing imple-ment. They must be used with the appropriateink, as specified by the manufacturer.
DISPOSABLE TECHNICAL PENS combine a tubu-lar support with a felt tip and are available ina range of point sizes. These pens require nomaintenance or cleaning, making them easy touse. Although disposable pens have beenknown to skip, causing inconsistent line work,they have improved a great deal recently andare becoming very popular.
FELT-TIP PENS are available in a range ofstyles and point sizes; they are often used insketching, exploration, and rendering. Felt-tippens are not generally used for refined drafteddrawings or working drawings.
Erasing ink marks is rather difficult and re-quires special erasers. Hard plastic erasers canremove ink. However, an ELECTRIC ERASER withthe appropriate eraser insert is most useful inremoving ink. Electric erasers are very effec-tive but must always be used with an erasershield. Ink marks on film are erased more eas-ily than those on vellum. Sharp razor bladesare sometimes used to scrape ink away fromdrawing surfaces.
A quality DRAWING BOARD is required for thecreation of successful drawings. Serious stu-dents must purchase a top-quality drawingboard if possible. The board should accommo-date a minimum paper size of 24" by 36".Drawing boards should be covered with a spe-cialized vinyl drawing surface, sold at drafting
I N T E R I O R D E S I G N V I S U A L P R E S E N TAT I O N4
IDVP 1 12/15/03 3:40 PM Page 4
and art supply stores. The vinyl surface helpsto improve line consistency.
T SQUARES are used in conjunction with theedge of the drawing board to provide an accu-rate horizontal line or right angle for drawings.PARALLEL RULERS can be attached to drawingboards using a system of screws, cables, andpulleys. This creates the sliding straightedgethat is the standard in professional practice.Triangles are used with a T square to createvertical and angled lines. Adjustable and45/45-degree and 30/60-degree triangles arereadily available. Triangles should be fairlyclear, easy to see through, and as substantialas possible. An inking triangle with raisededges is required when using ink. It is also use-ful to have a tiny triangle on hand as an aid inlettering. Triangles should never be used as acutting edge; this will ruin them. A cork-backed metal ruler is the best edge for cutting.
DRAFTING TAPE or PRECUT DRAFTING DOTSare used to attach drawings to drawing boards.Unlike standard masking and household tape,drafting tape and dots are easy to remove fromboth the paper and the drawing board. ADRAFTING BRUSH is used to remove eraser debrisfrom the drawing surface.
Measured interior design drawings requirethe use of a proportional scale. This allows forlarge areas to be reduced in size to fit on rela-tively small drawings. An ARCHITECTURALSCALE is the standard scale ruler used in inte-rior design drawing. Architectural scales aremarked in a manner that makes measuring inscale fairly easy. For example, in 1/4-inch scalethe ruler is marked so that each 1/4 inch meas-ures 1 foot in scale. Architectural scales haveinches marked below the zero marking; theseare used to measure elements that are notexact to the foot. In transferring measure-ments, great care should be taken to record ac-curate dimensions. Scale rulers should neverbe used to draw against, as this would result inpoorly drawn lines and damaged rulers.
TEMPLATES are most commonly constructedof plastic and are used much like stencils to
draw various shapes, including circles, el-lipses, furnishings, and fixtures. The more ex-pensive templates constructed of heavy,durable plastic are worth the extra money.Furniture and fixture templates work well toquickly lay out and plan spaces. However, inpresentation drawings furniture and fixturesdrawn from templates can appear artificialand monotonous.
FRENCH CURVES are drawn against as an aidin producing curved lines. FLEXIBLE CURVES,also known as snakes, are also used as an aidin drawing curved lines. These have flexiblesplines that can be bent to accommodate thedesired curve. These also work well for trans-ferring curves from one drawing surface to an-other. A COMPASS is used for drawing accuratecircles and arcs and is useful in situationswhere a template does not contain a circle ofthe required size. It is worthwhile to purchasea good compass that adjusts easily and ac-cepts drawing leads and ink heads.
UNDERSTANDINGORTHOGRAPHICPROJECTION DRAWINGSThe practice of interior design requires thecreation and use of various types of drawing.These can be divided into three broad cate-gories based on purpose. The first type ofdrawing allows the designer to explore ideas(known as ideation) and work conceptually,often in the form of sketches. The second typeallows the designer to communicate to others,including members of the design team, theclient, end users, consultants, and other profes-sionals (presentation drawings). The third typeof drawing conveys the technical informationrequired for construction (construction docu-ments or working drawings). This book fo-cuses on the first two types of drawing, thoseused for exploration and presentation orgraphic communication of ideas.
Unlike ideation sketches, presentationdrawings and construction documents must
O R T H O G R A P H I C D R AW I N G S 5
IDVP 1 12/15/03 3:40 PM Page 5
use certain standard drawing conventions toclearly communicate and delineate the pro-posed design. Unlike fine art drawing, designdrawing requires adherence to conventions,proportional scale, and accuracy of line. De-sign drawings are highly standardized so thatthey carry universal meaning. Or, as one earlyreviewer of this book put it, Design drawingis much like a language; the drawings mustconvey the designers meaning clearly.
The design drawings most commonly usedin scaled delineation of interior environmentsare floor plans, interior elevations, sections,and reflected ceiling plans. These drawings,called ORTHOGRAPHIC PROJECTIONS, are createdby projecting information about an object ontoan imaginary plane known as the PICTUREPLANE. This direct projection of an objects di-mensions allows orthographic projections toretain shape and proportion, making thesedrawings accurate and precise. Orthographicprojection creates fragmentary views of an ob-ject, resulting in the need for multiple drawings.This means that because of their fragmentarynature orthographic projections become partsof a system and are mutually dependent onone another. By their nature, orthographic pro-jections appear flat and lack the three-dimen-sional quality of perspective drawings. Oneway to visualize orthographic projection is toimagine an object enclosed in a transparentbox. Each transparent plane of the enclosingbox serves as the picture plane for that face ofthe object (Figure 1-2).
The view through the top plane of the en-closing box is called a PLAN. In a plan view onlythose elements seen when looking directlydown at the object are drawn. Figure 1-3 de-picts a roof plan.
The views through the picture planes thatform the sides of the enclosing box are calledELEVATIONS. Elevations depict only what is vis-ible when viewed directly through the pictureplane (Figure 1-4).
A SECTION portrays a view of the object orbuilding with a vertical plane sliced through it
and removed. One way of understanding sec-tion views is to imagine that a very sharpplane has been inserted into the object orbuilding, cutting neatly into it and revealingthe structure and complexity of the objectsform (Figure 1-5).
A floor plan, also known as a horizontalsection, portrays a view of the building with ahorizontal plane sliced through it and removed,exposing the thickness of the walls and the el-ements below the cut line such as floor finishesand furniture (Figure 1-6).
ORTHOGRAPHICPROJECTION DRAWINGSFOR INTERIORENVIRONMENTSThe special orthographic projection drawingsused in delineation of interior environmentsare based on the concepts mentioned to thispoint. These drawings impart information par-ticular to interior construction.
FLOOR PLANSA FLOOR PLAN is a view as though lookingstraight down at a room or building after ahorizontal cut has been made through thestructure. As stated previously, a floor plancan also be called a HORIZONTAL BUILDING SEC-TION because the drawing is created by cuttingthrough the building horizontally at roughlyfour to five feet above floor level and removingthe top half. With the building cut open andviewed from above, important informationsuch as wall, door, and window locations canbe drawn to scale (Figure 1-7). Additional de-sign elements such as fixtures and furniturecan be drawn in appropriate locations to scalein a floor plan.
In the United States floor plans are mostoften drawn at a scale of 18" = 1'0" or1/4" = 1'0", although this varies according toproject conditions. Larger-scale floor plans areuseful for presentation of complex or highlydetailed spaces. Smaller-scale floor plans are
I N T E R I O R D E S I G N V I S U A L P R E S E N TAT I O N6
IDVP 1 12/15/03 3:40 PM Page 6
FIGURE 1-5A section is a view of an objectwith the picture plane slicingneatly through it.
FIGURE 1-6A floor plan is a view of thebuilding from above with a hori-zontal plane sliced through it andremoved to expose the thicknessof the walls.
Figures 1-21-5 drawn by JustinThomson.
O R T H O G R A P H I C D R AW I N G S 7
FIGURE 1-2When an object is enclosed in aglass box, each plane of the boxcan serve as a picture plane.
FIGURE 1-3The view through the top plane(picture plane) creates a planview, in this case a roof plan.
FIGURE 1-4The view through the pictureplane enclosing the side of thebox is called an elevation.
1 - 2 1 - 3
IDVP 1 12/15/03 3:40 PM Page 7
required for large projects and are also used askey plans in complex presentations.
In drawing floor plans it is important toconvey significant spatial relationships withconsistent graphic conventions. Various lineweights are used to convey depths and quali-ties of form. In standard floor plans the bold-est line weight is used to outline those ele-ments that have been cut through and are clos-est to the viewer (such as full-height walllines). An intermediate line weight is employedto outline objects that lie below the plane ofthe cut but above the floor plane, such as fix-tures, built-ins, and furnishings. A finer lineweight is used to outline surface treatment offloors and other horizontal planes, such as tileand wood grain. Objects that are hidden, such
as shelves, or above the plane of the cut aredashed or ghosted in; this must be done in amanner that is consistent throughout the pres-entation.
Figures 1-8a and 1-8b are examples oftown-house floor plans drawn using AutoCADsoftware and employing standard conventionsand reference symbols. Figures 1-9a and 1-9bare freehand-drawn (no tools) floor plans ofthe town house.
Standard doors are generally drawn openat 90 degrees to the wall and are often shownwith the arc of their swing. The door frameand the space it requires must be considered inthe drawing of the door system (this meansthe dimensions of the frame must be consid-ered). Windowsills are typically outlined, often
I N T E R I O R D E S I G N V I S U A L P R E S E N TAT I O N8
FIGURE 1-7A floor plan is created when thepicture plane cuts through thebuilding horizontally, at 45'above floor level.
IDVP 1 12/15/03 3:40 PM Page 8
O R T H O G R A P H I C D R AW I N G S 9
FIGURE 1-8ATown-house lower-level floor plan employing stan-dard drafting conventions.
1. Boldest lines indicate the location of cut, mean-ing full-height walls are bold.
2. Fixtures, cabinetry, and finish materials aredrawn with progressively lighter lines as theyrecede from the cut location.
3. Elements that are above or below the cutline(such as cabinets and soffits) are indicated withdashed lines.
4. Standard doors are drawn open at 90 degreeswith the arc of swing shown.
5. Specialized doors such as bifold doors, slidingdoors, and pocket doors are drawn in a way thatindicates size and construction.
6. Window glass and sill lines are shown, oftenwith a lighter-weight line than walls.
7. Stairs are drawn as broken off past the line ofthe cut; a special cutline is used. An arrow indi-cating direction from the level of the plan andthe words up or down (dn.) are included.
8. A title, North arrow, and scale notation arerequired on all plans.
9. This is a section reference symbol. The arrowindicates the direction of the section view. Theletter indicates the particular drawing that isreferenced.
10. This is an elevation reference symbol. Thearrow indicates the direction of the elevationview. The number indicates the particular draw-ing that is referenced.
11. This is a centerline, indicating the centerline ofthe shared wall in the town house.
Design by Courtney Nystuen.
IDVP 1 12/15/03 3:40 PM Page 9
I N T E R I O R D E S I G N V I S U A L P R E S E N TAT I O N10
FIGURE 1-8BTown-house upper-level floor plan employing stan-dard drafting conventions.
10. This is a centerline, indicating the centerline ofthe shared wall in the town-house.
IDVP 1 12/15/03 3:40 PM Page 10
with a lighter line weight at the sill only. Win-dow frames and sheets of glass are shown invarious detail as scale allows. Stairs are gener-ally shown as broken off past the height of theplane of the cut; this is signified with a specialcutline. An arrow should be included to indi-cate the direction of the stairs from the level ofthe floor plan, with the word UP or DOWN (DN.)adjacent to the directional arrow.
A title, a North arrow, and some type ofscale notation should be included on all floorplans. Scale notation can be stated numerically,for example: 14" = 1'0". Current practice oftenrequires the use of a graphic scaling device,which allows for reduction, enlargement, andelectronic transmission of the drawings.
Symbols relating the floor plan to addi-tional orthographic views or details are oftendrawn on the floor plan and serve as cross-ref-erences.
Successful floor plan presentation draw-ings require a thorough understanding ofdrafting conventions. Presentation floor plansmay be drawn fastidiously with tools or drawnfreehand. Regardless of the style of drawing,presentation floor plans must be accurate anddrawn to the appropriate scale so that theycommunicate the design and can be used bythe designer as the project moves forward. Pre-sentation floor plans are enhanced by the useof tone, value, color, and/or other graphic de-vices. The graphic enhancement of floor plansis discussed in greater detail in Chapter 5.
INTERIOR ELEVATIONSJust as exterior elevations are created to revealexterior elements and features, interior eleva-tions reveal the interior features of a building.One way to understand the creation of interiorelevations is to imagine ourselves inside the
O R T H O G R A P H I C D R AW I N G S 11
FIGURE 1-9ATown-house lower-level floorplan, drawn freehand employingstandard drafting conventions.Design and drawing by CourtneyNystuen.
IDVP 1 12/15/03 3:40 PM Page 11
room we are drawing. Imagine standing insidea room facing one wall directly, with a largesheet of glass (the picture plane) inserted be-tween the viewer and the wall. The interior el-evation can then be created by outlining (pro-jecting onto the picture plane) the significantfeatures of the wall. Each wall of the room canbe drawn in elevation by means of projectingwhat is visible as the viewer faces that wall di-rectly (Figure 1-10).
Interior elevations are used extensively inprofessional practice. Successful elevationsmust clearly depict all interior architectural el-ements in a consistent scale. Interior elevationsare typically drawn in a scale ranging from14" = 1'0" to 1" = 1'0". Elevations drawn to de-pict accessories, equipment, cabinetry, fix-
tures, and design details are often drawn at38" = 1'0" or 12" = 1'0". Millwork and otherhighly complicated elevations are often drawnat 12" = 1'0" or larger.
All elevations require the use of differingline weights to clearly communicate spatial re-lationships. Typically, any portion of walls cutthrough and those closest to the viewer aredrawn using a bold line weight. Receding ele-ments become progressively lighter in lineweight as they move farther from the pictureplane. Some designers draw the line represent-ing the ground line as the boldest, with thoselines representing the top and sides of the walldrawn just slightly lighter in weight. Figure1-11 depicts kitchen elevations for the town-house project.
I N T E R I O R D E S I G N V I S U A L P R E S E N TAT I O N12
FIGURE 1-9BTown-house upper-level floorplan, drawn freehand employingstandard drafting conventions.Design and drawing by CourtneyNystuen.
IDVP 1 12/15/03 3:40 PM Page 12
O R T H O G R A P H I C D R AW I N G S 13
FIGURE 1-10In drawing interior elevations, thepicture plane is inserted betweenthe viewer and wall(s). What isvisible through the picture planeis drawn in elevation.
FIGURE 1-11Interior elevations for the town-house project.
1. Portions of walls cut into orclosest to viewer are bold.
2. Receding elements are drawnwith progressively lighterlines.
3. In elevations including cabi-netry and or millwork, detailssuch as countertops, doorframes, and hardware shouldbe included.
4. Interior elevations requiretitles, reference symbols(names or numbers), andscale notation.
IDVP 1 12/15/03 3:40 PM Page 13
Interior elevations can be difficult for be-ginning students to master. However, they de-serve full attention because accurate elevationsare necessary to successfully communicate keyelements of a design. Figures 1-12a and 1-12bare interior elevations depicting very differentdesign schemes for the same lobby space, indi-cating their importance in delineating thequality of a particular space.
Like floor plans, elevations used for designpresentations vary greatly from those used forconstruction. Elevations used for constructiondrawings must necessarily contain significantdimensions as well as appropriate technical in-formation. Those used for presentations can bedrawn more freely and often contain less tech-
nical information but must be drawn accu-rately and in consistent scale.
For elevations to work well in visual presen-tations, they must be clearly keyed, noted, or ref-erenced to the floor plan. Regardless of the refer-encing method used, titles must be included be-neath all elevations and scale should be noted.
Drawing interior elevations by hand or dig-itally requires a clear understanding of the con-cepts involved. To this end, a case study projectcontaining information about how elevationsare constructed for an existing residence can befound in Appendix 2. Elevations used for pre-sentations are enhanced by the use of tone,value, color, and/or other graphic devices,many of which are discussed in Chapter 5.
I N T E R I O R D E S I G N V I S U A L P R E S E N TAT I O N14
FIGURE 1-12AThis elevation delineates a tradi-tional wood-paneling designtreatment for a hotel lobby.Because this drawing wasreduced, a graphic scale notationwas used in place of writteninformation.
FIGURE 1-12BThis elevation delineates a com-pletely different design approachfor the hotel lobby shown in Fig-ure 1-12a. Because this drawingwas reduced, a graphic scalenotation was used in place ofwritten information.
IDVP 1 12/15/03 3:40 PM Page 14
SECTIONSAs described earlier, a building section is aview created as though a vertical plane has cutthrough the building and been removed. Unlikeinterior elevations, which depict only what oc-curs inside the interior, sections can expose thestructure of the building. In drawing sections,it is important to include the outline of thestructural elements as well as the internal con-figuration of the interior space. Sections re-quire varied line weights as a means of describ-ing depths and spatial relationships. It is typi-cal to show what is cut through, and thereforeclosest to the viewer, in the boldest line weight;receding features and details are drawn usingprogressively lighter line weights.
It is important to consider carefully themost useful location (or locations) of the build-ing to show in section. The section should becut through the building as a single continuous
plane. Sections should expose and convey im-portant interior relationships and details suchas doors, windows, changes in floor level, ceil-ing heights, and, in some cases, finish materiallocations.
Design and presentation sections differgreatly from construction sections. Construc-tion sections require technical information tocommunicate information about building sys-tems. In contrast, design sections and presen-tation sections focus on form, finish materials,and definition of interior space. For sections towork well in visual presentations, they must beclearly keyed, noted, or referenced to the ap-propriate floor plan. Generally, sections are ref-erenced to the floor plan with use of a symbolthat denotes the locations of the vertical cut.Figure 1-13 is an example of a hand-drawn(with tools) design section for the town-houseproject.
O R T H O G R A P H I C D R AW I N G S 15
FIGURE 1-13Building section for the town-house project.
1. Boldest lines indicate locationof cut.
3. Sections require titles, refer-ence symbols (names or num-bers), and scale notation.
IDVP 1 12/15/03 3:40 PM Page 15
REFLECTED CEILING PLANSREFLECTED CEILING PLANS are often used in con-junction with floor plans, elevations, and sec-tions to communicate interior design. Reflectedceiling plans communicate important informa-tion about the design of the ceiling, such asmaterials, layout and locations of fixtures, andceiling heights. A reflected ceiling plan isdrawn as though a giant mirror were on thefloor reflecting the elements located on the ceil-ing. The use of reflective imagery allows forthe ceiling plan to have exactly the same orien-tation as the floor plan.
There is often a distinction between ceilingplans used for presentation and those used forconstruction. Typically, ceilings plans createdfor construction are highly technical and in-clude a great deal of information. Reflectedceiling plans used in design presentations can
be simplified. Most often reflected ceiling plansused in presentations include simplified light-ing information, ceiling heights, and finish ma-terials, whereas precisely measured, complextechnical lighting plans are required for con-struction. Figure 1-14 is a simple reflected ceil-ing plan for the town-house project appropri-ate for use in a design presentation. More com-plex ceiling plans used for different projectscan be found in Figures C-71a, C-71b, and C-72.
Together, floor plans, elevations, sections,and ceiling plans communicate informationabout the quality of an interior environment.Because these drawings are abstracted, frag-mented versions of three-dimensional form,they depend on one another to communicateeffectively.
The orthographic projections covered inthis chapter relate directly to the communica-
I N T E R I O R D E S I G N V I S U A L P R E S E N TAT I O N16
FIGURE 1-14Simple reflected ceiling plan fortown-house project.
1. Ceiling heights are noted andenclosed in a symbol.
2. Light fixture locations arenoted with various symbolsand are keyed to a legend.
3. Finish materials such as gyp-sum board, wood, and ceilingtiles are indicated in scale.
4. Reflected ceiling plans requiretitles, North arrows, and scalenotation.
IDVP 1 12/15/03 3:40 PM Page 16
tion and design of interior space. Differing ver-sions of orthographic projections are used forconstruction and presentation, but they areused in one form or another on virtually allprojects.
Additional types of orthographic drawingare used to communicate the features of build-ings and building sites. Site plans, foundationplans, demolition plans, roof plans, framingplans, exterior elevations, wall sections, anddesign details are also used in the design ofbuildings. Designers of interior space must beknowledgeable about the nature of these draw-ings, how they are created, and how they relateto the interior architecture of a building.
LETTERINGTraditionally, floor plans, elevations, and sec-tions contained notes and dimensions writtenin a standardized style of hand lettering. How-ever, recent changes in technology allow forcreation of type that can be applied to hand-drawn orthographic projections. Lettering andtype can be computer generated, printed on ad-hesive reproduction film (sticky back), andapplied to drawings. Lettering is also createdby specialized machines (lettering machines)that print on adhesive-backed tape that can beapplied to drawings. Lettering machines canbe used to produce type in a range of sizes,styles, and colors. In addition, all of the com-
O R T H O G R A P H I C D R AW I N G S 17
FIGURE 1-15Hand-lettering reference.
IDVP 1 12/15/03 3:40 PM Page 17
monly used CADD programs allow for consis-tent, standardized type to be readily applied tothe appropriate location on a drawing.
Even with these changes in technology, it isuseful to develop the ability to hand-letter in aconsistent standardized style. Many designersstill create presentation drawings by hand, andfor the sake of visual consistency, hand letter-ing is crucial. Hand lettering is also often usedon quick sketches and design details, and fordimensions and revisions of drawings.
There are some basic rules for lettering de-sign drawings, as well as some stylistic ele-ments that influence letter form. Guidelines arerequired for all lettering locations. Horizontalguidelines create the lines on which the letter-ing rests. Consistent spacing between the linesof lettering is required. Vertical guidelinesmust be drawn so that the lines of type arealigned consistently. Lettering for design draw-ings is typically all capitals, allowing all lettersto fit within a single pair of guidelines, with notips or tails above or below the guidelines. Let-ters should have perfectly vertical strokes; thevertical strokes should not slant to the left or tothe right. A tiny lettering triangle is used as astraightedge in making vertical strokes. Figure1-15 is a hand-lettering reference.
DIMENSIONSDimensions, required on all construction draw-ings, are sometimes necessary on drawingsused for presentation purposes. Their inclu-sion is based on the project and the presenta-tion audience. Dimensions must be accurate,complete, and readable. Horizontal dimensionsshould read across the sheet from left to right.Vertical dimensions must read from the left-hand edge so as not to require rotating thedrawing in a variety of directions.
Dimension lines should be of a thin, crispline weight that sets them apart from wall andother construction lines. The lines leading
from the area dimensioned to the dimensionlines (known as leader lines) should be spacedslightly apart from construction lines.
Dimensions should be written above the di-mension lines, so that they are underlined bythem. Dimensions are best written in feet andinches. For example, 2'-4" is written, not 28".The single exception is made for items meas-uring less than one foot; these are listed ininches only. Figure 1-16 is a town-houseupper-level floor plan using standard dimen-sioning conventions for interior. Figure 1-17 isa town-house lower-level floor plan employ-ing standard conventions for locating interiorand exterior dimensions outside of the planboundaries.
COMPUTER-AIDED DRAFTING AND DESIGN (CADD)It is important to note that the conceptualbasis for orthographic drawings and draftingconventions is the same whether created byhand or through the use of electronic tools.The meaning communicated in a floor plan isthe same whether the drawing is created byhand or with the use of a CADD program.
While the debate rages on as to the bestCADD program, most of the commercial de-sign firms that I have interviewed use Auto-CAD software and expect entry-level design-ers to have a working knowledge of it. I havenoted more variation in terms of CADD soft-ware used by residential design firms. Mymany interviews with those who hire profes-sional interior designers have consistentlyshown that all employers expect recent gradu-ates to come equipped with high-level CADDskills. Clearly this book is not the guide to anysoftware program; instead the focus is on theconcepts and conventions that convey infor-mation in design drawings. Some recently pub-lished AutoCAD guides have proven highlyuseful, and those are listed in the references.
I N T E R I O R D E S I G N V I S U A L P R E S E N TAT I O N18
IDVP 1 12/15/03 3:40 PM Page 18
O R T H O G R A P H I C D R AW I N G S 19
FIGURE 1-16Dimensioned upper-level floor plan for town-houseproject, delineating conventions for interior dimen-sions.
1. Dimension lines should be light and crisp.
2. Horizontal written dimensions sit above thedimension lines and read left to right.
3. Vertical written dimensions sit above the dimen-sion lines and read from left.
4. Leader lines run from the building location beingdimensioned to the dimension lines. Leader linesshould not touch the building; instead theyshould be drawn slightly away.
5. Dimensions are written in feet and inches unlessless than one foot.
6. Dimensions measured from centerlines must beclearly indicated. Windows and doors are com-monly measured to centerlines.
IDVP 1 12/15/03 3:40 PM Page 19
Ching, Frank. Architectural Graphics. New York: John Wiley & Sons, 1996.. A Visual Dictionary of Architecture. New York: John Wiley & Sons, 1995.Forseth, Kevin, and David Vaughn. Graphics for Architecture. New York: John Wiley & Sons,
1998.Kirkpatrick, Beverly, and James Kirkpatrick. AutoCAD for Interior Design and Space
Planning. Upper Saddle River, N.J.: Prentice Hall, 2000.Liebling, Ralph. Architectural Working Drawings. New York: John Wiley & Sons, 1990.Porter, Tom. Architectural Drawing. New York: Van Nostrand Reinhold, 1990.Smith, C. Ray. Interior Design in 20th Century America: A History. New York: Harper & Row,
1987.Trachte, Judith. A Quick Start Guide to AutoCAD for Interior Design. Upper Saddle River,
N.J.: Prentice Hall, 2000.
I N T E R I O R D E S I G N V I S U A L P R E S E N TAT I O N20
FIGURE 1-17Dimensioned lower-level floorplan for town-house project,employing standard conventionsfor locating interior and exteriordimensions outside of the planboundaries.
IDVP 1 12/15/03 3:40 PM Page 20
INTRODUCTION TO THE DESIGN PROCESSThe complexity of the design process requiresthat at various points along the way designerscommunicate aspects and outcomes of theprocess to clients and consultants. Like profes-sionals, students must present in-process proj-ects to team members, instructors, and guestcritics. Visual presentations must vary to ac-commodate the process of design and to com-municate both process and outcome.
In Interior Design Illustrated, Francis Chingidentifies three basic stages of design process:analysis, synthesis, and evaluation. Accordingto Ching, analysis involves defining and under-standing the problem; synthesis involves theformulation of possible solutions; and evalua-tion involves a critical review of the strengthsand weaknesses of the proposed solutions.
Interestingly, these three basic stages of de-sign process are used by design practitionersin a variety of disciplines. Industrial design-ers, graphic designers, exhibition designers,and others often engage in a similar process.Of course, the design disciplines vary a greatdeal in terms of professional practice and finaloutcome. For this reason, actual interior designprocess and project phases are quite distinctand are more elaborate than the three basicstages may indicate.
For purposes of contractual organization,the process of design engaged in by architectsand interior designers in the United States hasbeen divided into five basic project phases: (1)PROGRAMMING, (2) SCHEMATIC DESIGN, (3) DESIGNDEVELOPMENT, (4) CONSTRUCTION DOCUMENTA-TION, and (5) CONTRACT ADMINISTRATION. Thesephases are derived from the American Insti-tute of Architects (AIA) Owner-ArchitectAgreement for Interior Design Services andthe American Society of Interior Designers(ASID) Interior Design Services Agreement.Both of these documents serve as contractsfor design services and reflect the current de-sign process and project management in theUnited States. Figure 2-1 is a description ofdesign phases and related visual presentationmethods.
Pea, Parshall, and Kelly, writing in Prob-lem Seeking, identify the actual design processas taking place in the first three projectphases. They state that programming is partof the total design process but is separatefrom schematic design. The authors go on tolink schematic design and design develop-ment as the second and third phases of thetotal design process. This chapter is intendedas an exploration of the three phases of thedesign process identified by Pea, Parshall,Kelly, and others and as a study of the draw-
T H E D E S I G N P R O C E S S A N D R E L AT E D G R A P H I C S 21
THE DESIGN PROCESSAND RELATEDGRAPHICS
IDVP 2 5/27/03 4:09 PM Page 21
I N T E R I O R D E S I G N V I S U A L P R E S E N TAT I O N22
FIGURE 2-1Project phases and related visual presentation methods.
PROJECT PHASE
Programming also known aspre-design
SchematicDesign also known as the preliminarydesign phase
DesignDevelopment
ConstructionDocuments
ConstructionAdministration
TYPICAL TASKS AND ACTIVITIES
In depth analysis and documentation of needs,requirements goals and objectives. Can include: identification of space and adjacencyrequirements analysis; asset assessment; special-ized needs assessments; codes and accessibility re-search and identification of conceptual and thematicissues. As well as; analysis of architectural or siteparameters; and analysis of scheduling and budget.
Preliminary conceptual, spatial, conceptual, andtechnical design of project. Includes preliminary space planning often using; rela-tionship diagrams; matrices; bubble diagrams; block-ing diagrams; stacking plans; and fit plans. As well asinitial furnishings, fixtures and equipment design/lay-out. Development of projects conceptual and thematicissues. Color, material and finish studies. Preliminarycode review. Preliminary budgetary information.
Refinement of finalized design. Includes space plan and design of interior construc-tion elements and details. Often involves incorpora-tion of lighting, electrical, plumbing, and mechanicalsystems design; as well as data and telecommunica-tion systems integration. Often includes millwork de-sign and detailing. Also includes color, materials,and finish selection. Design and specification of fur-nishings, fixtures,and equipment, as well as refine-ment of budgetary and scheduling information.
Preparation of drafted, working drawings and/orcontract documents. Includes preparation of drawings, schedules, details,and specifications, as well as coordination and inte-gration of consultants documents. Can includepreparation of specialized equipment and/or furnish-ings documents for bidding by purchasing agents.May include purchasing documents.
Guide and review construction and installation. Can include periodic site visits and creation ofprogress reports. Coordination and review of shopdrawings and sample submittals. May include clarifica-tion and interpretation of drawings, as well as possiblereview of billing and payment. Preparation of punchlist. May include move coordination and supervision offurnishings, fixtures and equipment installation.
TYPICAL MEANS OF VISUAL PRESENTATION
Most often written information compiled ina programming report. Often includesproblem identification, diagrams, charts,matrixes, and may include some ortho-graphic drawings and early fit studies. Mayinclude preliminary scheduling graphics.
Graphic presentation of preliminary design;can include relationship diagrams; blockingand fit plans; preliminary space plan(s); pre-liminary furnishing and equipment layouts;preliminary elevations and sections; prelimi-nary 3-D drawings; preliminary color andmaterials studies; and study models. Presen-tation may also include graphic presentationof conceptual and thematic issues usingsketches, diagrams, and mixed media.
Finalized, refined design presentation incor-porating all necessary components of de-sign. Graphic presentation of finalized de-sign can include conceptual diagrams;space plan(s); and plan(s) for furnishings,fixtures and equipment, as well as eleva-tions; sections; ceiling plans; 3-D drawings;colors, materials, and finish samples; scalemodels and mockups. Multimedia presen-tations can incorporate all of the above ele-ments plus sound and animation.
Preparation of contract documents. Oftenincludes submission to general contrac-tor(s) and purchasing agents for bid and toappropriate agencies for plan check.
Communication with contractors, agenciesand clients is primarily written and verbal.May include scheduling, budgetary, andadministrative graphics.
Adapted from: AIA Owner-Architect Agreement for Interior Design Services and the ASID Interior Design Services Agreement.
IDVP 2 5/27/03 4:09 PM Page 22
ings and graphics used to communicate, docu-ment, inform, and clarify the work done dur-ing these phases.
PROGRAMMINGThe experienced, creative designer with-holds judgment, resists preconceived so-lutions and the pressure to synthesizeuntil all the information is in. He refusesto make sketches until he knows theclients problem. . . . Programming is theprelude to good design. (Pea, Parshall,and Kelly, 1987)
Programming, also known as predesign orstrategic planning, involves detailed analysisof the clients (or end users) needs, require-ments, goals, budgetary factors, and assets, aswell as analysis of architectural or site param-eters and constraints. Information gatheredabout the users needs and requirements isoften documented in written form, whereas ar-chitectural or site parameters are often com-municated graphically through orthographicprojection. These two distinct forms of com-munication, verbal and graphic, must bebrought together in the early stages of design.
Some firms employ professionals to workas programmers and then hand the projectover to designers. It is also common for projectmanagers and/or designers to work on projectprogramming and then continue to work onthe design or management of the project. Itcould be said that programmers and designersare separate specialists, given the distinctionsbetween programming (analysis) and design(synthesis). However, many firms and design-ers choose not to separate these specialties ordo so only on very large or programming-in-tensive projects.
In practice, programming varies greatlyfrom project to project. This is due to variationin project type and size and to the quantity andquality of information supplied by the client(or end user). In some cases clients provide de-
signers with highly detailed written programs.In other situations clients begin with littlemore than general information or simply ex-claim, We need more space, we are growingvery fast or Help, we are out of control. Insituations such as the latter, research and de-tective work must be done to create program-ming information that will allow for the cre-ation of successful design solutions.
It is difficult to distill the programmingprocess used in a variety of projects into abrief summary. Clearly the programming re-quired for a major metropolitan public libraryis very different from that required in a small-scale residential renovation. It is important,therefore, to consider what all projects relatingto interior environments share in terms of pro-gramming.
All projects require careful analysis ofspace requirements for current and futureneeds, as well as analysis of work processes,adjacency requirements, and organizationalstructure (or life-style and needs-assessmentfactors in residential design). Physical invento-ries and asset assessments are required toevaluate existing furniture and equipment aswell as to plan for future needs. Building code,accessibility, and health/safety factors mustalso be researched as part of the program-ming process.
In addition to this primarily quantitative in-formation, there are aesthetic requirements.Cultural and sociological aspects of the projectmust also be identified by the designers. All ofthese should be researched and can be docu-mented in a programming report that is reviewed by the client and used by the projectdesign team. When possible, it is important toinclude a problem statement with the program-ming report. The problem statement is a con-cise identification of key issues, limitations,objectives, and goals that provide a clearer un-derstanding of the project. With the program-ming report complete, the designers can beginthe job of synthesis and continue the designprocess.
T H E D E S I G N P R O C E S S A N D R E L AT E D G R A P H I C S 23
IDVP 2 5/27/03 4:09 PM Page 23
I N T E R I O R D E S I G N V I S U A L P R E S E N TAT I O N24
FIGURE 2-2AProgramming information for thesample project.
FIGURE 2-2BFloor plan for the sample project.By Leanne Larson.
IDVP 2 5/27/03 4:09 PM Page 24
Residential projects generally require lessintensive programming graphics. Program-ming is a significant element of the residentialdesign process; however, the relationships, ad-jacencies, and organization of the space areoften simplified in relation to large commercialand public spaces. For this reason the follow-ing discussion focuses primarily on commer-cial design, where a significant amount of vi-sual communication of programming informa-tion is often required.
Clients, consultants, and designers requiregraphic analysis as a way of understandingprogramming data and information. Diagrams,charts, matrices, and visual imagery are com-prehended with greater ease than pages ofwritten documentation. It is useful to developways of sorting and simplifying programminginformation so that it can be easily assimilated.
Successful graphic communication of boththe programming process and the program-ming report can help to create useful informa-tion from overwhelming mounds of raw data.A sample project created to illustrate the draw-ings and graphics used in the various phases ofthe design project is referenced throughout thischapter. Figure 2-2a contains written program-ming information regarding the sample project.Figure 2-2b is a floor plan indicating the givenarchitectural parameters of the project.
PROGRAMMING ANALYSIS GRAPHICSMany designers find it useful to obtain earlyprogramming data and incorporate it intographic worksheets. Using a flip-chart pad,brown kraft paper, or other heavy paper, theprogrammers can create large, easy-to-readgraphic documents. These sheets are createdso that they may be understood easily by theclient and can therefore be approved or com-mented on. Often the eventual project designersfind these sheets useful as a means of projectdocumentation.
The book Problem Seeking (Pea, Parshall,and Kelly, 1987) provides an additional tech-
nique for the graphic recording of informationgenerated in the early stages of programming,using a device known as analysis cards. Analy-sis cards allow for easy comprehension, dis-cussion, clarification, and feedback. The cardsare drawn from interview notes and early pro-gramming data. Based on the notion that vi-sual information is more easily comprehendedthan verbal, the cards contain simple graphicimagery with few words and concise messages.The cards are most successful if they are largeenough for use in a wall display or presenta-tion and if they are reduced to very simple butspecific information. Figure 2-3 illustrates pro-gram analysis graphics for the sample project.See Figure C-6 for a color version of a pro-gramming analysis graphic.
PROGRAMMING MATRICESMatrices are extremely useful tools in pro-gramming, incorporating a wealth of informa-tion into an easily comprehended visual tool.An adjacency matrix is commonly used as ameans of visually documenting spatial prox-imity, identifying related activities and serv-ices, and establishing priorities. Adjacency ma-
T H E D E S I G N P R O C E S S A N D R E L AT E D G R A P H I C S 25
FIGURE 2-3Examples of programming analysisgraphics for the sample project.
IDVP 2 5/27/03 4:09 PM Page 25
trices vary in complexity in relation to projectrequirements. Large-scale, complex projectsoften require highly detailed adjacency matri-ces. Figures 2-4 and 2-5 illustrate two types ofadjacency matrix.
A criteria matrix can distill project issuessuch as needs for privacy, natural light, andsecurity into a concise, consistent format.Large-scale, complex design projects may re-quire numerous detailed, complex matrices,whereas smaller, less complex projects requiremore simplified matrices. Criteria matrices areused in residential design projects and in theprogramming of public spaces. Smaller proj-ects allow for criteria matrices to be combinedwith adjacency matrices. Figure 2-6 illustrates acriteria matrix that includes adjacency infor-mation. Special types of matrix are used by de-signers on particular projects.
Programming graphics, such as projectworksheets, analysis cards, and a variety ofmatrices, are widely used in interior designpractice. These are presented to the client orend user for comment, clarification, and ap-proval. Many of these graphics are refined,corrected, and improved upon during the pro-gramming process and are eventually includedin the final programming report.
SCHEMATIC DESIGNWith the programming phase completed, de-signers may begin the work of synthesis. An-other way of stating this is that with the prob-lem clearly stated, problem solving can begin.The creation of relationship diagrams is oftena first step in the schematic design of a project.Relationship diagrams serve a variety of func-
I N T E R I O R D E S I G N V I S U A L P R E S E N TAT I O N26
FIGURE 2-4Simple adjacency matrix for thesample project.
FIGURE 2-5Another type of adjacency matrixfor the sample project.
IDVP 2 5/27/03 4:10 PM Page 26
T H E D E S I G N P R O C E S S A N D R E L AT E D G R A P H I C S 27
FIGURE 2-6A combination criteria and adja-cency matrix, computer gener-ated. By Leanne Larson.
IDVP 2 5/27/03 4:10 PM Page 27
tions that allow the designers to digest and in-ternalize the programming information. Rela-tionship diagrams also allow the designer tobegin to use graphics to come to terms with thephysical qualities of the project.
One type of relationship diagram exploresthe relationship of functional areas to one an-other and uses information completed on thecriteria and adjacency matrices. This type ofone-step diagram can be adequate for smallercommercial and residential projects. Larger-
scale, complex projects often require a series ofrelationship diagrams. Diagrams of this type donot generally relate to architectural or site pa-rameters and are not drawn to scale. Most spe-cialized or complex projects require additionaldiagrams that explore issues such as personalinteraction, flexibility, and privacy requirements.
BUBBLE DIAGRAMSAs relationship diagrams begin to incorporateand account for necessary requirements and
I N T E R I O R D E S I G N V I S U A L P R E S E N TAT I O N28
IDVP 2 5/27/03 4:10 PM Page 28
adjacencies, they can become refined into whatare generally referred to as BUBBLE DIAGRAMS.Bubble diagrams take the project one step fur-ther in the schematic design process. Oftenbubble diagrams relate approximately to theactual architectural parameters (the buildingspace) in rough scale. In addition, they often in-corporate elements identified in criteria andadjacency matrices through the use of graphicdevices keyed to a legend. Figures 2-7a2-7eare a sequence of bubble diagrams for the
sample project. See Figure C-7 for a color ver-sion of a bubble diagram. It is important tonote that a primary purpose of these earlyschematic diagrams is to generate a number ofoptions. Brainstorming many ideas is highlyadvisable. Designers with years of experienceuse brainstorming techniques, as should stu-dents of design. Successful design requiressparks of creativity in every phase, and thesesparks are fostered by nurturing idea genera-tion. Rarely does the first try (or even the first
T H E D E S I G N P R O C E S S A N D R E L AT E D G R A P H I C S 29
FIGURES 2-7A, 2-7B, 2-7C, 2-7DBubble diagrams for the sampleproject.
IDVP 2 5/27/03 4:10 PM Page 29
several) create a masterpiece or a workable so-lution. It is often the combination of several di-verse schemes that eventually generates a goodsolution.
BLOCKING DIAGRAMSBubble diagrams are part of a continuousprocess of refinement. One diagram may haveuseful components that can be combined withelements of another. As this process of refine-ment continues, designers often proceed toBLOCKING DIAGRAMS.
Before moving to blocking diagrams, de-sign students benefit from the creation ofspace studies, also known as area prototypesketches. Each area or function is sketched in
scale with furniture and equipment included,and these sketches can be used for purposes ofapproximation in the blocking diagram. Spacestudy sketches are also helpful in the design ofsystems furniture, allowing students to ex-plore possibilities and gain insight into the useof these products. See Figures 2-8a, b, c for ex-amples of space studies.
Blocking diagrams can be generated ontracing paper taped over a scaled, drafted floorplan of the existing or proposed building. Inrare cases projects do not involve the use of ex-isting architectural parameters because the in-terior space will dictate the final building form.In these cases, bubble diagrams and blockingplans are sometimes the genesis for the even-
I N T E R I O R D E S I G N V I S U A L P R E S E N TAT I O N30
FIGURE 2-7EFinal successful bubble diagramfor the sample project.
IDVP 2 5/27/03 4:10 PM Page 30
T H E D E S I G N P R O C E S S A N D R E L AT E D G R A P H I C S 31
FIGURES 2-8A, 2-8B,2-8CSpace studies for thesample project.
IDVP 2 5/27/03 4:10 PM Page 31
tual building plan. It is increasingly commonfor designers to begin the blocking plan processon CADD and take the project through the restof the design process using CADD. Some de-signers find that space planning on CADD isfrustrating and therefore plot out a CADDdrawing and work over it with tracing paper.
As stated, blocking diagrams are generallydrawn to scale and relate directly to the archi-tectural parameters or the existing buildingplan. Blocking plans are generally drawn witheach area or function represented by a block ofthe appropriate square footage; circulation areasare often blocked in as rectilinear corridors. Fig-
ures 2-9a, b, c are blocking diagrams.Some experienced designers move quickly to
blocking diagrams, forgoing the use of bubblediagrams, whereas others dislike the blocky, con-fining nature of blocking diagrams. Many de-signers develop a personal system of schematicdiagrams that is a combination of bubble andblocking diagrams. The approach and graphicquality of schematic diagrams used by individ-ual designers vary greatly, yet the underlyingpurpose is consistent. Designers use these dia-grams to move from verbal and simplifiedgraphic notation toward true scale and the even-tual realization of architectural form.
I N T E R I O R D E S I G N V I S U A L P R E S E N TAT I O N32
IDVP 2 5/27/03 4:10 PM Page 32
T H E D E S I G N P R O C E S S A N D R E L AT E D G R A P H I C S 33
FIGURES 2-9A, 2-9B, 2-9CBlocking diagrams for the sampleproject. Note that these blockingdiagrams focus on the layout ofindividual work spaces.
IDVP 2 5/27/03 4:10 PM Page 33
FIT PLANS AND STACKING PLANSA FIT PLAN can be considered a further refine-ment of the blocking diagram. Basically the fitplan is a test determining whether the require-ments and needs clarified in programming fitinto a given space. In some cases, fit plans aredrawn up when a client reviews a piece of realestate or a potential site. In other cases, fitplans are drawn up to indicate the way a pro-posed office tower may eventually be laid out.These types of fit plan are generated for bothreal estate professionals and end users.
In still other situations the fit plan is part ofthe final stage of the space-planning process.For this reason, fit plans often contain furni-ture and equipment accurately drawn to scaleas a means of testing the space plan for fit andfor client review.
A STACKING PLAN is used when a project oc-cupies more than one floor of a building. Oftenthe interrelationships of departments or work-group locations are examined in a stackingdiagram. Generally stacking diagrams are cre-ated early in the design process as a means ofevaluating the use of each floor before refinedspace planning is done.
CONCEPTUAL DESIGNThe schematic design phase is often a timewhen designers explore symbolic representa-tion for the conceptual foundation of a project.Although relationship, bubble, and blockingdiagrams represent functional and spatial re-quirements, they sometimes do little to illumi-nate the conceptual nature of a project. It isoften useful to employ an abstract diagram orgraphic device to represent the conceptualqualities of a project.
One means of illustrating conceptual projectthemes is the use of a design PARTI. FrankChing, in A Visual Dictionary of Architecture(1995), defines a parti as the basic scheme orconcept for an architectural design representedby a diagram. A design parti can take a widerange of forms, from a highly simplifiedgraphic symbol to a more complex plan dia-
gram. Some designers use a conceptual diagramsuch as a parti as an aid in bringing together thefunctional and conceptual components of a de-sign. The parti, or another conceptual diagram,can be used throughout the design process as aconceptual anchor for the project. Designerssometimes employ the parti extensively, and itmay be the foundation for the design and ap-pear as a logo or project icon on all presentationgraphics.
A formal design parti is not sought for all de-sign projects. Most projects do, however, includea considerable number of thematic issues.Views, geography, climate, building context andsite, functional requirements, and cultural issuesmay contribute to the project on a conceptuallevel. Often the existing building form providesproject constraints in the design of interior envi-ronments. Most designers find it useful to ar-ticulate and explore conceptual and thematic issues early in the schematic phase of a project.Some designers find it useful to create three-dimensional conceptual studies in the form ofmodels (see Chapter 6). In professional practicethe methods of presentation of conceptualcomponents of a project are varied and highlypersonal, and involve both verbal and graphicnotations.
For purposes of organization, space plan-ning and conceptual development are dis-cussed separately here. However, in designpractice these elements are brought together inthe early stages of project design. Bubble dia-grams often incorporate conceptual elements,and a design parti can serve as an organiza-tional anchor in the space-planning process. Itis important to see the schematic/conceptualdesign phases as a continuous process ofrefinement whereby all elements are broughttogether. Figures 2-10a, b, c are conceptualsketches that might be generated during thedrawing of blocking diagrams.
As the project evolves and blocking dia-grams make way for a schematic space plan, itis often helpful to consider the totality of thedesign through the use of preliminary eleva-
I N T E R I O R D E S I G N V I S U A L P R E S E N TAT I O N34
IDVP 2 5/27/03 4:10 PM Page 34
T H E D E S I G N P R O C E S S A N D R E L AT E D G R A P H I C S 35
FIGURES 2-10A, 2-10B, 2-10CConceptual blocking diagrams for the sample project.
IDVP 2 5/27/03 4:10 PM Page 35
I N T E R I O R D E S I G N V I S U A L P R E S E N TAT I O N36
FIGURE 2-11Two preliminary elevations of varying approaches for thedesign shown in the blocking diagram in Figure 2-10c.
IDVP 2 5/27/03 4:10 PM Page 36
tions. Preliminary elevations, much like earlyperspective studies, allow for more completeunderstanding of the total volume of a space.Preliminary elevations can be used as a meansof ideation or idea generation, and therefore itis useful to attempt more than one approach asthe elevations are undertaken. Two such pre-liminary elevations of varying approaches forthe design shown in the blocking diagram inFigure 2-10c can be found in Figure 2-11.
SCHEMATIC DESIGN PRESENTATION GRAPHICSThe preliminary design(s) created in thisprocess of continual refinement must be evalu-ated by the designer or design team, as well theclient, for the project to continue successfully.Presentation of the preliminary design may behighly informal or formal, depending on thenature of the project. In all cases it is useful toconsider the purpose of the presentation aswell as its audience. The audience for a prelim-inary presentation may include the client, con-sultants, real estate professionals, and thosewith financial interests in the project. Prior tothe creation of any presentation, it is worth-while to take time to assess the audience for thepresentation; identifying and understandingthis audience is imperative to the quality of thecommunication.
In addressing members of the design teamor design consultants, a presentation may con-sist of rough sketches and multiple layers ofpaper. Designers and most consultants are fa-miliar with orthographic drawings and canwade through some confusing and messy draw-ings and notes. Many clients, however, requireeasy-to-understand graphic images as a meansto understanding the schematic presentation.The client must understand the preliminary de-sign to evaluate and approve it, which is neces-sary for the project to continue successfully.
The preliminary client presentation mustcommunicate the underlying project researchand the constraints that have led to the prelim-inary design. These include preliminary budg-
etary information, preliminary scheduling in-formation, research of appropriate buildingcodes, and programming information. Gener-ally at a minimum the preliminary schematicdesign presentation requires a floor plan as ameans of communicating the space plan.When the project involves more than one floor,each floor plan and stacking plan is typicallyincluded in the preliminary presentation.
The preliminary presentation floor plan(s)may be drawn freely, drafted with tools, or gen-erated on CADD. Regardless of the
Visual Merchandising and Display Part 3. Display Areas Storefront Store layout Store interior Interior Displays
Visual Rhetoric Presentation
Visual argument presentation
Weber Automotive Interior Presentation
Kiri & Company - Interior Presentation
Dagmara visual presentation
NORTH CAROLINA COMMUNITY COLLEGE SYSTEM R. Scott … · Change title to "Visual Presentation I" Fall 2015 (2015*03) Interior Design (A30220) DES 126 Graphic Presentation II Change
EP visual presentation
Presentation by CUBIC INTERIOR (INTERIOR dept.)
Visual Presentation
experimental presentation interior design
Renovatit.com Interior Designers presentation
Visual Essay Presentation
Visual literacy presentation
Visual Methodology Presentation
Architectural and Interior Presentation
Rezwans interior presentation
18938184 Interior Design Visual Presentation
Visual metaphoe presentation
Interior designer profession presentation
Interior Business Presentation
Powerful visual presentation
Introduction to Interior Design - D.A.H.S. Visual Art...Interior Design The design and decoration of interior spaces. A good interior design takes into account function, mood, and
Architecture and Interior Design - RMIT University · 2018 › Architecture › Building Design (Architectural) › Interior Design › Landscape Architecture › Visual Merchandising
Presentation on interior designing
Interior 3D visual
Earth & Its Interior (Presentation)
Interior lighting presentation for
Visual Advocacy Presentation
Interior Castle Presentation Notes
Interior visual 2
KCT Building Interior Presentation
The interior detail by visual pro detailing
Presentation to Interior Designers
Interior Design Visual Presentation[Team Nanban]Tmrg
Powerpoint Templates
Icon Bundle
Kpi Dashboard
Professional
Business Plans
Swot Analysis
Gantt Chart
Business Proposal
Marketing Plan
Project Management
Business Case
Business Model
Cyber Security
Business PPT
Digital Marketing
Digital Transformation
Human Resources
Product Management
Artificial Intelligence
Company Profile
Acknowledgement PPT
PPT Presentation
Reports Brochures
One Page Pitch
Interview PPT
All Categories

Interior Design Project Proposal Powerpoint Presentation Slides
Talk about your advanced skills and bid on new projects from your clients by using our content ready project proposal ppt . You can showcase your expertise and grab the attention of your customers with the help of this visually appealing interior design assignment proposal PPT layout. Use interior design project proposal PowerPoint graphic to explain the services your company offers like flooring, lighting design, fireplace & mantel design, appliance & plumbing fixture selection, custom furniture, space planning & elevation, artwork, kitchen & bath design, etc. Discuss your interior design process in a step-by-step way to impress your client. Gain the confidence of your customers by elaborating on your weekly service timeline procedures that include schedule & budget development, cost estimation, building system evaluation, preliminary space plan & design concepts, final space plan, furniture design, construction, and site observations. Showcase some of your best-implemented interior design projects to your customers and leave a lasting impression on them. The scope of the proposal includes project context, services offered, sample design, past project photos, client testimonials, investment, team members, agreement, etc. You can portray your creative ideas and innovative designs that catch the attention of your users massively. Deliver your simple planning skills that help in meeting the expectations of your clients. Employ this professionally designed interior design project PPT slides and talk briefly about your talent to convince your clients. Discuss the new methods, and technologies provided by you that draw a positive impact on your customers. Present your overall working budget, fees, and other informational things that provide your clients with good knowledge of your company. Included here are some graphics, and icons with which you can make your proposal more attractive to engage your consumers. Uncover the secrets of a perfect interior designer and fulfill the requirements of your clients by downloading our ready-to-use interior design assignment proposal PowerPoint template.

These PPT Slides are compatible with Google Slides
Compatible With Google Slides

- Google Slides is a new FREE Presentation software from Google.
- All our content is 100% compatible with Google Slides.
- Just download our designs, and upload them to Google Slides and they will work automatically.
- Amaze your audience with SlideTeam and Google Slides.

Want Changes to This PPT Slide? Check out our Presentation Design Services

Get Presentation Slides in WideScreen
Get This In WideScreen
- WideScreen Aspect ratio is becoming a very popular format. When you download this product, the downloaded ZIP will contain this product in both standard and widescreen format.

- Some older products that we have may only be in standard format, but they can easily be converted to widescreen.
- To do this, please open the SlideTeam product in Powerpoint, and go to
- Design ( On the top bar) -> Page Setup -> and select "On-screen Show (16:9)” in the drop down for "Slides Sized for".
- The slide or theme will change to widescreen, and all graphics will adjust automatically. You can similarly convert our content to any other desired screen aspect ratio.
- Add a user to your subscription for free
You must be logged in to download this presentation.
Do you want to remove this product from your favourites?
PowerPoint presentation slides
Presenting Interior Design Project Proposal PowerPoint Presentation Slides which is fully customizable. You can alter the colors, fonts, font types, and font size of the proposal as per your needs. The template is adaptable with Google Slides which makes it easily accessible at once. Can be changed into various file formats like PNG, PDF, and JPG. It is readily available in both 4:3 and 16:9 aspect ratio.

People who downloaded this PowerPoint presentation also viewed the following :
- Business Slides , Complete Decks , All Decks , Customer Service , Proposals , Professional Services
- Business Proposal ,
- Proposal Templates
Content of this Powerpoint Presentation
Slide 1 : This slide introduces Interior Design Project Proposal. State Company name Slide 2 : This slide displays Cover Letter for Interior Design Project. Slide 3 : This slide shows Table of Content. Slide 4 : This slide depicts Project Context of Interior Design Services. Slide 5 : This slide showcases Interior Design Services we Offered. Slide 6 : This slide describes Our Interior Design Process. Slide 7 : This slide shows Service Timeline of Interior Design with phases. Slide 8 : This slide shows Sample Interior Design. Slide 9 : This slide showcases Your Investment for Interior Design Project. Slide 10 : This slide depicts Mission Statement. Slide 11 : This is Our Team slide with names and designations. Slide 12 : This is Our Team slide with Names and Designations. Slide 13 : This slide showcases Previous Project Photos. Slide 14 : This slide shows Client Testimonials. Slide 15 : This slide displays the Agreement. Slide 16 : This is Sign-off slide. Slide 17 : This is Contact Us slide with Address, Contact number and Email address. Slide 18 : This slide is titled as Additional Slides for moving forward. Slide 19 : This is About Us slide to showcase Company specifications. Slide 20 : This is Our Mission slide with Mission, Goal and Vision. Slide 21 : This is 30 60 90 Days Plan slide. Slide 22 : This slide depicts Roadmap process. Slide 23 : This slide shows Roadmap process. Slide 24 : This slide depicts Roadmap process. Slide 25 : This slide shows Timeline process.
Interior Design Project Proposal Powerpoint Presentation Slides with all 25 slides:
Eliminate any distress with our Interior Design Project Proposal Powerpoint Presentation Slides. Bring back an air of celebration.

Ratings and Reviews

IMAGES
VIDEO
COMMENTS
Interior Design Portfolio. Inspire your prospects or employers with our latest work portfolio template created exclusively for interior designers. Show off your expertise and wow them with what you're capable of by adding your own photos and even design touch to this fully editable template. Business. 16:9.
Interior Design is made up of five separate but equally crucial elements: line, form, colour, pattern and texture. These five elements, and how closely or loosely they interact with one another, make up a design's overall composition. Composition, in turn, can be illustrated with seven basic design principles: unity, harmony, rhythm, emphasis ...
Interior design visual presentation : a guide to graphics, models, and presentation techniques / Maureen Mitton by Mitton, Maureen. Publication date 2008 ... Pdf_module_version 0.0.15 Ppi 360 Rcs_key 24143 Republisher_date 20211020093256 Republisher_operator [email protected] ...
Then add any other comments that you should keep in mind while creating the rest of your presentation. 2. Draw a 3D floor plan. The next part of the design process is to create the floor plan. A floor plan is essentially the container for all your creative ideas, so this is an important step.
What is Interior Design? is a handbook for students, scholars, and practitioners who have an interest in interior design and architecture. This book examines the fundamental characteristics of interior space—the analysis and understanding of existing buildings, the nature and qualities of organizing an interior space, and an understanding of the material and surface qualities of found and ...
Interior Design Visual Presentation, Fifth Edition offers thorough coverage of interior design communication used throughout the design process, complete with a broad range of real-world examples. This fully updated handbook presents a full range of styles and techniques used for interior design visual communication, from hand drawing to 3D ...
A practical, comprehensive guide to developing effective design communication skills From doing a quick sketch to producing a fully rendered model, the ability to create visual representations of designs is a critical skill for every designer. Interior Design Visual Presentation, Fourth Edition offers thorough coverage of interior design communication used throughout the design process ...
Free Google Slides theme and PowerPoint template. Create a new presentation using this template and find out how design affects the way your audience perceives your message. Square lines and shapes will give balance to your work. Add some pictures to the mix and you'll get a dynamic and attractive message. This is a template where the ...
Interior Design Visual Presentation: A Guide to Graphics, Models and Presentation Methods, 5th Edition Maureen Mitton E-Book 978-1-119-31255- April 2018 $46.00 Textbook Rental (130 days) 978-1-119-62270-3 July 2019 $29.00 ... Models and Presentation Methods, 5th Edition_978-1-119-31255-.pdf
A newly updated and comprehensive guide to all aspects of visual design From doing a quick sketch to producing a fully rendered model, the ability to create visual representations of designs is a critical skill for every designer.Interior Design Visual Presentation, Fifth Editionoffers thorough coverage of interior design communication used throughout the design process, complete with a broad ...
xii, 178 pages : 28 cm A total guide to developing and fine-tuning the graphic presentation skills needed to succeed as an interior design professional The first and only comprehensive guide to visual presentation written specifically for interior designers, this book is an indispensable resource for students and seasoned professionals alike.
The first step to creating a dynamic interior design presentation is to sketch your initial design concepts for each area clients want to be revamped. Draw a basic layout of the space, make note of its dimensions, and add comments that will help guide the remainder of your design process. 2. Draw a 3D floor plan.
Using AutoCAD will ensure that your interior design presentations look slick, professional and jump off the page. With AutoCAD, it will take you just a few hours to create your drawings. You can also draw your furniture items as per exact dimensions, or easily add them from the program's furniture library.
Design Boards. A design board is a collection of images, swatches and samples that help you to decide on the aesthetic design of your interior space. They may contain colours, wallpaper samples, furniture or images which all relate to the style that you want the space to evoke. Design boards are about experimentation in order to reach conclusions.
guage. Various phases of the design process are discussed in order to reveal the connection between process and presentation. Some often overlooked basic principles of graphic design and portfolio design are also discussed. Intended as a primer on interior design vi-sual communication, this book presents a range of styles and techniques. The ...
Dorothy Draper (1889-1969) is well known for her design of commer-cial interiors such as hotel lobbies, clubs, and stores. Her influence grew in the 1940s, and she is often identified by his-torians as one of the first interior design-ers to specialize in commercial interiors rather than residences.
Free Google Slides theme and PowerPoint template. Interior design is in fashion! These decoration professionals help us to create the perfect environment depending on the needs of our home. It's a bit like what we do at Slidesgo, offering you amazing designs according to your needs to decorate and present your information in a wonderful way.
Presentation PDF Available. ... Download file PDF. Read file. Download citation. Copy link Link copied. ... • Color psychology is a powerful interior design tool that impacts the mood .
Share your home design business and services using this interior design company presentation template. This template is made of sheer elegance and delicacy and is a perfect background for your creative projects. Or, you can use it to showcase your design agency's portfolio to potential clients. Change colors, fonts and more to fit your branding.
When it comes time to meet with the client and present your plan this is what I include. What I include in client presentations: 1. Design boards. Design boards are the foundation of my design presentation. I find that simple cork boards with pins and paper are the best.
Editor and Art Director: Alicia Kennedy Additional Content: Linda O'Shea Cover Image: Knoll, Inc. Graphic Design: Chris Grimley and Shannon McLean for over,under Printed in China Digital edition: 978-1-63159-579- Softcover edition: 978-1-63159-380-2 Job:10-700696 Title:RP - Interior Design Reference and Specification Dtp:225 Page:2 700696 ...
Library of Congress Cataloging-in-Publication Data:Mitton, Maureen. Interior design visual presentation : a guide to graphics, models, andpresentation techniques /Maureen Mitton.-- 2nd ed. p. cm.ISBN -471-22552-51. Interior decoration rendering.
Slide 1: This slide introduces Interior Design Project Proposal.State Company name Slide 2: This slide displays Cover Letter for Interior Design Project. Slide 3: This slide shows Table of Content. Slide 4: This slide depicts Project Context of Interior Design Services. Slide 5: This slide showcases Interior Design Services we Offered. Slide 6: This slide describes Our Interior Design Process.