- - Google Chrome
Intended for healthcare professionals
- Access provided by Google Indexer
- My email alerts
- BMA member login
- Username * Password * Forgot your log in details? Need to activate BMA Member Log In Log in via OpenAthens Log in via your institution

Search form
- Advanced search
- Search responses
- Search blogs
- How to prepare and...
How to prepare and deliver an effective oral presentation
- Related content
- Peer review
- Lucia Hartigan , registrar 1 ,
- Fionnuala Mone , fellow in maternal fetal medicine 1 ,
- Mary Higgins , consultant obstetrician 2
- 1 National Maternity Hospital, Dublin, Ireland
- 2 National Maternity Hospital, Dublin; Obstetrics and Gynaecology, Medicine and Medical Sciences, University College Dublin
- luciahartigan{at}hotmail.com
The success of an oral presentation lies in the speaker’s ability to transmit information to the audience. Lucia Hartigan and colleagues describe what they have learnt about delivering an effective scientific oral presentation from their own experiences, and their mistakes
The objective of an oral presentation is to portray large amounts of often complex information in a clear, bite sized fashion. Although some of the success lies in the content, the rest lies in the speaker’s skills in transmitting the information to the audience. 1
Preparation
It is important to be as well prepared as possible. Look at the venue in person, and find out the time allowed for your presentation and for questions, and the size of the audience and their backgrounds, which will allow the presentation to be pitched at the appropriate level.
See what the ambience and temperature are like and check that the format of your presentation is compatible with the available computer. This is particularly important when embedding videos. Before you begin, look at the video on stand-by and make sure the lights are dimmed and the speakers are functioning.
For visual aids, Microsoft PowerPoint or Apple Mac Keynote programmes are usual, although Prezi is increasing in popularity. Save the presentation on a USB stick, with email or cloud storage backup to avoid last minute disasters.
When preparing the presentation, start with an opening slide containing the title of the study, your name, and the date. Begin by addressing and thanking the audience and the organisation that has invited you to speak. Typically, the format includes background, study aims, methodology, results, strengths and weaknesses of the study, and conclusions.
If the study takes a lecturing format, consider including “any questions?” on a slide before you conclude, which will allow the audience to remember the take home messages. Ideally, the audience should remember three of the main points from the presentation. 2
Have a maximum of four short points per slide. If you can display something as a diagram, video, or a graph, use this instead of text and talk around it.
Animation is available in both Microsoft PowerPoint and the Apple Mac Keynote programme, and its use in presentations has been demonstrated to assist in the retention and recall of facts. 3 Do not overuse it, though, as it could make you appear unprofessional. If you show a video or diagram don’t just sit back—use a laser pointer to explain what is happening.
Rehearse your presentation in front of at least one person. Request feedback and amend accordingly. If possible, practise in the venue itself so things will not be unfamiliar on the day. If you appear comfortable, the audience will feel comfortable. Ask colleagues and seniors what questions they would ask and prepare responses to these questions.
It is important to dress appropriately, stand up straight, and project your voice towards the back of the room. Practise using a microphone, or any other presentation aids, in advance. If you don’t have your own presenting style, think of the style of inspirational scientific speakers you have seen and imitate it.
Try to present slides at the rate of around one slide a minute. If you talk too much, you will lose your audience’s attention. The slides or videos should be an adjunct to your presentation, so do not hide behind them, and be proud of the work you are presenting. You should avoid reading the wording on the slides, but instead talk around the content on them.
Maintain eye contact with the audience and remember to smile and pause after each comment, giving your nerves time to settle. Speak slowly and concisely, highlighting key points.
Do not assume that the audience is completely familiar with the topic you are passionate about, but don’t patronise them either. Use every presentation as an opportunity to teach, even your seniors. The information you are presenting may be new to them, but it is always important to know your audience’s background. You can then ensure you do not patronise world experts.
To maintain the audience’s attention, vary the tone and inflection of your voice. If appropriate, use humour, though you should run any comments or jokes past others beforehand and make sure they are culturally appropriate. Check every now and again that the audience is following and offer them the opportunity to ask questions.
Finishing up is the most important part, as this is when you send your take home message with the audience. Slow down, even though time is important at this stage. Conclude with the three key points from the study and leave the slide up for a further few seconds. Do not ramble on. Give the audience a chance to digest the presentation. Conclude by acknowledging those who assisted you in the study, and thank the audience and organisation. If you are presenting in North America, it is usual practice to conclude with an image of the team. If you wish to show references, insert a text box on the appropriate slide with the primary author, year, and paper, although this is not always required.
Answering questions can often feel like the most daunting part, but don’t look upon this as negative. Assume that the audience has listened and is interested in your research. Listen carefully, and if you are unsure about what someone is saying, ask for the question to be rephrased. Thank the audience member for asking the question and keep responses brief and concise. If you are unsure of the answer you can say that the questioner has raised an interesting point that you will have to investigate further. Have someone in the audience who will write down the questions for you, and remember that this is effectively free peer review.
Be proud of your achievements and try to do justice to the work that you and the rest of your group have done. You deserve to be up on that stage, so show off what you have achieved.
Competing interests: We have read and understood the BMJ Group policy on declaration of interests and declare the following interests: None.
- ↵ Rovira A, Auger C, Naidich TP. How to prepare an oral presentation and a conference. Radiologica 2013 ; 55 (suppl 1): 2 -7S. OpenUrl
- ↵ Bourne PE. Ten simple rules for making good oral presentations. PLos Comput Biol 2007 ; 3 : e77 . OpenUrl PubMed
- ↵ Naqvi SH, Mobasher F, Afzal MA, Umair M, Kohli AN, Bukhari MH. Effectiveness of teaching methods in a medical institute: perceptions of medical students to teaching aids. J Pak Med Assoc 2013 ; 63 : 859 -64. OpenUrl
- PRO Courses Guides New Tech Help Pro Expert Videos About wikiHow Pro Upgrade Sign In
- EDIT Edit this Article
- EXPLORE Tech Help Pro About Us Random Article Quizzes Request a New Article Community Dashboard This Or That Game Popular Categories Arts and Entertainment Artwork Books Movies Computers and Electronics Computers Phone Skills Technology Hacks Health Men's Health Mental Health Women's Health Relationships Dating Love Relationship Issues Hobbies and Crafts Crafts Drawing Games Education & Communication Communication Skills Personal Development Studying Personal Care and Style Fashion Hair Care Personal Hygiene Youth Personal Care School Stuff Dating All Categories Arts and Entertainment Finance and Business Home and Garden Relationship Quizzes Cars & Other Vehicles Food and Entertaining Personal Care and Style Sports and Fitness Computers and Electronics Health Pets and Animals Travel Education & Communication Hobbies and Crafts Philosophy and Religion Work World Family Life Holidays and Traditions Relationships Youth
- Browse Articles
- Learn Something New
- Quizzes Hot
- This Or That Game New
- Train Your Brain
- Explore More
- Support wikiHow
- About wikiHow
- Log in / Sign up
- Education and Communications
- Presentations
How to Do an Oral Presentation
Last Updated: April 15, 2024
This article was co-authored by Vikas Agrawal . Vikas Agrawal is a Visual Content Marketing Expert & Entrepreneur, as well as the Founder of Full Service Creative Agency Infobrandz. With over 10 years of experience, he specializes in designing visually engaging content, such as infographics, videos, and e-books. He’s an expert in Making content marketing strategies and has contributed to and been featured in many publications including Forbes, Entrepreneur.com, and INC.com. This article has been viewed 48,193 times.
The power of words can control the thoughts, emotions and the decisions of others. Giving an oral presentation can be a challenge, but with the right plan and delivery, you can move an entire audience in your favor.
Researching Your Presentation

- If speaking about the effect of junk food on an adult’s mind, include the increase of serotonin, a happiness hormone. Then inform the audience how fast the hormone drastically depletes to give out worse feelings. This gives the perspective that even the advantages of junk food are outweighed by the negative effects.

Writing Your Script

- Make sure to begin each argument with a clear description of the content such as. "The result of eating junk food has increased negative emotions such as depression, anxiety and low self-esteem". This gives the audience a quick outlook of what the argument is about. Always remember to state how the argument relates and supports the topic question.

- If necessary, this is where you could include, "My name is ___ and I will be speaking about the effect on junk food on our minds." Then you include a brief out view of each argument you will be speaking about. Do not include any information about your arguments in the introduction.

- Some example concluding sentences include, "The entire process of the mind, changed by a simple bite of a cookie. Our entire body's control system, defined by our choices of food. The definite truth. You are what you eat."
Practicing and Performing

- Taking the effort to memorize your script allows you to keep eye contact with the audience and brings confidence to your speech. Reading from an entire script can easily cause you to lose your place and stutter. Also make sure they are the same size and only put important key words or those that are hard to remember. This allows you to easily flip through and read off the cue cards.

What Is The Best Way To Start a Presentation?
Expert Q&A
- Research persuasive language techniques. Thanks Helpful 0 Not Helpful 1
- Watch online speeches to get an idea of how to tone your presentation. Thanks Helpful 0 Not Helpful 1
- Color code each sentence on your cue cards to never lose track. Thanks Helpful 0 Not Helpful 1

You Might Also Like

- ↑ https://www.princeton.edu/~archss/webpdfs08/BaharMartonosi.pdf
- ↑ https://education.seattlepi.com/give-good-speech-presentations-college-1147.html
About This Article

- Send fan mail to authors
Reader Success Stories
Henry Williams
Mar 20, 2016
Did this article help you?
Pavithra Arthi
Feb 14, 2018

Featured Articles

Trending Articles

Watch Articles

- Terms of Use
- Privacy Policy
- Do Not Sell or Share My Info
- Not Selling Info
wikiHow Tech Help Pro:
Develop the tech skills you need for work and life
- Utility Menu
GA4 Tracking Code
fa51e2b1dc8cca8f7467da564e77b5ea
- Make a Gift
- Join Our Email List
- Oral Presentations
With some thoughtful reflection and minor modification, student presentations can be as valuable online as they are in person. In deciding how to modify your assignment for remote teaching, it is key to reflect on what you hoped to assess about your students' learning through their presentations in the first place. Were you looking to evaluate how they make an argument in a new form, conduct research, work together in a group, and/or learn to use visuals? You may have had many objectives for your assignment. You still might be able to fulfill all of them; however, you may need to consider modifying or removing one of them if it would be difficult to include all of them in one assignment. (E.g. given that it is difficult for students in disparate locations to present together, it may be worth asking whether it is more important for students to demonstrate their ability to work together to prepare the presentation, or to make an argument on the spot. If you want to assess both, do you need to modify your assignment to have some individual components and some group components?)
Below we suggest three ways to incorporate student presentations into a remote class: (1) live via Zoom ; (2) pre-recorded via Zoom ; and (3) narrated slide decks . (It is also possible to have students submit pre-recorded presentations via Canvas’ media recording function, but we find this option to be less effective than the other three options presented here.)
Live Presentations in Zoom
- courses in which all students have reliable access to the internet and are comfortable with Zoom functions such as screenshare.
- attempting to reproduce the interactivity or spontaneity of live presentations in a classroom.
- assessing/providing feedback on students’ ability to present (and possibly field questions) "live."
Pre-recorded Presentations in Zoom
- presentations that do not rely heavily/exclusively on slides (although a student can use Zoom to record a presentation that includes a slide show).
Here's one way to have students give pre-recorded oral presentations (with or without accompanying visuals) using Zoom. If students are presenting using a slide deck, it may be easier to have them record their presentations directly into Powerpoint and submit those.
1. How to record a student presentation
Students can use Zoom ( harvard.zoom.us ) to create a permanent link that can function as a sort of "private video studio"; any time they go back to their Zoom account and click on the link, it will start a solo "meeting" that is recorded until they either stop the recording or leave the meeting. This is a great way for them to record themselves giving a presentation which they can share with others, in any of their courses. Your students will have all of the capabilities that any Zoom meeting host has—for example, they will be able to share a slideshow or other piece of media from their screen while they talk. Here’s how they can do it:
- Navigate to harvard.zoom.us and login. They should see the button to “Schedule a new meeting” right near the top of the screen. They should select that option.
- They can name the meeting anything they like—maybe something like “My personal recording studio”—and leave the description blank.
- Continuing onward, they should ignore the “When,” “Duration,” and “Timezone” prompts, and skip right to the checkbox for “Recurring meeting.” They should turn that on.
- In the “Recurrence” dropdown menu, they should select “No Fixed Time,” which will cause all of the date and time information to disappear—that’s good, and means they have succeeded in creating a link that they can re-use again and again.
- Skipping further down the page, they can ignore many of the other options, but they should make sure that “Video” is set to “on” for the host, and that “Audio” is set to “Both.” (These are probably their default options.)
- Finally, make sure that they check the last checkbox, “Record the meeting automatically,” and choose “In the cloud."
- After making their selections, they should click “Save.”
- Now, whenever they visit the “My meetings” page within harvard.zoom.us , they’ll see “My personal recording studio” at the top of the list and can use it to record themselves for any reason, including your presentation.
- While recording, they can speak to the camera, share a slideshow or other media while they talk, etc. Whenever they are sharing something on your screen, the resulting recording will capture what they are sharing fullscreen and overlay the student as a talking head in a small window in the upper righthand corner. Encourage your students to try a quick dry run and then watch the video (see the next step, below) to think through how they want to use (or not use) slides/images/sound in your presentation.
- Whenever they make a recording, the resulting video will automatically appear in their account within a few minutes to an hour after they finish, and they’ll be able to access it by clicking on “Recordings” in the left-side menu in harvard.zoom.us . They can watch it there to make sure they are happy with it; if not, they just need to go back into their “studio” again and re-record. They can delete recordings they don’t want to use (or just leave them there—there’s no penalty to having lots of recordings in an account). (They can also change the beginning and ending time of their presentations using the editing tool in Zoom, though we would recommend that instructors not overemphasize these kinds of polishing touches in assessing the clarity/sophistication/creativity/etc. of the presentation itself.)
- When it comes time for them to share their videos, they will be able to do so through a secure link. More on that next.
2. How to share a presentation with teaching staff
You and your teaching staff will need to let your students know how you would like to receive access to their recorded presentation—whether by email, uploading to Canvas, etc. Your students will be able to share their presentations through any of those methods by sharing a secure link. Students can retrieve that link by:
- Navigating to the “Recordings” page in the left side menu of harvard.zoom.us , and identifying the video they’d like to share with you.
- To the right of the video, they’ll see a “Share” button. They should click that.
- In the dialog box that pops up, students will need to make sure to turn on “Share this recording” and select “Only authenticated users can view.” They should leave the other options turned off.
- Students should look for the link for their recording toward the bottom of the gray box. Once they find it, they should highlight it with their mouse, and copy it.
- They can share that link by pasting it into an email, Canvas, etc.—however you’ve asked to receive it. That’s it!
3. How to share a presentation with peers / generate asynchronous discussion
As the instructor, you can choose to give students individual feedback on the recordings they share with you. But you can also choose to share them with your class and to create opportunities for peer feedback by using the same link through which students shared their videos with you. You might, for example, create a Canvas discussion forum for each student presenter, paste the link for the respective student’s video in the prompt (which will lead Canvas to embed the video right in the page), and encourage their classmates to watch their presentation and leave feedback or questions in the discussion forum.
Narrated Slide Decks
- Projects where students were already asked to create slide decks.
- Presentations where the slide deck matters more than seeing the student talk about the slide deck (this format can be helpful for students who have had difficult participating synchronously and/or using their camera).
It is relatively easy for students to record over a PowerPoint presentation. They can insert an audio file on each page by selecting the “Insert” tab and then the “Audio” icon. Students can also create narrated presentations that include slide transitions. Microsoft offers useful advice on how to record a presentation with slide transitions and narration. (N.B. Students could use Google Slides, but they would have to pre-record the audio, which they could do using their phone or Quicktime if they have a Mac.)
If your students are creating a presentation with transitions, here are some tips for recording:
- To pause recording, use the option from the menu bar
- To record narration on your last slide, you need to advance to the black screen that tells you the slide show has ended before ending the recording
- PowerPoint will not record while slides are transitioning so it can be helpful to build in a pause before transitioning to the next slide
- If you have transitions between the slides, you may need to change them so they do not truncate your audio recording
You can use similar strategies to those described in the section on pre-recording presentations in Zoom to share the recordings and create discussion.
- Designing Your Course
- In the Classroom
- Getting Feedback
- Equitable & Inclusive Teaching
- Advising and Mentoring
- Teaching and Your Career
- Where to Begin
- Communicating Expectations
- Sustaining Community
- Equity & Access
- Assessing Online Participation
- Key Moves for Online Interactivity
- Seminars & Sections
- Science Labs
- Language courses
- Designing Assignments for Remote Teaching
- Final Exams
- Office Hours / Helprooms
- Review Sessions
- TFs & Teaching Teams
- Back Again: The Return to In-Person Teaching
- Tools and Platforms
- The Science of Learning
- Bok Publications
- Other Resources Around Campus
Using PowerPoint or Prezi Effectively
Using powerpoint or prezi effectively (view pdf) .
Powerpoint and Prezi presentations are meant to serve as visual aids that can enhance audience engagement and their understanding of your speech. These 10 tips will set you on the path to presentation success.
Best Practices
- Only use bullet points . You should not have full sentences on PowerPoint or Prezi because they distract from your speech and you want your audience to listen, not read. Use short fragments or keywords to keep your presentation organized.
- Have a backbone slide . Have a slide that demonstrates the direction your presentation will have by outlining the major elements of your speech.
- Use Animations VERY carefully. It may look nice, but it can also be a distraction. Only use them if they play an essential role in your presentation (such as concealing a bullet point for a later point in the presentation).
- Make sure the text is visible. Your text should be large enough to be visible from the back of the room for someone with average eye sight. Sometimes, the text may get lost in the background of the slide (especially if the background includes a picture) or the text color is too close to the background color. Be sure to avoid red/green and blue/yellow color schemes as people with colorblindness may not be able to differentiate the text from the background.
- Keep the focus where you want it. If you are going to incorporate a graph or a quote into your presentation, be sure to have a slide with only the graph or quote, allowing you to speak about it to your audience and to use it as a reference. If you use an image, you should generally limit yourself to one image per slide.
- Cite your sources . For many of your presentations, you will be using outside sources. If so, be sure to cite them in the proper format on the last slide or throughout your presentation. For pictures, include an indication of the source next to the image. Be sure the pictures you chose are freely available for use. See creativecommons.org for great searching tools.
- Show a slide when it’s relevant. Use black screen or a blank slide to hide slides you’re not ready to show the audience. If you are going to speak for any length of time without a relevant slide, add a slide to your presentation that is simply black. You can keep your audience’s focus on you rather than on the slides.
- Provide a warning when necessary. If you are using graphic images that may seem unsettling to members of your audience, be sure to let them know before revealing the image(s).
- Have a backup. Sometimes you lose wifi access and sometimes your USB drive suddenly stops working. Be prepared by being able to access the presentation in multiple ways (e.g., have a copy in your email and on your laptop that you bring with you).
- Do not depend on the PowerPoint or Prezi. Technical difficulties occur all the time, so you may have to deliver your presentation without a PowerPoint. Also, you should not have to read off the PowerPoint or Prezi. Remember: you are the expert on the subject!
Office / Department Name
Oral Communication Center
Contact Name
Amy Gaffney
Oral Communication Center Director

Help us provide an accessible education, offer innovative resources and programs, and foster intellectual exploration.
Site Search
- FRONT MATTER
- TABLE OF CONTENTS
Oral Presentation and Powerpoint
I once attended a talk where the speaker held everyone’s attention for a key five minutes by pulling the Seinfeld trick—putting on "a show about nothing." An engineer at a small, struggling company, he was near the end of a slick Powerpoint presentation about whether the design for a critical machine should be modernized to speed up production, and he presented three options:
- Retool the machine in-house, which would sacrifice a month of production time but result in faster output in the long run.
- Buy a new machine from a known distributor, which would involve a hefty up-front expense but save labor costs and time;
- Do nothing.
That’s right—do nothing. Continue with production and learn to live with the sacrifices.
To dramatize this third point, the speaker filled the presentation screen—which up to then had held colorful Powerpoint slides employing slick transitions and graphics—with nothing. He simply left the screen blank, proposed the option of taking no action, and then shut off the projector. For the next five minutes, he engaged the audience members—which included the company president and the company accountant—by switching to a lecture format, moving around the room without so much as a pointer or note card, and arguing his case: that it was smarter for the company to maintain status quo, especially since it was struggling financially. Ultimately, he impressed his point on the audience not with the magic of presentation software, but with reasoning, creativity, common sense, and the bottom line. As the speaker hoped, the company bought into option number 3.
As this example demonstrates, effective oral presentation is more about creative thinking on your feet and basic skills than about wearing good shoes and knowing how to turn on the computer projector. Companies have long cried for graduates who can give dynamic talks, and they have long relied on talks as a key way to sway concerned parties towards a desired outcome. But many presenters make the mistake of trying to let the computer, bells and whistles blaring, do all the work for them. They forget the fundamentals of oral presentation, and thus whatever polish they have quickly loses its luster.
To become a modern speaker worth listening to, whether you’re serving as a company representative or presenting at a conference, you must come fully prepared, engage your audience’s attention and memory, attend to some visual design basics, and take stock of how you come across as a speaker.
Preparing for a Talk
There’s a rule-of-thumb in carpentry: Measure twice, cut once. The tenets behind this principle should be obvious—once a mistake is made, it’s difficult or impossible to undo. Though the carpenter can usually spackle or glue to repair, as a speaker you simply cannot get back those three minutes you just wasted in a fifteen-minute presentation. The following preparation principles will keep you right on plumb.
- Practice your talk straight through, and as you go jot quick notes to yourself about how to improve it. If you cannot manage to practice your talk straight through, perhaps you are not yet ready to offer it.
- Ideally, practice your talk under conditions similar to those in which you will give it, considering such factors as acoustics, distance from the audience, lighting, and room size. Lighting becomes especially important when computer equipment is involved. Be mentally prepared to adapt to the environmental conditions.
- As a draft, present your talk to a friend or two first and have them critique it. If you’re really gutsy and can tolerate the unforgiving lens of the camcorder, videotape your practice talk and critique it afterwards.
- View all of your visuals from your audience’s perspective prior to your talk. Be sure that your audience can easily see all that you want them to see, especially material that appears in the lower half of the screen.
- When you give a talk professionally, always request presentation guidelines from any relevant organizations and conform to them explicitly. It would be embarrassing for you if you were expected to present units in metric, for example, and you did otherwise because you failed to request or follow the available guidelines.
- As part of your preparation, choose an appropriately snappy and helpful title. You are expected not to come off as stodgy. Which talk would you rather attend: "Specific Geometrical Objects with Fractional Dimensions and Their Various Applications to Nature in General and The Universe At Large as we Know it" or "And On The Eighth Day, God Created Fractals"?
- Become highly familiar with any technology you’ll be using. Practice with the actual hardware or type of hardware you’ll be working with, making sure that compatibility or speed issues don’t get in your way. I’ve seen students go to present at a conference with a zip disk of their talk confidently in hand, only to find that the computer they were using didn’t have a zip drive. To facilitate faster computer speed, load your presentation onto the desktop if possible rather than run it from a CD or flash drive. If websites are needed as part of your presentation, check connection speeds and make sure all URLs are up and running.
Helping Your Audience Remember Your Key Points
Andy Warhol is known for the comment that everyone will be famous for 15 minutes. If your 15 minutes of fame is during your oral presentation, you want to be sure not to blow it. I’m amazed at how many times I’ve sat through a talk and come away with only a vague sense of what it was about. There are many reasons for this—some speakers view their talk as simply a format for reading a paper, while others fill the air with many words but little substance—but the most common reason is the simplest one: the speaker showed uncertainty about the talk's alleged subject. If you don’t spell out your premise, highlight your key points, and make it easy for your audience to remember the thrust of your presentation, you can’t expect your listeners to come away with understanding and investment.
To ensure an engaged audience for your talk, follow these practices:
- Introduce and Conclude . Use a formal introduction at the beginning of your talk and a summary afterwards to highlight your major points. Make sure your audience can remember your key points by keeping them simple and straightforward—even enumerated.
- Present in Sections . Give your talk "parts" —usually no more than three major parts for practical purposes—and let us know when we’re transitioning from one part to the next. This will help your audience to remain interested and focused.
- Spell out the Objective . Give the talk’s objective and even a hint of the conclusion right up front. Articulate the objective on its own slide so we can’t miss it. Revisit the objective at the end if necessary to underscore how it was realized.
- Use Props . Consider the use of some simple, meaningful props—even pass them around. Props can generate audience interest and, especially if they represent the actual work you did, they make the nature of that work more concrete. I’ve been to great talks where an experimental sample or photographs representing production sites were passed around, and they often generated focused questions from the audience members afterwards.
- Use Handouts . If appropriate, give a handout. As long as it’s well-designed, a concise written summary with bulleted points on a handout will ensure that your talk can be followed throughout. Such a handout should ideally be just one or two pages long, and be sure to time and manage its distribution so that it doesn’t take away attention from you as you speak. One possibility for handouts is an actual printout of your slides through the "Handouts" option in Powerpoint, but be certain that your audience actually needs all of your slides before electing this option.
- Offer Q&A . If question and answer is involved as part of the end of the talk, don’t let any questions deflect our interest. Some audience members might try to draw the attention to themselves, or focus on a mistake or uncertainty in your presentation, or even undermine your authority directly with an intimidating challenge. (I recall one speaker at a professional conference being tossed the strange question, "Your data is crap, isn’t it?") Remember that the stage and agenda are yours, and it’s your job to keep it that way and end your talk with a bang, not a whimper. If you don’t know the answer to a question, admit it or offer to discuss it privately after the presentation, then move on. One savvy way to handle questions is to turn back to your presentation slides as you answer them—call up a slide that will help repeat or explain the relevant point—and this will remind your audience that your talk had substance.
Mastering the Basics of Slide Design
Powerpoint helps us to think of each projected page as a "slide" in a slideshow. But just as someone else’s home movies can be thoroughly uninteresting if they’re grainy, poor in quality, and irrelevant, Powerpoint slides that are too flashy, cluttered, meaningless, or poorly designed can quickly turn a darkened room full of smart people into a mere gathering of snoozers. As you design your slides, consider these factors:
- Templates . Even though Powerpoint helps you design your slides, don’t assume that someone else’s template will always match your needs. Take charge of slide design by considering first the most efficient way to transmit the necessary information.
- Simplicity . Keep slides as simple and uncluttered as possible, and if the information must be complex, prioritize it for your audience as you present it (e.g., if presenting a ten-column table, direct your audience to the most significant columns). Offer only one major point per illustration. If you need to focus on more than one point, re-present the illustration in another form on a separate slide with the different point emphasized.
- Titles . Give most slides titles, with a font size of at least 36 points, and body text with a font size of at least 24 points. If you need to cite a source of information, include the citation in a smaller font size at the bottom of your slide.
- Rule of 8s. Apply the "rule of 8s": include no more than 8 words per line and 8 lines per slide.
- Bullets . When using bulleted lists in slides, present each bulleted line in parallel fashion—i.e., if the first line is a fragment, the others should be as well; if the first line opens with a verb, so should the others.
- Design . Design slides so that their longest dimension is horizontal rather than vertical. Use both uppercase and lowercase letters and orient pictures left to right. Avoid the overuse of animations and transitions, especially audio-based transitions, which can be distracting and downright silly.
- Color . Make sure the color for both the background and text are highly readable, especially under less than optimal lighting conditions. There’s nothing wrong with basic dark lettering and white background for your slides, particularly if they’re text-based. If you do choose a background theme or color, enhance continuity and viewability by keeping it consistent and subtle.
- Images . When possible, replace words with images. Use images in particular when presenting data, demonstrating trends, simplifying complex issues, and visualizing abstractions.
- Spelling. Spelling does count, and you can’t rely on Powerpoint to be an effective proofreader. Be sure your slides are free of grammatical and spelling errors. As Will Rogers quipped, "Nothing you can’t spell will ever work."
Maintaining the Look and Sound of a Professional Speaker
Public speaking is often cited by people as their number one fear (with death, ironically, as number two. Clearly, no one overcomes such fear overnight, and no one set of tips can transmogrify you into a polished speaker. However, you can work through that fear by learning from the successes of others. As Christopher Lasch once noted, "Nothing succeeds like the appearance of success." Good speakers attend first to their wardrobe, dressing as well as their "highest ranking" audience member is likely to dress. An equally important part of looking and sounding like a professional speaker is how you handle your body language and your voice. You must exude confidence if you want to be taken seriously, and remember that a high percentage of your audience’s perception is not about what you say but about how you look when you say it. The following guidelines will help you to look good and sound good as you give a talk:
- Take care not to stand in the way of your own slides—many speakers do this without even realizing it. Especially when using an overhead projector, point to the projected image of your slide (ideally, use a stick pointer or laser pointer) rather than the original source. This helps you avoid covering up more of the image than you intended and keeps our focus on the projected image rather than your accidental hand shadow puppet.
- Ideally, use the mouse pointer, a stick pointer, or a laser pointer to draw our attention to a particular item on the screen. One simple circle drawn briefly around the selected information is enough to draw our attention. Beware of slapping a stick pointer loudly against a screen, or leaving a laser pointer on for so long that its bright dot shakes all over the screen as a blazing red mirror of your nervousness.
- When you are not using a slide directly, keep it out of sight or out of your audience’s line of attention. Turn off the projector or create a dark screen when no visuals are relevant; literally invite your audience to turn its attention away from one thing to another.
- When working with computer projection, do not trust that hardware will always perform as you anticipate. Sometimes equipment fails midstream, or what worked fine for one speaker in a group doesn’t work for the next. If necessary, take backup transparencies of your slides ready for use on an overhead projector. Be certain that an overhead projector is available beforehand as a fallback.
- Don’t forget the value of a good old-fashioned easel or chalkboard. Not only do they offer variety, they are especially good for writing down basic information that you also want your audience to muse over or write down, or for presenting a picture as it evolves via its individual pieces (e.g., a flow chart, schematic, or simple experimental set-up).
- Maintain eye contact with at least a few people—especially those who are being the most responsive—in various parts of the room. Conversely, if you’re especially nervous about one or two audience members or you note some audience members looking sour or uninterested, avoid eye contact with them.
- Refer to time as an organizational tool: "For the next two minutes, I will summarize the city’s housing problem, then I will move on to . . . " This keeps both you and your audience anchored.
- Use the "point, turn, talk" technique. Pause when you have to turn or point to something, then turn back towards the audience, then talk. This gives emphasis to the material and keeps you connected with audience members. Strictly avoid talking sideways or backwards at your audience.
- Use physical gestures sparingly and with intention. For instance, raise three fingers and say "thirdly" as you make your third point; pull your hands toward your chest slightly as you advocate the acceptance of an idea. Beware, though, of overusing your body, especially to the point of distraction. Some speakers habitually flip their hair, fiddle with their keys, or talk with their hands. I’ve heard some people recommend that speakers keep one hand in a pocket to avoid overusing physical gestures.
- Minimize the amount of walking necessary during your talk, but do stand rather than sit because it commands more authority. As you speak, keep your feet firmly rooted and avoid continual shuffling of your weight. Intentionally leaning slightly on one leg most of the time can help keep you comfortable and relaxed.
- Take care to pronounce all words correctly, especially those key to the discipline. Check pronunciation of ambiguous words beforehand to be certain. It would be embarrassing to mispronounce "Euclidian" or "Möbius strip" in front of a group of people that you want to impress. I once mispronounced the word "banal" during a speech to English professors and one of the audience members actually interrupted to correct me. Most of that speech was—as you might guess—banal.
- Dead air is much better than air filled with repeated "ums," "likes," and "you knows." Get to know your personal "dead air" fillers and eliminate them. Out of utter boredom during a rotten speech a few years ago, I counted the number of times the speaker (a professor) used the word "basically" as an empty transition—44 times in just five minutes. Don’t be afraid to pause occasionally to give your listeners time to digest your information and give yourself a moment for reorientation. To quote Martin Fraquhar, "Well-timed silence hath more eloquence than speech."
- If you know that you have a mannerism that you can’t easily avoid—such as stuttering or a heavy accent—and it distracts you from making a good speech, consider getting past it by just pointing it out to the audience and moving on. I’ve been to several talks where the speaker opened by saying "Please accept the fact, as I have, that I’m a stutterer, and I’m likely to stutter a bit throughout my speech." One such speaker even injected humor by noting that James Earl Jones, one of his heroes, was also once a stutterer, so he felt in good company. As you might guess, the following speeches were confidently and effectively delivered, and when the mannerism arose it was easy to overlook.
- Avoid clichés, slang, and colloquialisms, but don’t be so formal that you’re afraid to speak in contractions or straightforward, simple terms. Use visual language, concrete nouns, active single-word verbs. When using specialized or broad terms that might be new or controversial to some audience members, be sure to define them clearly, and be prepared to defend your definition.
- Be animated and enthusiastic, but carefully so—many notches above the "just-the facts" Joe Friday, but many notches below the over-the-top Chris Rock.
For more advice on giving oral presentations and the use of Powerpoint, visit these websites:
"Powerpoint Presentations That are Not so Pretty" from about.com
"Rethinking the Design of Presentation Slides" Powerpoint by author Michael Alley
Search Utah State University:
Oral presentations.
An oral presentation is usually more than just reading a paper or set of slides to an audience (though in some disciplines, this is the expectation). How you deliver your presentation is as important in communicating your message as what you say. Use these guidelines to learn simple tools that help you prepare and present an effective presentation, and design PowerPoint slides that support and enhance your talk.
Download Oral Presentation Template
Preparation Tips
An effective presentation is more than just standing up and giving information. A presenter must consider how best to communicate the information to the audience. Use these tips to create a presentation that is both informative and interesting:
- Organize your thoughts. Start with an outline and develop good transitions between sections. Emphasize the real-world significance of your research.
- Have a strong opening. Why should the audience listen to you? One good way to get their attention is to start with a question, whether or not you expect an answer.
- Define terms early. If you are using terms that may be new to the audience, introduce them early in your presentation. Once an audience gets lost in unfamiliar terminology, it is extremely difficult to get them back on track.
- Don't get lost in the details. It's natural to be excited about your research and want to tell your audience all about it, but they don't need to know every detail. Focus on giving them enough information to broadly understand how you arrived at your conclusion, what your findings are, and why they matter.
- Finish with a bang. Find one or two sentences that sum up the importance of your research. How is the world better off as a result of what you have done?
- Design PowerPoint slides to introduce important information. Consider doing a presentation without PowerPoint. Then consider which points you cannot make without slides. Create only those slides that are necessary to improve your communication with the audience.
- Time yourself. Do not wait until the last minute to time your presentation. Different conferences will allow for different amounts of time. At on-campus events hosted by the Office of Research, you only have 8 minutes to speak, so you want to know, as soon as possible, if you are close to that limit.
- Create effective notes for yourself. Have notes that you can read. Do not write out your entire talk; use an outline or other brief reminders of what you want to say. Make sure the text is large enough that you can read it from a distance.
- Practice, practice, practice. The more you practice your presentation, the more comfortable you will be in front of an audience. Practice in front of a friend or two and ask for their feedback. Record yourself and listen to it critically. Make it better and do it again.
Powerpoint Tips
Microsoft PowerPoint is a tremendous tool for presentations. It is also a tool that is sometimes not used effectively. If you are using PowerPoint, use these tips to enhance your presentation:
- Use a large font. As a general rule, avoid text smaller than 24 point.
- Use a clean typeface. Sans serif typefaces, such as Arial, are generally easier to read on a screen than serifed typefaces, such as Times New Roman.
- Use bullet points, not complete sentences. The text on your slide provides an outline to what you are saying. If the entire text of your presentation is on your slides, there is no reason for the audience to listen to you. A common standard is the 6/7 rule: no more than six bulleted items per slide and no more than seven words per item.
- Use contrasting colors. Use a dark text on a light background or a light text on a dark background. Avoid combinations of colors that look similar. Avoid red/green combinations, as this is the most common form of color blindness.
- Use special effects sparingly. Using animations, cool transition effects, sounds and other special effects is an effective way to make sure the audience notices your slides. Unfortunately, that means that they are not listening to what you are saying. Use special effects only when they are necessary to make a point.
Presentation Tips
When you start your presentation, the audience will be interested in what you say. Use these tips to help keep them interested throughout your presentation:
- Be excited. You are talking about something exciting. If you remember to be excited, your audience will feel it and automatically become more interested.
- Speak with confidence. When you are speaking, you are the authority on your topic, but do not pretend that you know everything. If you do not know the answer to a question, admit it. Consider deferring the question to your mentor or offer to look into the matter further.
- Make eye contact with the audience. Your purpose is to communicate with your audience, and people listen more if they feel you are talking directly to them. As you speak, let your eyes settle on one person for a few seconds before moving on to somebody else. You do not have to make eye contact with everybody, but make sure you connect with all areas of the audience equally.
- Avoid reading from the screen. First, if you are reading from the screen, you are not making eye contact with your audience. Second, if you put it on your slide, it is because you wanted them to read it, not you.
- Blank the screen when a slide is unnecessary. A slide that is not related to what you are speaking about can distract the audience. Pressing the letter B or the period key displays a black screen, which lets the audience concentrate solely on your words. Press the same key to restore the display.
- Use a pointer only when necessary. If you are using a laser pointer, remember to keep it off unless you need to highlight something on the screen.
- Explain your equations and graphs. When you display equations, explain them fully. Point out all constants and dependent and independent variables. With graphs, tell how they support your point. Explain the x- and y-axes and show how the graph progresses from left to right.
- Pause. Pauses bring audible structure to your presentation. They emphasize important information, make transitions obvious, and give the audience time to catch up between points and to read new slides. Pauses always feel much longer to speakers than to listeners. Practice counting silently to three (slowly) between points.
- Avoid filler words. Um, like, you know, and many others. To an audience, these are indications that you do not know what to say; you sound uncomfortable, so they start to feel uncomfortable as well. Speak slowly enough that you can collect your thoughts before moving ahead. If you really do not know what to say, pause silently until you do.
- Relax. It is hard to relax when you are nervous, but your audience will be much more comfortable if you are too.
- Breathe. It is fine to be nervous. In fact, you should be—all good presenters are nervous every time they are in front of an audience. The most effective way to keep your nerves in check—aside from a lot of practice beforehand—is to remember to breathe deeply throughout your presentation.
- Acknowledge the people who supported your research. Be sure to thank the people who made your research possible, including your mentor, research team, collaborators, and other sources of funding and support.
Sharing your work can help you expand your network of contacts who share your research interests. For undergraduate researchers who intend to complete a graduate degree, presenting can be an invaluable experience. We recommend discussing your interest in sharing your research with your faculty advisor. They can help match your interests with the appropriate venue.
See guide for Poster Presentations

- Presentation Skills
Preparing for Oral Presentations
Search SkillsYouNeed:
Rhubarb The blog at SkillsYouNeed
- Rhubarb Front Page -guidelines for contributors-
- Essential Strategies to Boost Your Public Speaking Confidence
- What is a Pitch Deck and Why Do You Need One?
- Enhancing Creativity: A Guide to Harnessing Mid-Journey Prompts for Image Creation
- Strategic Planning for Conference Success - A Step-by-Step Guide for Teams
- Effective Presentation Skills for Professionals
- Presentation Skills: Using AI To Help You Thrive in Your Presentations
- Mastering Soft Skills to Deliver Impactful Presentations
- How to Present Statistics and Analytics in an Effective Manner?
- 7 Tools to Improve Your Presentation Skills
- Five Reasons Why Singing Lessons Will Be a Game Changer for Your Public Speaking Efforts
- Captivating Presentations: Techniques to Engage and Retain Your Audience
- How Can AI Help in Creating Winning Presentations?
- How to Dress to Impress During an Important Presentation
- How to Present Effectively to your Colleagues
- How to Become a Better Public Speaker
- How You Can Improve Your Video Editing Skills
- What is Your Story? How to Identify Your Story from Raw Data
- Why Public Speaking and Communication Are So Important to Your Career
- Learn Better Presentation Skills with TED Talks
- How to Get People to Actually Listen to What You’re Saying
- Can Presentation Science Improve Your Presentation?
- 7 Public Speaking Tips For Introverts
- Psychological Secrets for Effective Presentations
Subscribe to our FREE newsletter and start improving your life in just 5 minutes a day.
You'll get our 5 free 'One Minute Life Skills' and our weekly newsletter.
We'll never share your email address and you can unsubscribe at any time.
Sooner or later, a lot of us will be faced with the task of delivering an oral presentation. Even if this is not the first time that you are required to do so, you may still feel nervous or insecure in your ability to hold a good presentation.
Luckily, holding oral presentations is a skill like any other. It can be practiced and improved. And the more time you allocate for preparing for oral presentations, the better your presentation will be. If you want to properly prepare and improve your presentation skills , then you've come to the right place! Here's what you can do.
Preparing Your Presentation

Preparing for oral presentations begins with preparing the presentation itself. Presentations usually consist of two aspects: the oral part itself, and the presentations made in Microsoft PowerPoint that will help you to illustrate your points.
When it comes to what you will be saying during your oral presentation, you should know that, no matter how charismatic a speaker you are, taking the time to prepare is vital. As you will only have a limited time to speak, any improvisation is likely to eat up precious time. That is why you need to rehearse in advance and have a good idea of which words you will use and how you will phrase your thoughts.
Rehearsing in advance will also allow you to time your presentation. While you can rehearse in front of a mirror, it is definitely better to convince a friend or a family member to substitute for the audience. Without holding such a presentation before the actual presentation commences, there is no way to precisely time your performance. Usually, there will be parts that you will need to shorten (or you will need to speak faster during those parts), or you may find that you don't actually have enough material.
Additional tips

Preparing for oral presentations is much easier with a little help from your friends.
Here are some other tips that will help you with this part of preparing for your oral presentations:
Know your audience! For example, if you're talking to professionals in your field, there's no need to explain the terms you are using mean (and vice versa). Or, for instance, if you expect that your audience not to agree with your arguments, it's a good idea to provide more examples and to go into detail when you're presenting the evidence.
The clock is ticking, so you'll want to focus on your main points. Don't waste time on overlong introductions and detailed background information. Rather than that, get to the gist quickly and then elaborate on it.
On the other hand, some audience members might be especially interested in the details surrounding the main point. So, notify your audience that if they're interested in such details, you will be happy to answer all the questions they may have. Being prepared for dealing with questions also includes the questions to which you currently don't have an answer for. In such situations, it is best to offer to send the answer later (for example, by e-mail), once you've looked it up.
You can also prepare handouts to give out to the audience. Otherwise, the audience members may be too busy writing down notes, and incapable of fully following your presentation.
How to Make an Excellent PowerPoint Presentation
Preparing for oral presentations includes taking the time to prepare a great PowerPoint presentation. However, it is important to remember that such presentations are only there to complement the oral part of your presentation.
Under no circumstances should you read from your PowerPoint presentation during your entire performance. Rather, use it as a tool to reinforce your points in the mind of the audience, and to help you remember the structure of your oral presentation.

Use dark text against a light background if you want your audience to be able to focus.
Here are some more tips & tricks on making an excellent PowerPoint presentation:
The font should be large (avoid going under 24 points), and the typeface should be easy to read (as a rule, Sans Serif is better than Serif).
Instead of full sentences, use bullet points. Remember, you're the one who's delivering full sentences; bullet points are simply there to underline what you are saying.
When it comes to your use of colors, remember that the text should be easy to read. So, if the background is dark, the text should be light, and vice versa.
Don't use too many effects. They tend to distract the audience from what you are saying.
A website can be a good alternative to a PowerPoint presentation.
Preparing for the Delivery of Your Oral Presentations
Finally, you should also work on your delivery. When it comes to this part of your oral presentation, it is important to have the right mindset. Namely, you are not giving a speech; you are delivering a presentation! This means that you are there to actively communicate with the audience members and to try to involve them in the presentation.
And to be able to do that, the audience must be able to understand you clearly. Pay attention to see if anyone is having a hard time hearing you. If you have any written notes, you can consult them, but don't read from them all the time. Instead, maintain eye contact with the audience members. Basically, if you show an interest in your audience, if you show that you care whether they're listening to you or not, the audience will respond with interest.
The science of fear
Admittedly, this may be hard to do if you're feeling nervous. In such cases, what one suffers is called a "fight or flight reaction", something that can be explained from an evolutionary standpoint. Whenever our ancestors were scared by the dangers lurking in the primordial wilderness, their neural systems produced so-called "fear hormones", urging them to either fight or run away.
Our ancestors were rightfully afraid of lions; however, we still experience a similar fear in physically much less dangerous circumstances.
Today, nothing has changed, only the "danger" that's responsible for causing fear is usually very different (and much less harmful). This is perfectly normal; even experienced presenters may often still feel nervous before delivering a presentation.
Luckily, coping with presentation nerves is indeed possible with some useful tips and some practice. Have in mind that your instincts are wrong in this situation, as there's actually no need for a fight or flight reaction. Focus on preparing oral presentations as best as you can, stand your ground, and simply try to communicate to the best of your abilities in the given situation.
About the Author
Alex Durick has delivered quite a few oral presentations in his life. From college to his previous job working as a marketing consultant, he was at first a reluctant public speaker, but over time, he grew to enjoy holding presentations.
Today, he is a freelance writer focusing on marketing guides, but he occasionally writes about different topics as well.
Continue to: Top Tips for Effective Presentations Effective Speaking
See also: Self-Presentation in Presentations | Giving a Speech Dealing With Presentation Questions | Building Rapport
Jerz's Literacy Weblog (est. 1999)
Oral presentation tips: how to deliver a speech for school or work.
Jerz > Writing > [ Academic | Technical ] This document briefly describes how to write and deliver a formal oral presentation on an academic or professional subject. It should be useful for anyone who wants to know how to speak in public.
Note: by “formal presentation,” I don’t necessarily mean a Shakespeare monologue or a scientific treatise on robot-assisted microsurgery. Giving an oral presentation on any subject–your favorite book, current events, a family story–can be “formal” and “technical” whenever its primary purpose is to communicate complex information.
The content is the most obvious component of any oral presentation — after all, if you are talking, you had better have something worthwhile to say. But a presentation is only as effective as its delivery .
Part 1: Planning the Content
1. Determine your goals. 2. Prepare your material. 3. Study a model. 4. Arrange with your strongest points first . 5. Practice, practice, practice .
Part 2: Delivering the Content
6. Make eye contact with your audience. 7. Engage actively with the audience. 8. A slide show is not a speech. 9. Watch the time! 10. Take questions in the middle, not the end?
1) Determine Your Goals as a Speaker

2) Prepare your material
Plan. Practice. Keep what’s good and try again.
Good speakers usually aim to look like they are speaking effortlessly, tossing off words as they come to mind. What you don’t see is the preparation that paved the way for the polished performance. It’s all an act! You can do it too, if you plan ahead.
Once you know what your goal is, and you know what your audience wants, you can start strategizing. There is no single strategy that will guarantee success. How you plan depends on many variables.
How many minutes long is your speech? About how many words do you speak per minute?
Will your audience be lost if you use jargon? Will they feel talked down to if you spend time defining terms they already know?
Do you expect that your audience will disagree with you? (If so, you might need to give more examples and more evidence and spend more time addressing reasonable objections in order to sound convincing, which may mean talking a little faster.)
Do you expect your audience already agrees with the position you will take? (If so, they may check out if your speech simply rehashes arguments they already accept without question. What can you say to an audience that already agrees with you? Why would you listen to a speaker who is restating things you already accept as the truth?)
Graphics, inspirational quotations, and anecdotes are all well-respected methods of maintaining audience interest. However, Pinterest clip art, fancy computer transitions between slides, and vaudeville tricks get old pretty quickly (see Don McMillan’s hilarious “ Death by Powerpoint “), and they eat up time that you could use more effectively.
3) Study a Model
The internet is of course full of examples of good speeches, but the YouTube users who vote on videos may not have much in common with the audience who will hear your oral presentation.
Do you have access to speeches that your discourse community values? Your instructor or supervisor may not have ready access to video recordings from last year’s class or last quarter’s budget meeting, but you can pay attention to the speaking techniques deployed by people with authority in your field.
For instance, I have a colleague who never says, “This is taking too long, and I’m watching the clock, so let’s get on with it already.” Instead, this person says, “I’m conscious of everyone’s time, so shall we move on to the next item?”
Bear in mind that
- if you have been assigned to deliver a speech that defends a position on a topic (such as, whether Huckleberry Finn should be taught in middle school)…
- but your instructor usually refrains from stating any one answer is the best (preferring instead to present several viewpoints and letting the students decide for themselves)…
- then your instructor’s open-ended lecture (intended to spark a discussion) is not a good model of a position statement (intended to showcase your ability to latch onto a specific solution).
While this handout aims to provide general tips, you should ignore any general tip that contradicts something specific you learn about the goals, context, or genre of the specific speech you are preparing.
General Model
Successful oral presentations typically share some basic characteristics, owing to the nature of the spoken word.
- Tell them what you’re going to tell them.
- Tell them what you told them.
When we read, we can go back and reread passages we skimmed over the first time, and we can skip ahead when we’re bored. In a live oral presentation, the audience can’t re-read or skip ahead. If the audience doesn’t know why they are listening to your anecdote about winning the spelling bee, or why they should care what version of the software was installed on the computer that you used to crunch your numbers, their attention will wander and it will be hard to get it back.
When we listen, we gratefully cling to orientation phrases that help us understand what the whole shape of a speech is, where we are within the overall structure, and when we are transitioning from one section to another.
Your specific occasion for delivering a speech may involve specific contextual details that don’t mesh with the general advice I’m providing here.
- Introduction : "I am Pinky J. Witzowitz from the U.S. Department of Bureaucracy, and I have been asked to speak for 20 minutes on 'The Government's Plan for Preventing Situation X in America's Heartland.'"
- "Situation X is the worst thing that can happen to you and your family." [ Startling claim ; follow up by citing the source of this quote, or giving evidence that supports it.]
- "It happened once to a family in Dubuque, and they were never heard from again." [ Anecdote ; follow up with details.]
- "I am here today to tell you how to prevent this terrible tragedy from striking you." [ Demonstrates relevance ; move directly to your road map ]
- Main Content : Put up a slide with topics to cover, a specific problem to solve, or a series of questions to answer. Promise that your talk will address the material on that slide. You might even return to that slide each time you start a new subsection, with the current place in the talk highlighted.
- Questions/Comments from the Audience? Even though most people save the question period until the end, they lose the opportunity to modify their conclusion to address the interests of the audience.
- Recap : Our earnest “Situation X” speaker might give microencapsulated answers to all the questions on the main road map: "We have learned that Situation X is a blah blah blah; that we should all care about it because yada, yada, yada..."
- Wrap it up : After reminding the audience how all these factors fit together, the speaker might say, "Now that you understand how the U.S. Department of Bureaucracy helps you keep Situation X out of your life, please take one of our pamphlets home to your family and put it by the telephone where you can get it in an emergency; your family will thank you."
- Invite Questions : If there is time, and if you haven’t already done so.
4) Arrange with Your Strongest Points First
In rare cases — such as when you are facing a hostile audience, you might want to start out by emphasizing where you agree with your audience, and then carefully working your way towards your most divisive, most daring claims.
- If the question is actually important to your talk, you’ll probably be able to answer right away.
- If you can’t answer right away, or you don’t want to take the time, just promise you’ll follow up via e-mail , and then go right back to your presentation. Most audience members will probably have been annoyed by the interruption. They will be delighted that you didn’t take the questioner’s bait .
5) Practice, Practice, Practice.
Set a timer, and deliver your speech to a willing co-worker or family member, your pet fish, or the bathroom mirror.
My students are often surprised at how hard it is to fill up 3 minutes for an informal practice speech early in the term, and how hard it is to fit everything they want to say into a 10-minute formal speech later in the term.
Once you have the right amount of content, make a video recording of yourself practicing. If you plan to show a video clip, or ad-lib an explanation of a diagram, or load a website, or pass out paper handouts, or saw an assistant in half, actually do it while the camera is rolling, so that you know exactly how much time it takes.
Time it out.
- Script out a powerful introduction and conclusion.
- Know how long each section of your speech should take.
- which example or anecdote you will cut if you are running long?
- what additional example you can introduce if you need to fill time?
If you know your conclusion takes you 90 seconds to deliver, make sure to start your conclusion when you have at least 90 seconds left.
At several key points during your speech, maybe while you are playing a video or while the audience is taking in a complex image, glance at the clock and check to see — are you on track?
If you notice you’re starting Section 3 60 seconds later than you had intended, try to make up for time by rushing through your second example in section 3 and cutting the third example in section 4, so that you still have the full 90 seconds at the end to deliver that powerful conclusion.
Technological Considerations
- Do you know how to connect your computer to the overhead projector? (If you don’t know, who does?)
- What will you do if you can’t get your computer connected to the projector? (Back in 2003, when I applied for my current job at Seton Hill University, I was asked to give a teaching demonstration. I couldn’t get my laptop to work with the overhead projector, but I had posted the most important links on my blog, and I had brought along a printout of my speech, just in case. My preparations have paid off, because I got the job.)
- In the room where you will be speaking, will you be using a microphone, or relying on your unamplified voice?
- Will you be able to walk around with the microphone — perhaps to gesture at details in the slides — or is the mic attached to a stand? (Do you need to borrow a laser pointer, or get a volunteer to advance slides for you?)
6) Make Eye Contact With Your Audience.

I once sat through a four-hour training session, during which this was all I could see of the instructor.
Go ahead and write your whole speech out so you can read robotically if you blank out, but you should practice your speech so you know it well enough that you can glance up from your notes and look at your audience as you speak.
7) Engage with the audience.
Pay attention to the audience, and they will pay attention to you.
Don’t try to recite from memory . If you spend your energy worrying about what you’re supposed to say next, you won’t be able to pay attention to whether the audience can hear you, or whether the overhead projections are focused.
Preparation : Set up before the audience files into their seats. If you have scheduled a presentation for a class, don’t sit in your seat like a lump while your professor calls the roll and hands out papers. Few things are more boring than watching a presenter log into the computer, fiddle with the video data projector, hunt around for the light switches, etc.
Introduction : As the audience files into their seats, have a title card displayed on the screen — or at least write your name and the title of your talk on the whiteboard. In a formal setting, usually a moderator will usually introduce you, so you won’t need to repeat everything the moderator says. Avoid canned introductions like “Principal Burch, members of the faculty, and fellow students, we are gathered here today…”
Hashtag : If it’s likely that many people in your audience use the same social media network, consider encouraging them to post their thoughts there. When you introduce yourself, give your social media handle and suggest a hashtag.
Handouts : Consider distributing handouts that present the basic facts (names, dates, timelines) and your main points. You can keep the conclusion just slightly mysterious, if you don’t want to give everything away immediately, but the idea is to free the audience from the feeling that they have to write everything down themselves. (Note: Simply printing up all the overhead slides wastes a lot of paper.)
Grabber : Grab the attention of your audience with a startling fact or claim, an inspiring quotation, or a revealing anecdote. This is not the time to try out your nightclub act; the “grabber” is not just comic relief, it also helps you set up the problem that you are going to address. If the audience will be diverse and general, you can use the “grabber” as a metaphor, helping the audience see why the topic is so important to you, and how it might be important to them, too. If your audience shares your technical specialty, and thus needs no special introduction to the topic, feel free simply to state your purpose without much to-do; but bear in mind that even technical audiences don’t want to be bored.
Road Map : Once you have established the problem or the main point of your talk, let the audience know how you are going to get to a solution. You might put up a series of questions on a slide, then as your talk progresses, proceed to answer each one. You might break each question down into a series of smaller questions, and answer each one of these in turn. Each time you finish a subsection, return to the road map, to help your audience keep track of where you have been and where you are going.
Conclusion : To give your presentation closure, return to the “grabber”, and extend it, modify it, or otherwise use it to help drive home your main point. Recap your main points, and demonstrate how they all fit together into a thought that the audience members can take with them.
8) A Slide Show Is Not a Speech
Don’t read word-for-word with your nose buried in a stack of papers . If you bother to show up to hear a person speak, how do you feel when the speaker mumbles through page after page of written text? Do you feel you should have just asked for a copy of the paper in the mail?
When you present, make every effort to include your audience; after all, they are the reason you are speaking in the first place.
If you do feel that you must write out your speech word-for-word, you should be familiar enough with it that you don’t need to look at the paper all the time. (And hold the page up when you glance at it, rather than bending down to look at it.)
9) Watch the time!
To help pace yourself, at the top of each page of your notes, write down what time it should be ; as you turn each page, you can glance at the clock and see whether you are on track.
(The first time I gave this advice to a technical writing class, I mimed the action of “looking at the clock” — and noticed that I was running ten minutes behind, eating into time that I had promised to a student for an in-class testing session. That was a rather humbling experience!)
See the “preparation” section above. If you have already practiced your speech and timed out the various sections, you’ll know whether you are running long. If you are, don’t talk faster — cut something that you already marked out as optional.
Decide in advance which examples, which anecdotes, which subsections you can drop, without damaging the whole presentation.
I was at a conference in 1998 where the first speaker talked for 40 minutes — double her allotted time. (Why the moderator allowed this is a mystery to me.)
- None of the other speakers on the panel felt like cutting their talks to compensate.
- The result was that the last scheduled speaker — who had paid for an international plane ticket and a week in a hotel — did not get to speak at all.
10) Take questions in the middle, not at the end?
The benefits include:
- If you spark a good Q & A session, your audience will remember and appreciate it.
- If nobody has any questions, you can just fill up the space with more of your own material . That would be much harder to do if you have already wrapped up your talk and had nothing left to say.
- If you really know your material, you can adjust your conclusion to address the questions raised by the audience. Even if someone in the audience steals a little of your thunder by bringing up points you were saving for your big finish, you will appear smart for having predicted that audience response. At the same time, someone in your audience will feel smart for having anticipated what you were going to say.
Dennis G. Jerz , 01/27/2009 07:24:28 Oct, 1999 — first written 03 Dec, 2000 — posted here 03 June 2003 — tweaked and updated 30 Oct 2011 — updated and added video links 31 May 2016 — major update; separated into “preparation” and “presentation” sections. 26 Jan 2018 — blackboard -> whiteboard
50 thoughts on “ Oral Presentation Tips: How to Deliver a Speech for School or Work ”
Thanks alot for your teachings
Thank a lot , really great tip for oral presentation, i’ll implement these tips, and will let you know.
Very helpful tips.
this is awfully helpful. I am a teacher in France and my students have to do presentations in English. I wish they could read this and understand.
Thank you for these very useful tips on Oral presentation. I am taking an Organizational Behavior class and need to do a 5 minute oral presentation on a real life situation about Conflict Management in the Workplace. I am not sure how to structure or begin the presentation.
I like it Really helpful for me
Thank you for helping me to do my presentation…..and I have learned so much from oral presentation.
thankyou thankyou thankyou this helped me so much!!! : )
thankyou thankyou thankyou this helped me so much in english!!! : )
Thanks. Really helpful
Hi, I going to do 3 minute presentation and my topic is My son. what is a best tips to talk about the this topic. I am not sure where to start. Any tips to help me with.
Is that the topic you were assigned? Are you taking a public speaking class, a child development class, a class in writing personal memoirs, or are you learning English as a second language? I don’t know how your instructor will evaluate your work, so I am not sure how to help.
You might find it useful to look at this handout on writing personal essays. http://jerz.setonhill.edu/writing/creative1/personal-essays/
Hi, I going to do minute presentation and my topic is My son. what is a best tips to talk about the this topic. I am not sure where to start. Any tips to help me with.
This sort of helped
Denise Gillen Caralli liked this on Facebook.
Enter your comment here…Thanks a lot… I will follow your instructions..I’m hopeful those tips will work. .. Thanks once again….
Thanks so much will follow your instruction tomorrow where I will be having presentation with 180 Head masters about suplimetary feeding on their hunger striken ares
Yeah ,thanks and good luck to all of you from a powerful Jamaican girl
That’s great… It will work well for those who are aiming for like me. Thanks!
The tips are totally handy until now I am still applying it.
Appreciate it. =)
Very helpful for my presentation. Thanks!
I have learned a lot on this…thanks
Thanks a lot I have learned so much on this
I suppose to give out a presentation on Monday on someone or something in either an athlete or an actor and I don’t know how to start
i have a question i am supposed to give a speech but it has to have a power point or a drama thing the only problem is that i can’t have a power point because it won’t work into my speech and neither will a drama thing what should i do?
I suggest you talk to whoever set up the requirement for a slideshow/drama component. Maybe there is some flexibility, or maybe you’ll find a way to work that component into your speech.
Thank you heaps this really helped a lot
that is such good information and i believe im going to pass my speeches.
wow!!this are really helpfull stuff..but im just not confident enough to stand infront of all those people..wish i could do it without them looking at me
blind fold them! just joking…I’m getting ready to do mine and I’m having the same problem as you.
this is a helpfull site
this isn’t helping me with how nervous I am!! bye!!
love it really helped
thanks you are good
I have to do a presentation about “Importance of learning English”. There are 6 people in my group including myself. The presentation has to be exactly 8 minutes. We can’t use PowerPoint. Can you give us any unique, memorable and creative idea?
What are some lessons or life experiences that you find unique and memorable? I’d probably do a play, with a character who gets into trouble because he/she doesn’t know English, and then has a chance to correct those problems by demonstrating how learning English can fix the problems.
Hello mr.Dennis,I go straight to it.how can I become the most sought after Master of Ceremony(M.C.)/tv show presenter extra-ordinaire in my country before going international?any useful tips?
Sorry, that question is not something I cover on this page.
really well writen loved how you added steps so its easy to follow clear easily can be understaned and really helps us and gives us tips that we should actually think about and use at times
Yeah! I found it quite impressive. I hope it’z gonna be helpful for me to develop my speech techniques.
Nice tips….i think it will help me. but it’s too lengthy,it takes so much of time to read.
This really helps to prepare for all sort of things, Thanks a lot
Really helpful! Thank you
Pingback: Oral Presentation Readings « readwriteredroom
i love this helpful tips of oral presentation.. hope to visit this again or i just make a hard copy of this… thank you very much for that…
it was quite helpful
thank you for the great tip, but my problem is actually that I have a presentation on ‘All About Me’ and I have to keep the audience ‘engaged’ like by making a guessing game or something. If anyone has any other ideas please help!!
This may help: http://jerz.setonhill.edu/writing/creative1/showing/
This really helped me prepare my oral presentation…thanks very much!!!!
Leave a Reply Cancel reply
Your email address will not be published. Required fields are marked *
Save my name, email, and website in this browser for the next time I comment.

- school Campus Bookshelves
- menu_book Bookshelves
- perm_media Learning Objects
- login Login
- how_to_reg Request Instructor Account
- hub Instructor Commons
- Download Page (PDF)
- Download Full Book (PDF)
- Periodic Table
- Physics Constants
- Scientific Calculator
- Reference & Cite
- Tools expand_more
- Readability
selected template will load here
This action is not available.
14.3: Importance of Oral Presentations
- Last updated
- Save as PDF
- Page ID 83686

- Arley Cruthers
- Kwantlen Polytechnic University
In the workplace, and during your university career, you will likely be asked to give oral presentations. An oral presentation is a key persuasive tool. If you work in marketing, for example, you will often be asked to “pitch” campaigns to clients. Even though these pitches could happen over email, the face-to-face element allows marketers to connect with the client, respond to questions, demonstrate their knowledge and bring their ideas to life through storytelling.
In this section, we’ll focus on public speaking. While this section focuses on public speaking advocacy, you can bring these tools to everything from a meeting where you’re telling your colleagues about the results of a project to a keynote speech at a conference.
Imagine your favourite public speaker. When Meggie (one of the authors of this section) imagines a memorable speaker, she often thinks of her high school English teacher, Mrs. Permeswaran. You may be skeptical of her choice, but Mrs. Permeswaran captured the students’ attention daily. How? By providing information through stories and examples that felt relatable, reasonable, and relevant. Even with a room of students, Meggie often felt that the English teacher was just talking to her . Students worked hard, too, to listen, using note-taking and subtle nods (or confused eyebrows) to communicate that they cared about what was being said.
Now imagine your favourite public speaker. Who comes to mind? A famous comedian like Jen Kirkman? An ac

tivist like Laverne Cox? Perhaps you picture Barack Obama. What makes them memorable for you? Were they funny? Relatable? Dynamic? Confident? Try to think beyond what they said to how they made you feel . What they said certainly matters, but we are often less inclined to remember the what without a powerful how — how they delivered their message; how their performance implicated us or called us in; how they made us feel or how they asked us to think or act differently.
In this chapter, we provide an introduction to public speaking by exploring what it is and why it’s impactful as a communication process. Specifically, we invite you to consider public speaking as a type of advocacy. When you select information to share with others, you are advocating for the necessity of that information to be heard. You are calling on the audience and calling them in to listen to your perspective. Even the English teacher above was advocating that sentence structure and proper writing were important ideas to integrate. She was a trusted speaker, too, given her credibility.
Before we continue our conversation around advocacy, let’s first start with a brief definition of public speaking.

An official website of the United States government
The .gov means it’s official. Federal government websites often end in .gov or .mil. Before sharing sensitive information, make sure you’re on a federal government site.
The site is secure. The https:// ensures that you are connecting to the official website and that any information you provide is encrypted and transmitted securely.
- Publications
- Account settings
Preview improvements coming to the PMC website in October 2024. Learn More or Try it out now .
- Advanced Search
- Journal List
- Lippincott Open Access
How to deliver an oral presentation
Georgina wellstead.
a Lister Hospital, East and North Hertfordshire NHS Trust
Katharine Whitehurst
b Royal Devon and Exeter Hospital
Buket Gundogan
c University College London
d Guy's St Thomas' NHS Foundation Trust, London, UK
Delivering an oral presentation in conferences and meetings can seem daunting. However, if delivered effectively, it can be an invaluable opportunity to showcase your work in front of peers as well as receive feedback on your project. In this “How to” article, we demonstrate how one can plan and successfully deliver an engaging oral presentation.
Giving an oral presentation at a scientific conference is an almost inevitable task at some point during your medical career. The prospect of presenting your original work to colleagues and peers, however, may be intimidating, and it can be difficult to know how to approach it. Nonetheless, it is important to remember that although daunting, an oral presentation is one of the best ways to get your work out there, and so should be looked upon as an exciting and invaluable opportunity.
Slide content
Although things may vary slightly depending on the type of research you are presenting, the typical structure is as follows:
- Opening slide (title of study, authors, institutions, and date)
- Methodology
- Discussion (including strengths and weaknesses of the study)
Conclusions
Picking out only the most important findings to include in your presentation is key and will keep it concise and easy to follow. This in turn will keep your viewers engaged, and more likely to understand and remember your presentation.
Psychological analysis of PowerPoint presentations, finds that 8 psychological principles are often violated 1 . One of these was the limited capacity of working memory, which can hold 4 units of information at any 1 time in most circumstances. Hence, too many points or concepts on a slide could be detrimental to the presenter’s desire to give information.
You can also help keep your audience engaged with images, which you can talk around, rather than lots of text. Video can also be useful, for example, a surgical procedure. However, be warned that IT can let you down when you need it most and you need to have a backup plan if the video fails. It’s worth coming to the venue early and testing it and resolving issues beforehand with the AV support staff if speaking at a conference.
Slide design and layout
It is important not to clutter your slides with too much text or too many pictures. An easy way to do this is by using the 5×5 rule. This means using no more than 5 bullet points per slide, with no more than 5 words per bullet point. It is also good to break up the text-heavy slides with ones including diagrams or graphs. This can also help to convey your results in a more visual and easy-to-understand way.
It is best to keep the slide design simple, as busy backgrounds and loud color schemes are distracting. Ensure that you use a uniform font and stick to the same color scheme throughout. As a general rule, a light-colored background with dark-colored text is easier to read than light-colored text on a dark-colored background. If you can use an image instead of text, this is even better.
A systematic review study of expert opinion papers demonstrates several key recommendations on how to effectively deliver medical research presentations 2 . These include:
- Keeping your slides simple
- Knowing your audience (pitching to the right level)
- Making eye contact
- Rehearsing the presentation
- Do not read from the slides
- Limiting the number of lines per slide
- Sticking to the allotted time
You should practice your presentation before the conference, making sure that you stick to the allocated time given to you. Oral presentations are usually short (around 8–10 min maximum), and it is, therefore, easy to go under or over time if you have not rehearsed. Aiming to spend around 1 minute per slide is usually a good guide. It is useful to present to your colleagues and seniors, allowing them to ask you questions afterwards so that you can be prepared for the sort of questions you may get asked at the conference. Knowing your research inside out and reading around the subject is advisable, as there may be experts watching you at the conference with more challenging questions! Make sure you re-read your paper the day before, or on the day of the conference to refresh your memory.
It is useful to bring along handouts of your presentation for those who may be interested. Rather than printing out miniature versions of your power point slides, it is better to condense your findings into a brief word document. Not only will this be easier to read, but you will also save a lot of paper by doing this!
Delivering the presentation
Having rehearsed your presentation beforehand, the most important thing to do when you get to the conference is to keep calm and be confident. Remember that you know your own research better than anyone else in the room! Be sure to take some deep breaths and speak at an appropriate pace and volume, making good eye contact with your viewers. If there is a microphone, don’t keep turning away from it as the audience will get frustrated if your voice keeps cutting in and out. Gesturing and using pointers when appropriate can be a really useful tool, and will enable you to emphasize your important findings.
Presenting tips
- Do not hide behind the computer. Come out to the center or side and present there.
- Maintain eye contact with the audience, especially the judges.
- Remember to pause every so often.
- Don’t clutter your presentation with verbal noise such as “umm,” “like,” or “so.” You will look more slick if you avoid this.
- Rhetorical questions once in a while can be useful in maintaining the audience’s attention.
When reaching the end of your presentation, you should slow down in order to clearly convey your key points. Using phases such as “in summary” and “to conclude” often prompts those who have drifted off slightly during your presentation start paying attention again, so it is a critical time to make sure that your work is understood and remembered. Leaving up your conclusions/summary slide for a short while after stopping speaking will give the audience time to digest the information. Conclude by acknowledging any fellow authors or assistants before thanking the audience for their attention and inviting any questions (as long as you have left sufficient time).
If asked a question, firstly thank the audience member, then repeat what they have asked to the rest of the listeners in case they didn’t hear the first time. Keep your answers short and succinct, and if unsure say that the questioner has raised a good point and that you will have to look into it further. Having someone else in the audience write down the question is useful for this.
The key points to remember when preparing for an oral presentation are:
- Keep your slides simple and concise using the 5×5 rule and images.
- When appropriate; rehearse timings; prepare answers to questions; speak slowly and use gestures/ pointers where appropriate; make eye contact with the audience; emphasize your key points at the end; make acknowledgments and thank the audience; invite questions and be confident but not arrogant.
Conflicts of interest
The authors declare that they have no financial conflict of interest with regard to the content of this report.
Sponsorships or competing interests that may be relevant to content are disclosed at the end of this article.
Published online 8 June 2017
Chunking information
Most people remember three to five things at a time. Chunking information can help you to recollect what to say and can help your audience to remember the main points. So, if possible:
- Chunk your whole presentation into three sections.
- Chunk each section into three chunks.
- Chunk your slides into a maximum of three points per slide.
Tips for slide content
- Your presentation slides should be a guide for what you are presenting.
- Omit long texts. Use short sentences or bullet points.
- Aim for a maximum of one slide per minute. You should not have 50 slides for a 15 minute presentation.
- Aim to present one idea per slide.
- Too much animation can be distracting. Only use it for emphasis.
Making your slides accessible
If you are sharing your slides and you want to follow best practice, make sure your presentation is accessible to people with disabilities (i.e., dyslexia, low vision).
These are some points to consider:
- Include alternative text with all visuals.
- Make sure that the content in your slides can be read in the order that you intend.
- Add meaningful and accurate hyperlink text.
PowerPoint has many built-in features and an accessibility checker that can help you maximise the accessibility of your slides. Explore this website to learn how to make your PowerPoint presentations accessible.
Want to learn more?
- For more in depth information visit the Presenting your Research module in the Postgraduate Research Skills hub

Related topics
- Time management
- Writing at university
- Dealing with procrastination (Chunking)
- Let’s Talk
See all available workshops .
Have any questions?
This is the footer
Want to create or adapt books like this? Learn more about how Pressbooks supports open publishing practices.
21 Tips and Strategies Supporting Learners’ Oral Presentations
Design & assign.

There are many options to consider when assigning an oral presentation. As you answer the following questions, reflect on your own commitment to continue using traditional oral presentations for evaluation.
Determine Oral Presentation Type
If you answered “No” to at least half of the questions, you may want to consider the following alternative formats that mitigate some of the specific anxieties your ELLs experience with oral presentations. While the default may be the traditional individual or group presentation of concepts in front of the whole class, there are a number of alternatives that may serve the same purpose.

Consider the different types of presentations and the steps that you can do to help your learners succeed.
Types of Oral Presentations
Short oral talks in a group
Usually a short oral talk in a group is informal with little time to prepare for this type of speech. Learners share their thoughts or opinions about a specific topic. This type of talk follows a structure with a brief introductory statement, 2-3 ideas and a concluding statement. These brief oral talks can help students develop confidence because they are presenting to a small group rather than the whole class. They do not have to create and coordinate visuals with their talk and the talk is short. There still needs to be substance to the talk, so participants should be given advance warning that they will be asked to speak on a particular topic. One advantage is that several students in the class can be presenting simultaneously; however, as a result, in-process marking is not possible.
Formal oral presentations in front of class
Formal oral presentations in front of the class usually require individual students to make a longer presentation, supported with effective visual aids. Adequate time has been given for the presenter to prepare the topic. This type of presentation can be used to present research, information in general, or to persuade. The presenter is often put in charge of the class during the presentation time, so in addition to presenting, the presenter has to keep the class engaged and in line. Formal oral presentations often involve a Q & A. Most of the grading can be done in-process because you are only observing one student at a time. It is very time consuming to get through a whole class of presentations and have the class engaged and learning and you are giving up control of many course hours and content coverage.
Group Presentations

- Tips for giving a group presentation
Sharing Presentations Online
Students can be made the presenter in online platforms to complete presentations. Zoom, Blackboard, WebEx and other similar software allow the moderator (Professor) to make specific participants hosts which enables them to share their screens and control the participation options of other students in the class. As each platform has variations on how to share documents and control the presentation, it is important that students are given specific instructions on how to “present” using the various platforms. If possible, set up separate “rooms” for students to practice in before their presentation.
- Instructions for screen sharing in Zoom
- Instructions for screen sharing in WebEx
- Instructions for screen sharing in Blackboard Collaborate
Use Oral Recordings of Presentations Synchronously or Asynchronously
Consider allowing students to record their presentations and present the recording to the class. While this would not be appropriate for a language class where the performance of the presentation is likely more important than the content, in other classes providing the opportunity for learners to record multiple times until they are satisfied with the output is an ideal way to optimize the quality of the presentation as well as reduce the performance related stress. The presentation can then be shared synchronously in class or online with the presenter hosting and fielding questions, or asynchronously posted on a discussion board or other app such as Flipgrid with the presenter responding to comments posted over a set period of time. A side benefit to the use of some of these tools such as Skye and Google Meet is that they are commonly used in the workforce so it good practice for post-graduation application of skills.
Possible Tools for Recording and Sharing
- Flipgrid – an easy to use app that lets students record short video clips and resubmit as many times as needed. The video stays in the Flipgrid app for other students to see (if shared) and allow for easy teacher responses whether via video or text. (Asynchronous)
- Skype – Follow the instructions to record and share a video on the MS website (Either if posted on course platform)
- Google Meet – Follow the i nstructions to record and share a presentation on Google Meet . (Either if posted on course platform)
- Zoom – students can share their narrated PPT slides via Zoom (don’t forget to enable the sound)
- Powerpoint – Recording of narrations for slides
- Youtube – Recorded videos can be uploaded to Youtube to share by following instructions to upload Youtube video
- OneDrive – most institutions provide OneDrive accounts for faculty and students as part of Office 365. Students can save their video in OneDrive and choose who to share it with (faculty member, group, class)
Presenting in Another Language
If the goal of the presentation is to demonstrate in depth understanding of the course content and ability to communicate that information effectively, does the presentation have to be done in English? Can the student’s mastery of the subject matter be demonstrated in another language with a translator? It would still be possible to evaluate the content of the presentation, the confidence, the performance, the visual aids etc. On the global stage, translated speeches and presentations are the norm by political leaders and content experts – why not let students show the depth of their understanding in a language they are comfortable with?
If a more formal type of oral presentation is required, is it possible to give students some choice to help reduce their anxiety? For example, could they choose to present to you alone, to a small group, or to the whole class?
Teach Making a Presentation Step by Step
Don’t assume that all the students in your class have been taught how to make a presentation for a college or university level class. Furthermore, there are many purposes for presentations (inform, educate, persuade, motivate, activate, entertain) which require different organizational structure, tone, content and visual aids.
- Ask the class to raise their hands if they feel ♦ very comfortable presenting in front of the class, ♦ somewhat comfortable presenting in front of the class or ♦ not comfortable presenting in front of the class. This will help you gauge your learners’ prior experience / comfort and also let learners in the class see that others, both native speakers and ELLs are nervous about presenting orally in class.
Provide Clear Instructions
- Write clear, detailed instructions (following the suggestions in Module 3).
- Ask students to download a copy to bring to class and encourage them to record annotations as you discuss expectations.
- Example: How many slides should you use as your visual aid? Do you need to use outside sources? What tools can you use to create this presentation?
- Include the rubric that you will use to grade the presentations and explain each section, noting sections that have higher weighting.
Provide a Guide to Planning
- Have students write a description of the target audience for their presentation and explicitly state the purpose of the presentation.

- Encourage students to read widely on their topic. The more content knowledge the learner has about the topic, the more confident the learner will be when presenting.
- Teach students how to do an effective presentation that meets your course expectations (if class time does not permit, offer an optional ‘office hours’ workshop). Remember – many of your students many never have presented a post-secondary presentation which may cause significant anxiety. Your ELL’s experiences with oral presentations may be limited or significantly different in terms of expectations based on their prior educational contexts.
- Have students view examples of good presentations and some bad ones – there are many examples available on YouTube such as Good Presentation vs Bad Presentation .
- Provide specific guidelines for each section of the presentation. How should learners introduce their presentation? How much detail is required? Is audience interaction required? Is a call to action expected at the end?
- If audience interaction is required, teach your students specific elicitation techniques (See Module 3)
- Designing Visual Aids Centre for Teaching Excellence, University of Waterloo
- Presentation Aids Video
- Paralinguistic features like eye contact are potentially culture – bound. If the subject that you are teaching values eye contact, then include this expectation in the presentation. On the other hand, if your field of study doesn’t require presentations typically, consider valuing the cultural diversity of your learners and not grading learners negatively for not making eye contact.
- Review the rubric. Let learners know what you are specifically grading during the presentation. The rubric should be detailed enough that learners know what elements of the presentation are weighted the heaviest.
Model an Effective Presentation
A good speech is like a pencil; it has to have a point.
- Provide an exemplar of a presentation that you have presented yourself and recorded, or a presentation done by a previous student for which you have written permission to share.
Require Students to Practice
- Practice saying the presentation out loud
- Practice with a room mate/ classmate / family member / friend
- Go on a walk and talk – encourage students to get outside, and go for a walk – as they walk, they can say their presentation orally out loud. The fresh air and sunshine helps one to relax and reduce anxiety, so it is easier to focus on the talk.
- Record a practice presentation. Encourage students to find a quiet place to record and to use headphones with a mic to improve quality of the recording.
- If time allows, build formative practice presentations into the schedule. Have students practice their presentation in small groups and have other group mates give targeted feedback based on content, organization and presentation skills. Provide a checklist of expectations for the others in the group to use to provide specific, targeted feedback to the presenter. Students can watch their performance at home along with their peer’s feedback to identify areas for improvement.

- If you have assigned oral presentations in your class, review the course outcomes and the content covered in the assignment and determine if a formal oral presentation is necessary.
- Think of one alternative you could offer to students who struggle with individual assignments.
- Annotate your assignment with notes indicating possible modifications you could make to improve the inclusivity and equity of the assignment.
- Skip to Nav
- Skip to Main
- Skip to Footer
How to Use Oral Presentations to Help English Language Learners Succeed
Please try again

Excerpted from “ The ELL Teacher’s Toolbox: Hundreds of Practical Ideas to Support Your Students ,” by Larry Ferlazzo and Katie Hull Sypnieski, with permission from the authors.
Having the confidence to speak in front of others is challenging for most people. For English Language Learners, this anxiety can be heightened because they are also speaking in a new language. We’ve found several benefits to incorporating opportunities for students to present to their peers in a positive and safe classroom environment. It helps them focus on pronunciation and clarity and also boosts their confidence. This type of practice is useful since students will surely have to make presentations in other classes, in college, and/or in their future jobs. However, what may be even more valuable is giving students the chance to take these risks in a collaborative, supportive environment.
Presentations also offer students the opportunity to become the teacher—something we welcome and they enjoy! They can further provide valuable listening practice for the rest of the class, especially when students are given a task to focus their listening.
Research confirms that in order for ELLs to acquire English they must engage in oral language practice and be given the opportunity to use language in meaningful ways for social and academic purposes (Williams & Roberts, 2011). Teaching students to design effective oral presentations has also been found to support thinking development as “the quality of presentation actually improves the quality of thought, and vice versa” (Živković, 2014, p. 474). Additionally, t he Common Core Speaking and Listening Standards specifically focus on oral presentations. These standards call for students to make effective and well-organized presentations and to use technology to enhance understanding of them.
GUIDELINES AND APPLICATION
Oral presentations can take many different forms in the ELL classroom—ranging from students briefly presenting their learning in small groups to creating a multi-slide presentation for the whole class. In this section, we give some general guidelines for oral presentations with ELLs. We then share ideas for helping students develop their presentation skills and describe specific ways we scaffold both short and long oral presentations.
We keep the following guidelines in mind when incorporating oral presentations into ELL instruction:

Length —We have students develop and deliver short presentations (usually 2-4 minutes) on a regular basis so they can practice their presentation skills with smaller, less overwhelming tasks. These presentations are often to another student or a small group. Once or twice a semester, students do a longer presentation (usually 5-8 minutes), many times with a partner or in a small group.
Novelty —Mixing up how students present (in small groups, in pairs, individually) and what they use to present (a poster, a paper placed under the document camera, props, a slide presentation, etc.) can increase engagement for students and the teacher!
Whole Class Processing -- We want to avoid students “tuning out” during oral presentations. Not only can it be frustrating for the speakers, but students also miss out on valuable listening practice. During oral presentations, and in any activity, we want to maximize the probability that all students are thinking and learning all the time. Jim Peterson and Ted Appel, administrators with whom we’ve worked closely, call this “whole class processing” (Ferlazzo, 2011, August 16) and it is also known as active participation. All students can be encouraged to actively participate in oral presentations by being given a listening task-- taking notes on a graphic organizer, providing written feedback to the speaker, using a checklist to evaluate presenters, etc.
Language Support —It is critical to provide ELLs, especially at the lower levels of English proficiency, with language support for oral presentations. In other words, thinking about what vocabulary, language features and organizational structures they may need, and then providing students with scaffolding, like speaking frames and graphic organizers. Oral presentations can also provide an opportunity for students to practice their summarizing skills. When students are presenting information on a topic they have researched, we remind them to summarize using their own words and to give credit when using someone else’s words.
Technology Support —It can’t be assumed that students have experience using technology tools in presentations. We find it most helpful using simple tools that are easy for students to learn (like Powerpoint without all the “bells and whistles” or Google Slides). We also emphasize to students that digital media should be used to help the audience understand what they are saying and not just to make a presentation flashy or pretty. We also share with our students what is known as “The Picture Superiority Effect”-- a body of research showing that people are better able to learn and recall information presented as pictures as opposed to just being presented with words (Kagan, 2013).
Groups -- Giving ELLs the opportunity to work and present in small groups is helpful in several ways. Presenting as a group (as opposed to by yourself) can help students feel less anxious. It also offers language-building opportunities as students communicate to develop and practice their presentations. Creating new knowledge as a group promotes collaboration and language acquisition--an ideal equation for a successful ELL classroom!
Teacher feedback/student evaluation --The focus of oral presentations with ELL students should be on the practice and skills they are gaining, not on the grade or “score” they are earning. Teachers can give out a simple rubric before students create their presentations. Then students can keep these expectations in mind as they develop and practice their presentations. The teacher, or classmates, can then use the rubric to offer feedback to the speaker. We also often ask students to reflect on their own presentation and complete the rubric as a form of self-assessment. Figure 30.1 – “Presentation Peer Evaluation Rubric” , developed by talented student teacher Kevin Inlay (who is now a teacher in his own classroom), is a simple rubric we used to improve group presentations in our ELL World History class.
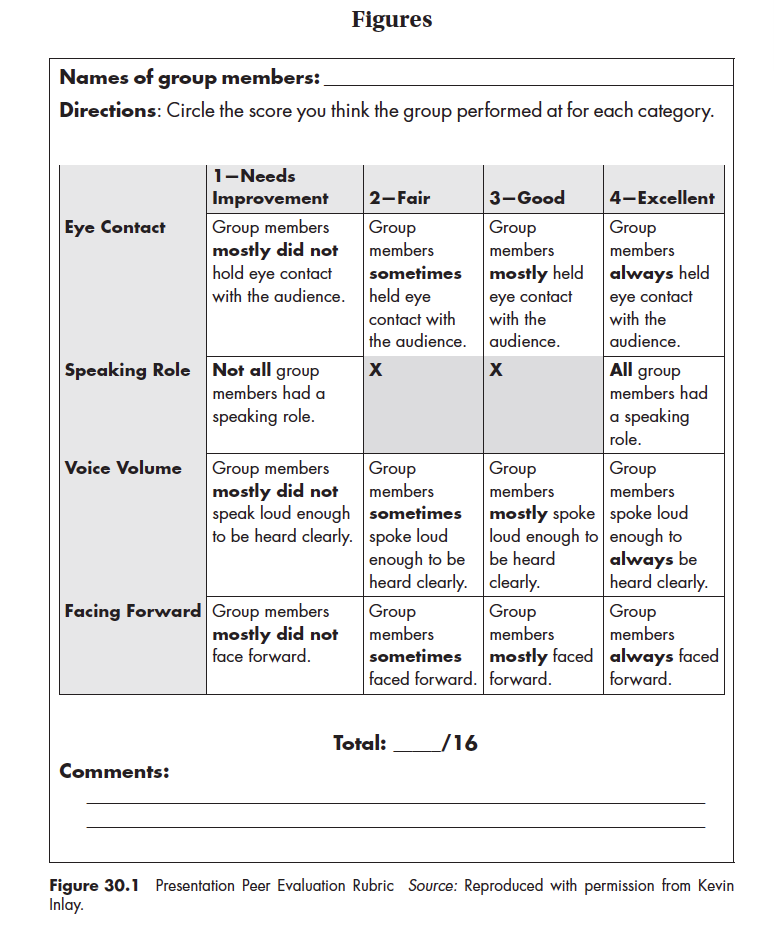
Teaching Presentation Skills
We use the following two lesson ideas to explicitly teach how to develop effective presentation skills:
LESSON ONE: Speaking and Listening Do’s and Don’ts
We help our students understand and practice general presentation skills through an activity we call Speaking and Listening “Do’s and Don’ts.” We usually spread this lesson out among two class periods.
We first ask students to create a simple T-chart by folding a piece of paper in half and labeling one side “Do” and the other side “Don’t.” We then post Figure 30.2 “Speaking Do’s and Don’ts” on the document camera and display the first statement (the rest we cover with a blank sheet of paper).
We read the first statement, “Make eye contact with the audience,” and ask students if this is something they want to do when they are giving a presentation or if it is something they don’t want to do. Students write the statement where they think it belongs--under the “Do” column or “Don’t” Column. Students then share their answer with a partner and discuss why they put it in that column. After calling on a few pairs to share with the class, we move down the list repeating the same process of categorizing each statement as a “Do” or a “Don’t.” Students write it on their chart and discuss why it should be placed there.
After categorizing the statements for speaking, we give students Figure 30.3 “Listening Do’s and Don’ts .” We tell students to work in pairs to categorize the statements as something they do or something they don’t want to do when listening to a student presentation. This time, we ask students to make a quick poster with the headings “Do’s” and “Don’ts” for Listening. Under each heading students must list the corresponding statements--the teacher can circulate to check for accuracy. Students are asked to talk about why each statement belongs in each category and should be prepared to share their reasoning with the class. Students must also choose one “do” statement and one “don’t” statement to illustrate on their poster. Students can present their posters in small groups or with the whole class. This serves as a great opportunity to apply the speaking and listening “do’s” they just reviewed and heightens their awareness of the “don’ts!”
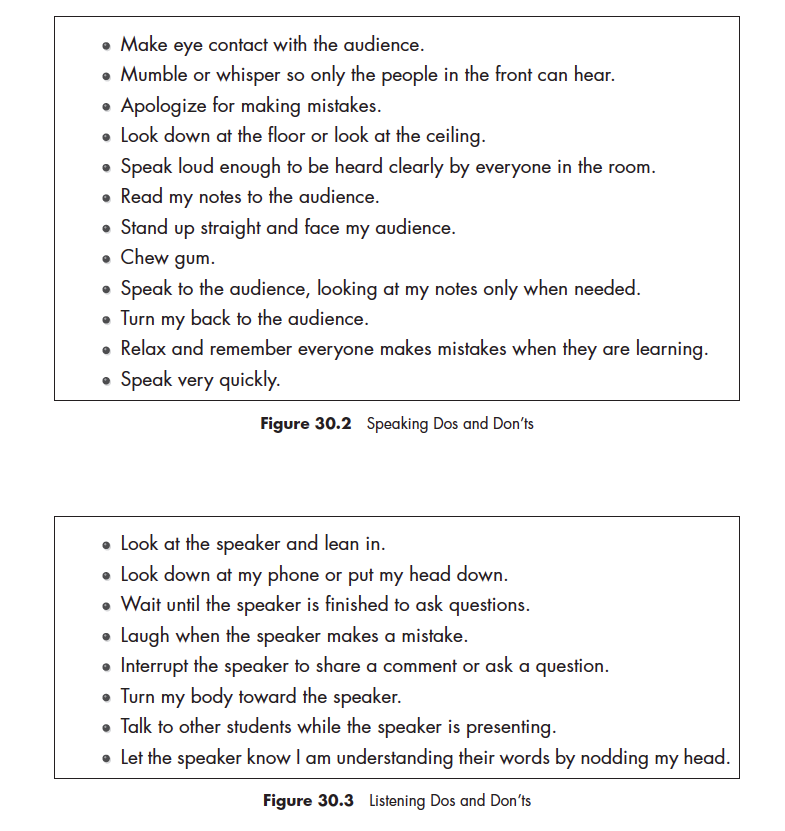
A fun twist, that also serves as a good review on a subsequent day, is to ask groups of students to pick two or three “do’s” and “don’ts” from both Speaking and Listening to act out in front of the class.
LESSON TWO Slide Presentations Concept Attainment
We periodically ask students to make slide presentations using PowerPoint or Google Slides to give them practice with developing visual aids (see the Home Culture activity later in this section). We show students how to make better slides, along with giving students the language support they may need in the form of an outline or sentence starters. An easy and effective way to do this is through Concept Attainment.
Concept Attainment involves the teacher identifying both "good" and "bad" examples of the intended learning objective. In this case, we use a PowerPoint containing three “good” slides and three “bad” ones (see them at The Best Resources For Teaching Students The Difference Between A Good and a Bad Slide ).
We start by showing students the first example of a “good” or “yes” slide (containing very little text and two images) and saying, “This is a yes.” However, we don’t explain why it is a “yes.” Then we show a “bad” or “no” example of a slide (containing multiple images randomly placed with a very “busy background”), saying, “This is a no” without explaining why. Students are then asked to think about them, and share with a partner why they think one is a "yes" and one is a "no."
At this point, we make a quick chart on a large sheet of paper (students can make individual charts on a piece of paper) and ask students to list the good and bad qualities they have observed so far. For example, under the “Good/Yes” column it might say “Has less words and the background is simple” and under the “Bad/No” column “Has too many pictures and the background is distracting.”
We then show the second “yes” example (containing one image with a short amount of text in a clear font) and the “no” example (containing way too much text and using a less clear font style). Students repeat the “think-pair-share” process and then the class again discusses what students are noticing about the “yes” and “no” examples. Then they add these observations to their chart.
Students repeat the whole process a final time with the third examples. The third “yes” example slide contains one image, minimal text and one bullet point. The third “no” example, on the other hand, contains multiple bullet points.
To reinforce this lesson at a later date, the teacher could show students more examples, or students could look for more “yes” and “no” examples online. They could continue to add more qualities of good and bad slides to their chart. See the Technology Connections section for links to good and bad PowerPoint examples, including the PowerPoint we use for this Concept Attainment lesson.
You can learn more about other presentations that support public speaking, such as home culture presentations, speed dating, talking points, top 5 and PechaKucha Book talks in our book, “ The ELL Teacher’s Toolbox: Hundreds of Practical Ideas to Support Your Students .”

Larry Ferlazzo has taught English Language Learners, mainstream and International Baccalaureate students at Luther Burbank High School in Sacramento for 15 years. He has authored eight books on education, hosts a popular blog for educators, and writes a weekly teacher advice column for Education Week Teacher . He was a community organizer for 19 years prior to becoming a high school teacher.

Katie Hull Sypnieski has worked with English Language Learners at the secondary level for over 20 years. She currently teaches middle school ELA and ELD at Rosa Parks K-8 School in Sacramento, California. She is a teaching consultant with the Area 3 Writing Project at the University of California, Davis and has leads professional development for teachers of ELLs. She is co-author (with Larry Ferlazzo) of The ESL/ELL Teacher’s Survival Guide and Navigating the Common Core with English Language Learners .

- SUGGESTED TOPICS
- The Magazine
- Newsletters
- Managing Yourself
- Managing Teams
- Work-life Balance
- The Big Idea
- Data & Visuals
- Reading Lists
- Case Selections
- HBR Learning
- Topic Feeds
- Account Settings
- Email Preferences
How to Make a “Good” Presentation “Great”
- Guy Kawasaki

Remember: Less is more.
A strong presentation is so much more than information pasted onto a series of slides with fancy backgrounds. Whether you’re pitching an idea, reporting market research, or sharing something else, a great presentation can give you a competitive advantage, and be a powerful tool when aiming to persuade, educate, or inspire others. Here are some unique elements that make a presentation stand out.
- Fonts: Sans Serif fonts such as Helvetica or Arial are preferred for their clean lines, which make them easy to digest at various sizes and distances. Limit the number of font styles to two: one for headings and another for body text, to avoid visual confusion or distractions.
- Colors: Colors can evoke emotions and highlight critical points, but their overuse can lead to a cluttered and confusing presentation. A limited palette of two to three main colors, complemented by a simple background, can help you draw attention to key elements without overwhelming the audience.
- Pictures: Pictures can communicate complex ideas quickly and memorably but choosing the right images is key. Images or pictures should be big (perhaps 20-25% of the page), bold, and have a clear purpose that complements the slide’s text.
- Layout: Don’t overcrowd your slides with too much information. When in doubt, adhere to the principle of simplicity, and aim for a clean and uncluttered layout with plenty of white space around text and images. Think phrases and bullets, not sentences.
As an intern or early career professional, chances are that you’ll be tasked with making or giving a presentation in the near future. Whether you’re pitching an idea, reporting market research, or sharing something else, a great presentation can give you a competitive advantage, and be a powerful tool when aiming to persuade, educate, or inspire others.
- Guy Kawasaki is the chief evangelist at Canva and was the former chief evangelist at Apple. Guy is the author of 16 books including Think Remarkable : 9 Paths to Transform Your Life and Make a Difference.
Partner Center
How to Give an Oral Presentation?
- Open Access
- First Online: 24 October 2021
Cite this chapter
You have full access to this open access chapter

- Samiran Nundy 4 ,
- Atul Kakar 5 &
- Zulfiqar A. Bhutta 6
28k Accesses
1 Citations
1 Altmetric
An oral presentation is a form of communication, where you impart and then exchange information with your audience. This can be either one-way, a didactic, or two-way called a Socratic or a Dialectic presentation. There are many forms of oral presentation and you should find out where and when you are required to speak [1]. The National Training Laboratory in Maine, USA has suggested a ‘cone’ of learning or learning ‘pyramid’. In this, they have found that the most effective way of learning is through teaching others. Most students remembered only 10% of the material given in books but remembered 90% of the facts they learned when they had to teach others [2] (Fig. 38.1).
The first 30 seconds and the last 30 seconds have the most impact in a presentation. — Patricia Fripp, American author
You have full access to this open access chapter, Download chapter PDF
Strategies for the Preparation and Delivery of Oral Presentation

How to Prepare and Give a Scholarly Oral Presentation

See It, Speak It, Draw It, and Learn to Communicate in Simple Language
An oral presentation is a form of communication, where you impart and then exchange information with your audience. This can be either one-way, a didactic, or two-way called a Socratic or a Dialectic presentation. There are many forms of oral presentation and you should find out where and when you are required to speak [ 1 ]. The National Training Laboratory in Maine, USA has suggested a ‘cone’ of learning or learning ‘pyramid’. In this, they have found that the most effective way of learning is through teaching others. Most students remembered only 10% of the material given in books but remembered 90% of the facts they learned when they had to teach others [ 2 ] (Fig. 38.1 ).
The Lecture is an old way of teaching and by convention called the ‘chalk and talk’ method. The talk needs to be prepared carefully but it is thought to be an ineffective way of imparting knowledge. The flow of ideas and organization of a lecture is an art. It is usually taken by a qualified person. In this, there is passive learning of the attendees as it is a one-way communication. The number of people in a lecture should be around 30 and its duration should be 15–20 minutes. In a lecture during a conference, the number of participants can vary from 50 to 1000.
Symposium —This consists of a series of lectures usually on a single selected topic. Each speaker gives a brief presentation, there is no discussion between the speakers during the presentation and finally the chairman summarizes the talks. People who speak in symposia are experts in the field and all talks are delivered in a single day.
Group discussion or Round table talk —In this, there is a face-to-face discussion between a group of people of usually 6–12 members who sit around a table. The leader initiates the talk and the other members give their opinions. Most round table sessions are fairly structured and require attention to time management and content, with intermittent audience participation.
Workshop— This is a series of lectures in a smaller group. There is an interaction between the members but it is usually at a local level.
Seminar— This is a half to full-day discussion on a particular topic with about 30–40 participants.
Debate— This is an increasingly popular format utilized in larger meetings with two speakers discussing controversy and arguing for either side. This can be through formal presentations or interactive discussions.

Retention rate of various teaching methods adapted from National Training Laboratories, Bethel, Maine, USA
All these teaching activities can now be virtual and recent circumstances have indicated that this might be the ‘new normal’. Physicians need to be accustomed to this as it may be the way forward for medical education.
2 Does the Success of an Oral Presentation Depend on the Audience?
This is generally true and a presentation works if:
The audience feels the need for the information.
Is enthusiastic.
The subject is applicable to their clinical practice.
Its content is clear and easy to grasp.
There is active audience participation.
Multiple ways of presentation are used, i.e., PowerPoint slides and videos.
3 What Is a Powerful Oral Presentation?
A powerful oral presentation can be summarized with 5 C’s
Contains C rucial information
There is a Clear style of presentation
Confidently delivered
With Concise data
The delivery is Creative and Clever
4 What Are the Steps You Should Take Before an Oral Presentation?
An oral presentation can be divided into:
A Pre-Presentation stage
The Presentation
The Post-presentation stage [ 3 , 4 , 5 ]
In the Pre-Presentation stage:
It is important to check the venue and equipment. It is always better to arrive on time, load the presentation, and recheck it in the preview room to see if the presentation is in order. You should also check with the organizer whether there is double projection, because this requires a lot of coordination and rehearsal.
Check the podium and make a mental picture of how much of the area of the podium and dais you will use during the presentation. Currently, many people follow the TED (Technology, Entertainment, Design) format where there is no podium and they use the entire stage for the talk. For this type of presentation, you should be a seasoned public speaker. Body language is important in this.
Find out about your target audience—general physicians, a mixed group of doctors, a specialty group, or the lay public. However, if it is a speciality lecture the content should cater only to specialists.
You should be appropriately dressed—properly and professionally.
It is always better to email the presentation in case there is a hitch in your pen drive function at the last minute.
Before planning the presentation, go through the programme of the conference as many of the topics in the session might have been covered by someone else. So, those aspects should be omitted from your talk.
The preparation time for your lecture, whether it is 10 min or 30 min long is the same as you need to review all the relevant literature before the presentation. The shorter the talk the more difficult it is to condense and give a powerful performance.
‘Rehearse, rehearse and rehearse’ are the three most important mantras for a flawless delivery.

5 How to Deliver an Oral Presentation?
Making a presentation is a skilful art, which has to be learned over years. Richard Leech, a medically qualified actor, stated that ‘Lecturing is like Acting, where you have to a tell a tale to the audience but it is more difficult than acting because you have to write the script as well’. You cannot inherit the ability to give a good lecture—it comes with repeated practice and as you lecture more you become more confident of speaking in public.
A presentation has two important components, i.e., its content and style.
The content can be further divided into introductory slides, the main text, and conclusions.
The Introduction is the most powerful part of the presentation. There are various models that have been suggested for an introduction slide.
The expected introduction would be to greet the audience and start reading the slides. However, this approach although considered polite, is benign, boring, and lacks power and passion.
Model 1–2-3 consists of, step 1 to greet the audience, step 2 pause, and step 3 is to make an attention-grabbing statement or relate a story that is linked to the presentation.
The opening few slides should make the audience believe that you are the best person to deliver this lecture and also it has important content for them (WIIFM—What’s in it for me?). In case the chairperson has not introduced you it would be relevant to provide some personal and professional information in the first few slides. Typically, the introduction should take 2–3 minutes or 10–15% of your allotted time. This is also the time you will take to establish a relationship with your audience.
Thus, the introduction slides are:
The first contact with the audience and they set the tone for the rest of the lecture.
An opportunity to grab the audience’s attention.
You can start by asking a question or pose a hypothesis to the audience.
The main body of the talk should be divided into 3–4 subheadings and each subheading should have a learning and take-home message to reduce the monotony and increase (Fig. 38.1 ) the learning. The content of the presentation should also contain the purpose of the talk. Although information repeated is important for learning, unnecessary facts are usually boring. You should use diagrams, charts, cartoons, tables, and photos to decrease the written parts.
You should use varied modes of presentation which may include PowerPoint slides, clips of videos, or discuss real-world scenarios. These make the presentation more interesting.
The Conclusions can take up the last few slides and rather than re-stating the same sentences try to find new and easily understood words.
As for the style of the presentation, it should be bold and exude confidence.
The other qualities are:
Maintain calm—Many people get anxious when it comes to an oral presentation. Mild anxiety increases the androgenic drive which makes the presentation more exciting, however, if you have moderate-to-severe anxiety it may manifest as jitteriness and you may fumble. Sometimes deep breathing exercises can help to allay symptoms of anxiety. Do not take any drugs before the presentation.
Rehearse your presentation. This has two advantages—you can do time management and you can speak with clarity on all the important slides. You should not read out the slide but use it as a point of reference to dilate on the subject. Under all circumstances, DON’T read your slides!
You should not be nervous, shuffle, fidget, and fumble once you are on stage. Even if you are anxious, like a good actor you should not show it.
A boring presentation can be judged by the non-verbal communication during it. The audience will see how many people are sleeping, busy on their cell phones and how many are learning and taking notes.
During the presentation, you should have eye contact with the audience and not with the slides.
6 What Should Be Done in the Post-Presentation Period?
You should invite questions. Do not be afraid to answer questions because you as a presenter have more knowledge about the subject than the audience [ 5 ]. The questions can be answered by saying ‘thank you, it was an intelligent question’. The answer to the question should be brief and should not be the signal to launch a second presentation.
The questions after the lecture can be divided into irrelevant . For which you need to be polite in answering, profound to which you can regret that there is a lack of time and the person can interact with you during the break or might be challenging and requires inputs from the house. You can ask for a show of hands or a debate on such challenging questions.
7 What Should Be the Speed of the Presentation?
The newsreaders on the media speak at 120–130 words per minute. You need to practice this. If you speak very fast the information is not grasped. In the case of an international talk, you need to speak slowly as language and pronunciation may be a problem for the audience [ 6 ].
8 Should You Take Short Pauses During a 30-Minute Talk?
You should not take a pause or stop the presentation as it becomes boring for the audience. There is an attention curve that is maximum in the first few minutes of the lecture and then during the last portion of the lecture (Fig. 38.1 ). However, in case the lecture is lengthy, you can change the tone of your voice or show a visual aid rather than pause. In general, avoid lectures exceeding 30 min and as a general principle, try not to exceed one slide per minute.
9 What Kind of Slides Should There Be?
The background of the slide should be such that the information written is clear; traditionally a light colour with black writing is recommended. There should be no more than 6–8 lines in a slide with not more than 8 words in a line and with proper alignment. No detailed sentences are required while making the slide [ 7 , 8 ]. Examples of good and bad slides are shown in Figs. 38.2 and 38.3 .

Example of good studies

Example of bad studies
10 What Are the Ten Steps Towards a Robust PowerPoint Presentation?
Delivering PowerPoint presentation requires skill in public speaking. Below we summarize the six steps for a power-packed presentation [ 9 ].
Step 1 —Know what are goals of your presentation. Is it to educate the audience on a naïve subject or to update existing knowledge?
Step 2 —Know your audience. It is usually said that one size does not fit all and similarly your audience may be heterogenous and your aim will be to give all of them a basic level of information. Each time there is a new audience your slides should change accordingly.
Step 3 —Prepare an outline of your talk. Each topic can be subdivided into small topics and try to focus on 3–4 subpoints in your presentation.
Step 4 —Build up your subpoints. Work on the ‘pyramidal’ approach to build up your presentation (Fig. 38.4 ).

The Minto Pyramid
Step 5 —know the layout, designs, and background available. Few of the layouts and background designs are shown (Fig. 38.5 ).

Some designs available
Step 6 —Your PowerPoints slides should be perfect. Use a font which is legible, a background colour which is soothing, and a template which suits your presentation.
Step 7 —Follow the 5/5/5 rule that is not more than five words in line, not more than five lines per slide, and no more than five text slides in a row.
Step 8— Adjust the number of slides according to the time allowed. For a five-minute presentation about 5–6 slides are recommended.
Step 9 —The slide design should match the audience and ambience.
Step 10 —Use graphs, photos, and other visual aids to decrease the monotony.
11 What Is the Conclusion for an Oral Presentation?
Conclude by recapitulating what you have said in your slides. Why did you do this study, How did you do it, what results did you get and what is your ‘take home’ message.
An Oral presentation is a powerful way of communication with the audience. It should be presented clearly and with confidence.
The Stages of an oral presentation include the pre-presentation preparation, podium presentation, and post-presentation period. An Oral presentation is an art that is learnt with time.
The Slides for an oral presentation should follow the 5 × 5 rules.
Conference Monkey Last accessed on 12th May 2020. Available on https://conferencemonkey.org/blog/whats-the-difference-between-a-conference-a-seminar-a-workshop-and-a-symposium-1075915 .
Ken Masters. Edgar Dale’s Pyramid of Learning in medical education: A literature review, Medical Teacher 2013;35:11, e1584–e1593.
Google Scholar
Haber RJ, Lingard LA. Learning oral presentation skills: a rhetorical analysis with pedagogical and professional implications. J Gen Intern Med. 2001;16:308–14.
Article CAS Google Scholar
Bourne PE. Ten simple rules for making good oral presentations. PLoS Comput Biol. 2007;3(4):e77.
Article Google Scholar
Hall GH. How to present at meetings. BMJ; 2001, London.
What’s your speech rate. Last accessed on 12th May 2020. Available on https://www.write-out-loud.com/speech-rate.html .
How to give successful oral presentation. Last accessed on 12th May 2020. Available on https://www.scientificleaders.com/presentations/ .
Top eight rules to make PowerPoint presentation. Last accessed on 12th May 2020. Available on https://www.pharmacoepi.org/pub/?id=76a123f3-c419-8689-f823-a38e28f5fd02 .
How to make & give great PowerPoint presentations (in 5 simple steps). Last accessed on 12th July 2020. Available on https://business.tutsplus.com/tutorials/how-to-make-and-give-great-powerpoint-presentations%2D%2Dcms-28734 .
Download references
Author information
Authors and affiliations.
Department of Surgical Gastroenterology and Liver Transplantation, Sir Ganga Ram Hospital, New Delhi, India
Samiran Nundy
Department of Internal Medicine, Sir Ganga Ram Hospital, New Delhi, India
Institute for Global Health and Development, The Aga Khan University, South Central Asia, East Africa and United Kingdom, Karachi, Pakistan
Zulfiqar A. Bhutta
You can also search for this author in PubMed Google Scholar
Rights and permissions
Open Access This chapter is licensed under the terms of the Creative Commons Attribution 4.0 International License ( http://creativecommons.org/licenses/by/4.0/ ), which permits use, sharing, adaptation, distribution and reproduction in any medium or format, as long as you give appropriate credit to the original author(s) and the source, provide a link to the Creative Commons license and indicate if changes were made.
The images or other third party material in this chapter are included in the chapter's Creative Commons license, unless indicated otherwise in a credit line to the material. If material is not included in the chapter's Creative Commons license and your intended use is not permitted by statutory regulation or exceeds the permitted use, you will need to obtain permission directly from the copyright holder.
Reprints and permissions
Copyright information
© 2022 The Author(s)
About this chapter
Nundy, S., Kakar, A., Bhutta, Z.A. (2022). How to Give an Oral Presentation?. In: How to Practice Academic Medicine and Publish from Developing Countries?. Springer, Singapore. https://doi.org/10.1007/978-981-16-5248-6_38
Download citation
DOI : https://doi.org/10.1007/978-981-16-5248-6_38
Published : 24 October 2021
Publisher Name : Springer, Singapore
Print ISBN : 978-981-16-5247-9
Online ISBN : 978-981-16-5248-6
eBook Packages : Medicine Medicine (R0)
Share this chapter
Anyone you share the following link with will be able to read this content:
Sorry, a shareable link is not currently available for this article.
Provided by the Springer Nature SharedIt content-sharing initiative
- Publish with us
Policies and ethics
- Find a journal
- Track your research
IMAGES
VIDEO
COMMENTS
Delivery. It is important to dress appropriately, stand up straight, and project your voice towards the back of the room. Practise using a microphone, or any other presentation aids, in advance. If you don't have your own presenting style, think of the style of inspirational scientific speakers you have seen and imitate it.
1. Prepare your cue cards. Do not paste your entire script on to the cue cards. Key words are your best friend in an oral presentation. Only having certain key words on your script allows you to easily track your train of words and gives you the opportunity to focus on your audience.
Oral presentations typically involve three important steps: 1) planning, 2) practicing, and 3) presenting. 1. Planning Oral presentations require a good deal of planning. Scholars estimate that approximately 50% of all mistakes in an oral presentation actually occur in the planning stage (or rather, lack of a planning stage). Make sure to ...
Oral Presentations. With some thoughtful reflection and minor modification, student presentations can be as valuable online as they are in person. In deciding how to modify your assignment for remote teaching, it is key to reflect on what you hoped to assess about your students' learning through their presentations in the first place.
Only use bullet points. You should not have full sentences on PowerPoint or Prezi because they distract from your speech and you want your audience to listen, not read. Use short fragments or keywords to keep your presentation organized. Have a backbone slide. Have a slide that demonstrates the direction your presentation will have by outlining ...
Use this animation to help you prepare for an oral presentation.Back to page: https://www.learnquebec.ca/how-to-do-an-oral-presentation1Check out more of our...
If you need to focus on more than one point, re-present the illustration in another form on a separate slide with the different point emphasized. Titles. Give most slides titles, with a font size of at least 36 points, and body text with a font size of at least 24 points. ... For more advice on giving oral presentations and the use of ...
Oral Presentations. An oral presentation is usually more than just reading a paper or set of slides to an audience (though in some disciplines, this is the expectation). How you deliver your presentation is as important in communicating your message as what you say. Use these guidelines to learn simple tools that help you prepare and present an ...
Preparing for oral presentations begins with preparing the presentation itself. Presentations usually consist of two aspects: the oral part itself, and the presentations made in Microsoft PowerPoint that will help you to illustrate your points. When it comes to what you will be saying during your oral presentation, you should know that, no ...
Table 1 Strategies for PowerPoint presentations. Full size table. ... Just like academic papers, oral presentations need to have a structure—a beginning and an end. To assist the audience in following the oral presentation, best practices include starting with an overview. An overview lets the audience know where the presentation is going and ...
Don't hide behind the computer monitor when you run your PowerPoint presentation. Don't stare down into your notes, either; ... I am taking an Organizational Behavior class and need to do a 5 minute oral presentation on a real life situation about Conflict Management in the Workplace. I am not sure how to structure or begin the presentation.
Page ID. In the workplace, and during your university career, you will likely be asked to give oral presentations. An oral presentation is a key persuasive tool. If you work in marketing, for example, you will often be asked to "pitch" campaigns to clients. Even though these pitches could happen over email, the face-to-face element allows ...
Here are a few tips for business professionals who want to move from being good speakers to great ones: be concise (the fewer words, the better); never use bullet points (photos and images paired ...
Difference between Normal View & Slide Show View, Presenting Keyboard ShortcutsHow you design and use visual/audio aids in an oral presentation like a speech...
doing it in person. Usually, presentations would have 10 to 20 slides for a 10-minute talk, so your presentation should have no more than 20 slides. • As you plan your presentation, it is a good idea to use a rubric as a guide. Please see the oral presentation rubric available on the "Prepare to Present" tab our website. The Fall Showcase ...
An easy way to do this is by using the 5×5 rule. This means using no more than 5 bullet points per slide, with no more than 5 words per bullet point. It is also good to break up the text-heavy slides with ones including diagrams or graphs. This can also help to convey your results in a more visual and easy-to-understand way.
Great PowerPoint slides do not make a great oral presentation. Your slides should be based on your planned talk. Think about your slides last - they should assist you with the presentation, not be the presentation itself! Text. Select the right font and font size - easy to read and clear. Avoid text-heavy slides.Use bold or CAPITALS for ...
To request information without consenting, please call 844-977-8323. Expert advice can help make your oral presentations more effective. At Walden University, helpful guides like Oral Presentation and Powerpoint are part of the academic experience, making your education as relevant as possible for today's competitive job market.
Group presentations have many of the same elements as the individual oral presentation; however, the topic is shared between 3-4 learners. This can take the pressure off the individual because more than one person is responsible for covering the topic. Depending on the mix of the team, this can be a positive or a negative.
Take a pause after you ask a question or make a strong statement. Spare your audience a moment to think, reflect, and ponder. Or leave a gap of silence right before you present something exciting to build suspense and anticipation. No one expects you to go on talking for 10-15 minutes without a pause.
The oral presentation is a critically important skill for medical providers in communicating patient care wither other providers. It differs from a patient write-up in that it is shorter and more focused, providing what the listeners need to know rather than providing a comprehensive history that the write-up provides.
Research confirms that in order for ELLs to acquire English they must engage in oral language practice and be given the opportunity to use language in meaningful ways for social and academic purposes (Williams & Roberts, 2011). Teaching students to design effective oral presentations has also been found to support thinking development as "the ...
When in doubt, adhere to the principle of simplicity, and aim for a clean and uncluttered layout with plenty of white space around text and images. Think phrases and bullets, not sentences. As an ...
An oral presentation is a form of communication, where you impart and then exchange information with your audience. This can be either one-way, a didactic, or two-way called a Socratic or a Dialectic presentation. There are many forms of oral presentation and you...