Azure and automation

Create role assignments for different scopes with Bicep
When you create Azure resources with Bicep, you are able to set up role assignments as well. This can be very useful in different scenario’s as it enables you to add an extra layer to your infra as code, which you don’t have to perform manually or through other automation. A role assignment is a resource when you use it in Bicep and can be defined as such, but handling the different scope levels can be a challenge. That is why in this post, I will explain how to create role assignments for different scopes with Bicep.
Before you read on, I recommend you scan through this page in the Microsoft Docs , which gives a great explanation of the different properties of a role assignment. In this post, we will focus on how to handle the scope. To do so, I will walk through all scopes with examples of how a template could be deployed.
Management Group Scope
Let’s start with the biggest scope we have available in Azure resource manager: Management Group. This is how you define the role assignment in Bicep:
To deploy it and set the parameters, you can use different methods. For this post I have used PowerShell. As you can see, you need to define the Id for both the roledefinition and the principalID. To make this a bit easier and more readable, I have made use of Get-AzADUser and Get-AzRoleDefinition
Deployment would go like this:
This deployment would refer to the file rbac-mg.bicep , which it will use to give the user [email protected] the reader role over the management group exampleGroup. Of course you change the values to your own use case.
Subscription scope
So how do we do the same for a subscription? Fortunately, we don’t have to make that many changes. We change the following values:
- Change targetScope = 'managementGroup' to targetScope = 'subscription'
- managementGroup() is changed to subscription()
- managementGroup().id is changed to subscription().subscriptionId
This is all we have to do for the Bicep template. You can find the new template here .
Note: if you don’t define the targetscope, it will by default use the subscription if you use New-AzDeployment. But for readability, you could consider specifying it anyway.
As for the PowerShell deployment, that would now look like this:
The role assignment will be deployed to the current scope of the PowerShell session, which you can find by using Get-AzContext .
Resource Group Scope
The resource scope is very similar to the subscription scope. Again, you change the targetscope and the references from subscription() to resourcegroup() . And for resource groups as well you are able to leave out the targetscope, but you could consider adding it for readability.
To see what the Bicep file would look like, click here .
And deployment would go like this:
Resource scope
A resource resource role assignment is a little different than the previous deployments. You need to refer to the resource within the role assignment, which you do with the scope parameter. To show how it works, I have used a storage account as an example.
A role assignment to a resource has a different use case than to one of the other scopes. If you are doing an assignment for users, a Resource scope is possible, but can make your environment very complicated. It is recommended to keep the assignments at a higher level. That is different for managed identities or service principles. They need the least amount of principal and could be set on a resource level. An example is a key vault, where you want the role assignment to be very specific.
This is what the bicep file could look like:
I have removed all flexibility in the storage account to keep the focus. In production, you would want some flexibility in the properties of the storage account.
Deployment is the same method as the resource group scope:
Deployment in Modules
This is all cool, but one of the great things about Bicep is the use of modules! So how would you do that? For Management groups, subscriptions, or resource groups, that is pretty straight forward. All of the above files can be used as a module and deployed from a different file with the following syntax:
Now with Resources, it is a little more difficult. As we have seen before, you have to define the scope within the role assignment. You are not able to use a parameter for this scope, as it needs the resource itself as a scope. This makes it more difficult to provide flexibility. Even if you would consider making use of the existing option, you wouldn’t get flexibility as you need to define the resource type there. So how doe we make sure we don’t have to create a separate rbac-module for every resource type?

The answer can be found in the files in the brand new public registry : you make the role assignment a part of the resource module. So in this case, for every storage account you provide the option to add a role assignment in the module file.
But you still need flexibility. Flexibility to not create a role assignment or to create multiple. Again, we can find a great method at the public registry : we use a for loop that is empty by default. If the role assignment is not needed, just don’t add it as a parameter. If you need more than one, you add them as an array. Let’s see how that would look.
The template
Although the registry uses a submodule, I prefer to add it straight to the resource. This is how the module for a storage account would look:
If we want to create the resource without role assignment, we just omit the roleAssignments parameter. If we do want to create one (or multiple), our main.bicep file would refer to it like this:
By using this method for every resource you have in a module, you will have some duplicate code, but you won’t have a separate rbac-module for every resource type. This will keep your module files clean but still provide flexibility.
So this is how you create role assignments for different scopes with Bicep. You can find all the complete Bicep files that are referred to here .
If you want to learn more about Bicep, follow along with the LearnLive series that are running right now: https://aka.ms/learnlive-iac-and-bicep
Related Posts:

I’m also having a problem with the scope of a role assignment. Your post was helpful, but I do have one question. For the example for management group scope, there’s a parameter called “ManagementGroupId”, but it doesn’t seem to be used. I see the role definition is created a the management group level. Is the role assignment also defined at the management group level by default? I assume that’s the case since the targetScope = “managementGroup”. Thanks.

Great article Barbara. Thanks so much!
Leave a Reply Cancel reply
Your email address will not be published. Required fields are marked *
Like often, some automation can make your life just easier! I hope you’ve enjoyed this one!
UPCOMING TRAININGS
CHECK OUT OUR TRAININGS
Azure Integration Services
Azure migration.
- Azure Governance
Azure Security
Azure foundations, recent posts.
- Azure Service Bus vs Event Grid Pull Delivery
- Trying the new Microsoft Applied Skills
- Finally a correct way to configure RBAC for DevOps agents!
- What do the new API Management v2 tiers mean for you?
- Validate payloads in Azure API Management
- Announcement
- API Management
- Architecture
- Azure App Service
- Azure Data Factory
- Azure DevOps
- Azure Event Grid
- Azure Functions
- Azure Kubernetes Service
- Azure Policy
- Azure Resource Graph
- Azure Resource Manager
- Azure Service Bus
- Azure Stream Analytics
- BizTalk Server
- Container Apps
- Geen categorie
- Home Automation
- Microsoft Learn
- Service Bus
MEET THE YOUR AZURE COACH TEAM
Your Azure Coach is specialized in organizing Azure trainings that are infused with real-life experience. All our coaches are active consultants, who are very passionate and who love to share their Azure expertise with you.
Toon Vanhoutte
Azure integration services & serverless.

Wim Matthyssen
Azure infra, security & governance, azure development and ai/ml, azure identity and security, stéphane eyskens, cloud-native azure architecture, geert baeke, azure kubernetes service & containerization, maik van der gaag, azure infrastructure as code & devops, bart verboven, sammy deprez, azure ai, ml & cognitive services, sander van de velde.
Assign Azure Privileged Identity Management Roles using Bicep
Azure Privileged Identity Management (PIM) is a tool that allows you to provide Just In Time (JIT) access to Azure RBAC roles. Using PIM, you can create a role assignment to make a user or group eligible for a role. This assignment doesn’t mean that the user or group has the role, but instead that they can request the role when they need it. When this occurs, the user can trigger an elevation request to be granted the role for a short period (usually hours, but definable). Rules can then be applied to their request, such as requiring approval, requiring a ticket number and so on, and then the rights are granted. PIM is a great tool for removing many permanent access rights to users, but it does require an Azure AD P2 licence for each user.
PIM is an Azure AD feature, so I assumed it wouldn’t be possible to create PIM assignments using Bicep (or ARM), but it is possible. PIM roles are often application or service-specific, so being able to create them as part of your Infrastructure as Code is quite helpful.
Creating PIM Assignments
To create a PIM assignment, we are going to use the Microsoft.Authorization/roleEligibilityScheduleRequests , the full API sec for this can be found here . This object can be used for more than just creating an assignment, it can, in theory, be used to activate an assignment, remove assignments and more. We’ll focus on creating and updating assignments.
To be able to use this, we are going to need a couple of pieces of information:
The object ID of the user or group you want to assign the role to. This can be found by looking at the user or group in AAD. You’re looking for the object ID field
The complete ID of the role you want to assign. This is usually in the format:
Subscription ID is the ID of the subscription holding the role you want to assign. The role ID is the GUID of the role. You can find the GUID’s for all the built-in roles in the MS docs here , or you can also use the handy AzRoleAdvertizer site . If you’re applying the assignment at the management group rather than subscription or resource, you will replace this with the ID of the management group role.
With this information, we can create the Bicep code we need. First, we need to get the start date for the role in the correct format. The format is 2022-04-10T14:40:08.067566 but fortunately, the Bicep utcNow function gets this in the correct format, so we can use that. This function can only be used as a default value for a parameter, so we need to create a parameter in our template that we assign this to and won’t override in the future.
Now we have that we can create the actual resource:
A few things to note:
- The name needs to be a GUID, so I am using the guid function to generate one, passing the resource group and a string as a seed to ensure a consistent GUID generation should I run this again
- The request type is set to AdminUpdate. This will create a role if it doesn’t exist and update it if it does. You can use AdminCreate if you want only to create it.
- The schedule info section is setting that the user or group should be eligible to elevate for a year (the max allowed) before the role needs to be reviewed
- I have set the scope to be the resource group. This defines that the PIM role should be for this resource group only. If I wanted to assign rights to elevate over a whole subscription or management group, then I would adjust the scope
The whole template looks like this:
Once deployed, you should be able to go to the PIM UI in the portal and see that the designated user or group is now eligible to elevate to this role.
Permissioning Azure Pipelines with Bicep and Azure RBAC Role Assignments

How can we deploy resources to Azure, and then run an integration test through them in the context of an Azure Pipeline? This post will show how to do this by permissioning our Azure Pipeline to access these resources using Azure RBAC role assignments. It will also demonstrate a dotnet test that runs in the context of the pipeline and makes use of those role assignments.

We're following this approach as an alternative to exporting connection strings , as these can be viewed in the Azure Portal; which may be an security issue if you have many people who are able to access the portal and view deployment outputs.
We're going to demonstrate this approach using Event Hubs. It's worth calling out that this is a generally useful approach which can be applied to any Azure resources that support Azure RBAC Role Assignments. So wherever in this post you read "Event Hubs", imagine substituting other Azure resources you're working with.
The post will do the following:
- Add Event Hubs to our Azure subscription
- Permission our service connection / service principal
- Deploy to Azure with Bicep
- Write an integration test
- Write a pipeline to bring it all together
Add Event Hubs to your subscription
First of all, we may need to add Event Hubs to our Azure subscription.
Without this in place, we may encounter errors of the type:
##[error]MissingSubscriptionRegistration: The subscription is not registered to use namespace 'Microsoft.EventHub'. See https://aka.ms/rps-not-found for how to register subscriptions.
We do this by going to "Resource Providers" in the Azure Portal and registering the resources you need. Lots are registered by default, but not all.

Permission our service connection / service principal
In order that we can run pipelines related to Azure, we mostly need to have an Azure Resource Manager service connection set up in Azure DevOps. Once that exists, we also need to give it a role assignment to allow it to create role assignments of its own when pipelines are running.
##[error]The template deployment failed with error: 'Authorization failed for template resource {GUID-THE-FIRST} of type Microsoft.Authorization/roleAssignments . The client {GUID-THE-SECOND} with object id {GUID-THE-SECOND} does not have permission to perform action Microsoft.Authorization/roleAssignments/write at scope /subscriptions/\*\*\*/resourceGroups/johnnyreilly/providers/Microsoft.EventHub/namespaces/evhns-demo/providers/Microsoft.Authorization/roleAssignments/{GUID-THE-FIRST} .'.
Essentially, we want to be able to run pipelines that say "hey Azure, we want to give permissions to our service connection". We are doing this with the self same service connection, so (chicken and egg) we first need to give it permission to give those commands in future. This is a little confusing; but let's role with it. (Pun most definitely intended. 😉)
To grant that permission / add that role assignment, we go to the service connection in Azure Devops:

We can see there's two links here; first we'll click on "Manage Service Principal", which will take us to the service principal in the Azure Portal:

Take note of the display name of the service principal; we'll need that as we click on the "Manage service connection roles" link, which will take us to the resource groups IAM page in the Azure Portal:

Here we can click on "Add role assignment", select "Owner":

Then when selecting members we should be able to look up the service principal to assign it:

We now have a service connection which we should be able to use for granting permissions / role assignments, which is what we need.
Event Hub and Role Assignment with Bicep
Next we want a Bicep file that will, when run, provision an Event Hub and a role assignment which will allow our Azure Pipeline (via its service connection) to interact with it.
Do note that our bicep template takes the service principal id as a parameter. We're going to supply this later from our Azure Pipeline.
We're now going to write a dotnet integration test which will make use of the infrastructure deployed by our Bicep template. Let's create a new test project:
We'll create a test file called EventHubTest.cs with these contents:
Let's talk through what happens in the test above:
- We read in Event Hub connection configuration for the test from environment variables. (These will be supplied by an Azure Pipeline that we will create shortly.)
- We post a message to the Event Hub.
- We read a message back from the Event Hub.
- We confirm that the message we read back matches the one we posted.
Now that we have our test, we want to be able to execute it. For that we need an Azure Pipeline!
Azure Pipeline
We're going to add an azure-pipelines.yml file which Azure DevOps can use to power a pipeline:
When the pipeline is run, it does the following:
- Gets the service principal id from the service connection.
- Compiles our Bicep into an ARM template
- Deploys the compiled ARM template to Azure
- Installs the dotnet SDK
- Uses the Azure CLI task which allows us to access service principal details in the pipeline to run our dotnet test.
We'll create a pipeline in Azure DevOps pointing to this file, and we'll also create the variables that it depends upon:
- azureResourceGroup - the name of your resource group in Azure where the app will be deployed
- location - where your app is deployed, eg northeurope
- serviceConnection - the name of your AzureRM service connection in Azure DevOps
- subscriptionId - your Azure subscription id from the Azure Portal
- tenantId - the Azure tenant id from the Azure Portal
Running the pipeline
Now we're ready to run our pipeline:

Here we can see that the pipeline runs and the test passes. That means we've successfully provisioned the Event Hub and permissioned our pipeline to be able to access it using Azure RBAC role assignments. We then wrote a test which used the pipeline credentials to interact with the Event Hub. To see the repo that demostrates this, look here .
Just to reiterate: we've demonstrated this approach using Event Hubs. This is a generally useful approach which can be applied to any Azure resources that support Azure RBAC Role Assignments.
Thanks to Jamie McCrindle for helping out with permissioning the service connection / service principal. His post on rotating AZURE_CREDENTIALS in GitHub with Terraform provides useful background for those who would like to do similar permissioning using Terraform.
- Add Event Hubs to your subscription
- Event Hub and Role Assignment with Bicep
- Azure Pipeline
- Running the pipeline
Easy way to set Azure RBAC roles in Bicep
When deploying resources in Azure using Bicep, occasionally you will have to assign rights to a user or principal to perform certain actions. For example, authorizing an app service to access a storage account.
Initially you would create something like this:
I came up with the following Bicep module which shows a nice way to hide the nasty details such as the role guids in a module.
This makes the Bicep files a lot more readable, especially when you have to assign roles more often.
Creating a module to do this also has the advantage that you can change the scope, for example when the storage account is part of a different resource group.
Cleaned up initial example:
I hope someone has some use for this as well.
Update 18-07-2023: Updated to include principalType in template.
John Folberth
Resources and posts for those figuring out DevOps in Azure
- Professional
Nested Loops In Azure Bicep with an RBAC Example
Did you know that “technically” nested loops in Azure Bicep are supported? Neither did I until really digging into it. The scenario I was trying to tackle was the ability to effectively manage/configure subscription level RBAC permissions via Bicep. This seems simple enough; however, how can this be done efficiently and positioned to be scaled in the future? Enter nested loops in Azure Bicep with an RBAC Example.
Anyone can create a parameter file with an entry for each role/roleId combo. This could work; however, what if some groups only should have access to lower environments…well time to do if conditions…..or what if the same group needs multiple roles…..time to repeat the id multiple times.
Wouldn’t the best solution be to provide an object that has all the information? Then Bicep can just loop through 1, 2, 10 Azure AD Objects. Now let’s take it down to another level and each Azure AD object defines the principal type and lists of Azure RoleIDs to be assigned. This can help with scalability and maintainability. Abstractly this would mean that each parameter file can have any amount of RoleIDs and Assignments in them. This could look like:
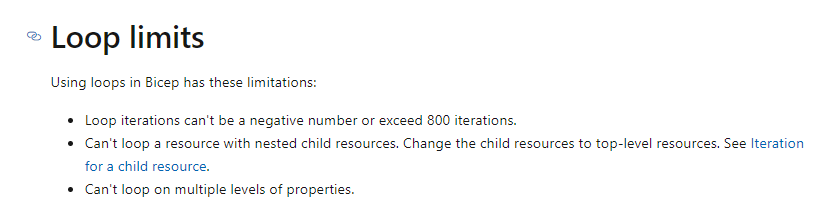
Still with me? How can this be achieved in Bicep? At the time of this writing the official documentation shows you cannot loop on multiple levels of properties.
The key here is understanding each loop resource substantiation can’t access the multiple levels. So, what if we passed the object to a module and that module then looped through the lower levels?
Whatever account will be deploying the Bicep file will need to have access to provision RBAC access for this walkthrough to work. In this example this deployment will occur via an Azure DevOps (ADO) service principal assigned Owner and will be executing the bicep as part of a CI/CD Software Delivery Lifecycle (SDLC)
The minimum version of Bicep required is version v.0.3.1 which supports looping.
Parameters File
The parameters file will be laid out similar to our pseudo code above.
The intent here is to help ease maintainability. It helps to be able to quickly identify all the roles being provisioned to a specific Azure Active Directory (AAD) object.
This is pretty straightforward as we will be using modules. All that’s required is for us to pass the parameter, which is an object containing the information for all the assignments that will be provisioned and a module that will loop into another module.
So, something to notice here is we are using the index array in the loop. Since this module will expand out, we can’t have the same name for each iteration so the index will help differentiate each module substantiation.
It never occurred to me there can be a module without any Azure resources defined in it.
var_roleAssignmentInfo_module.bicep
This module’s sole purpose is to loop into the assignments array value.
We were sneaky and switched the parameter to an array which will now loop through each AAD ID that is in our parameter file. The list array of RoleIDs will be passed to the next module for further iteration.
auth_roleassignment_sub.module.bicep
Now for the actual role assignments. At this stage an input may contain a single principalID, a Principal type, and a list of roleIDs. I did through in allowed types of only Groups and ServicePrincipals to keep security happy as assigning individual roles at a subscription level is typically not a good practice.
So, the next step here is to loop through all the roleIDs that are passed in and actual execute the individual role assignment.
There you have it! Nested loops in Azure Bicep with an RBAC example. It feels a little like Inception with a module inside a module and honestly not something I would typically recommend unless you have it. That being said it is kind of cool to recognize that something like this could be supported in the work you are doing.
There is a great discussion I started over on the Bicep git repo on Assigning RBAC via Role Assignment Module . There is a TON of good information on there as honestly my initial vision for this was to leverage a private registry for Bicep modules .
With intention being pass in principalID, type, role, and scope. Could you imagine this helping with scaling out how roles can be assigned across an organization? Even giving control over what roles and types can be assigned by the module. Alas, this proved a little too complicated for what we were looking for given the timeframe. However, maybe there are alternatives?
For additional content on Bicep check out my posts on Introl: CI/CD Pipelines for Bicep or if you prefer video a presentation on using Bicep done for the 20201 Cloud Lunch and Learn Marathon
Leave a Reply Cancel reply
Your email address will not be published. Required fields are marked *
Save my name, email, and website in this browser for the next time I comment.
Search code, repositories, users, issues, pull requests...
Provide feedback.
We read every piece of feedback, and take your input very seriously.
Saved searches
Use saved searches to filter your results more quickly.
To see all available qualifiers, see our documentation .
- Notifications
RBAC - Modification / Removal in BICEP #4432
{{editor}}'s edit
Harirajan2014 sep 14, 2021.
Beta Was this translation helpful? Give feedback.
Can you clarify a bit more about the scenario of needing to add a role assignment, then quickly remove it? Is this specific to assigning blueprints?
Once we have stacks, in two separate deployments of a stack you could do this:
Stack at Time 0:
- Role assignment:
Updated stack at Time 1:
That will remove the role assignment since it is no longer in the bicep/template code.
That's more of a scenario of needing the role assignment at one point, but then deciding it's not needed later, so you update the definition of the goal state. What's a bit more unusual about this scenario is that you know at the beginning you won't need the role assignment eventually.
cc @bmoore-msft …
Replies: 2 comments · 7 replies
Brwilkinson sep 14, 2021 maintainer, alex-frankel sep 14, 2021 maintainer.
brwilkinson Sep 16, 2021 Maintainer
HariRajan2014 Sep 17, 2021 Author
alex-frankel Sep 22, 2021 Maintainer
bmoore-msft Sep 22, 2021
Harirajan2014 sep 23, 2021 author.
- Numbered list
- Unordered list
- Attach files
Select a reply
This browser is no longer supported.
Upgrade to Microsoft Edge to take advantage of the latest features, security updates, and technical support.
Manage Azure Cosmos DB for NoSQL resources with Bicep
- 2 contributors
In this article, you learn how to use Bicep to deploy and manage your Azure Cosmos DB accounts, databases, and containers.
This article shows Bicep samples for API for NoSQL accounts. You can also find Bicep samples for Cassandra , Gremlin , MongoDB , and Table APIs.
- Account names are limited to 44 characters, all lowercase.
- To change the throughput (RU/s) values, redeploy the Bicep file with updated RU/s.
- When you add or remove locations to an Azure Cosmos DB account, you can't simultaneously modify other properties. These operations must be done separately.
- To provision throughput at the database level and share across all containers, apply the throughput values to the database options property.
To create any of the Azure Cosmos DB resources below, copy the following example into a new bicep file. You can optionally create a parameters file to use when deploying multiple instances of the same resource with different names and values. There are many ways to deploy Azure Bicep files including, Azure CLI , Azure PowerShell and Cloud Shell .
Azure Cosmos DB account with autoscale throughput
Create an Azure Cosmos DB account in two regions with options for consistency and failover, with database and container configured for autoscale throughput that has most index policy options enabled.
Azure Cosmos DB account with analytical store
Create an Azure Cosmos DB account in one region with a container with Analytical TTL enabled and options for manual or autoscale throughput.
Azure Cosmos DB account with standard provisioned throughput
Create an Azure Cosmos DB account in two regions with options for consistency and failover, with database and container configured for standard throughput that has most policy options enabled.
Azure Cosmos DB container with server-side functionality
Create an Azure Cosmos DB account, database and container with a stored procedure, trigger, and user-defined function.
Azure Cosmos DB account with Microsoft Entra ID and RBAC
Create an Azure Cosmos DB account, a natively maintained Role Definition, and a natively maintained Role Assignment for a Microsoft Entra identity.
Free tier Azure Cosmos DB account
Create a free-tier Azure Cosmos DB account and a database with shared throughput that can be shared with up to 25 containers.
Here are some additional resources:
- Bicep documentation
- Install Bicep tools
Coming soon: Throughout 2024 we will be phasing out GitHub Issues as the feedback mechanism for content and replacing it with a new feedback system. For more information see: https://aka.ms/ContentUserFeedback .
Submit and view feedback for
Additional resources
IMAGES
VIDEO
COMMENTS
Azure role-based access control (Azure RBAC) is the way that you manage access to Azure resources. In this quickstart, you create a resource group and grant a user access to create and manage virtual machines in the resource group. This quickstart uses Bicep to grant the access. Bicep is a domain-specific language (DSL) that uses declarative ...
This is how you define the role assignment in Bicep: @ description ( 'Principal type of the assignee.') To deploy it and set the parameters, you can use different methods. For this post I have used PowerShell. As you can see, you need to define the Id for both the roledefinition and the principalID.
A pure Bicep approach, user-friendly, but quite some work to setup; Generate the Bicep module. I wanted to have a Bicep module to perform role assignments on resource group level, similar like Jos described in his blog post. It had to support all available Azure roles.
Azure Privileged Identity Management (PIM) is a tool that allows you to provide Just In Time (JIT) access to Azure RBAC roles. Using PIM, you can create a role assignment to make a user or group eligible for a role. This assignment doesn't mean that the user or group has the role, but instead that they can request the role when they need it.
This post will show how to do this by permissioning our Azure Pipeline to access these resources using Azure RBAC role assignments. It will also demonstrate a dotnet test that runs in the context of the pipeline and makes use of those role assignments. We're following this approach as an alternative to exporting connection strings, as these can ...
This is a simple demo of how to (ab)use scoping and extension type resources in Bicep with a main.bicep that deploys at the subscription scope the option to create a role assignment at either subscription, resource group or resource scope with one template.. Depending on the type parameter the main template invokes one of three templates as modules. . Note that due to missing support (see ...
If so, I unfortunately do not know of a way to do that in Bicep. I know you can download a CSV or JSON file of all the role assignments on a resource in the Azure Portal, which might be of some help. Alternatively, you can use the AzCLI to get what you want using: az role assignment list --scope <resource id> --role "<role name>" Hope this helps!
Now for the actual role assignments. At this stage an input may contain a single principalID, a Principal type, and a list of roleIDs. ... CI/CD Pipelines for Bicep or if you prefer video a presentation on using Bicep done for the 20201 Cloud Lunch and Learn Marathon. Post navigation. Securely populating Azure Key Vault via Azure DevOps.
name: resourceName. } Now, if I want to make this role assignment specific to one resource type, it's easy enough to solve: targetScope = 'resourceGroup'. @description('The ID of the principal receiving the role assignment') param principalId string. @description('The ID of the role definition to assign to the principal') param roleDefinitionId ...
Assigning RBAC via Role Assignment Module. #5678. Trying to have a module to handle RBAC assignment. Thought this was a good use case where multiple assignments can be handled via a single module. This would include having to pass the scope of the assignment. Per ARM documentation this could be done as a string.
You need to use this in a module that targets the resourceGroup you want to assign permissions to. So you need to have 3 files - one is where you create the resource groups, second is where you put the roleAssignments resource. Then, from the first one call the module (s): module rgLaDevPermissions 'devPermissions.bicep' = {.
Once we have stacks, in two separate deployments of a stack you could do this: Stack at Time 0: Role Def. Role assignment: Updated stack at Time 1: Role Def. That will remove the role assignment since it is no longer in the bicep/template code. That's more of a scenario of needing the role assignment at one point, but then deciding it's not ...
Since I came across the same problem and bicep does not offer a way to assign the role (yet) I added an AzureCLI task to my pipeline and grant the role via az synapse role assignment create after the deployment.. Output defined in the bicep file to pass the name of the newly created synapse workspace along to the AzureCLI task:
Create an Azure Cosmos DB account in two regions with options for consistency and failover, with database and container configured for autoscale throughput that has most index policy options enabled. Bicep. Copy. @description('Cosmos DB account name, max length 44 characters, lowercase') param accountName string = 'sql-${uniqueString ...
The Azure functions deployment is running under a managed identity. And as we want to deploy everything automatically, using Azure Bicep, I want to automatically give the correct role assignment on the Service Bus namespace (or entities) for that managed identity, in an Azure Bicep file. But I don't seem to find out how to do that.