The 7 Best PowerPoint Clickers on the Market (2024 Review)
Written by co-founder Kasper Langmann , Microsoft Office Specialist.
Want to step up your presentation game? A smart and reliable PowerPoint clicker is all you need🎯
It is a small wireless remote that fits in your hand. Use it to move between different slides. Pause or restart, laser point, and control what your audience gets to see.
The right PowerPoint clicker can turn you into a presentation wizard🧙🏼♂️
But with so many of them on the market, how do you find the right one? Below, I’ve listed the seven absolute best PowerPoint clickers on the market.

⚠️Spoiler Alert⚠️
My top pick is the Logitech R800 .
It stands out as one of the most advanced clickers with very well-thought-out features. Such as a small LCD to help you track the time gone into presenting. Set a timer on it or monitor the battery level of your clicker🔋
However, these might not make the most important features for your needs. To find the best of the best for yourself, continue reading.
A quick note of how we test each clicker
Each clicker on this list is best in at least one crucial aspect. Be it the battery or the laser light, or something else.
To pull this list together, we have evaluated each presenter on a total of 5 parameters 💪
Laser Pointer, Battery, Control Range, Compatibility, User Friendliness.
So, in the review below, we will score each of these parameters for every clicker. Based on these, you can find the clicker that best suits your needs.
PowerPoint Clickers Reviewed
1: Logitech R800 (Best Overall)
2: Kensington Wireless Presenter K33272WW (Best Basic)
3: Kensington K72426AMA (Best Cursor Control)
4: Logitech R500 (Easiest to Use)
5: Amerteer Wireless Presenter (Best on Budget)
6: Amerteer Finger Ring Presenter (Best Ring Presenter)
7: NINJAABXY Wireless Clicker (Best Ergonomic Design)
This list was last updated on January 4th, 2023.
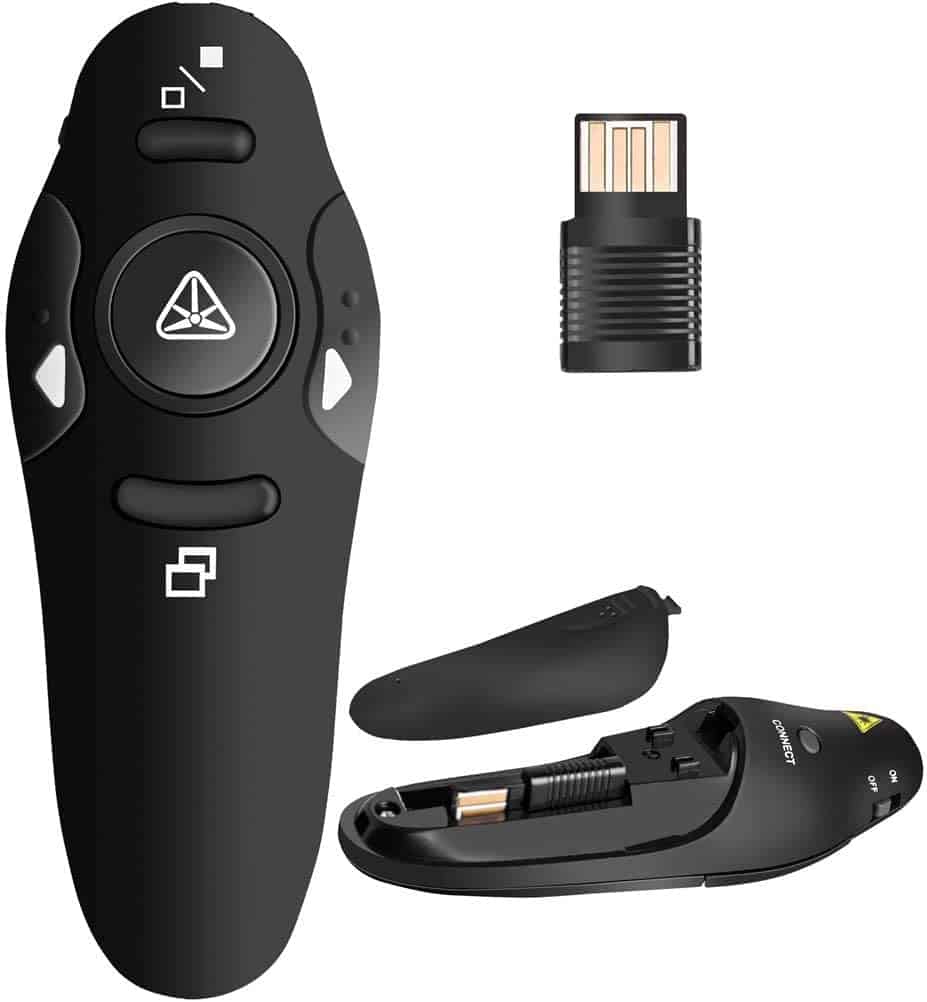
1. Logitech R800 (Best Overall)
The Logitech R800 is the perfect choice for professionals who can’t stand anything less than perfection.
The best highlight of this presenter? An excellent battery life. It works on two AAA batteries that will give you a 20-hour lifetime in laser light mode😍
And in simple presentation mode, the battery life goes up to 1050 hours. No meeting lasts longer than that.
Plus, the LCD screen allows users to track the battery life. So you are well informed about the battery life, and there’s no guessing game.
Specifications in the version we reviewed
- Laser Light: Green laser light
- Connectivity: Plug-and-play USB Receiver
- Battery: 2 AAA batteries
- Control Range: 100 Feet (30 meters)
- Special feature: LCD Display with track of time and battery
Score on review parameters
- Laser Pointer: Green laser light is a big plus as it never fails (not even in well-lit rooms).
- Battery Type: Two replaceable AAA batteries give you an excellent battery life of 20 to 1050 hours.
- Control Range: A 100-feet control range. This means you can roam around your conference room (and even in a nearby garden) freely. The clicker will still work. And if you get a little too away, the reception indicator will beep to bring you back in the control range.
- User Friendliness: Plug and play means just connecting the USB receiver to any Windows PC, and that’s it. No complicated setups. When done, unplug the USB receiver and store it inside the actual clicker.
- LCD Screen: Here’s an additional feature that we would love to highlight. The LCD on top of the presenter allows you to track the time, the battery, and wireless reception. Get silent or vibration alerts when the battery goes low.
- Value-for-Money: For $78 and all these modern features, we won’t call it exorbitant. But yes, slightly overpriced.
Overall Spreadsheeto Rating: 💚💚💚💚💚💚 (6/6)
This, in my view, is the best choice for professionals. With live information on the LCD screen, there’s no chance of running out of battery or range.
2. Kensington Wireless Presenter K33272WW (Best Basic)
If you need a basic PowerPoint clicker that’s reliable and easy to use, look no further. This wireless presenter from Kensington will take care of it all.
With a four-intuitive-button design, it is very user-friendly. You need not wrap your head around a complicated design with lots of buttons and unnecessary functions😏
It’s simple, very durable, and ergonomically built to fit your hands.
It offers AES 28-bit encryption (also adopted by the US Govt. as the encryption standard). This makes it safe and secure against any hacking attempts.
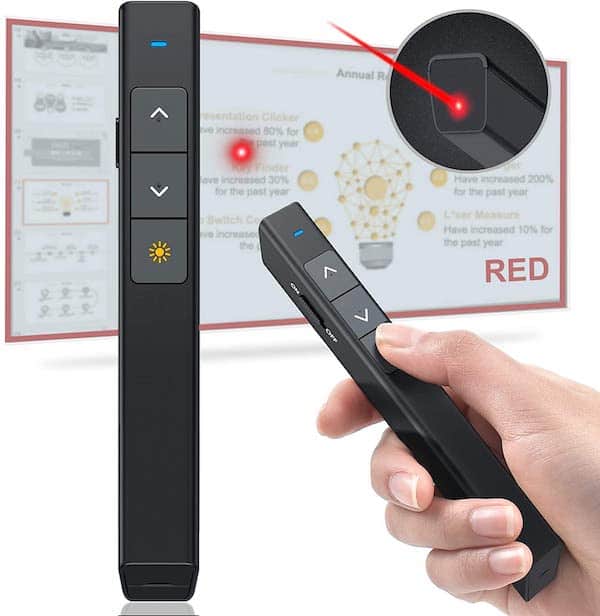
- Laser Light: Red
- Battery : External battery
- Control Range: 65 Feet
- Special feature: AES 128-bit encryption (secure wireless technology)
- Price : $38
- Laser Pointer: A red pointer laser light is great for a basic presenter.
- Battery Type: Replaceable battery goes a long way.
- Control Range: A Plug-and-play 2.4GHz and 65 feet control range are pretty good even if you have a large-sized auditorium to address.
- User Friendliness: An intuitive design of four buttons to move between slides, hide the screen and use the laser light makes it very user-friendly.
- Value-for-Money: If you’re focused on reliability and longevity – a basic design for $38 might bring great value for you. But considering the only very basic features offered by it, we don’t score it great in this aspect.
Overall Spreadsheeto Rating: 💚💚💚💚💚🤍 (5/6)
Although the Kensington K33272WW provides an internal compartment for storing the USB receiver, it’s inside the battery cover. You might find it difficult to detach the battery cover to store the USB receiver every time. Other clicker models have a more convenient style for USB receiver storage.
3. Kensington K72426AMA (Best Cursor Control)
Which is the second best PowerPoint clicker on this list? The Kensington K72426AMA.
Why? The list of reasons is a little long✌
But the best part is the joystick in it that gives you cursor control. This PowerPoint clicker from Kensington is almost a portable mouse.
Other clickers would allow you to move between slides, but what if you want to click something on the slide (like a hyperlink)? Would you rush back to your PC to use the mouse? That’s no longer needed.
Use this clicker to launch any file or click anywhere with its joystick.
Wireless presenter with bright green laser pointer and cursor control for presentations.
- Laser Light: Green laser
- Connectivity : Plug-and-play USB / MicroSD Card
- Control Range: 150 Feet (50 meters)
- Compatibility : Windows & Mac OS X (Keynote and PowerPoint)
- Special feature: Cursor control mode (Joystick helps using it as a mouse)
- Price : $45
- Laser Pointer: Green laser light which is 10X brighter than ordinary red laser pointers. Also, if you think red is a little too harsh to use on-screen, go green.
- Battery Type: Replaceable battery.
- Control Range: Excellent control range of 150 feet. That’s the best control range we have seen in all the presenters reviewed until now.
- User Friendliness: Simple design with four intuitive buttons. Specially designed contours to facilitate holding for long hours.
- Value-for-Money: Excellent features for a reasonable price of $45. Great value for money.
Kensington offers similar models in two opalescent colors – pearl white and rose gold. Both of them are real eye candies. If you want an aesthetic look with great functionality, check out Kensington K75771WW (Pearl White) and K757720WW (Rose Gold).
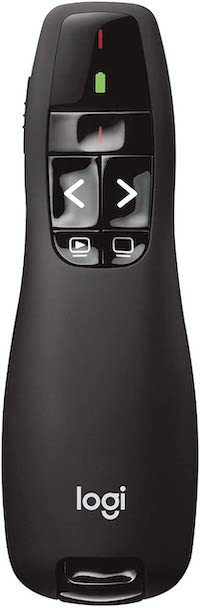
4. Logitech R500 (Easiest to Use)
Minimalism, but with some sass! If that’s your demand, the Logitech R500 is meant for you.
The R500 is a hassle-free, reliable presenter. It comes with three big buttons that are intuitively designed so you can confidently navigate between slides without having to look down⚡
Affordable, easy-to-use wireless presenter with laser pointer and presentation mode.
- Laser Light: Red laser
- Connectivity : Plug-and-play USB / Bluetooth
- Compatibility : Windows, Android, MacOS, Linux. Presentation software (MS Word, Excel, PowerPoint, iWork, Google Slides, Prezi, etc.)
- Battery : AAA battery (runs for 12 months)
- Control Range: 65 Feet (20 meters)
- Special feature: Pairing with the Logitech Presentation App
- Price : $76
- Laser Pointer: Bright red laser light
- Battery Type: Replaceable AAA battery runs for 12 months. Also includes a power saving mode to save battery under low battery conditions.
- Control Range: Move away freely for up to a 20 feet control range.
- User Friendliness: The rubber texture and textured buttons make using this presentation remote control easier. It will fit in your palm snugly. Excellent user-friendliness.
- Connectivity : If you’re buying R500, must take note of this feature. Unlike all other clickers, the R500 can also be connected via a Bluetooth connection in addition to a USB receiver.
- Value-for-Money: R500 offers great features but, for $76, it’s a little over-priced.
If you want to navigate confidently, easily, and freely between slides of your daily presentations – I believe R500 to be one of the best fits for you. It is compatible with almost all operating systems.
5. Amerteer Wireless Presenter (Best on Budget)
Got hyperlinks in your slides that you want to launch during the presentation?
Ordinary presenters won’t help you with this situation – you need the Amerteer Wireless Presenter . It’s slim like a pen and lightweight like a feather🖊
If you need an excellent presenter but are on a tight budget – you’ll not find an option better than this.
- Connectivity : Plug-and-play USB Receiver
- Battery : AAA battery
- Special feature: Supports hyperlinks
- Control Range: 39 Feet (12 meters)
- Price : $12
Laser Pointer: Powerful red laser light. Battery Type: This doesn’t include a battery. You’d have to insert an AAA battery. We don’t appreciate this part much. Control Range: Allows a control range of 39 feet. User Friendliness: Very easy to use. Has a hyperlink button that’ll navigate you through all the hyperlinks on the screen with one press. Double-clicking the same button will launch the selected hyperlink. Additionally, it has a very slim design that looks just like a pen. Value-for-Money: For $12 only, it’s literally like buying a bag of chips (pringles, let’s say). For this price, the value for money on this product is just too good.
This one’s a good choice – and the price tag makes it even better.
6. Amerteer Finger Ring Presenter (Best Ring Presenter)
Let us now move on from simple remote control-shaped designs. Need something different?
Something as compact as a finger ring? Let me introduce you to the Amerteer Finger Ring Presenter 💍
A non-slip rubber-based ring clicker that fits around your finger – no falling off, no need to hold it throughout the presentation. Wear it on and navigate through slides with ease and grace.
- Connectivity: Plug-and-Play USB Receiver
- Compatibility : Windows, Android, MacOS, Linux. Presentation apps (MS Word, Excel, PowerPoint, iWork, Google Slides, Prezi, etc.)
- Battery : Built-in rechargeable Li-polymer battery
- Special feature: Rubberized slip-resistant ring made to fit the size of a finger
- Price : $18.99
Laser Pointer: Red laser light to point out any area you like. Battery Type: No need to replace batteries. Has a rechargeable Li-polymer battery that can be recharged through the USB port. Switch it off when out of use to save power. A charging time of 1 to 1.5 hours allows you a playing time of up to 7 to 10 days. Very seamless. Control Range: Offers a fine control range of up to 12 meters. User Friendliness: An anti-slip rubberized ring that fits around your finger – no worries about dropping it or constantly gripping it. To use all the buttons, you only need your thumb. This makes it very easy to use and carry. Value-for-Money: For $19 only, it’s dirt cheap. Superb value for money.
Don’t want to be hand-bound while you present? That’s one big reason why you need this Ring presenter. Fixes in your finger so you can freely bring your hands to action and animate them just as you like.
7. NINJAABXY Wireless Clicker (Best Ergonomic)
The NINJAABXY Wireless presenter is more of a basic presenter. But, why we like it the most is because of its ergonomic design and value for money💸
It is made using environment-friendly ABS plastics. Plus, it features an ergonomic design that supports long holding hours. And when not in use, slide it into your pocket, and it will unnoticeably fit in.
- Compatibility : Windows, Android, MacOS, Linux, MacBook, Chromebook, etc.
- Control Range: 50 Feet (15 meters)
- Special feature: Laser range of 300 feet
- Price : $13.99
Laser Pointer: Red laser light that extends across 300 feet. Battery Type: Replaceable battery. Control Range: Access up to 50 feet. User Friendliness: Just plug and play the USB receiver in your computer/laptop – no software and no setup formalities. The ergonomic design and button placement make it very user-friendly. Value-for-Money: It comes for $14 only and offers all the basic features of a presenter. We find it to be of great value for the price tag it shows up.
This clicker has got all the good features at a good price. If you’re not particular about an exceptional feature, go for this one.
Wrapping things up…
In the review above, we have pulled together the 7 best PowerPoint presentation clickers from the market.
There are still hundreds of more clickers on the market to choose from. The key to choosing the right presentation clicker for yourself is jotting down your needs and your budget💭
Once you know what you want, and which features can or cannot be compromised, the rest is easy. The clickers above will give you a clear idea of what best can you expect in a particular feature.
After you’ve spotted the right clicker for yourself, how about upgrading the PowerPoint projector? Learn about the 7 best PowerPoint projectors on the market here.
- Search Search Please fill out this field.
- Career Planning
- Skills Development
Important Presentation Skills for Workplace Success
:max_bytes(150000):strip_icc():format(webp)/ADHeadshot-Cropped-b80e40469d5b4852a68f94ad69d6e8bd.jpg "best presentation clicker for chromebook")
- What Are Presentation Skills?
Steps To Create a Presentation
Skills that help make an effective presentation, how to make your skills stand out.
xavierarnau / Getty Images
Whether you’re a high-level executive or an administrative assistant, developing your presentation skills is one key way to climb in an office-based job. Leaders make decisions based on information shared in presentation format, and hardly any business changes its mind without first seeing a persuasive presentation.
It is important for any office employee to know what steps go into creating an effective presentation and what presentation skills are most important to employers. Highlighting these skills will also help you stand out during your job search.
Key Takeaways
- Presentation skills are what you need to know to be able to give an engaging, effective presentation.
- The steps to creating a successful presentation are preparation, delivery, and follow-up.
- Employers want to know you have the necessary skills to research, analyze, and create a presentation, plus the communication skills needed to deliver it and field questions afterward.
- You can highlight your skills to employers through your resume, cover letter, and interview.
What Are Presentation Skills?
Presentation skills refer to all the qualities you need to create and deliver a clear and effective presentation. While what you say during a presentation matters, employers also value the ability to create supporting materials, such as slides.
Your prospective employer may want you to deliver briefings and reports to colleagues, conduct training sessions, present information to clients, or perform any number of other tasks that involve speaking before an audience.
Giving engaging and easy-to-understand talks is a major component of the strong oral communication skills that are a job requirement for many positions. Not all presentations take place in a formal meeting. Many presentation skills are relevant to one-on-one consults or sales calls.
Any presentation has three phases: preparation, delivery, and follow-up. All presentation skills fit into one of these three phases.
Preparation
Preparation involves research and building the presentation. Consider the audience you'll be presenting to and what most interests them. This may mean crafting the entire text (or at least writing notes) and creating any slides and other supporting audio/visual materials.
You will also have to make sure that the appropriate venue is available, properly set up beforehand, and ensure the projector (if you'll need one) works and connects with your laptop.
You'll also want to practice your presentation as many times as you need to to feel comfortable delivering it with ease and confidence within the time allotted for the presentation.
Skills related to preparation include conducting research related to your presentation topic, devising charts and graphs depicting your research findings, and learning about your audience to better tailor your presentation to their needs. You'll also need to create digital slides, using statistics, examples, and stories to illustrate your points and effectively to persuade the audience.
Preparing handouts or digital references is an added courtesy that will help the audience pay attention because they won't be preoccupied with note-taking.
Your delivery is the part of the presentation that the audience sees. A good delivery depends on careful preparation and confident presentation and requires its own distinctive skill set .
Skills related to delivery include giving an attention-grabbing opening for a talk, providing a summary of what will be covered to introduce the presentation and provide context, and using body language and eye contact to convey energy and confidence.
Make sure you pause to emphasize key points, modulate your vocal tone for emphasis, and articulate your speech clearly and smoothly.
Don't be afraid of injecting humor or speaking with enthusiasm and animation—these techniques can help you in projecting confidence to your audience.
Summarize key points at the conclusion of the presentation, and be sure to have a plan for how you'll field any audience questions.
Presentation follow-up includes properly breaking down and storing any equipment, contacting any audience members with whom you agreed to communicate further, and soliciting, collecting, and analyzing feedback.
In some presentations, you may collect information from audience members—such as names and contact information or completed surveys—that you also must organize and store.
Skills related to follow-up include creating an evaluation form to solicit feedback from attendees, interpreting feedback from evaluations, and modifying the content and/or delivery for future presentations. Other follow-up skills include organizing a database of attendees for future presentations, interviewing key attendees to gain additional feedback, and emailing presentation slides to attendees.
To create and deliver the most effective presentation takes a variety of skills, which you can always work to improve.
You must be able to look honestly at your performance, assess the feedback you get, and figure out what you need to do to get better. That takes analytical thinking .
More importantly, you need to have a firm grasp of the information you are about to communicate to others. You need to analyze your audience and be prepared to think quickly if asked questions that force you to demonstrate that you are fully aware of the material and its implications.
The kind of analytical skills you need to be an effective presenter include problem sensitivity, problem-solving , reporting and surveying, optimization, and predictive modeling. It also helps to be adept at strategic planning, integration, process management, and diagnostics. With these skills, you'll be better able to objectively analyze, evaluate, and act on your findings.
Organization
You do not want to be the person who spends half of their presentation time trying to find a cable to connect their laptop to the projector. Many things can and do go wrong just before a presentation unless you are organized .
Presentation preparation also means keeping track of notes, information, and start/stop times. You will want to proofread and fine-tune all the materials you plan to use for the presentation to catch any mistakes. Make sure you time yourself when you rehearse so you know how long it will take to deliver the presentation.
A presentation that's finished in half the time allotted is as problematic as one that's too long-winded.
Some key organizational skills to work on include event planning, auditing, benchmarking, prioritization, and recordkeeping. Make sure your scheduling is on point and pay close attention to detail. Quick thinking is an important skill to have for when things inevitably go wrong.
Nonverbal Communication
When speaking to an audience, the way you present yourself can be just as important as how you present your information. You want to appear confident and engaging. You can do this through good posture, the use of hand gestures, and making eye contact with the audience.
Practice your nonverbal communication by filming yourself doing a practice presentation and observing your body language carefully. Your physical bearing and poise should convey a degree of comfort and confidence in front of an audience, while active listening , respect, and emotional intelligence will help you in facilitating group discussions.
Presentation Software
Microsoft PowerPoint is the dominant software used to create visual aids for presentations. Learn to use it well, including the special features outside of basic templates that can really bring a presentation to life. Even if someone else is preparing your slideshow for you, it will help to know how to use the software in case of last-minute changes.
Other software that is good to learn includes Microsoft Office, Apple Keynote, Google Slides, and Adobe Presenter.
Public Speaking
You need to appear comfortable and engaging when speaking before a live audience, even if you're not. This can take years of practice, and sometimes public speaking just isn't for certain people. An uncomfortable presenter is a challenge for everyone. Fortunately, public speaking skills can improve with practice . Some skills to work on include articulation, engagement, and memorization. You should be able to assess the needs of the audience and handle difficult questions. Controlling your performance anxiety will help you communicate more effectively.
Research is the first step in preparing most presentations and could range from a multi-year process to spending 20 minutes online, depending on context and subject matter. At the very least, you must be able to clearly frame research questions, identify appropriate information sources, and organize your results. Other useful skills include brainstorming, collaboration , comparative analysis, data interpretation, and deductive and inductive reasoning. Business intelligence is a skill that will help you evaluate what information you need to support the bottom line, while case analysis and causal relationships will help you parse and evaluate meaning.
Verbal Communication
Public speaking is one form of verbal communication , but you will need other forms to give a good presentation. Specifically, you must know how to answer questions. You should be able to understand questions asked by your audience (even if they're strange or poorly worded) and provide respectful, honest, and accurate answers without getting off-topic. Use active listening, focus, and empathy to understand your audience. Skills such as assertiveness, affirmation, and enunciation will help you restate and clarify your key points as it relates to their questions or concerns.
You may or may not need a written script, but you do need to pre-plan what you are going to say, in what order you will say it, and at what level of detail. If you can write a cohesive essay, you can plan a presentation.
Typical writing skills apply to your presentation just as they do to other forms of writing, including grammar, spelling, vocabulary, and proofreading. The ability to build outlines, take notes, and mark up documents will also be useful.
More Presentation Skills
In addition to the skills previously mentioned, there are other important skills that can apply to your presentation. The other skills you need will depend on what your presentation is about, your audience, and your intended results. Some of these additional skills include:
- Summarizing
- Providing anecdotes to illustrate a point
- Designing handouts
- Recognizing and countering objections
- Posing probing questions to elicit more detail about specific issues
- Awareness of ethnic, political, and religious diversity
- Receiving criticism without defensiveness
- Refraining from speaking too often or interrupting others
- Anticipating the concerns of others
- Product knowledge
- SWOT analysis format
- Supporting statements with evidence
- Multilingual
- Working with reviewers
- Consistency
- Developing and maintaining standard operating procedures (SOPs)
- Developing a proposition statement
- Creating and managing expectations
Include skills on your resume. If applicable, you might mention these words in your resume summary or headline .
Highlight skills in your cover letter. Mention one or two specific presentation skills and give examples of instances when you demonstrated these traits in the workplace.
Show your presentation skills in job interviews. During the interview process, you may be asked to give a sample presentation. In this case, you will want to embody these skills during the presentation. For example, you will want to demonstrate your oral communication skills by speaking clearly and concisely throughout the presentation.
PennState. " Steps in Preparing a Presentation ."
Harvard Division of Continuing Education. " 10 Tips for Improving Your Public Speaking Skills ."
Northern Illinois University. " Delivering the Presentation ."
Oratory Club
Public Speaking Helpline

The Best Presentation Clickers
The best presentation clickers offer convenience, reliability, and ease of use. Presentation clickers are essential tools for speakers and presenters, allowing them to navigate slides effortlessly and engage with their audience effectively.
With numerous options available in the market, finding the best clicker can be overwhelming. However, certain features set the top clickers apart from the rest. These include reliable wireless connectivity, ergonomic design, intuitive controls, long battery life, and compatibility with various presentation platforms.
We will explore some of the best presentation clickers that encompass these qualities, enabling you to make an informed decision and enhance your presentation experience. Whether you are a student, professional, or public speaker, having a high-quality clicker can elevate your presentation skills and make a lasting impression on your audience. So, let’s dive in and discover the top clickers available for all your presentation needs.

Credit: www.youtube.com
Table of Contents
Wireless Presentation Clickers
Wireless presentation clickers are indispensable tools for presenters seeking to deliver seamless and engaging presentations. With the freedom of movement they provide, presenters can move around the room, interact with their audience, and maintain a strong connection with their content.
Bluetooth Clickers
Bluetooth clickers offer a convenient and reliable solution for controlling presentations without the need for wires. By connecting seamlessly with your device via Bluetooth, these clickers allow you to navigate through your slides, pause and play videos, and even control the mouse cursor, all from a distance. With their wide range of compatibility, Bluetooth clickers can be used with different devices such as laptops, tablets, and smartphones, making them incredibly versatile.
These innovative clickers offer a range of impressive features, such as:
- Ease of use, with simple pairing and setup processes
- Compact and lightweight design, ensuring portability
- Intuitive buttons for effortless navigation
- Long battery life, allowing for extended presentation sessions
- Strong wireless connectivity for uninterrupted control
Rf Clickers
RF clickers, short for Radio Frequency clickers, provide an alternative wireless solution for presenters. Unlike Bluetooth clickers that rely on Bluetooth technology, RF clickers work through radio frequency signals. This technology offers excellent range and reliability, making RF clickers suitable for large auditoriums and conference rooms.
RF clickers come with their own USB receiver that needs to be connected to the presenting device. Once paired, the clicker communicates with the receiver using radio waves, allowing for seamless control over your presentation. These clickers offer similar features to Bluetooth clickers, including:
- Simple setup and pairing process
- Ergonomic and user-friendly designs
- Durable construction for long-lasting use
- Responsive buttons for easy slide navigation
- Extended battery life for uninterrupted presenting
Whether you opt for a Bluetooth clicker or an RF clicker, both wireless presentation clickers provide unmatched flexibility and convenience. Their ability to free you from the constraints of cords and cables ensures that your presentations are smooth, engaging, and impactful.
:max_bytes(150000):strip_icc()/best-overall-beboncool-wireless-presenter-80aca6ee51ae44a8a778a7e210c1af15.jpg "best presentation clicker for chromebook")
Credit: www.thebalancemoney.com
Features To Consider
Choosing the right presentation clicker is crucial to ensure a smooth and seamless presentation experience. To make an informed decision, it is important to consider various features that can enhance your presentation. Here are the key features you should focus on:
The range of a presentation clicker refers to the distance at which it can accurately transmit signals to control your slides. A larger range gives you the freedom to move around the stage or the room without losing control. Look for a clicker with a long range, such as 100 feet or more, to eliminate any potential limitations.
Compatibility
Compatibility is another vital aspect to consider when selecting a presentation clicker. Ensure that the clicker you choose is compatible with the software you use for your presentations. Most clickers are designed to work seamlessly with popular presentation software like Microsoft PowerPoint, Apple Keynote, or Google Slides. Additionally, check whether the clicker supports both Windows and Mac operating systems to prevent any compatibility issues.
Battery Life
Battery life is a crucial factor that can impact the longevity of your presentation. You don’t want your clicker to run out of power in the middle of an important presentation. Look for a clicker with a long battery life, preferably one that can last for several presentations without needing a recharge or battery replacement. Additionally, consider whether the clicker uses standard or rechargeable batteries, depending on your preference.
If you want to take your presentations to the next level, having a reliable presentation clicker is essential. A good clicker gives you the freedom to confidently move around the room while staying in control of your slides. To help you find the perfect companion for your next presentation, we have compiled a list of our top picks. These clickers offer exceptional functionality, reliability, and ease of use. Let’s take a closer look at our top two choices: the Logitech R500 and the Satechi Aluminum Wireless Presenter.
Logitech R500
The Logitech R500 is an excellent choice for those who value simplicity and reliability. This compact and lightweight clicker fits comfortably in your hand, making it easy to use during long presentations. With a wireless range of up to 65 feet, you can freely move around the room without worrying about connectivity issues. The R500 features three intuitive buttons: one for navigating forward, one for going back, and a dedicated button for starting and stopping presentations. Additionally, this clicker is compatible with various presentation software, including PowerPoint, Keynote, and Google Slides. Its powerful red laser pointer ensures that your audience can easily see and follow along with your important points. The Logitech R500 is a trusted choice that delivers consistent performance, making it a top pick for any presenter.
Satechi Aluminum Wireless Presenter
If you’re looking for a sleek and stylish clicker without compromising functionality, the Satechi Aluminum Wireless Presenter is an excellent option. This clicker features a slim, aluminum body that looks and feels premium. It offers a wireless range of up to 33 feet, providing you with the flexibility to move around the room with ease. The Satechi clicker also includes a built-in red laser pointer, which is perfect for highlighting your key ideas. With its intuitive navigation buttons, including next, previous, and a dedicated button for black screen mode, you can effortlessly control your presentations. The clicker is compatible with most presentation software and is incredibly easy to set up. For those who appreciate both style and functionality, the Satechi Aluminum Wireless Presenter is one of the top picks in the market.
:max_bytes(150000):strip_icc()/best-for-compatibility-dinofire-wireless-presentation-clicker-0a0d1ae554d543ab977d398e9927d859.jpg "best presentation clicker for chromebook")
Frequently Asked Questions On The Best Presentation Clickers
What is the best presentation clicker for distance.
The ideal presentation clicker for distance is one that offers reliable wireless connectivity, long-range operation, and user-friendly features. Look for models with strong connectivity, extended range up to 100 feet, and intuitive controls. These clickers ensure seamless presentation delivery and give you the freedom to move around the room effortlessly.
How Do I Choose A Presentation Clicker?
To choose a presentation clicker, consider its compatibility with your device, range, ease of use, and additional features like laser pointer or timer. Check customer reviews, compare prices, and select a reliable brand. Make sure it’s comfortable to hold and suits your presentation style.
What Is The Best Clicker For Teachers?
The best clicker for teachers varies based on personal preferences and needs. Some popular options include the TurningPoint clicker, Poll Everywhere, and Kahoot. These clickers offer features like real-time feedback, interactive quizzes, and audience response systems, making them effective tools for classroom engagement.
To wrap it up, these presentation clickers are a game-changer for speakers. They offer seamless control, reliability, and convenience, ensuring a smooth and engaging presentation. From the ergonomic design to advanced features, each clicker that we’ve discussed brings unique benefits.
So, whether you’re a student or a professional, investing in the best presentation clicker is a surefire way to make your next presentation flawless and impactful. Happy presenting!
Similar Posts
What are you passionate about.
What are You Passionate About? Passion is what drives us to pursue our interests, achieve our goals, and find fulfillment in life. It is that fire within us that keeps us motivated and energized. Discovering your passion is an essential part of personal growth and self-awareness. In this article, we will explore the importance of…
Do You Have Any Questions for Me?
Do You Have Any Questions for Me? – Blog Post Have you ever walked out of a job interview and realized that you never asked any questions? It’s a common scenario that many job seekers experience. However, not asking questions during an interview can be a missed opportunity to learn more about the company, the…
What Is Your Greatest Strength?
What Is Your Greatest Strength? Discovering your greatest strength is an essential step towards personal and professional growth. Understanding what makes you unique and valuable allows you to develop it further, stand out from the crowd, and achieve success. In this blog post, we will explore the concept of greatest strengths, how to identify them,…
How to Motivate Disengaged Employees?
Motivating disengaged employees can be achieved by implementing recognition programs and providing opportunities for growth and development. By acknowledging their efforts and offering paths for advancement, employees will be inspired to re-engage with their work and contribute to the overall success of the company. Motivating employees is a crucial aspect of any successful organization. However,…

Which Communication Skill is Most Useful for Medical Professionals
The most useful communication skill for medical professionals is active listening. Active listening is essential for understanding patient concerns and providing effective care. Medical professionals who are adept at active listening can create a trusting and supportive environment for patients, leading to better outcomes. Strong communication skills are vital in the medical field as they…

Top Communication Skills
Communication skills are crucial for effective interaction, as they allow individuals to convey their ideas and thoughts clearly and efficiently. They encompass both verbal and non-verbal forms of communication, such as active listening, expressive body language, and articulate speech. Developing strong communication skills can greatly enhance one’s personal and professional relationships, improve teamwork and collaboration,…
What is a Presentation Clicker? [And How to Use it?]
By: Author Shrot Katewa
![What is a Presentation Clicker? [And How to Use it?]](https://artofpresentations.com/wp-content/uploads/2021/04/Featured-Image-What-is-a-Presentation-Clicker.jpg "best presentation clicker for chromebook")
If you are preparing to give a presentation, a presentation clicker can be a very helpful tool! In fact, if you have never given a presentation on a stage before, and you probably just found out that you will need to use a presentation clicker during the presentation, it can make you a bit anxious. This may perhaps make you wonder, what exactly is a presentation clicker?
A presentation clicker (or a presentation remote) is a wireless device that acts as a remote to control the movement of your slides during a presentation. A presentation clicker helps to advance the slides, or move back. Some presentation clickers also have a built-in laser that acts as a pointer.
In this article, I will help you understand a bit more about a presentation clicker, and provide you with tips on how to use it when giving a presentation. Plus, if you are looking to buy a presentation clicker, I shall be sharing some of the best options for you to choose based on my experience.
So, let’s get started!
How Does a Presentation Clicker Work?
A presentation clicker works by connecting to a computer wirelessly using a Bluetooth connection (often using a Bluetooth receiver). Once connected, it allows the presenter to move the slides forward or backward in the presentation mode using the buttons present on the clicker.
Thus, if you are using a presentation clicker when giving the presentation, you can easily move around on the stage and you don’t have to worry about running back to your computer (or asking someone else) to change the slide!

It is important to note that most presentation clickers come with a Bluetooth receiver that is injected into a USB slot on the computer (much like how a wireless mouse is connected to a laptop or a desktop). Furthermore, a receiver is unique to a specific device. Meaning, if you lose the Bluetooth receiver, the presentation clicker will not work!
Additionally, some clickers are designed to work specifically with a special application such as Microsoft PowerPoint. These clickers won’t work with other presentation applications like Keynote and Google Slides. Whereas, some clickers work with most major presentation applications and even with PDF files!
If you are planning to buy a presentation clicker, make sure that you choose one that works at least with Microsoft PowerPoint, Google Slides, and Keynote!
I’m also going to share with you how to use a presentation clicker, so make sure that you keep reading!
Top 5 Best Presentation Clickers
Sometimes, organizers simply don’t provide the presenter with a presentation clicker. Even when they do, the type of clicker will vary from one event to the other! Learning how to use a different clicker at the last moment can be a bit annoying especially when you are focusing on getting the presentation delivered perfectly!
That is one of the main reasons I carry my own presentation clicker. In fact, I highly recommend you do that too as it really doesn’t cost too much to buy a clicker.
So, let me share with you a few options that you should consider if you are interested in buying a clicker for delivering presentations.
Note – You can also check out the best selling presentation remotes on Amazon. These are usually the most reliable choices in addition to the ones that I’ve tried and reviewed below!
If you are in a rush and want to know which one is the best, my recommendation would be to go with Logitech Spotlight Remote . It is the easiest one to use with a design that requires minimal explanation, and works in a plug-and-play model! It even works without the receiver, that way you don’t have to worry about losing the receiver!
1. Logitech Spotlight Presentation Remote [Most Complete]
Spotlight by Logitech is THE BEST presentation remote out there! It provides you with some of the most unique features. Some of these features include –
- Mouse-like cursor control
- Allows you to not only highlight but magnify elements on the screen (which is pretty cool!)
- Range of up to 100 feet
- Seamless connectivity – it really is seamless as it works even without a receiver via Bluetooth. That way, if you lose the receive it still works! (If you are like me, you’re bound to lose a receiver at some time!)
- Highly compatible – Works with not just Google Slides, but also with PowerPoint, and Keynote. It even works with PDF files and Prezi!
In my experience, the most helpful feature is its design! Other than the Power button, it only has 2 buttons which are used for next and previous slides. That way, you don’t get confused when presenting and end up showing slides that you aren’t meant to!
The best part is that it is not obnoxiously expensive! For all the features that it encompasses, Spotlight is quite affordable.
Check out the latest price by clicking on the button below.
2. Beboncool RF Wireless Presenter [Most Budget Friendly]
The Beboncool is pretty budget-friendly and also has an integrated laser pointer. It is made out of unique ABS material which is environmentally friendly.
To use it, you do not have to install any software. Just plug in and it is ready for some action – which is quite helpful.
It has all the standard features available on the remote. It works with both Windows and Mac. Furthermore, it can also be used with PowerPoint and Keynote along with Google Slides.
The only drawback (if we can call it that) is that it doesn’t come with a battery. So, you really can’t just unbox and use it directly! But, for most people, that shouldn’t be a problem I suppose.
3. DinoFire Presentation Clicker [Most Ergonomic]
DinoFire pointer comes with quite a sleek and ergonomic design. It is comfortable to hold in your hands.
It has 3 clicky buttons and one integrated laser pointer. Some of the other features that it offers are as follows –
- Range of 100 feet
- Wide Compatibility – Works with all Windows operating systems, Mac and Linux. Furthermore, it also works with PowerPoint, Keynote, and Google Slides
- Magnetic USB receiver – this ensures that the receiver doesn’t accidentally fall off.
- 3-year guarantee on USB receiver – this is really cool! If you end up losing the receiver, the manufacturer will replace the receiver for you completely free for the first 3 years! This is one thing that I definitely loved about this clicker!
- Low power indicator – another helpful feature is the low power indicator. This feature ensures that your presentation clicker doesn’t ditch you in the middle of your presentation!
If you are looking for a presenter remote on a budget, I would recommend DinoFire presentation clicker with my eyes closed! Apart from being the most ergonomic, I also feel that this is the best all-round remote on a budget!
4. DinoFire Presenter Remote with Air Mouse [Best Features on a Budget]
The DinoFire presenter remote with remote air is compatible with any USB A or USB type C device.
It is also a future-proof purchase for you as it works with Windows, Mac, Linux, and Android. Not only that, this two-in-one receiver will provide you 164 feet of wireless coverage. Besides being a presentation clicker, it can also be used as a mouse!
It actually comes packed with a loads of features! Let’s take a look at some of the most helpful features –
- Rechargeable battery – you will never run out of power on this device as you can just plug it into an electric socket and use it. It takes about 1.5 hours to charge fully and runs for about 8-10 hours on operation.
- Also functions as a real mouse – with a click of a button, you can switch from a presenter to an air mouse!
- Green Light as a pointer – this presentation clicker comes with a green light. The advantage of green light is that it works even with TV screens. It is also far more powerful than a red laser light; thus easily visible.
- High range – Clicker range up to 50 feet, mouse range is about 80 feet, and light range is about 300 feet.
- Battery indicator – it also comes with a battery indicator that starts flashing red when the battery is low.
- Compatibility – this DinoFire presentation remote is compatible with Windows, Mac, and Linux. It also works with Google Slides, PowerPoint, Keynote, and a few other applications.
5. Logitech Wireless Presenter R400 [Best Branded Remote on a Budget]
The Logitech R400 is perfect for professional usage and compatible with all windows versions. It has a strong red laser to highlight your presentation content. The most attractive part is that it has touch-sensitive buttons and 50 feet wireless coverage.
While it does come with most of the standard features, there are a couple of drawbacks to keep in mind though –
- It requires 2 AAA batteries to use
- It is only compatible with Windows
That said, you do get a trusted product with a fail-proof brand name like Logitech at quite a low price point!
How to Use a Presentation Clicker?
As mentioned previously, the presentation clicker will usually have at least the previous and the next button on it.
To use a presentation clicker, first, connect it to the computer. Then, enter the presentation into presenter mode. Finally, press the ‘Previous’ and the ‘Next’ buttons on the clicker to move the slides ahead or back in the presentation. To use the laser pointer, press and hold the laser button.
Using a presentation clicker is actually not difficult at all. So, don’t worry if you have not used it before. That said, presentation clickers usually have their buttons placed differently and it varies based on the model and the brand.
Some clickers come with additional functionality such as converting the clicker into a mouse. It can be annoying when you have to adjust to a presentation clicker every time. However, it is better to spend 5 minutes orienting yourself with the clicker before starting with the presentation rather than committing a mistake during the presentation.
What Else is a Presentation Clicker Called?
There are several names used for a presentation clicker! You may hear other people refer to it as a Presentation Remote, Wireless Clicker, Slide Clicker, PowerPoint Remote, Presentation Pointer among others!
You can rest assured, all these actually mean the same thing!
More Related Topics
- 7 EASY Tips to Make Your Presentation Attractive? [Even for Beginners!]
- Do Presentation Clickers Work with Google Slides?
- Why Do Presentations Make Us Nervous? [With 17 Tips to Overcome it!]
- How to Give a Presentation on Zoom [A Complete Step-by-Step Guide!]
- PowerPoint vs Google Slides: Which is Better? [The ULTIMATE Test!]
Credit to Nakaridore for the featured image of this article
How to Run a PowerPoint Presentation on Chromebook
Whether using Microsoft PowerPoint or Google Slides, creating a presentation on a Chromebook is not a problem.
Chrome OS is largely a cloud-based operating system, which means you can easily synchronize your data between devices. This can be helpful for students and corporate users who want to keep their data and presentations at hand at all times.
A boost in hybrid work environments has increased the demand for the virtual sharing of ideas, and presentations are one of the best ways of doing so. The good news is you can use your Chromebook to create and run presentations pretty conveniently.
So, let's look at how you can run PowerPoint presentations on your Chromebook using two different apps.
Running a Presentation on a Chromebook
The two commonly used apps for running presentations on your Chromebook are Microsoft PowerPoint and Google Slides. Both are developed by two top tech giants and are quite reliable tools.
Since Chrome OS is a Google product, your presentation slides will open in Google Slides by default. However, you can use either app. Both have diverse features, along with some unique ones.
To determine your preference and which is more suitable for you, let's see how you can utilize PowerPoint and Slides to efficiently run presentations on your Chromebook.
But if you aren't already familiar with both products, here is a more general comparison of PowerPoint and Slides .
How to Use the PowerPoint Chrome App
PowerPoint is part of Microsoft Office and is available as an online app on your Chromebook. It enables you to create and run presentations, and you can use it for educational, business, or professional purposes.
To use PowerPoint on your Chromebook, you have to install the PowerPoint Chrome app . Microsoft created this app for users who can't install Office on their devices.
Once installed, the app will appear in your Chromebook's app drawer, which you can access by clicking on Launcher in the bottom left and then the Caret icon.
To get started, PowerPoint will ask you for your Outlook account. Enter your details, and you are ready to go.
To run an existing PowerPoint presentation, simply click on Upload and open and locate the file that you want to run. When the time comes, you can run it in full-screen mode by going to Slide Show > From Beginning or From Current Slide from the top bar.
If you are going to create a presentation using this app, here are some features to look out for.
1. Templates
Don't have the time to do all the styling and design? You can choose from various PowerPoint templates to get started.
Templates are pre-built slides with unique designs and formatting such as colors, font size, images, and animations. Templates can help you save time since all you have to do is write your content on the slides.
Templates are easy to find. When you open the PowerPoint web app, it will show you several templates on the screen alongside a New blank presentation . Press on More themes on the right to access all the templates available.
2. Designer
If you want to design your customized presentation, PowerPoint will help you with that as well. Designer is an innovative feature of PowerPoint to help you in designing the slides based on the content, colors, styles, and fonts used in the slides. You can access Designer by going to Design > Designer .
It will give you several design recommendations, and you can access these design ideas by simply clicking on them from the right sidebar. This feature can save you a lot of time in designing and styling your slides.
3. Animations
Animations make the presentation more interactive and visually appealing. The transition of objects with different animation styles such as fade-in, fade-out, appear, and split really embellish your presentation. You can access them from the top bar by clicking on Animations .
4. Images & Videos
Multimedia is essential for any presentation. Whether it is a business presentation showing your growth and revenue or a college assignment on a semester project, you need to add images and videos to help your viewers focus.
PowerPoint makes it easy for you to add images and videos. You can add your multimedia through the Insert option in the top bar.
Here are some more PowerPoint tips for preparing a professional presentation .
How to Use Google Slides
Google Slides is a presentation app part of Google Workspace and the default presentation viewer and editor on your Chromebook. It is cloud-based, which means it incrementally stores all your progress in your Google Drive, helping prevent data loss.
The app has good integration with other Google apps, such as Google Docs, and you don't need to buy any premium subscription to use it. You can find the Google Slides app in the Chrome Web Store.
Once installed, go to your app drawer as you did above and open Slides . If you have a pre-existing presentation at hand, go to Open file picker and open that file. You can run it in full-screen mode by going to View > Full screen . You can even run your slide on a loop .
If you are going to create a presentation using Google Slides, you might want to use the following useful features.
Templates are pre-built slides made for different purposes. You just have to write your content in them. They help you save time on design, fonts, colors, and animations.
When you open Google Slides, it shows you several templates, and you can browse more templates by going into the Template gallery . You might also want to check out these useful resources for finding Google Slides themes .
Google Slides allows you to search for an image and add it to the slide without leaving the app. You can search the internet for the image you want to add and can also add one from your Google Drive.
This helps you save time by staying inside the presentation. Simply go to Tools > Explore from the top bar to access this option. From there, you can drag and drop the images from your search results.
3. Host Q&A
Presentations are meant to deliver information and communicate with the audience. So, a good communication response from the audience is vital. This response can be in the form of questions or suggestions.
Google Slides has Q&A features that allow you to get responses or queries from the audience. It can be anonymous or from the users' email IDs. The audience members need to follow a link, and they can add their questions virtually.
Go to Presenter view > Audience Tools > Start New to begin the Q&A session. There, it will show the link that your audience needs to access.
4. Publish to Web
If you want to share your presentations with a broader audience, you can publish your Google Slides file on the web. It lets you share the link to your slides with others. Anyone with the link can open the slides without having a Google account.
To do so, go to File > Publish to the web . Click on it and publish the slides after choosing the right options.
Use Your Chromebook for Presentations
PowerPoint and Google Slides are both great options for creating presentations on a Chromebook. They offer great features to help you create and run compelling presentations.
You can try both on your Chromebook easily—no long installation steps are required. Just add the Chrome app or open the website to get started.
How to Run a PowerPoint Presentation on Chromebook

Chromebooks have become increasingly popular over the past few years due to their affordability, portability, and ease of use. However, some users may find the inability to natively run Microsoft PowerPoint presentations limiting. The good news is there are several methods to run PowerPoint presentations on Chromebooks. In this blog post, we’ll provide a step-by-step guide on the options available.
Prerequisites
Before getting started, make sure you have the following:
- A Chromebook with the latest OS update installed
- A Google account
- A Microsoft account (optional)
- PowerPoint presentation files stored locally or in cloud storage like OneDrive or Google Drive
Method 1: Use PowerPoint Online
PowerPoint Online is the web-based version of PowerPoint that runs in any modern browser. Here are the steps to use it:
- Open the Chrome browser on your Chromebook.
- Navigate to www.office.com .
- Click “Sign in” and sign in with your Microsoft account credentials.
- Click on the PowerPoint icon to launch the web app.
- Locate and open your PowerPoint presentation file from OneDrive or upload it from your local downloads folder.
- Edit the presentation if required. All changes save automatically.
- When ready, click “Present” to launch the slideshow.
- Use your trackpad or attached mouse to navigate slides.
PowerPoint Online allows editing presentations and gives you access to most commonly used features. It’s a great way to quickly view or do minor edits to a presentation on a Chromebook.
Method 2: Use Google Slides
Google Slides is a free web-based alternative to PowerPoint offered by Google. Here is how you can use it:
- Open your Chrome browser and navigate to slides.google.com .
- Sign in to your Google account.
- Click on a blank presentation or template to create a new slide deck.
- To import an existing PowerPoint presentation, click File > Import slides and pick your file.
- Edit slides using the available formatting options in the right sidebar.
- To play your presentation, select “Present” in the top right.
- Use keyboard shortcuts or your mouse/trackpad to navigate slides.
The benefit of Google Slides is it’s free and lets multiple people collaborate easily. But certain PowerPoint features like slide transitions may not get converted properly when importing.
Method 3: Install Microsoft PowerPoint Android App
The Microsoft PowerPoint app available on Google Play Store allows you to easily view, edit and present files on your Chromebook. Here is how to install and use it:
- Open “Play Store” on your Chromebook.
- Search for “Microsoft PowerPoint”.
- Install the PowerPoint app from official publisher Microsoft Corporation.
- Open the app and sign in with your Microsoft account.
- Locate the presentation file in your OneDrive or local storage.
- Click a file to open it. Make edits if required.
- Click “Play slide show” to launch your presentation.
- Use touchscreen gestures or attach a mouse for navigation.
The Android app delivers full PowerPoint capabilities for Chromebook users. However, it requires you to purchase a Microsoft 365 subscription after a limited trial period.
Running PowerPoint presentations on Chromebooks is easy and convenient with multiple options available. PowerPoint Online and Google Slides offer free web-based solutions while the Android app provides the full desktop experience. We hope this step-by-step guide helps you successfully present PowerPoint slide decks on Chrome OS. Let us know if you have any other questions in the comments!
About The Author
Vegaslide staff, related posts.

How to Remove a Background or Watermark in PowerPoint

How to Set a Custom Template as the Default in PowerPoint
 to PDF in Windows 5")
How to Batch Convert PowerPoint (PPT or PPTX) to PDF in Windows

How to Automatically Play Audio in PowerPoint

Guide to the Best Wireless Presenters (Presentation Remotes) for 2023
Disclosure: When you buy something through links on our site, we may earn an affiliate commission.
In both the corporate and educational world, giving presentations is an important part of life. Anything that can help your presentation go smoothly can have a positive effect on your career. Luckily, there’s plenty of technology out there that can help you out in this area. Digital projectors are clearer and easier to see than the models we had available only a few short years ago, and most can now integrate with remote controllers.
Your typical remote controller is nothing more than a button that allows you to advance to the next slide. But there are a few models out there that offer much more control than this. You can start and stop multimedia, go back to a previous slide, or even use a laser pointer to draw attention to specific parts of your presentation. Today, we’re going to be taking a look at the three best presentation remotes on the market.
Canon PR10-G Wireless Presentation Remote
Whether you’re looking for the latest photo gear, a high-quality printer, or powerful business technology, Canon is an excellent choice. They’ve been manufacturing presentation remotes for quite some time now, but the PR10-G is the latest in modern presentation technology.

The Canon PR10-G Wireless Presentation Remote is easy to hold in the hand, but built to withstand a lot of use and abuse. It’s made from injection molded plastic, tastefully designed with a lightly textured pattern that makes it both resistant to scratches and easy to hold. Right where your thumb rests are the easy to push buttons. They use rubber dome actuators that provide a firmer press but won’t wear out with time. At the top you’ve got a handy LCD display. This screen can be used for a variety of reasons. Most people will use it for timing your presentations.
I’m sure we all know how important this is. When rehearsing, it’s easy to set a timeline and stick to it. But once you get in front of people, you find that you’re either spending too much time on one topic, or rushing through the presentation quicker than you expected. With the timer, you’ll be able to find out where you are at with just a quick glance at the face of the display. You can also use the timer to keep track of where you are at in your presentation if you’ve integrated it with video or audio media.

Perhaps the most important feature of any wireless presenter is the control layout. This is one of the many areas where the Canon model really excels. At the top, you’ve got the large button that turns the laser pointer on or off. A partial press will keep the light on as long as it’s held down. But if you depress it all the way, the laser will stay on until pressed a second time.
Below that you’ve got the typical forward and backwards buttons. Below each of those, there are two unique buttons you might not have seen before. The first is the “expand” button. This can be used with both PowerPoint or Keynote to blow up an image, video, or diagram to full size. Press it again to return to the standard size. On the right, you’ve got the start / stop button that can trigger playback of multimedia.

Compatibility
The Canon PR10-G is designed to work straight out of the box with Apple’s Keynote or Microsoft’s PowerPoint. You won’t need to go through any complicated setup procedure, just unpack it and start using it.
The biggest issue with compatibility is range. Presentation remotes often have to choose between standard Bluetooth, or Wi-Fi direct. Bluetooth is the most compatible of all standards, but suffers from short range. Wi-Fi direct works only with modern devices, but supports a longer range. Canon found a creative solution for this problem. Their remote comes bundled with a high-powered Bluetooth transceiver that plugs into the USB port on any Mac or Windows computer. This allows them to use a higher-powered setting that isn’t supported by all devices. The end result is a huge 100-foot range, allowing the remote to be used in even the largest presentation rooms.
Even without drivers, the presentation remote can be used with any Windows computer from Vista SP2 and up. This means that Windows 7, 8, and 10 all work out of the box. Mac OS 10.5 and up are supported, meaning that the remote will work with any Intel based Mac released in the last 11 years.

The stand out feature of this remote is the powerful green laser. This laser pointer might look a little different from the standard red ones, but it’s up to 8 times brighter than the red wavelength. This means that even in the brightest most well-illuminated room, you’ll have no problem drawing attention to the most important parts of your presentation.
Another great feature of canons presentation remote is the vibration feature. You can easily set notifications at various points throughout your presentations to help keep you on track. It will automatically vibrate one, five, or ten minutes before the end to remind you to wrap things up. You can also set the timer to vibrate at any other point, as needed.
Kensington Wireless Presenter
If the name rings a bell, it’s because Kensington is known primarily for their high-quality laptop security devices. The Kensington lock is generally accepted as being one of the locks on the market. Their remote presenter goes hand in hand with these locks, as you’ll often want to keep your notebook safe while you give your presentation.

The incredibly compact Kensington Wireless Presenter is designed to be simple and easy to use. While it’s not the most attractive of the bunch, you might be surprised to learn that it’s actually very comfortable to hold in the hand. Its strong curves fit with the curves of your hand, meaning that you’re not going to get uncomfortable even when you’re using it for long periods of time. Aside from the four buttons on the face, there isn’t really a whole lot of extras on this presentation remote. But the one thing we did really like was the USB port on the bottom. This can be used to charge the remote, but also provides a handy storage space for the USB receiver when not in use.

The control scheme with this remote is simple, but still highly effective. The two buttons that you’ll use the most, the forward and backward buttons, are located on either side of the main section. On the opposite orientation, you’ve got the play and stop buttons. The main difference between this button and some of the more advanced models is that each one serves a single purpose.

For example, Canon combined the play and stop buttons. If your media is currently playing, then the button will stop it, and vice versa. But this can create confusion in presentations where there are multiple media types, or if you change slides without stopping the previous media. To avoid any awkward mistakes, many presenters will prefer this simple control scheme.

The Kensington Wireless Presenter decided to go for a high bandwidth method of communication to offer solid range without dropouts. Running on the 2.4 Ghz frequency, it requires that a USB dongle be used with your computer. This transceiver can be used with Windows 7, 8, and 10 PCs. It can also work with OSX systems from 10.6 and up. It works with Microsoft PowerPoint out of the box, but the drivers allow you to map the buttons to the keyboard. With a few quick clicks, you can set it up to control any presentation software you like.
Logitech R800 Professional Presenter
We’ve reviewed Logitech’s accessories many times before, and not once have we come across one that disappoints us. While their professional wireless presenter is much larger than some, the impressive range of included features makes this presenter just as powerful as it is large.

The Logitech R800 Professional Presenter is ergonomically designed to be comfortable to hold in the hand, and keeps all of your most important features easily accessible from the face. But aside from the standard controls, you’ve got access to a powerful LCD display on the face that performs much of the same features as the Canon model. It can help you keep track of how long you’ve bene presenting for, how long you’ve spent on a particular slide, or show you a countdown to a specific time.

The controls are quite similar to those on the Canon. You’ve got the forward and backward buttons for navigating between slides, the full screen button for expanding visual aids, and the play button to start and stop embedded media. But the unique feature on this remote is the programmable button located just below the display. You can configure this button to set any particular element you like, giving you a little more control over your presentation.

This wireless remote presenter is compatible with a wide range of Windows PCs, starting from Windows 7 and going up to the latest release of Windows 10. It uses the same wireless technology as the Cannon, requiring a dongle but giving you up to 100 ft (30 meters) of range.

The Logitech R800 Professional Presenter has a couple of features we’ve seen before, but are happy to see included. It’s got the timed vibration feature, which we found to be a little easier to use than the Canon model. The timer is set from the included features, and gives you a ton of control over how and when the timer goes off. You can set different types of vibrations for different alarms. For example, short pulses can signify an impending time limit, or long ones can remind you to move on to the next slide.
Another great feature of this remote is the same high powered green laser pointer we liked so much. Once you use such a bright pointer it’s unlikely that you’ll want to go back to the basic model.
Which Wireless Remote Presenter is Right for Me?
Not sure which one is right for your business? For most users, we’re recommend the Canon PR10-G . This remote is fully compatible with both Windows and Mac operating systems, and gives you plentiful controls and a powerful laser.
You might also want to consider the Logitech R800 Professional Presenter . This model adds a powerful timing system that lets you make the most of the built-in vibration feature.
Finally, there will be a few people who just need something simple for their presentations. In this case, you can’t go wrong with the Kensington Wireless Presenter . It’s affordable, easy to use, and reliable. If this is all you need, there is no sense is spending money on a high-end model.

Meet Derek, “TechGuru,” a 34-year-old technology enthusiast with a deep passion for tech innovations. With extensive experience, he specializes in gaming hardware and software, and has expertise in gadgets, custom PCs, and audio.
Besides writing about tech and reviewing new products, Derek enjoys traveling, hiking, and photography. Committed to keeping up with the latest industry trends, he aims to guide readers in making informed tech decisions.
2 thoughts on “Guide to the Best Wireless Presenters (Presentation Remotes) for 2023”
I am seeking a presenter which is compatible with Corel software on a PC running Windows 10. I will appreciate any comments or suggestions. Thank you.
Thank you for the great reviews. I am currently using a Kensington Presenter Pro that has been good for me for quite some time now. I like the size and the button layouts; the range is wonderful; and the green laser is plenty bright. That all said, the one thing that drives me mad is the clicking sounds of the buttons. How on earth did the design team feel this was okay. During a quiet part of a presentation when I’m not talking, but still advancing slides, this is completely distracting.
You did not happen to mention if any of these above have silent ‘soft touch’ buttons. I think the Canon might, but not sure. Can you please confirm which ones do and which ones don’t.
Thank you. Cheers! Kevin
Leave a Comment Cancel reply
- Electronics & Computers
- Other Electronics
- Presentation Remotes
Best Presentation Remotes

This site is a free online resource that strives to offer helpful content and comparison features to its visitors. Please be advised that the operator of this site accepts advertising compensation from certain companies that appear on the site, and such compensation impacts the location and order in which the companies (and/or their products) are presented, and in some cases may also impact the scoring that is assigned to them. The scoring that appears on this site is determined by the site operator in its sole discretion, and should NOT be relied upon for accuracy purposes. In fact, Company/product listings on this page DO NOT imply endorsement by the site operator. Except as expressly set forth in our Terms of Use, all representations and warranties regarding the information presented on this page are disclaimed. The information which appears on this site is subject to change at any time. More info

Kensington K72427AM
Design and Convenience
Operation and Extras

Dinofire FG01

Satechi SP400

Doosl DSIT001

Logitech R400

What is a Presentation Remote
Presentation remotes are truly helpful gadgets for people who need to make presentations or reports quite often. This compact digital device allows you to switch the slides when you wish and, therefore, to control the time for each slide. Most wireless presentation remotes have a built-in laser pointer that helps you draw the attention of the audience to a certain important aspect. If you want to make a really successful presentation, no matter if it's at school, college, or at work, a USB presentation remote is a must-have device.
If you wish to use a versatile remote for controlling several digital devices at a time, read our review of the best TV remotes and get one of them.
What Features to Compare
The first thing you should pay attention to when making a choice of a wireless presentation remote is the design. Consider the shape and the size of the pointer as well as the material it's made of. You should use the device that you will be able to hold comfortably. If the material is slippery, you might even drop the device. Also, if the remote is too big for your palm, using it won't be convenient. Also, the best gadgets have a special storage place for a USB receiver. This way, you will never lose this tiny yet indispensable peripheral. If the model you choose has no receiver storage, make sure to check if it has a special case or a bag. The best wireless presentation remotes have light indicators, informing you about such important issues as the battery charge level and the signal strength. There's another highly important aspect we are going to draw your attention to - very often we prepare files for presentations and forget to copy them to a flash drive. Has this ever happened to you? Quite likely it has! And that's why the best presentation remotes have a receiver with a slot for microSD cards. Thanks to this important feature, you can copy all your presentation files to a memory card. That's particularly handy for busy people like teachers and professors.
Next, you need to know what each wireless presentation remote can actually do. It's self-evident that slide switch is not the only option these devices can cope with. There are many other handy capabilities that will make your presentations really interesting and efficient. Many presentation remotes support a Mouse mode which allows you to control the cursor on the screen of your computer. This way you can pick the files you need, open them, as well as launch apps/videos or even click on hyperlinks. Very often the audience can't get major points of a presentation and that's why a laser pointer comes in handy too. How does it work? You just need to push the button and a laser pointer will appear on the screen, so you will be able to highlight the most important features. Many people think that the laser pointer glows red only, but this is wrong. Today, some wireless presentation remotes glow green - a green laser is brighter. Moreover, some devices feature violet or blue laser pointers but they aren't widespread yet. Finally, when you are done with the slides, you may need to switch the audience's attention from a large glowing screen to yourself. How to do it without losing time? The answer is simple - turn off the screen completely. That's why most presentation remotes have a Black Screen button that allows you to do it in the blink.
We've come to the final features that are worth you consideration. Since nearly all presentation remotes are wireless, you should know their operational range. If the computer is too far, the signal from the remote to the receiver won't be strong enough. No need to say, the range is important if you are going to make presentations in large premises. If it's just a small conference room in your office, the range won't be important. Also, don't forget to check which operating system a USB presentation remote is compatible with. Most of them are compatible with Windows (usually, all versions are supported, though Windows 10 might be a trouble for certain dongles), but if you make lots of presentations and, thus, need to use different kinds of computers, choose the remote compatible with Mac OS as well. Some devices can also work with Linux and Android-operated computers. In the end, check what power source every device uses. As usual, it's either a built-in battery or 1-2 AAA batteries. The batteries can be replaced quickly but if a remote has a built-in battery, it should be charged in advance.
Other reviews

To leave a comment please sign up/sign in
Leave a comment as or Logout
Your comment was successfully sent
Error! Please try again later
The Tech Edvocate
- Advertisement
- Home Page Five (No Sidebar)
- Home Page Four
- Home Page Three
- Home Page Two
- Icons [No Sidebar]
- Left Sidbear Page
- Lynch Educational Consulting
- My Speaking Page
- Newsletter Sign Up Confirmation
- Newsletter Unsubscription
- Page Example
- Privacy Policy
- Protected Content
- Request a Product Review
- Shortcodes Examples
- Terms and Conditions
- The Edvocate
- The Tech Edvocate Product Guide
- Write For Us
- Dr. Lynch’s Personal Website
- The Edvocate Podcast
- Assistive Technology
- Child Development Tech
- Early Childhood & K-12 EdTech
- EdTech Futures
- EdTech News
- EdTech Policy & Reform
- EdTech Startups & Businesses
- Higher Education EdTech
- Online Learning & eLearning
- Parent & Family Tech
- Personalized Learning
- Product Reviews
- Tech Edvocate Awards
- School Ratings
Reading Groups: Everything You Need to Know
Product review of the ultenic p30 grooming kit, reading anxiety in children: everything you need to know, iep meetings and parent-teacher conferences: everything you need to know, college disability services and accommodations: everything you need to know, spam vs. phishing: how are these unwanted messages different, how to charge your iphone properly, encouraging your teenager to read: everything you need to know, 8 ways to service an air conditioner, 3 ways to stop a baby from vomiting, how to run a powerpoint presentation on chromebook.
As Chromebooks become increasingly popular, users may find themselves wondering if it’s possible to run a PowerPoint presentation on their device. The good news is, it is indeed possible. In this article, we’ll go over how to run a PowerPoint presentation on a Chromebook.
Option 1: Use PowerPoint Online
One way to run a PowerPoint presentation on a Chromebook is by using PowerPoint Online, which is available for free through OneDrive or Microsoft’s Office website. Here’s how:
1. Open your web browser and navigate to OneDrive or office.com.
2. Sign in with your Microsoft account.
3. Click “PowerPoint” to create a new presentation or open an existing one.
4. Create or edit your presentation as you would in the desktop version of PowerPoint.
5. When you’re ready to present, click “Slide Show” in the top menu, then select “From Beginning” or “From Current Slide” to start your presentation.
6. Use the arrow keys on your keyboard to navigate through the slides.
Option 2: Use Google Slides
Another option for running a PowerPoint presentation on a Chromebook is to use Google Slides, which is a free web-based alternative to PowerPoint. Here’s how:
1. Open your web browser and navigate to Google Slides.
2. Sign in with your Google account.
3. Click “Blank” or “From Template” to create a new presentation or open an existing one.
4. Create or edit your presentation as you would in PowerPoint.
5. When you’re ready to present, click “Present” in the top right corner of the screen.
Option 3: Use a Third-Party App
If neither PowerPoint Online nor Google Slides meets your needs, there are third-party apps available that allow you to run PowerPoint presentations on a Chromebook. Here are a few options:
1. SlideDog: This app allows you to combine PowerPoint presentations with other media, such as PDFs and videos.
2. Prezi: Prezi uses a different type of presentation format that is more fluid and interactive than traditional slideshows.
3. Zoho Show: Zoho Show is a web-based presentation tool that includes features for collaborating with others in real-time.
How to Change Your PlayStation Username on ...
How to return merchandise without a receipt.

Matthew Lynch
Related articles more from author.

How to Solder Two or More Wires Together

How to Watch Disney+ Movies in IMAX Resolution
What Is Cloud Library, and How to Use It?

How to Fix It When Alexa Won’t Connect to Wi-Fi
How to Use Nintendo Switch Joy-Cons on PC

How to Use Google Find My Device
How to Do a Presentation on a Chromebook
As Chromebooks become more popular people see them in classrooms, boardrooms and other places where users will want to do presentations on a Chromebook. It’s now easy thanks to some awesome online presentation tools available for use on a Chromebook.
Read on for the best services to use for creating presentations on a Chromebook, some useful tips for great presentations and the accessories needed to present your hard work using a Chromebook.
Creating Presentations on a Chromebook

Google Slides, part of Google Docs
Google’s presentation tool, Google Slides , offers the best simple option for Chromebook users heavily invested in the Google Docs service. It’s part of Google Docs and the user doesn’t need to sign up for a new account to use Google Slides. Google Slides offers a simple user-interface and shows PowerPoint files imported into Slides. To install the web app version, head over to the Chrome Web Store .

Prezi is a popular tool especially among educators.
Prezi offers a slightly different approach to presentations, but still has a nice online tool used to make and share presentations. Instead of a linear series of slides, Prezi organizes their presentation tool on a large overview screen with smaller elements. The tool fluidly moves from one part of the overview screen to another to show the smaller parts. The user organizes the “slides” on the larger screen and then puts links them in the order the person wants to show them. Look at the image above and notice the circles. The represent parts of the presentation.
It takes getting used to how Prezi works, especially for a person used to the traditional presentation styles of PowerPoint, Google Slides, or Keynote. The service will hold your hand to help you learn to use it. It benefits presenters because their presentations won’t look like all the other PowerPoint or Keynote presentations we’ve seen. They’ll stand out.

The image insertion tool searches the Internet for copyright-free images that users can include for free in their presentations. It also offers an awesome image editing feature powered by Aviary. Insert the image, click on the toolbar button that pops up just above the image to edit it or add effects. Only Pro and Team users can edit images. See more on those price plans below.
The biggest drawback of Prezi is the cost. Prezi offers four price points – Free, Enjoy, Pro, Teams.
- Enjoy – $10/month or $59/year with online editing and presenting and 4GB of storage. Best for light users.
- Pro – $20/month or $159/year with online editing, offline editing on Windows and Mac and unlimited storage.
- Team – contact them for a price quote based on your enterprise needs.
The free version’s not a good option since everyone can see your presentations unlike Google Apps and Microsoft’s PowerPoint Online which offer free versions and don’t expose them to the world.

PowerPoint online running on a Chromebook
People with a lot of PowerPoint presentations may prefer to use the web version of PowerPoint. It seems like Microsoft gives users a bunch of ways to get to their web apps. Just install the web app from the Chrome Web Store or log in via Live.com . Chromebook users can use Office Online free, but they won’t get advanced features. Most people will do fine with a free account.

iCloud includes Keynote editing and presentation inside the Chrome browser.
Owners of Apple products get free access to iCloud, Apple’s version of online office and personal information management tools. Head over to iCloud.com , log in and select Keynote to create and edit presentations online. It works fine on a Chromebook. You can also install the launcher icon for iCloud available in the Chrome Web Store , but it’s not needed.
iCloud comes free to anyone with an Apple account, but users get more storage if they pay extra for an iCloud storage account that starts at just $2/month.
Tips for Great Presentations on a Chromebook
After years of doing weekly presentations and researching the topic for my graduate studies, the following tips gleaned from research and experience will help you present more effectively to the audience.
Start with a main idea. Presentations that scatter a bunch of unrelated ideas will bore audiences, confuse them and go unremembered. Find one big idea that summarizes the point in a single sentence. Then build on it from that point.
One of the best outlines for organizing presentations comes from Alan H. Munroe and his Motivated Sequence outline . He said to begin by grabbing attention, unearth some need that your message meets in the introduction. Then share the solution in the body of the message followed by a conclusion that gives a summary of the big idea presented in the form of a visualization of the idea in an illustrative story. Finally, call the hearers to action in some concrete way.

In this PowerPoint Online presentation, I put an image of a doctor’s office on this slide instead of putting words about a person’s health.
When creating slides, use lots of images in very few words. If a slide has more than a dozen words, then people won’t read it. Exceptions include quotations, but even then it’s often better to only show a key phrase in the quotation.
Instead of words, illustrate the ideas presented using images. Find images online from places like Flickr, Google Image search or use Prezi and their copyright-free image searching tool.

Change the image search in Flickr to find images legally usable in your presentations.
When searching Flickr , change the license filter. After a user performs a search using the main search box on the home page of Flickr, the service will show a bunch of photos in a grid format. Above the images on the left side of the screen there’s a drop down box labelled Any license . Click the arrow to show the list seen in the screen shot above. Choose one of the following depending on your needs:
- Any license for personal use if you don’t plan to show the presentation to others
- All creative commons to use images for nonprofit educational purposes but when you will show it to others
- Commercial use allowed if you plan to use it in business or for promotional purposes even if it’s for nonprofit
- Modifications allowed if you plan to edit the image before using it in the presentation
- Commercial use & mods allowed if you combine those two uses
- No known copyright restrictions if you want to use it for any reason and want no restrictions from the person who owns the image
- U.S. Government works if you work for the government
When creating presentations avoid complex animations and transition. This becomes distracting from the message. Also, use consistent fonts. Changing fonts often from slide to slide or worse on a single slide will look amateurish and distract from the message. Finally, consider the look of the slides. The colors should match and the layout should look clean and professional. Use themes, but be careful to avoid themes you’ve seen repeatedly from co-workers or other presentations at the business or organization where you plan to present.
Tools Needed for Presentations on a Chromebooks
To present you need a few things like a device that runs the presentation, a display of some kind to show the presentation and a way to connect the two. Optionally, add a remote to easily advance the slides in the presentation without standing or sitting right next to the device.
For the most reliable presentations opt for a wired connection between the Chromebook and the display. If that’s not possible due to the distance between the display and where the Chromebook needs to sit, use wireless. More on that below.
Wired Connections
Any Chromebook does a great job presenting with the above services or web apps. Consider the video output available on the Chromebook. Most come with full-sized HDMI ports, but a few use mini-HDMI or micro-HDMI. In those cases look for a cheap adapter or cable with mini or micro HDMI on one side and regular HDMI on the other, like one found on Amazon for $8-$10.

Use the HDMI cable to plug it into a TV, monitor or projector. If your display doesn’t include HDMI, which many older projectors don’t, then you will need an adapter of some kind to plug into VGA, DVI or component (red, blue, green or RGB inputs).
Use an HDMI to DVI adapter if possible. The [amazon_link id=”B0035B4LJM” target=”_blank” ]Importer520 Gold Plated HDMI Female to DVI-D Male Video Adapter[/amazon_link] will connect for a few bucks.
Grab the [amazon_link id=”B00IVD019I” target=”_blank” ]Mnxo® HDMI Male to VGA Female Adapter Converter with Audio[/amazon_link] to plug a Chromebook into a display with only VGA. It’s $12, a great price for this kind of adapter since many cost $40-$100. The adapter splits the video and audio signal that HDMI output carries. Plug the HDMI connector into the Chromebook and then plug a VGA cable into the other end of the MNXO adapter. There’s a stereo 3.5mm port on the side of the adapter. Plug a stereo cable into the port and the speakers used to play audio, if needed.
Wireless Connections

Google Chromecast with extension sets where the Chromecast won’t fit without it.
ChromeOS now supports casting the screen to a Chromecast or Android TV . Plug the Chromecast or Android TV into the projector via HDMI. Some of the above adapters will work with Chromecast, but not all do, so test your adapter out before the presentation. Set up the Chromecast on the local Wi-Fi network in the presentation room or connect directly. Use the setup tool from Google to make this work. Follow the instructions in the setup tool.
Alternatively, users can cast using an Android TV like the awesome new NVIDIA Shield . This device costs $200 but it makes for a great gaming device and includes Chromecast style mirroring.

Roku streaming stick has Chromecast functionality built-in.
If you own a Roku 3 or Roku Stick you might be able to get it to work as well. Use the Google Cast Chrome plug in that enables casting to Roku 3 and Roku Stick as well as Chromecast or Android TV.
To show a presentation, get a good projector with the right kinds of inputs or a large enough HDTV that everyone in the room can see without squinting. According to THX.com a good rule to follow says take the size of the screen and use it to find the distance from the screen that works best for the space. If participants will sit 6 feet from the screen, then git a 60-inch screen or a projector that shows a 60-inch image. Follow their guide to set up the room if you can change things.
Share this:
Related posts.
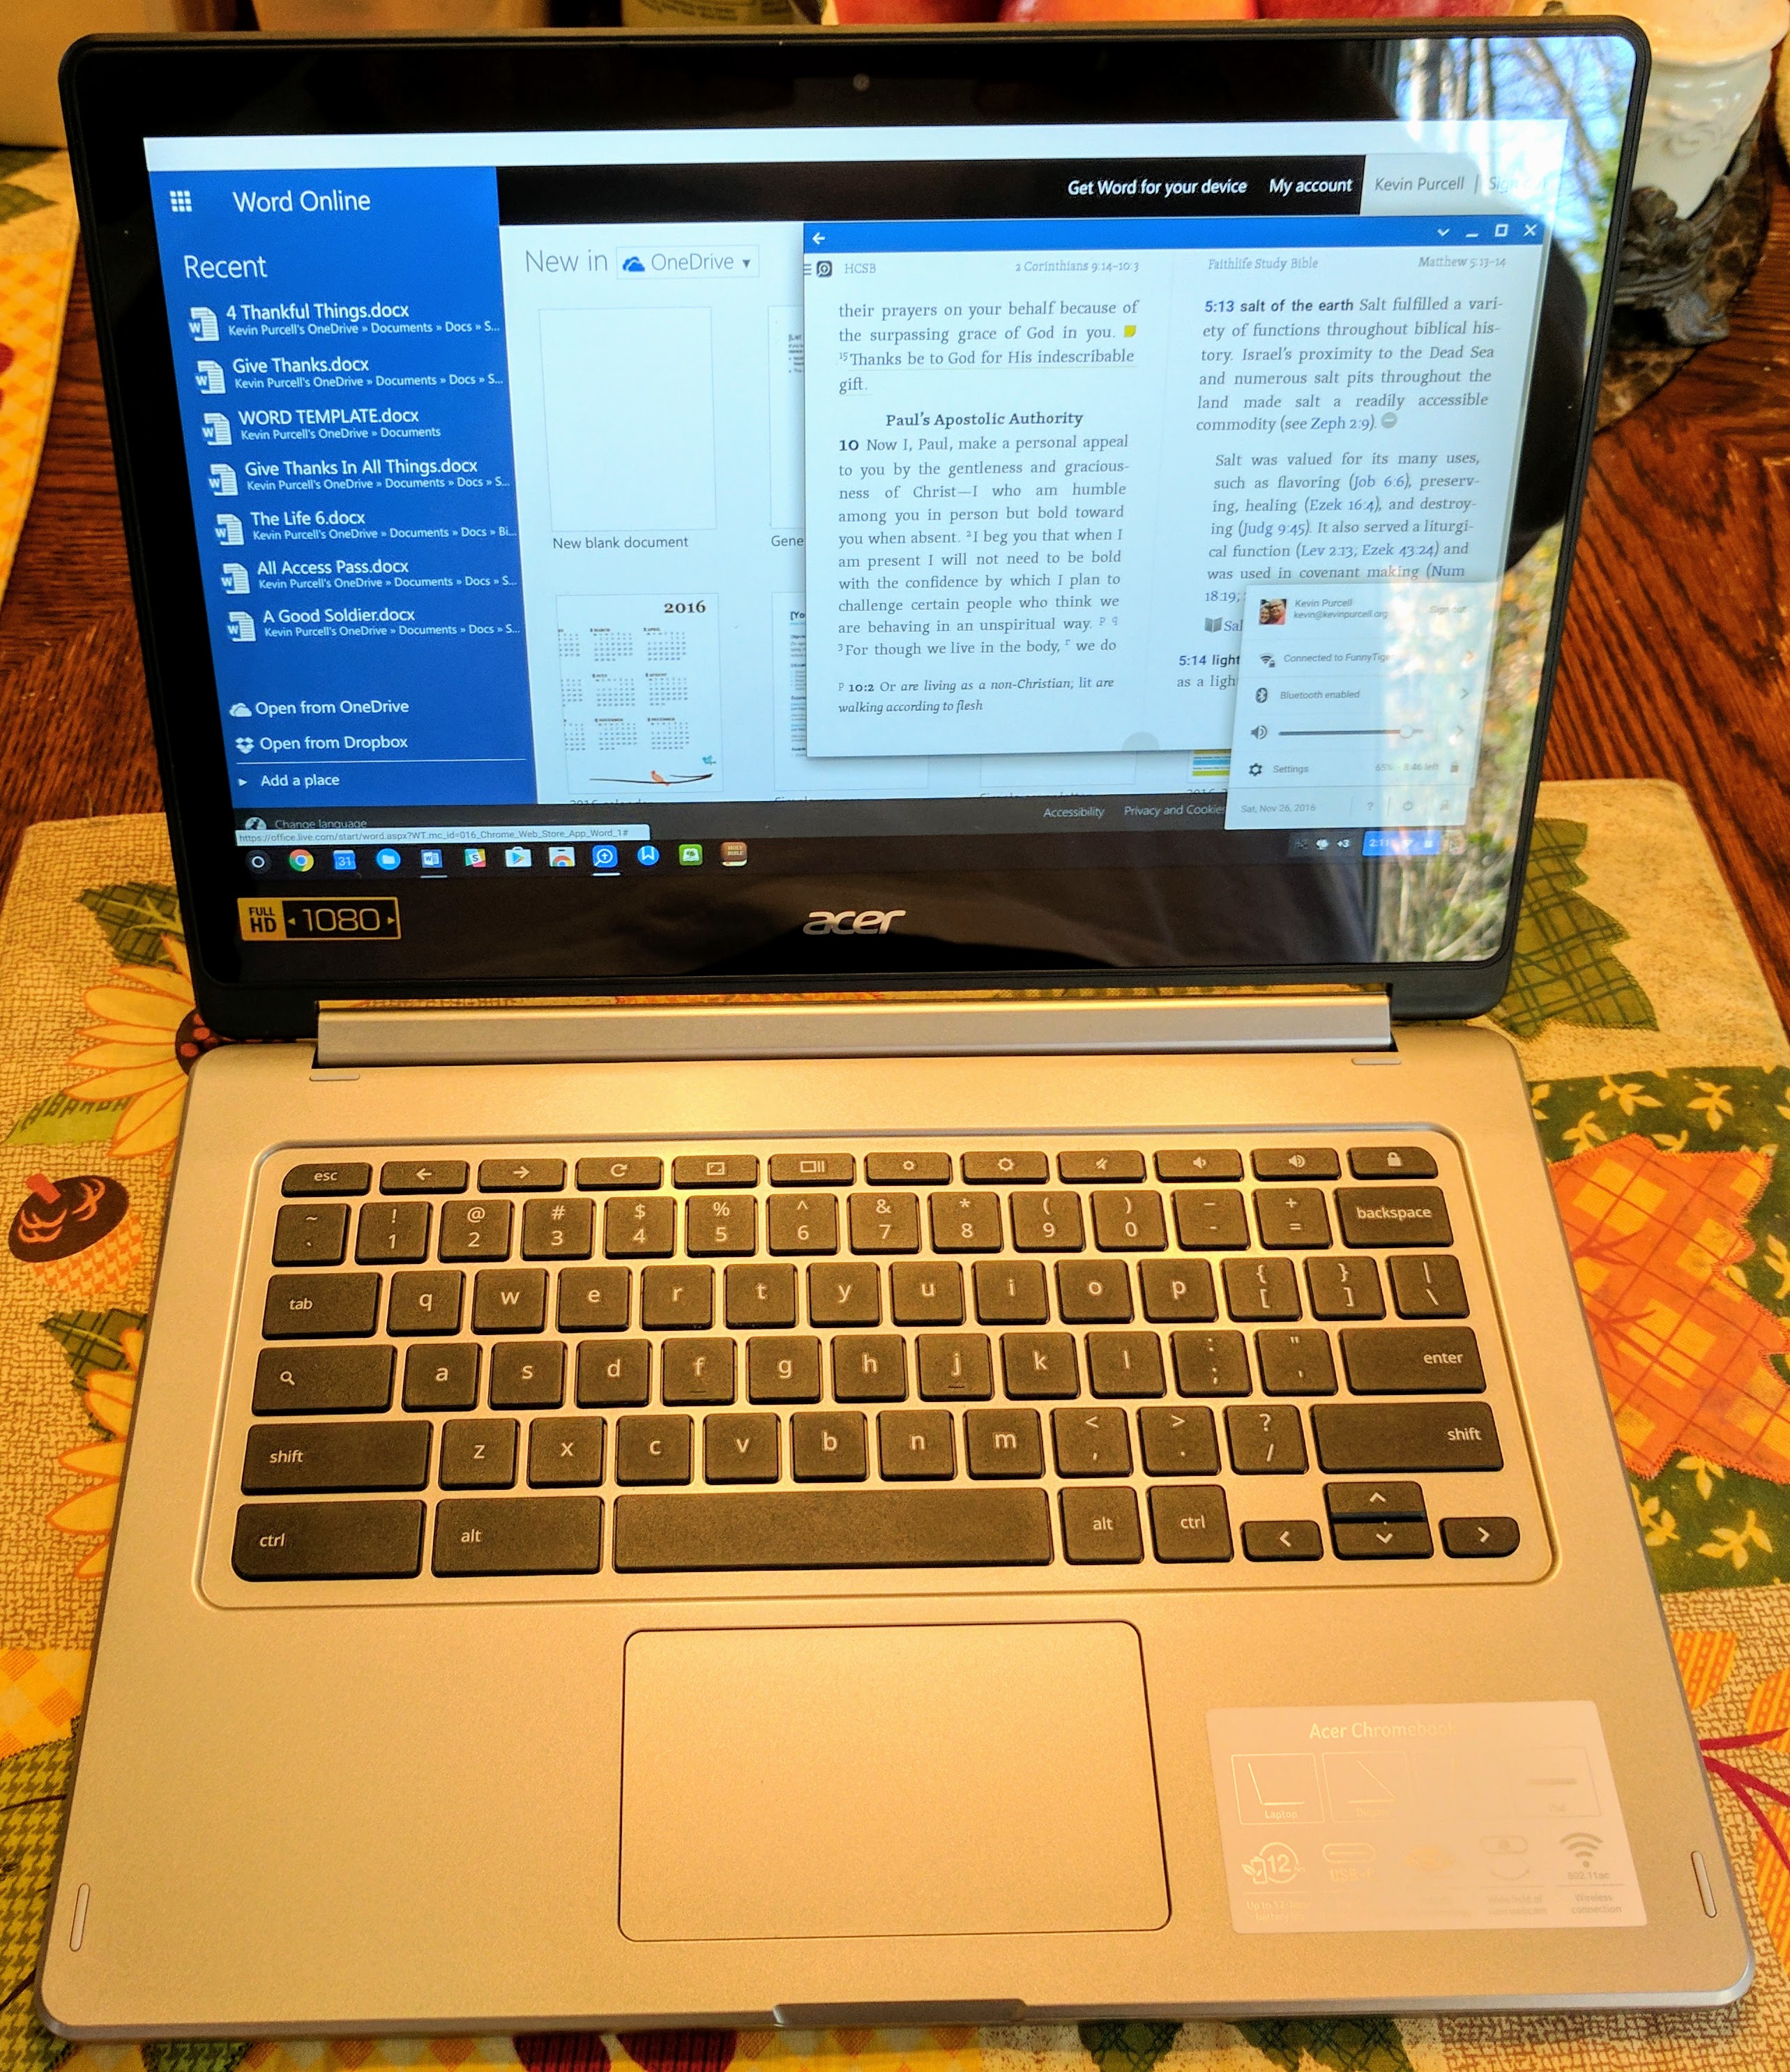
The Acer Chromebook R13 brings Android to ChromeOS in an attractive convertible computer form factor.…

At CES 2017 Samsung unveiled their long-awaited Samsung Chromebook Plus and Samsung Chromebook Pro. Both…

The ASUS Chromebook Flip isn't a brand new machine, but with the recent addition of…

We are using cookies to give you the best experience on our website. You can view our Privacy Policy and information regarding our use of cookies here for more information about cookies .

Logitech Professional Presenter R800, Wireless Presentation Clicker Remote with Green Laser Pointer and LCD Display

Key Features
- Color: Green
- Display Type: LCD
- Connectivity Technology: 2.4GHz wireless
- Wireless Range: Up to 100 feet
- Movement Technology: Laser
Protect and Support Info about service plan
- --> No Service Plan