- Locations and Hours
- UCLA Library
- Research Guides
- Research Tips and Tools

Poster Presentations
- Size, Layout, and Text
Elements of a Poster
Change size in powerpoint, using the ruler, grid, and guides in powerpoint, more powerpoint training, template resources, font choice, text alignment.
- Colors and Images
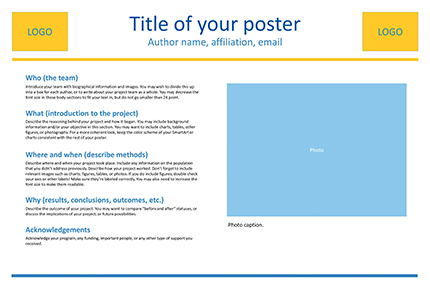
Your poster should include these elements:
- Author(s), with affiliations and emails
If your poster is a representation of a research study, you will want to include the following sections:
- Introduction or objective
- Conclusions and/or discussion
- Acknowledgements
If your poster is a representation of an event or other kind of project, you may want to forego formal abstract sections in favor of the 5 Ws:
- Who (introduce the author, organization, or community)
- What (what did you do? how did you do it?)
- Where (where did you do it?)
- When (when did it take place?)
- Why (what are the outcomes, implications, or future possibilities?)
To change the size in Powerpoint:
- Go to the Design tab and choose "Slide Size" (it's on the right size of the ribbon)
- Choose "Custom Slide Size"
- Change "Slides sized for:" to "Custom"
- Fill in your desired width and height.
Click the View tab to see checkboxes that will allow you to turn on the Ruler, Grid, and Guides (click the image below to see a screenshot).

Ruler : Allows you to see the dimensions of your slide. You'll see a vertical and horizontal ruler.
Grid : By default, the gridlines are 1 inch apart. Right click in white space of your poster to get more options for spacing. This enables precise alignment.
Guides : By default, you'll get one horizontal and one vertical guide placed in the center of your poster. Right click on a guide to add more guidelines, or to delete one. You can use Guides to invisibly define columns of your poster, margins, and more. This gives you manual control, alternatively, you can use Smart Guides (see below).
Smart Guides : Powerpoint has a built-in system for showing you alignment as you move objects around. The video below demonstrates what Smart Guides look like.
Once you've got your slide layout set, you'll want to start creating Shapes and Text Boxes. Here are some tips and tricks for working with objects:
- Use Ctrl+D to duplicate any object.
- Then you can format them all at once, identically!
- You can also group them, for easier movement and alignment (right click to see the Group option).
Most posters are landscape (horizontal) orientation. The title/author(s) will be across the top, with 3–4 columns below that contain the rest of the poster elements. Make sure you leave plenty of white space in your design—a poster crammed full of text and images is very difficult to read.
Here is an example of a 2 column poster layout using the 5 Ws for headings (who, what, where, when, and why):
Use the links below to download this template and other similar templates in two sizes: 24x36 and 36x48. These templates include a variety of placeholder elements for photos and figures.
- 2 column Powerpoint template, size 24x36
- 3 column Powerpoint template, size 24x36
- 3 column Powerpoint template, size 36x48
- 4 column Powerpoint template, size 36x48
Below are some additional web resources where you can search for templates. Keep in mind that you may need adjust the size of a template for your own poster. Alternatively, you can use the resources on this page to design your own layout in Powerpoint.
- David Geffen School of Medicine poster templates Although this is labeled for the sciences, the information can be used in many disciplines.
- Penn State poster template
- PhD Posters
- MakeSigns.com poster templates
- The body of your poster should have a minimum 24 point font . Viewers should be able to read your smallest text from a few feet away.
- The title of your poster should have a 50+ font size, depending on the size of your poster and the length of the title.
- Do not use all uppercase letters for the title or body of the poster.
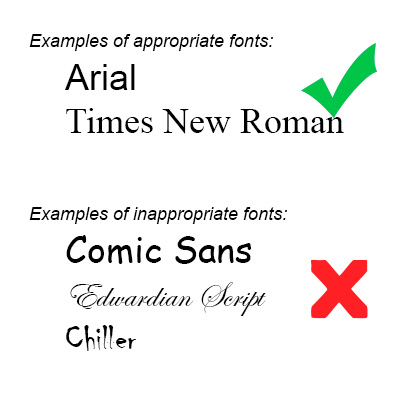
- Avoid using more than 2 or 3 different fonts in one poster.
- Stick with basic fonts like Times New Roman or Georgia for serif, or Arial or Helvetica for sans-serif. Avoid elaborate, difficult-to-read, or cartoon-like fonts.
- In general, left-align your text boxes (with the possible exception of your title and any image captions). Avoid centering the text on your whole poster.
- << Previous: Home
- Next: Colors and Images >>
- Last Updated: Nov 9, 2023 2:31 PM
- URL: https://guides.library.ucla.edu/posters

Research Poster Presentation
- Planning & Preparation
- Layout & Content
- Color Scheme
- Images & Graphics
- Review & Printing
Beginning Graphic Design: Typography
Best Practices
Choose your fonts
For maximum impact, choose different fonts for the header and body of your poster. Select a serif font for your title and a sans serif font for the body. Serif fonts, such as Times New Roman and Garamond, have short lines at the ends of the strokes in a letter (as indicated by the arrows in the images below); sans serif fonts, such as Helvetica and Arial, do not.

Some common font pairings and recommended font sizes can be found below.

Size appropriately

- 33 perfect font pairings
- The art of mixing typefaces - Google Fonts edition
- The ultimate guide to font pairing
- Poster Design And Layout: From Font Sizes To Color Contrast
- << Previous: Color Scheme
- Next: Images & Graphics >>
- Last Updated: Jun 15, 2023 4:50 PM
- URL: https://researchguides.wcu.edu/researchposter
HUNTER LIBRARY
176 Central Drive Cullowhee, NC 28723 Administration: 828-227-7485 Reference: 828-227-7465 Circulation: 828-227-7485

QUICK LINKS
Ask-A-Librarian Reserve a Study Room My Account Library Catalog Article Databases Interlibrary Loan
Want to create or adapt books like this? Learn more about how Pressbooks supports open publishing practices.
Scientific Posters
Characteristics of a scientific poster.
- Organized, clean, simple design.
- Focused on one specific research topic that can be explained in 5-15 minutes.
- Contains a Title, Authors, Abstract, Introduction, Materials & Methods, Results, Discussion, References and Acknowledgements.
- Has four to ten high-resolution figures and/or tables that describe the research in detail.
- Contains minimal text, with figures and tables being the main focus.
Scientific Poster
A scientific poster ( Fig.1 ) is an illustrated summary of research that scientists and engineers use to present their scientific discoveries to larger audiences. A typical poster is printed on paper with dimensions of 36-inches (height) by 48-inches (width).
Figure 1. Scientific Poster

Posters are displayed at events such as symposiums, conferences and meetings to show new discoveries, new results and new information to scientists and engineers from different fields. A large event can have hundreds of posters on display at one time with scientists and engineers standing beside their individual posters to showcase their research. A typical interaction between a poster presenter and an audience member will last 5-15 minutes.
Scientific posters are organized systematically into the following parts (or sections): Title, Authors, Abstract, Introduction, Materials and Methods, Results, Discussion, Acknowledgments and References ( Table 1 and Fig. 2 ). Organizing a poster in this manner allows the reader to quickly comprehend the major points of the research and to understand the significance of the work.
Table 1. Characteristics of a Scientific Poster

The most important parts of a scientific poster will likely be its figures and/or tables because these are what an audience will naturally focus their attention on. The phrase “a picture is worth a thousand words” is certainly true for scientific posters, and so it is very important for the poster’s author(s) to create informative figures that a reader can understand. The “ideal” figure can be challenging to create. Providing too much information in a figure will only serve to confuse the reader (or audience). Provide too little information and the reader will be left with an incomplete understanding of the research. Both situations should be avoided because they prevent a scientist from effectively communicating with their audience.
Authors use different sizes of font for their poster text ( Table 2 ). The general rule is to use a font size that can be read from a distance of 3-feet (1 meter), which is the approximate distance that a person will stand when viewing a poster. The largest fonts (e.g., 40-120 point font) will be used for the title, author list and institutions. Section headings will use 30-40 point font. Section text, table captions, figure captions and references will typically use 20-30 point font. Font sizes smaller than about 20-points can be difficult for an audience to read and should only be used for the References and Acknowledgements sections ( Table 2 ).
Table 2. Poster Font Size and Style

A poster abstract contains all text (no figures, no tables) and appears at the beginning of the poster ( Fig. 2 ). An abstract is one paragraph containing 200-300 words in length. The Introduction section ( Fig. 2 ) appears after the abstract and typically contains 100-200 words of text, a figure(s) and/or table(s) and a caption for each figure and table consisting of 25-100 words for each caption. The Material and Methods sections ( Fig. 2 ) appears third and consists of 100-200 words of text, a figure(s) and/or table(s) and a caption for each figure and table consisting of 25-100 words for each caption. This is followed by the Results section and Discussion section ( Fig. 2 ). Each of these sections contain 100-200 words of text, a figure(s) and/or table(s) and a caption for each figure and table consisting of 25-100 words for each caption. Sometimes these two parts of a poster are combined into one large section titled Results and Discussion. Some posters contain a Conclusion section, which follows the Discussion section. The example shown is Figure 2 does not contain a Conclusion section. The final parts of a poster are the References and Acknowledgements sections ( Fig. 2 ).
Figure 2. Parts of a Scientific Poster

An audience will focus most of their attention on the poster title, abstract, figures and tables. Therefore, it is important to pay particular attention to these parts of a poster. A general rule is that less text is best and a figure is worth a thousand words. The text contained within a poster should be reserved for the most important information that a presenter wants to convey to their audience. The rest of the information will be communicated to the audience verbally by the scientist during their presentation.
Its very important for a scientist to thoroughly understand all the data and information contained within their poster so that they can effectively communicate the research to an audience both verbally (i.e., during their presentation) and visually (i.e., using the figures and tables contained within the poster). It is also important that the References section of a poster contains a thorough summary of all publications pertinent to the research presented in the poster. This way, if an audience member wants more information on a particular topic (e.g., instrument, technique, method, study site) the presenter can direct the audience to the publication(s) where more information can be found.
Scientific Posters: A Learner's Guide Copyright © 2020 by Ella Weaver; Kylienne A. Shaul; Henry Griffy; and Brian H. Lower is licensed under a Creative Commons Attribution-NonCommercial 4.0 International License , except where otherwise noted.
Share This Book
Customer Reviews
How big is the text going to be on the poster.
What size should I make my fonts? When you create a poster, especially for the first time, you may be asking the questions: - Is my font size too small to read? - Is it too big? What size to make the title? - What size to make the body text? The quick answer is that it depends on how much content you want to add to your poster. There is no hard rule, but at the same time, you want your audience to be able to read what you wrote comfortably. On the other hand, you don't want your text to be so big, as if you did not have enough to write. The easiest way to find out is to start creating your poster using the default font sizes we provide on our templates. Then, as you add your content to the template, you will be able to determine if the default font needs to be enlarged or reduced to accommodate your layout. Do not waste time perfecting your layout as you work on your poster. Instead, do it at the end, after adding all your information. It will save you a great deal of time and frustration. It will also let you adjust the font sizes before tweaking everything to perfection. PowerPoint's little-known limitation PowerPoint has a page size limit of 56 inches (142.24 cm). So to create a poster larger than 56 inches, the poster document has to be built at half the size of the final printed poster. For example, a 48x72 poster will be printed from a 24x36 PowerPoint document doubled at printing time. That means that all the text on the original document is also at half the size of the final. So if you want a 24 point font on the poster, it should be set to 12 points. If your document is 56 inches or less, the file will be printed at 100% the original, which means that your fonts will print the same size as they are on the original document. These two charts will keep you from guessing. These two 8.5x11 charts will help you preview how big or small your fonts will appear on your actual poster. If your poster size can fit in a 48x56 inch space, download and print chart A on your desktop printer. Otherwise, download and print chart B. Place the chart of your choice on the wall and look at it from approximately 3 to 4 feet away. The numbers on the chart represent font sizes in both Arial and Times fonts. Sizes of other fonts may vary slightly.
PowerPoint font size reference cards
Download and print these to 8.5x11" pages on your desktop printer.

For posters UNDER 56 inches
CHART A: Use as reference with poster templates that when printed will not exceed 56 inches (142cm) in either width or height.

For posters OVER 56 inches
CHART B: Use as reference with poster templates that when printed will exceed 56 inches (142cm) in either width or height.
PosterPresentations.com 2117 Fourth Street STE C Berkeley California 94710 USA
Copyright © 2024
Poster Printing
Research paper posters
Fabric posters
Trifold poster boards
Rollup banners
Dry-erase whiteboards
PowerPoint poster templates
Poster-making tutorials
Google Slides support
Terms and Privacy
Poster design services
New Services
Virtual poster meetings
- Virtual poster handouts
Home Blog Design How to Design a Winning Poster Presentation: Quick Guide with Examples & Templates
How to Design a Winning Poster Presentation: Quick Guide with Examples & Templates

How are research posters like High School science fair projects? Quite similar, in fact.
Both are visual representations of a research project shared with peers, colleagues and academic faculty. But there’s a big difference: it’s all in professionalism and attention to detail. You can be sure that the students that thrived in science fairs are now creating fantastic research posters, but what is that extra element most people miss when designing a poster presentation?
This guide will teach tips and tricks for creating poster presentations for conferences, symposia, and more. Learn in-depth poster structure and design techniques to help create academic posters that have a lasting impact.
Let’s get started.
Table of Contents
- What is a Research Poster?
Why are Poster Presentations important?
Overall dimensions and orientation, separation into columns and sections, scientific, academic, or something else, a handout with supplemental and contact information, cohesiveness, design and readability, storytelling.
- Font Characteristics
- Color Pairing
- Data Visualization Dimensions
- Alignment, Margins, and White Space
Scientific/Academic Conference Poster Presentation
Digital research poster presentations, slidemodel poster presentation templates, how to make a research poster presentation step-by-step, considerations for printing poster presentations, how to present a research poster presentation, final words, what is a research poster .
Research posters are visual overviews of the most relevant information extracted from a research paper or analysis. They are essential communication formats for sharing findings with peers and interested people in the field. Research posters can also effectively present material for other areas besides the sciences and STEM—for example, business and law.
You’ll be creating research posters regularly as an academic researcher, scientist, or grad student. You’ll have to present them at numerous functions and events. For example:
- Conference presentations
- Informational events
- Community centers
The research poster presentation is a comprehensive way to share data, information, and research results. Before the pandemic, the majority of research events were in person. During lockdown and beyond, virtual conferences and summits became the norm. Many researchers now create poster presentations that work in printed and digital formats.

Let’s look at why it’s crucial to spend time creating poster presentations for your research projects, research, analysis, and study papers.

Research posters represent you and your sponsor’s research
Research papers and accompanying poster presentations are potent tools for representation and communication in your field of study. Well-performing poster presentations help scientists, researchers, and analysts grow their careers through grants and sponsorships.
When presenting a poster presentation for a sponsored research project, you’re representing the company that sponsored you. Your professionalism, demeanor, and capacity for creating impactful poster presentations call attention to other interested sponsors, spreading your impact in the field.
Research posters demonstrate expertise and growth
Presenting research posters at conferences, summits, and graduate grading events shows your expertise and knowledge in your field of study. The way your poster presentation looks and delivers, plus your performance while presenting the work, is judged by your viewers regardless of whether it’s an officially judged panel.
Recurring visitors to research conferences and symposia will see you and your poster presentations evolve. Improve your impact by creating a great poster presentation every time by paying attention to detail in the poster design and in your oral presentation. Practice your public speaking skills alongside the design techniques for even more impact.
Poster presentations create and maintain collaborations
Every time you participate in a research poster conference, you create meaningful connections with people in your field, industry or community. Not only do research posters showcase information about current data in different areas, but they also bring people together with similar interests. Countless collaboration projects between different research teams started after discussing poster details during coffee breaks.
An effective research poster template deepens your peer’s understanding of a topic by highlighting research, data, and conclusions. This information can help other researchers and analysts with their work. As a research poster presenter, you’re given the opportunity for both teaching and learning while sharing ideas with peers and colleagues.
Anatomy of a Winning Poster Presentation
Do you want your research poster to perform well? Following the standard layout and adding a few personal touches will help attendees know how to read your poster and get the most out of your information.

The overall size of your research poster ultimately depends on the dimensions of the provided space at the conference or research poster gallery. The poster orientation can be horizontal or vertical, with horizontal being the most common. In general, research posters measure 48 x 36 inches or are an A0 paper size.
A virtual poster can be the same proportions as the printed research poster, but you have more leeway regarding the dimensions. Virtual research posters should fit on a screen with no need to scroll, with 1080p resolution as a standard these days. A horizontal presentation size is ideal for that.
A research poster presentation has a standard layout of 2–5 columns with 2–3 sections each. Typical structures say to separate the content into four sections; 1. A horizontal header 2. Introduction column, 3. Research/Work/Data column, and 4. Conclusion column. Each unit includes topics that relate to your poster’s objective. Here’s a generalized outline for a poster presentation:
- Condensed Abstract
- Objectives/Purpose
- Methodology
- Recommendations
- Implications
- Acknowledgments
- Contact Information
The overview content you include in the units depends on your poster presentations’ theme, topic, industry, or field of research. A scientific or academic poster will include sections like hypothesis, methodology, and materials. A marketing analysis poster will include performance metrics and competitor analysis results.
There’s no way a poster can hold all the information included in your research paper or analysis report. The poster is an overview that invites the audience to want to find out more. That’s where supplement material comes in. Create a printed PDF handout or card with a QR code (created using a QR code generator ). Send the audience to the best online location for reading or downloading the complete paper.
What Makes a Poster Presentation Good and Effective?
For your poster presentation to be effective and well-received, it needs to cover all the bases and be inviting to find out more. Stick to the standard layout suggestions and give it a unique look and feel. We’ve put together some of the most critical research poster-creation tips in the list below. Your poster presentation will perform as long as you check all the boxes.
The information you choose to include in the sections of your poster presentation needs to be cohesive. Train your editing eye and do a few revisions before presenting. The best way to look at it is to think of The Big Picture. Don’t get stuck on the details; your attendees won’t always know the background behind your research topic or why it’s important.
Be cohesive in how you word the titles, the length of the sections, the highlighting of the most important data, and how your oral presentation complements the printed—or virtual—poster.
The most important characteristic of your poster presentation is its readability and clarity. You need a poster presentation with a balanced design that’s easy to read at a distance of 1.5 meters or 4 feet. The font size and spacing must be clear and neat. All the content must suggest a visual flow for the viewer to follow.
That said, you don’t need to be a designer to add something special to your poster presentation. Once you have the standard—and recognized—columns and sections, add your special touch. These can be anything from colorful boxes for the section titles to an interesting but subtle background, images that catch the eye, and charts that inspire a more extended look.
Storytelling is a presenting technique involving writing techniques to make information flow. Firstly, storytelling helps give your poster presentation a great introduction and an impactful conclusion.
Think of storytelling as the invitation to listen or read more, as the glue that connects sections, making them flow from one to another. Storytelling is using stories in the oral presentation, for example, what your lab partner said when you discovered something interesting. If it makes your audience smile and nod, you’ve hit the mark. Storytelling is like giving a research presentation a dose of your personality, and it can help turning your data into opening stories .
Design Tips For Creating an Effective Research Poster Presentation
The section above briefly mentioned how important design is to your poster presentation’s effectiveness. We’ll look deeper into what you need to know when designing a poster presentation.
1. Font Characteristics
The typeface and size you choose are of great importance. Not only does the text need to be readable from two meters away, but it also needs to look and sit well on the poster. Stay away from calligraphic script typefaces, novelty typefaces, or typefaces with uniquely shaped letters.
Stick to the classics like a sans serif Helvetica, Lato, Open Sans, or Verdana. Avoid serif typefaces as they can be difficult to read from far away. Here are some standard text sizes to have on hand.
- Title: 85 pt
- Authors: 65 pt
- Headings: 36 pt
- Body Text: 24 pt
- Captions: 18 pt

If you feel too prone to use serif typefaces, work with a font pairing tool that helps you find a suitable solution – and intend those serif fonts for heading sections only. As a rule, never use more than 3 different typefaces in your design. To make it more dynamic, you can work with the same font using light, bold, and italic weights to put emphasis on the required areas.
2. Color Pairing
Using colors in your poster presentation design is a great way to grab the viewer’s attention. A color’s purpose is to help the viewer follow the data flow in your presentation, not distract. Don’t let the color take more importance than the information on your poster.

Choose one main color for the title and headlines and a similar color for the data visualizations. If you want to use more than one color, don’t create too much contrast between them. Try different tonalities of the same color and keep things balanced visually. Your color palette should have at most one main color and two accent colors.
Black text over a white background is standard practice for printed poster presentations, but for virtual presentations, try a very light gray instead of white and a very dark gray instead of black. Additionally, use variations of light color backgrounds and dark color text. Make sure it’s easy to read from two meters away or on a screen, depending on the context. We recommend ditching full white or full black tone usage as it hurts eyesight in the long term due to its intense contrast difference with the light ambiance.
3. Data Visualization Dimensions
Just like the text, your charts, graphs, and data visualizations must be easy to read and understand. Generally, if a person is interested in your research and has already read some of the text from two meters away, they’ll come closer to look at the charts and graphs.

Fit data visualizations inside columns or let them span over two columns. Remove any unnecessary borders, lines, or labels to make them easier to read at a glance. Use a flat design without shadows or 3D characteristics. The text in legends and captions should stay within the chart size and not overflow into the margins. Use a unified text size of 18px for all your data visualizations.
4. Alignment, Margins, and White Space
Finally, the last design tip for creating an impressive and memorable poster presentation is to be mindful of the layout’s alignment, margins, and white space. Create text boxes to help keep everything aligned. They allow you to resize, adapt, and align the content along a margin or grid.
Take advantage of the white space created by borders and margins between sections. Don’t crowd them with a busy background or unattractive color.

Calculate margins considering a print format. It is a good practice in case the poster presentation ends up becoming in physical format, as you won’t need to downscale your entire design (affecting text readability in the process) to preserve information.
There are different tools that you can use to make a poster presentation. Presenters who are familiar with Microsoft Office prefer to use PowerPoint. You can learn how to make a poster in PowerPoint here.
Poster Presentation Examples
Before you start creating a poster presentation, look at some examples of real research posters. Get inspired and get creative.
Research poster presentations printed and mounted on a board look like the one in the image below. The presenter stands to the side, ready to share the information with visitors as they walk up to the panels.

With more and more conferences staying virtual or hybrid, the digital poster presentation is here to stay. Take a look at examples from a poster session at the OHSU School of Medicine .
Use SlideModel templates to help you create a winning poster presentation with PowerPoint and Google Slides. These poster PPT templates will get you off on the right foot. Mix and match tables and data visualizations from other poster slide templates to create your ideal layout according to the standard guidelines.
If you need a quick method to create a presentation deck to talk about your research poster at conferences, check out our Slides AI presentation maker. A tool in which you add the topic, curate the outline, select a design, and let AI do the work for you.
1. One-pager Scientific Poster Template for PowerPoint

A PowerPoint template tailored to make your poster presentations an easy-to-craft process. Meet our One-Pager Scientific Poster Slide Template, entirely editable to your preferences and with ample room to accommodate graphs, data charts, and much more.
Use This Template
2. Eisenhower Matrix Slides Template for PowerPoint

An Eisenhower Matrix is a powerful tool to represent priorities, classifying work according to urgency and importance. Presenters can use this 2×2 matrix in poster presentations to expose the effort required for the research process, as it also helps to communicate strategy planning.
3. OSMG Framework PowerPoint Template

Finally, we recommend presenters check our OSMG Framework PowerPoint template, as it is an ideal tool for representing a business plan: its goals, strategies, and measures for success. Expose complex processes in a simplified manner by adding this template to your poster presentation.
Remember these three words when making your research poster presentation: develop, design, and present. These are the three main actions toward a successful poster presentation.

The section below will take you on a step-by-step journey to create your next poster presentation.
Step 1: Define the purpose and audience of your poster presentation
Before making a poster presentation design, you’ll need to plan first. Here are some questions to answer at this point:
- Are they in your field?
- Do they know about your research topic?
- What can they get from your research?
- Will you print it?
- Is it for a virtual conference?
Step 2: Make an outline
With a clear purpose and strategy, it’s time to collect the most important information from your research paper, analysis, or documentation. Make a content dump and then select the most interesting information. Use the content to draft an outline.
Outlines help formulate the overall structure better than going straight into designing the poster. Mimic the standard poster structure in your outline using section headlines as separators. Go further and separate the content into the columns they’ll be placed in.
Step 3: Write the content
Write or rewrite the content for the sections in your poster presentation. Use the text in your research paper as a base, but summarize it to be more succinct in what you share.
Don’t forget to write a catchy title that presents the problem and your findings in a clear way. Likewise, craft the headlines for the sections in a similar tone as the title, creating consistency in the message. Include subtle transitions between sections to help follow the flow of information in order.
Avoid copying/pasting entire sections of the research paper on which the poster is based. Opt for the storytelling approach, so the delivered message results are interesting for your audience.
Step 4: Put it all together visually
This entire guide on how to design a research poster presentation is the perfect resource to help you with this step. Follow all the tips and guidelines and have an unforgettable poster presentation.
Moving on, here’s how to design a research poster presentation with PowerPoint Templates . Open a new project and size it to the standard 48 x 36 inches. Using the outline, map out the sections on the empty canvas. Add a text box for each title, headline, and body text. Piece by piece, add the content into their corresponding text box.

Transform the text information visually, make bullet points, and place the content in tables and timelines. Make your text visual to avoid chunky text blocks that no one will have time to read. Make sure all text sizes are coherent for all headings, body texts, image captions, etc. Double-check for spacing and text box formatting.
Next, add or create data visualizations, images, or diagrams. Align everything into columns and sections, making sure there’s no overflow. Add captions and legends to the visualizations, and check the color contrast with colleagues and friends. Ask for feedback and progress to the last step.
Step 5: Last touches
Time to check the final touches on your poster presentation design. Here’s a checklist to help finalize your research poster before sending it to printers or the virtual summit rep.
- Check the resolution of all visual elements in your poster design. Zoom to 100 or 200% to see if the images pixelate. Avoid this problem by using vector design elements and high-resolution images.
- Ensure that charts and graphs are easy to read and don’t look crowded.
- Analyze the visual hierarchy. Is there a visual flow through the title, introduction, data, and conclusion?
- Take a step back and check if it’s legible from a distance. Is there enough white space for the content to breathe?
- Does the design look inviting and interesting?
An often neglected topic arises when we need to print our designs for any exhibition purpose. Since A0 is a hard-to-manage format for most printers, these poster presentations result in heftier charges for the user. Instead, you can opt to work your design in two A1 sheets, which also becomes more manageable for transportation. Create seamless borders for the section on which the poster sheets should meet, or work with a white background.
Paper weight options should be over 200 gsm to avoid unwanted damage during the printing process due to heavy ink usage. If possible, laminate your print or stick it to photographic paper – this shall protect your work from spills.
Finally, always run a test print. Gray tints may not be printed as clearly as you see them on screen (this is due to the RGB to CMYK conversion process). Other differences can be appreciated when working with ink jet plotters vs. laser printers. Give yourself enough room to maneuver last-minute design changes.
Presenting a research poster is a big step in the poster presentation cycle. Your poster presentation might or might not be judged by faculty or peers. But knowing what judges look for will help you prepare for the design and oral presentation, regardless of whether you receive a grade for your work or if it’s business related. Likewise, the same principles apply when presenting at an in-person or virtual summit.
The opening statement
Part of presenting a research poster is welcoming the viewer to your small personal area in the sea of poster presentations. You’ll need an opening statement to pitch your research poster and get the viewers’ attention.
Draft a 2 to 3-sentence pitch that covers the most important points:
- What the research is
- Why was it conducted
- What the results say
From that opening statement, you’re ready to continue with the oral presentation for the benefit of your attendees.
The oral presentation
During the oral presentation, share the information on the poster while conversing with the interested public. Practice many times before the event. Structure the oral presentation as conversation points, and use the poster’s visual flow as support. Make eye contact with your audience as you speak, but don’t make them uncomfortable.
Pro Tip: In a conference or summit, if people show up to your poster area after you’ve started presenting it to another group, finish and then address the new visitors.
QA Sessions
When you’ve finished the oral presentation, offer the audience a chance to ask questions. You can tell them before starting the presentation that you’ll be holding a QA session at the end. Doing so will prevent interruptions as you’re speaking.
If presenting to one or two people, be flexible and answer questions as you review all the sections on your poster.
Supplemental Material
If your audience is interested in learning more, you can offer another content type, further imprinting the information in their minds. Some ideas include; printed copies of your research paper, links to a website, a digital experience of your poster, a thesis PDF, or data spreadsheets.
Your audience will want to contact you for further conversations; include contact details in your supplemental material. If you don’t offer anything else, at least have business cards.
Even though conferences have changed, the research poster’s importance hasn’t diminished. Now, instead of simply creating a printed poster presentation, you can also make it for digital platforms. The final output will depend on the conference and its requirements.
This guide covered all the essential information you need to know for creating impactful poster presentations, from design, structure and layout tips to oral presentation techniques to engage your audience better .
Before your next poster session, bookmark and review this guide to help you design a winning poster presentation every time.

Like this article? Please share
Cool Presentation Ideas, Design, Design Inspiration Filed under Design
Related Articles

Filed under Design • January 11th, 2024
How to Use Figma for Presentations
The powerful UI/UX prototyping software can also help us to craft high-end presentation slides. Learn how to use Figma as a presentation software here!

Filed under Design • December 28th, 2023
Multimedia Presentation: Insights & Techniques to Maximize Engagement
Harnessing the power of multimedia presentation is vital for speakers nowadays. Join us to discover how you can utilize these strategies in your work.

Filed under Google Slides Tutorials • December 15th, 2023
How to Delete a Text Box in Google Slides
Discover how to delete a text box in Google Slides in just a couple of clicks. Step-by-step guide with images.
Leave a Reply
- UNC Libraries
- Design & Creation
- Designing Effective Posters
- Layout and Text
Designing Effective Posters: Layout and Text
- Classes and Tutorials
- Getting Started With PowerPoint and Adobe InDesign
- Images and Graphics
- Adding and Revising Content: PowerPoint
- Adding and Revising Content: InDesign
- Evaluation Checklist
- Before & After Examples
- Printing Your Poster
- Archiving Your Poster
- Poster Templates
Writing Tips
- Boil down information into bullet points where possible.
- Avoid wordiness and jargon.
- Use active voice. (The Purdue OWL has a great guide on active vs. passive voice)
- Use vocabulary that your audience understands.
- Spell Out Acronyms The First Time You Use Them (SOATFTYUT) -- always! Even if you think your audience will know the acronym, you should still spell it out at least once.
Is all the information in the poster essential to your message?
Posters are not the same as research papers. Posters are intended to boil down a project or topic to its bare essentials, not provide details or supporting documentation. If some of your information is relevant but not essential to your main points, don't include it. Consider putting non-essential "nice to know" information in a supplementary handout.
Media & Design Center

Content Layout
You have a lot of room to be creative when making a poster, but there are some general rules you'll want to follow to ensure that your poster is as effective as possible. The layout of a poster can drastically impact how well it is received by others. There are a few key features you'll want to include in your layout.
This is the section at the top which includes the title of the poster, the author(s), and the authors' affiliations. The title should be the largest text in the poster, and the author names should be the next largest. The title should be large enough for someone to read from several feet away. On a standard size print poster, this is somewhere between 96-120 pt. text .
Many researchers also put the logo of their institution or department in the banner. See our page on UNC logos for more information on using a logo in your poster.
Below the banner, a poster usually includes three or four columns of content. There are exceptions; in some cases you may opt for a different layout.
Alignment
Headings, columns, and graphics should be aligned whenever appropriate. For example, a poster is typically broken into columns. the tops of the columns should be aligned with each other, and the sections in each column should be left justified so that each paragraph is exactly at the left edge of the column.
Align graphics where possible. For example, you could align the top edge of a photo in one column with the bottom edge of a diagram in another column.
Balance and Spacing
Distribute the content and images in the poster so that it looks balanced. Strive to achieve an aesthetically pleasing, uncluttered look. Include a margin of about an inch along all edges of the poster.
White Space
Be sure to include some white space. Too much content can actually make it difficult for viewers to read the poster.
Organization
This is one feature that people often don't think about. The way you organize the content on your poster has a big impact on how easily viewers will be able to understand it. In general, you want your content to move from left → right and top → bottom. This is the way we learn to read, so the eye naturally follows this same trajectory when viewing a poster. This means you'll want to have introductory information at the top or left side of your side, and your concluding information at the bottom or right side.
Remember, if you're presenting to an international audience, you might have to think more about how to organize your poster! Some languages don't read left to right, so those viewers might not ingest the information in the same way as a native English speaker.
Consistency
Use the same fonts throughout the poster. Use similar dimensions for illustrations and photographs. Use similar color and design elements throughout the poster.
Use color judiciously to add to the visual appeal of your poster. Consider using one or two accent colors (such as for shadows or or thin lines separating columns) or using a pale, solid background color. If you're using any images, charts, or other graphics, try picking accent colors that are already included in your graphics.
Feel free to use either serif or sans serif fonts, but be consistent in what you use! Many people use one font for the headings and another for the body text, but it's perfectly fine to use one font for the whole poster. More people are using sans serif fonts for posters these days because it feels a little easier to read, particularly on a digital screen. However, it's entirely up to you which font(s) to use. You want to pick fonts that are readable and don't distract from the content of your poster.
This is a serif font (Times New Roman).
This is is a sans serif font (Arial).
If you're creating a poster for a young audience or non-academic audience, you might want to incorporate a novelty font for headings just to keep things light and interesting. There are many websites that allow you to download fonts for free for non-commercial uses.
Divide the poster into parts with major headings for each section. Make heading for each level distinct and consistent so that the viewer can easily see the structure of the content. You may also choose to add color to a level to set it apart. For example:
Good organization involves breaking down your content into logical categories. Organize your information into major sections. For example, a poster describing a quantitative study might include section headings such as:
- Background or Introduction
- Purpose or Objectives
- Methods or Procedures
- Conclusions
- Lessons Learned or Future Plans
Don't feel as though you need to include ALL of these headings. Many students use 3-4 headings for a simple research poster. On the other hand, don't be afraid to use a unique heading where applicable. Pick headings that fit into your research and allow viewers to synthesize your content easily.
It is important that your title and headings stand out so people can quickly see what your poster is about and how it is structured. The font sizes you should use depends on your overall poster size as well as the amount of content in your poster, and it is somewhat subjective. If you are doing a PRINT poster (48 in. x 36 in.) here are some suggested font sizes:
- Title: 88 to 120 points
- Names and Affiliations: 70 to 90 points
- Major headings: 54 to 80 points
- Sub headings: 48 to 72 points
- Text: 36 to 52 points
The above are only guidelines. When you have completed a draft, take a look at your font sizes and tweak them as needed to make them look good.
If you are doing a digital poster, disregard the font sizes listed above, unless you have increased the dimensions of your slide. PowerPoint slides default to 13.3 inches wide by 7.5 inches high. You don't need to increase the slide size if you are presenting a digital poster, since the computer screen will automatically adjust the size of your slide accordingly.
Generally speaking, titles and headings should be bold . Text should not be bold.
- Last Updated: Feb 21, 2024 11:06 AM
- URL: https://guides.lib.unc.edu/posters
Search & Find
- E-Research by Discipline
- More Search & Find
Places & Spaces
- Places to Study
- Book a Study Room
- Printers, Scanners, & Computers
- More Places & Spaces
- Borrowing & Circulation
- Request a Title for Purchase
- Schedule Instruction Session
- More Services
Support & Guides
- Course Reserves
- Research Guides
- Citing & Writing
- More Support & Guides
- Mission Statement
- Diversity Statement
- Staff Directory
- Job Opportunities
- Give to the Libraries
- News & Exhibits
- Reckoning Initiative
- More About Us
- Search This Site
- Privacy Policy
- Accessibility
- Give Us Your Feedback
- 208 Raleigh Street CB #3916
- Chapel Hill, NC 27515-8890
- 919-962-1053
404 Not found
Presentation font size: Dos and don’ts
- Categories: PowerPoint design , Google Slides
- Comments: 1

It’s no secret that at BrightCarbon we generally recommend keeping text on slides to a minimum . The main reason you need to avoid lots of text in presentations is because it’s virtually impossible to read and listen to someone speaking at the same time. In a presentation, you want to allow the audience to listen to the presenter while looking at an appropriate visual or diagram with minimal words, so that it all comes together seamlessly. Whereas, with documents like reports – while you can create them in PowerPoint – they aren’t presentations; there won’t be anyone talking over them. So you can (and possibly should) have a lot more text.
So, when you are using text in a presentation or document, how do you decide what size it should be? We’ve found there’s no hard-and-fast rule for how big or small text on slides should be. Each presentation has its own unique requirements – it all depends on what you’re using the slides for, what you’re hoping to achieve with them, and how your audience will be viewing them. Accessibility considerations also come into play, as well as readability across different typefaces and devices.
Determining appropriate text size
One way to decide on the right size for your text is to consider the height of each line of text in proportion to the total height of the slide . For example, in a sales or training presentation, the height of the title (per line) should take up approximately 4% of the slide’s total height; headers around 3%; and copy text around 2%.

This principle can be applied to text appearing in other types of presentation, too. For example, in a keynote presentation, the height of the text should take up around 6.5% of the slide’s total height. And in a document or report, aim for the height of the title text to take up around 4% of the slide’s total height; headers around 3%; and copy text around 1.5%.
When deciding on the right font size for a face-to-face presentation, it’s also worth considering how close audience members should be seated to the screen in order to be able to read the text easily. Check out presentation expert Dave Paradi’s table on comfortable viewing distances for text in presentation visuals [1] for more on this.
Our text size recommendations
We called upon our team of designers to determine what size they would make the text in a set of example slides. To create the slides, we used PowerPoint’s default widescreen slide size (19.05cm x 33.86cm, or 7.5”13.33”), and Arial – one of the most commonly used fonts.
The examples covered three different use-cases where text is sometimes used:
- A sales or training presentation. Small amounts of text can be used to point out key features and emphasise value and benefits.
- A keynote presentation. You want the audience to focus on the presenter during a keynote presentation, so the amount of text on each slide should be kept to a minimum. This means any text you do use can be much larger.
- A document or report. Text can generally be slightly smaller in stand-alone, static documents like reports, as readers will jump around the page to find the information they’re looking for.
Based on our team’s responses, we’d make the following recommendations:
Use-case 1: Presentation font size for a sales or training presentation
Top tip : As a general rule, aim to keep the number of different font sizes you use across your presentation to a minimum – ideally, no more than three different sizes per slide. And try to use font sizes consistently. For example, if you’ve used 20pt for headers on one slide, make sure headers on other slides are the same size.
Use-case 2: Presentation font size for a keynote presentation
Top tip : If you’re also using text labels or callouts in a keynote presentation, then make sure the font is slightly smaller than the rest of your text – ideally no smaller than 28pt.
Use-case 3: Font size for a document or report
Top tip : It’s also worth using visual hierarchies to help readers navigate documents like these – check out our blog post for tips on how to do this.
Hopefully, our recommendations help you to decide what size text on your slides should be. Remember, every presentation is different and will have its own individual requirements – for guidance on your particular use-case, get in touch and we’ll be happy to look over your slides. And if you want more help with upping your sales presentations’ font game, have a read of our article packed with typography tips and tricks!
[1] PARADI, D. 2008. Comfortable Viewing Distance for Text on Presentation Visuals [online]. Available from: https://thinkoutsidetheslide.com/wp-content/uploads/2012/08/ViewingDistanceTable16x9.pdf [Accessed 14 November 2022].
Related articles
Insights from a presentation templates expert.
- PowerPoint design / Industry insights
A PowerPoint template is the foundation on which polished and professional presentations are built. We interview BrightCarbon’s new Templates Lead, Gemma Leamy, and pick her brains on the ideal process for creating robust PowerPoint templates.

115 PowerPoint Christmas cards to download and share!
- PowerPoint design
- Comments: 45
It's Christmas! After a late night with too much eggnog and brandy snaps we set ourselves a challenge to see who could come up with the wildest PowerPoint Christmas card! So it's the day after the night before, and through blurry eyes we can reveal our efforts...

How to create PowerPoint templates that work
Without a proper PowerPoint template, presentations can be a bit of a mess. Here are the building blocks for developing a PowerPoint template that works!

thank you so much that was helpful
Leave a Reply Cancel reply
Save my name and email in this browser for the next time I comment.
Join the BrightCarbon mailing list for monthly invites and resources
Thank you for today’s PowerPoint productivity masterclass. I’ve learned so much from BrightCarbon when it comes to PowerPoint. If there isn’t a BrightCarbon fan club already, I’ll be happy to start one! Kimm Babo Wegmans Food Markets

It appears you have javascript disabled. Please enable javascript to get the full experience of gustavus.edu
How to design a great poster.
A poster provides an overview of your project. The reader should be able to tell what you did, why you did it, and what the main conclusion is. Remember that most people at CCI will not be an expert in your area of study, so consider how you can make the information accessible to a general audience. You will also be standing near your poster during the event to talk with people, so you don't have to include every detail of your project on your poster. Most often, you'll find yourself giving an oral overview of your project while pointing to your poster both as a visual aid and as a point of reference, so your poster should be structured in a way that mirrors the sequence in which you would naturally present your project (see Organization section below).
At a poster session, a viewer will likely pass right by a poster that is intimidatingly packed with dense text. Instead, present your project in bullet points or in short sentences. Clear images can help your poster be more concise. Keep the words to a minimum. Less is more. And allow for plenty of white space and a ½ inch border or more all around.
Visibility:
- The font size must be large enough for a viewer to read from a distance. Don't use a font size smaller than 24 point.
- Most posters use three font sizes (section headings, sub-headings, text, in decreasing order of size).
- Make sure that you have good contrast between the background color and the text color.
- Left justify; don’t full justify (like a newspaper column), as that is hard to read.
- Limit yourself to two fonts (e.g., one font on the title and headings, and another for the text). Sans serif fonts (such as Arial and Helvetica) work well for headings; many have a serifed font (such as Garamond, Century, or Times) for the text.
- Avoid all-caps, underlining, and italics, which are hard to read, unless content requires it. Use color or bold to make text stand out. Put your headings in a different color than the text so that they stand out.
Organization:
- A poster should have a logical organizational flow. For the typical elements and layout of a poster, watch this video by Ben Nargi.
- Adobe InDesign is ideally suited to poster design. All Gustavus computers have InDesign installed, and you can also install the program on your own laptop through the Managed Software Center . Watch this video for a guide to creating a research poster using InDesign.
- PowerPoint offers a more basic but perfectly good alternative option for making a poster. For a step-by-step guide on how to create a research poster in PowerPoint, watch this video by Tamara Swedberg.
Size:
- Gustavus' Printing Services (located on the lower level of the Campus Center) offers large-formatting printing at reasonable rates.
- The two most popular sizes for presentation posters are 24” x 36” and 32” x 40”. These currently cost $18 or $26.70 respectively (price current as of 2018). But check the specifications of the conference at which you are presenting, as many poster sessions give minimum/maximum size guidelines. If the cost of printing is a hardship for you, please email [email protected] to request support.
- Printing Services requires 3 business days to print your poster, so submit it by the Tuesday at the latest if you are presenting at the Celebration of Creative Inquiry, and don't forget to pick up your poster before closing time.
- Posters are to be submitted online in PDF format. For full details, see their overview at https://gustavus.edu/gts/Large_format_printing
- Visual aids (illustrations, photographs, charts, graphs etc.) can increase audience interest, understanding, and retention. Choose your graphic images carefully. They should be relevant to your message, rather than just being tangentially relevant or haphazardly chosen clip art. They should be clear and easily understood.
- When presenting data in graphic form, think carefully about how many data points or messages a graph contains. Elements should be labeled and figures should have an accompanying caption. This blog by Colin Purrington has some good tips, including specifics about presenting data and some examples of bad posters.
- Wikipedia Commons is a great place to find images that are in the public domain and can be reused without copyright infringement. Flickr also has many photos in the public domain.
- Make sure that images are high enough resolution for large-scale printing. PowerPoint, Photoshop etc. allows you to view your image at 100% or “actual size.” If the images on the poster are clear at actual size, then you know that they won’t be fuzzy when printed. Pixelated, low-resolution graphics are one of the most common mistakes on posters.
Proofing:
- Spell check and proofread and have several other people proofread too. Typos on a poster are embarrassing. Proof read before sending to Printing Services (they don't do the proofreading for you).
Additional resources:
Design of Scientific Posters . Virginia Tech . Provides guidelines for effective design, with several examples as well as a PowerPoint poster template.
- Subject Guides
Posters with a Powerful Point: A practical guide to designing academic posters
- Preparation
The text content of an academic poster will generally be very important, so you need to make sure it is easily readable, and helps viewers follow the flow of ideas.
In this section we'll take a look at some basic principles of text layout for posters, and then we'll look at the process of adding and configuring text in PowerPoint.
Some basic principles
Readability can be improved by reflecting on some essential principles of text design. You'll find a lot about this on the web, but here are a few pointers.
The three-levels model
The three-levels model is a structural principle based around three levels of text: title(s), sub-headings and body content. If you design three distinctive appearances for these, it helps the reader find their way around the content.
At the very least, these should use different sizes, but it's worth giving consideration to colour and font choice too. For example:
This is a section title
This is a sub-heading
This is some body-text. Most of the writing on your poster will be body-text, naturally. But that text can be broken up into sections (e.g. thematic boxes) and then further sub-divided into sub-sections. This is a fairly basic example but it gives an idea.
This is another sub-heading
And this is some more body-text. All three levels of text in this example are using the same font, but with different weights, different colours, and different sizes.
How much text?
It may be that your brief specifies a minimum wordcount, but otherwise, how much text should you be writing?
A poster is not an essay. It's one of those situations where 'less is more'. Let visuals speak for themselves, and keep your written content as efficient as possible. Use shorter paragraphs than you would normally, and make good use of summary methods like bullet points.
As a rule of thumb, 300-500 words might be typical. Plus references. But practice varies from discipline to discipline. As ever, try to find some peer examples for inspiration.
Think about other forms of poster too, like street advertising. How do they convey a message? What text is being used? It's an extreme example, but sometimes there are opportunities to even forgo text altogether and let visuals do the talking...
For instance, here's a process being outlined... a methodology of sorts...

Think of your poster text more as an extended, illustrated abstract summary ... like the abstract you get with a journal article, only with the added advantage of illustrations. There won't be room for everything but there doesn't need to be. Let your visuals do as much work for you as possible, and concentrate on the "must know" elements for the text.
You might find it helpful to draft out the text for your poster in advance. Look at ways you can structure it and break it up into sections on your poster. It might help you to formulate your layout and your design as a whole.
Text characteristics
Font choice.
If you 'Google' about readability of fonts, you'll find all sorts of opinions, and even quite a bit of research. You can ignore most of this if you remember:
- Upper case ('capitals') does not make things easier to read — in fact it multiple lines of upper case text are much more difficult to read. Avoid fonts that have no lower case.
UPPER CASE IS NOT EASIER TO READ
- There are many 'fancy' or 'artistic' fonts around — these are extremely difficult to read, and are likely to encourage anyone reading your poster to give up!
'Fancy' or 'artistic' fonts can be tiring to read — ESPECIALLY IF YOU WRITE THEM IN UPPER CASE!
The best way to judge the readability of your poster is to ask someone else to read it.
In terms of font selection, University-managed computers have a broad range of fonts. If you're on your own computer and want a better variety of fonts, there are a number of free fonts available online. We got the fancy font above ("Arizona") from Google Fonts , and there's also Font Squirrel . As always, use caution if downloading fonts from unfamiliar sites.
As any optician's chart will demonstrate, size of font is important. Your poster needs to be readable from at least a metre away.
Font size in PowerPoint is in 'points' – a sizing convention which is consistent across different paper sizes: 14pt on a sheet of A4 paper is the same as 14pt on a sheet of A1, which means you can always print off a handy font-size chart in Word and use it as a guide. However, different fonts have different interpretations of points: one font at 14pt may be a different size to another.
>72pt for titles,
>50pt for other headings,
and >30pt for the main body text.
However, this very much depends on which font you choose, and even on the nature of the text you're writing (you might go as low as 18pt in some "smallprint" cases, though probably not much smaller). Size isn't everything, and there are other factors that can affect readability.
Line length
Academic posters have writing on them. And that writing is there to be read. One reason why a column layout is so often used is because it reduces the line lengths, making it less likely that you will accidentally skip a line or lose your place.
...is harder to scan than...
It's why newspapers and magazines used columns in the first place.
Character spacing
Introducing a bit of extra space into text, particularly headings, can make them more noticeable. It doesn't usually help for whole paragraphs of text, though.
'normal' spacing
expanded by 3pt
Paragraph alignment
Full justification, where word spacing is adjusted so both the left and right edges are straight, may look 'neat', but it is not considered good for reading at a distance.
Centrally aligned text is fine for headings or captions, but again it's a mess to read in any amount.
Right-aligned text has its occasional uses if you're wrapping around an image, but it's another one you wouldn't want to inflict on a reader for very long.
Use left-alignment for all significant blocks of text (unless you're writing in a script that reads right to left).
Line spacing
Squashing lines together is a sure way to make them difficult to read. A dense jumble of letters is just going to put people off. Your aim is to engage people, not give them a headache. Squashed-up text like this gets buzzy very quickly.
Increase line-spacing a little to add some 'fresh air'. This is often easier on the eye even with a reduced font size. For instance, this font size is 12pt, while the previous box was 14pt.
Paragraph spacing
Use fairly short paragraphs and make sure there is a bit of extra space between them.
Since posters are printed, it won't actually hurt to space paragraphs with blank lines (possibly at a different font size), but it's bad practice (it gets messy and difficult to consistently modify), and if you're doing several paragraphs it's worthwhile setting up paragraph spacing properly.
Setting paragraph spacing is also a good habit to get into for other uses.

Adding and configuring text
Adding text in PowerPoint
Text in PowerPoint can be entered into text boxes or shapes .
To insert a text box, choose Insert > Text > Text Box . However, when you adjust the width of a text box, the height is adjusted automatically to match the length of the text content. This is great for presentations, but less helpful for posters, where positioning is likely to be quite important.

You're therefore probably better off using shapes as your text container...
Any shape can be used to hold text, and the size remains as set, making them much easier to use with posters. They're particularly suitable for text boxes with fill or borders, but you can also make the border and background transparent if they're not required.

Shapes can be found at Insert > Illustrations > Shapes . There's several shapes to choose from. Rectangles (with or without rounded corners) are the easiest choice to work with for a box structure, but any shape can be used. With more complicated shapes, you may find the margins restrictive, and it may sometimes be easier to overlay a transparent rectangle.
Having selected the shape you want, drag to draw it onto the page (hold shift to create a regular shape). Select the shape and you will be able to start typing into it.
There is another form of text entry in PowerPoint... WordArt. It can do some nice things (not least being able to write in an arc), but be careful: WordArt can easily end up looking a bit... well... naff.

Configuring text

Changing text
Highlighting a section of text will allow you to format that section, but if you want to change all the text within a text box or shape, the best thing to do is to select the entire shape. The easiest way to do that (especially if the shape has no background fill) is to click the shape's border. It's quite a narrow target to hit so it may take a few attempts before you get the knack. Your cursor will turn to the "move" crosshair pointer as you hover over the selectable area, and once selected, the "expand" and "rotate" toggles will appear on the shape. You can now start formatting.
Paragraph attributes
You can get more precise control of your paragraphs from the dialogue launcher toggle at the bottom-right-hand corner of the Home > Paragraph ribbon group (on a Mac, click on any text then go to the Format menu, then Paragraph... ). Here you can configure settings such as line -spacing and paragraph -spacing:

The "Multiple" option in the line-spacing settings lets you express line spacing fractionally, as a multiple of the default line space. 1 gives single line spacing; 2 gives double line spacing, etc. So in the example above, 1.2 means there's an extra 20% of space for each line.
Text attributes
You shouldn't have any problems setting the font, size etc, but for other attributes there's a dialogue launcher at the bottom-right-hand corner of the Home > Font ribbon group. In addition to providing more font control options, it also has a tab for setting up character spacing:

Text positioning
When you first create a shape containing text, the content will be centred; there will also be a margin around the text. These attributes can easily be changed using Home > Paragraph > Align Text . The More Options section of this Align Text menu will open the Format Shape side panel where there are further settings, including margin options. We'll look at those in more detail in the next section...
Configuring text boxes and shapes
The text boxes and shapes used for text can be configured in various ways to help with presentation.
Shape Fill and Shape Outline
As with the background of the page itself , the background of a shape (its fill ) can be a solid colour, graduated, patterned or even a photograph. You can also set its transparency level, which allows some of the background to show through, though be sure to test this thoroughly as it can sometimes give poor results when printed.
A shape's border — its outline — can be solid or patterned, and can be of different widths.

Once a shape has been drawn, its attributes can be changed from the Shape Format > Shape Styles ribbon group:

When you select More Fill Colors... from the "Shape Fill" or "Shape Outline" dropdowns, you'll have the chance to set a precise colour (and transparency) using numerical values:

Shape Effects
A number of special effects can be applied from Shape Format > Shape Styles > Shape Effects — of these, the most commonly used with text boxes is the drop-shadow .
Employed with care, it can appear to lift the shape slightly off the page:
This box uses fill and outline but does not have a drop-shadow.
This box uses fill and outline and also has a drop-shadow.
This box has fill and a drop-shadow but doesn't bother with an outline.
- Select the shape first, then choose Shape Format > Shape Styles > Shape Effects > Shadow
- Usually the simplest Outer shadow will be suitable, but there are a few default options to choose from
- If you want to adjust the shadow, select Shape Format > Shape Styles > Shape Effects > Shadow > Shadow Options... — this will give a side panel for you to adjust the shadow.
Text Margins
This box has quite narrow margins. The text is right up against the sides. Sure, the box is longer than the text, so there's a bit of space to the bottom, and the text is left-aligned, so there's space to the right too, but potentially the text can go really very close to the edges.
This box has much bigger margins than the other box (four times the size). The wider margins mean there's a lot more blank space between the box border and the text itself.

- Select the shape
- Select Home > Paragraph > Align Text > More Options... to get to the "Text Box" settings in the "Format Shape" side-panel. You can also get to the "Format Shape" panel by right-clicking a shape and choosing Format Shape...
- The "Text Box" settings in the "Text Options" allow you to set the margins (along with various other features).
Textbox controls are rather straightforward for rectangular shapes. For other shapes you may find that the writing area is a little restrictive, even with margins set to zero. You may find it simpler to overlay a transparent rectangular shape to hold your text.
- << Previous: Images
- Next: Production >>
- Last Updated: Mar 25, 2024 5:30 PM
- URL: https://subjectguides.york.ac.uk/posters

- Thompson Rivers University Library
- Research Guides
- Research Strategies Guides
- Creating an Academic Poster: Tips and Tricks
Typefaces and Font Sizes
- Academic Poster: Basic Components
- Orientation and Size
- Editing and Organizing Content
- Colour and Contrast
- Graphs, Charts, and Images
- Poster Templates
- Citing Your Sources
General guidelines:
- use one, or a maximum of two, typefaces
- choose suitable font sizes for titles, body copy, etc. (see suggested ranges below) and use them consistently
- if you use bold, italics, or underline, use them consistently
- check if the conference or event has specific guidelines for formatting posters and follow them
Suggested ranges for font sizes of different poster sections (Remember, a typical academic poster, when printed, is MUCH larger than a laptop screen!):
- poster title: 80-150 pts (bold recommended)
- author name(s): 54-60 pts
- headings: 36-40 pts
- body text: 24-32 pts
- figure captions: 18 pts

Example academic poster presented at the TRU 2020 Teaching Practices Colloquium
Serif vs sans serif typefaces

- << Previous: Colour and Contrast
- Next: Graphs, Charts, and Images >>
- Last Updated: Sep 19, 2023 10:24 AM
- URL: https://libguides.tru.ca/academicposters
404 Not found
404 Not found
70+ Best Fonts for Posters 2024
Fonts come in all shapes and sizes, but when it comes to poster design, there are certain types of fonts that can help you make bold statements and attract attention. In this post, we feature some of the best fonts for posters you can use to create the perfect poster design.
It’s quite difficult to generalize poster design. There are just too many types of posters that require various design standards. For example, a poster you design for a business conference and a poster you make for a summer beach party will require completely different designs, including different colors, shapes, layouts, and more importantly, fonts.
When creating this collection of fonts, we decided to cover all categories of poster designs and include both formal and casual fonts you can use to design titles, headers, and text for various types of posters. We’re also featuring a set of tips for choosing a poster font to help get you started.
Hopefully you’ll find the perfect typeface that matches your project!
2 Million+ Poster Templates, Flyer Templates, and Design Resources With Unlimited Downloads
Download thousands of stunning poster templates, flyer templates, and more with an Envato Elements membership. It starts at $16 per month, and gives you unlimited access to a growing library of over 2,000,000 poster designs, flyers, print templates, themes, photos, and more.

Fashion Poster

1000 Poster Templates

Music Typography Poster
Explore Poster Templates
Devant Horgen – Modern Poster Font

Devant is a modern decorative font that’s ideal for designing creative poster titles, website headers, banner headings, and much more.
The font comes with a set of beautiful, tall, and slightly rounded set of characters. And it’s available in multiple versions, including OpenType, TrueType, and WebFont versions.
Why This Is A Top Pick
The clean, narrow, and smooth lettering design of this font will ensure your titles are clearly visible even from afar while making your designs look more modern and professional.
Newgate – Classic Poster Font

Newgate is an attractive font that features a beautiful contemporary design that will fit in nicely with various types of business and creative poster designs. Inspired by typography from the 70s, the font comes in 5 different weights and lots of ligatures.
Brimons – Big Poster Font

If you’re looking for a big bold font with thick letters to craft attention-grabbing titles for posters, this is a must-have for you. This font comes with tall and narrow letters that are perfect for poster headings. It includes all-caps letters with a set of small caps characters.
Sysmatic – Soft Condensed Poster Font

Sysmatic is a creative poster font that has a condensed letter design. This font features letters with smooth rounded edges and stylish characters. You can use it to craft big titles and headings for posters, flyers, website headers, and more.
Simple Candy- Trendy Poster Font

This trendy font has the perfect look for designing typography for elegant lifestyle, fashion, and luxury designs. The beautiful serif letters of this font have unique curves that will add a certain classy look to your typography designs.
Coplette – Minimal Poster Font

A clean and minimal font is often the best choice for a poster title. With this font, you can design typography for professional-looking posters with a geometric letter design. The font includes all-caps letters and has multilingual support for 100 languages.
Hazard – Free Marker Poster Font

This is a marker-style font you can use to craft big poster titles for various types of business and entertainment-related designs. The font comes with lots of swashes as a bonus and it’s free to download.
Waldrip – Modern Condensed Poster Font

The big, thick, and condensed design of this font makes it a great choice for crafting big poster titles that can be seen from far away. It features stylishly carved letters with creative strokes. And it will fit perfectly with any type of poster design.
Evaluation – Tall & Narrow Poster Font

Evaluation is another condensed sans serif font featuring a tall and narrow letter design. It also has letters with a clean and modern look. This makes it most suitable for poster designs related to modern brands, agencies, and tech companies.
Glafine – Stylish Font for Posters

Glafine is another stylish poster font you can use to design modern and trendy titles for various types of projects. It has a set of clean characters with creative strokes that give its own personality to every letter.
Silent Phobia – Creative Font for Posters

This font comes with a horror-themed letter design featuring brush-style strokes. It’s designed with Halloween-themed poster and banner designs in mind. But you can use it to craft titles for horror movie posters as well as energetic titles for fitness and gym posters.
Quick Ravage – Free Bold Poster Font

You can download this font for free to craft clean and minimal titles for modern poster designs. The font features uppercase and lowercase characters. And it’s free to use with your personal projects.
Thrive Modern – Sans Serif Poster Font

A chunky poster font for designing big titles and headings. This font has the ideal look that will instantly grab the attention of your title designs. The font includes all-caps letters with international accents.
Feogra – Futuristic Poster Font

If you’re working on a poster design related to modern technologies, this font will fit perfectly with your project. It features a futuristic letter design with a very uncommon vibe. The font includes multilingual support as well.
Marika – Clean Font for Posters

Craft simple, minimal, and clean titles for your modern posters using this sans font. It has a modern letter design with a bold aesthetic feel. It’s the type of font that goes along perfectly with all kinds of poster and flyer designs.
Christmas Theme Font for Posters

It’s never too early to start preparing for Christmas. Grab this font to use in all your Christmas-themed poster and flyer designs. It features a beautiful character design with holiday festive vibes.
Signate Grotesk – Free Poster Font

This font features a stylish letter design with decorative elements along with a Cyrillic character set. It’s ideal for modern and minimal poster designs. And you can use it for free with personal projects.
Fresh Mango – Creative Poster Font

A beautiful retro-style font with a creative and curvy letter design. This font has the perfect look for designing titles and headings for fun and casual posters. It’s especially great for product promotions, packaging designs, and labels.
Jakote – Fun & Quirky Display Font

The simplicity of this font design adds a certain personality to each letter. It’s a fun and casual font made with both kids and grownups in mind. The font comes with uppercase and lowercase letters. You can use it for posters, flyers, book covers, and everything in between.
The Qostter – Retro Serif Poster Font

This is one of the most stylish fonts on our list. It has a unique retro-style serif letter design with beautiful curves. This font is great for designing titles for not just posters but for various other product labels, packaging designs, and even logos. It includes over 700 glyphs, alternate characters, and more.
Miguity – Bold Display Font

Miguity is a bold poster font featuring a classic letter design. Even though it looks like a simple font at first glance, this font packs a lot of additional elements to help you craft unique typography designs. It comes with ligatures, stylistic sets, and multilingual support as well.
Regarn – Free Variable Poster Font

Regarn is a free font you can use to design typography for everything from posters to flyers, social media posts, and more. This font has a set of letters with a mix of retro and modern design elements. It’s free for personal and commercial use.
Begin – Luxury Poster Font

If you’re working on a poster design to promote a luxury brand, jewelry brand, or fashion brand, this font is a great choice for crafting the perfect title for that poster. It has an elegant sans-serif lettering design that will make your poster stand out from the crowd.
Gulam Kingdom – Unique Serif Poster Font

This font is perfect for crafting a poster title that not only attracts attention but also shows off creativity. It features a set of stylish characters that will look great on posters, flyers, banners, and even product labels.
MBF Edge – Futuristic Poster Font

MBD Edge is a modern poster font with a futuristic character design. It has a bold and creative design that’s perfect for tech-themed designs. This font also includes lots of stylish ligatures that you can use to craft monogram logos as well.
Actay – Free Geometric Poster Fonts

Actay is a family of geometric fonts that comes in all kinds of weights and styles. There’s a total of 60 fonts included in this font family. And it’s completely free to use with your personal and commercial projects.
Black Willow – Handbrush Poster Font

Brush-style typography is most suitable for creative poster designs. Use this font to add a bit of creativity to your poster designs. It features a set of handcrafted brush letters with lots of swashes.
MBF Atom – Modern Sans-Serif Poster Font

Atom is an elegant and bold font you can use to craft titles for futuristic event posters or even movie posters. It’s an all-caps font that includes a set of alternative characters that you can enable with capslock.
Grifon – Bold Poster Font

This is a collection of four big and bold fonts made just for crafting titles and headings. You can choose from thin, bold, regular, and black weights to craft titles that fit in well with your overall design.
Blankeny – Vintage Sports Poster Font

Blankeny is a vintage poster font inspired by typography used in sports, especially baseball. This makes it a great font for designing titles for sports-related posters and flyers. As well as logos and badges.
Floreste – Free Elegant Poster Font

Floreste is a free poster font that features a unique vintage letter design. This font is ideal for making stylish titles and headings for both posters and flyers. You can use it for free with personal projects.
Volos – Font For Posters

Check out Volos, a modern and stylish font perfect for posters, flyers, and other branding needs. It comes with a stunning design and a range of features that really should be seen to be appreciated.
Blephyca – Creative Brush Poster Font

If you’re working on a creative poster design, this beautiful font will help create a unique title for your project. It comes with a smooth brush letter design that features both uppercase and lowercase letters. The font is perfect for posters, flyers, and website headers as well.
Andreas – Bold Condensed Poster Font

You can design elegant titles for posters or flyers using this bold poster font. It features a set of unique sans-serif characters with a condensed design. The font includes multilingual support and comes in both TrueType and OpenType formats.
Morish – Handmade Display Font

Serif fonts are now quite popular in website header design as well as in print designs. This is a creative display font you can use to craft titles for your professional projects. The font features a design inspired by the vintage designs from the 1970s.
Chelsy – Fun & Creative Display Font

Make your designs look more fun and entertaining with this quirky poster font. This font is perfect for all kinds of designs for children as well as for fun T-shirt and poster designs. It comes with multilingual support.
Stanley – Free Display Poster Font

This is a free display font you can use in your personal and commercial projects. It comes with a unique letter design that consists of shapes and forms. In addition to posters, you can use the font to design many other digital and print designs.
Vicenza – Elegant Serif Poster Font

This font is perfect for designing posters, banners, flyers, and all kinds of designs for promoting luxury brands. The elegant look and feel of the font give it a certain classy vibe unlike any other font on our list. The font includes lots of glyphs and an italic version as well.
Portway – Military Stencil Poster Font

Portway is a modern stencil poster font that features a letter design inspired by the typography used in military designs. This font works well for designing bold poster titles as well as T-shirt designs and logos.
Huelva – Handwriting Display Font

Huelva is a unique handwriting font you can use to add a creative personality to your designs. The uncommon letter design even makes the font stand out. It includes both uppercase and lowercase letters as well as Webfont versions.
Monstarr – Playful Handmade Poster Font

Designing a poster for children? Then this font is made just for your projects. This playful and adorable font will definitely grab the attention of the kids. It’s perfect for designing flyers, book covers, and banners as well.
Obrazec – Free Industrial Poster Font

Obrazec is a free poster font that comes with a design inspired by industrial designs. It’s an all-caps font that’s most suitable for crafting big and bold titles. You can use it for free with personal and commercial projects.
Burtons – Poster Font

Burton is a stylish font that comes with mixed elements of both retro and modern design. The font’s bold look will allow you to craft eye-catching headlines and titles for posters. It comes with lots of alternate characters, symbols, and ligatures as well.
Lemonade – Poster Font

Lemonade is a creative font with a fresh design. This font will fit in perfectly with your fun, creative, and entertaining poster designs. It will also look great on vintage-themed posters. As a bonus, you’ll also get 5 unique and editable vintage vector badges with this font.
Rhinos Rocks – Brush Font

This font comes with a bold and unique look that makes it ideal for designing posters for movies, rock music events, and many others. It features a hand-brushed design. The font is available in several versions, including all-caps typeface and swashes.
Ironclad – Modern Creative Poster Font

Ironclad is an art deco-style font featuring an elegant design. It’s ideal for making logos, website headers, and titles for luxury and creative branding designs. The font includes multilingual support as well.
Bronxos – Font For Posters

Emulate the classic 90s collaged music posters style with Bronxos, a collage punk font best suited for posters, urban city design, logos, flyers, packaging requirements, you name it. A great font that is sure to impress!
Girock – Quirky Poster Font

Girock is a creative poster font with a fun and quirky design. This font can be used to design all kinds of creative poster designs, flyers, book covers, and much more.
The Ancient – Medieval Sans Typeface

This unique font features a set of medieval-style characters, making it a great font for designing posters for movies, music, and other entertainment-related projects. The font includes both uppercase and lowercase letters.
Bacoter – Free Brush Font

This modern free font comes with a brushstroke design that gives it quite a unique look and feel. The font features a handcrafted design and it’s free to use with your personal projects.
Phenomena – Free Modern Font Family

Phenomena is a complete font family that features 7 different weights you can use to craft both titles and paragraphs. The font features a beautiful rounded character design as well.
Morton – Poster Font

Morton is a modern poster font that is most suitable for designing posters for formal events, such as business conferences, networking events, and exhibitions. The font features a professional design and it comes in 9 different weights.
Reef – Rounded Font

Reef is a casual font featuring an attractive rounded design. You can use this font to craft poster titles as well as paragraph text. The rounded look also makes it ideal for both professional and casual poster designs.
Rogue – Font For Posters

If you are looking for an elegant and trendy font for posters, take a leap of faith in Rogue, a tall letter typeface that will fit right into your needs. A great choice for a wide range of creative and professional applications!
Sallsburgg – Free Font For Posters

Next up is Sallsburgg, a unique and playful outlined font containing the full set of uppercase and lowercase letters, punctuations, numerals, and symbols. The font can be fully customized to your liking.
Hello Miami – Free Font For Posters

Perfect for summer beach party posters, Hello Miami is a creative and stunning font that will draw attention and make people notice your content. It’s free for download, so get your hands on it now.
Helios – Futuristic Font

Helios is a unique sans-serif font with a futuristic space-themed design. It includes all uppercase letters, numbers, and punctuations. The font is also available in rounded and regular versions. It’s perfect for designing technology-related posters.
Clarkson – Script Poster Font

If you’re working on a vintage-themed poster for a special event, holiday promotion, or a business, then this font will come in handy. It comes with a creative design featuring many alternate characters, ligatures, making a total of 550 characters.
The Painter – Vintage Poster Font

The Painter is yet another vintage-themed poster font you can use to design bold titles for posters. It features a design inspired by traditional sign and brush lettering. The font includes a total of 420 characters.
Originals – Poster Font

Originals is a creative font that features a fun and quirky design. The font is available in multiple versions featuring different designs. It’s most suitable for designing posters for school, children, and entertainment events.
Sayfull – Free Bold Sans Serif Font

Sayfull is a bold poster font with a quirky character design. You can use this font to design website headers, poster titles, banners, and much more.
Galaxy – Free Display Font

This creative free font comes with a unique stencil-like character design. It’s most suitable for designing titles for technology and entertainment-themed posters and banner designs.
Crutsen – Poster Font

This font comes with an elegant design that makes it the perfect choice for designing posters for business, branding, and product promotions. It includes lots of stylistic alternate characters, ligatures, and more.
Sunrise Waves – Poster Font

This is a font you can use to design creative posters for holiday-themed events and promotions. It’s a brush font that looks better when used with all-caps. The font is available in both TrueType and OpenType formats.
Monofor – Poster Font

Monofor is a creative font featuring an uncommon design. You can use this font to craft posters for fashion, apparel, travel, and other brand-related events and promotions. It also includes alternate characters and multi-language support.
Rendang – Handmade Font

This font comes with a modern design that makes it perfect for designing titles for travel, business, event, and other promotional posters. It features a handmade script design and comes in TrueType and OpenType formats.
Zeky – Classic Poster Font

Zeky is a modern font with a classic design. It features an elegant formal design that will make your posters stand out from the crowd. This font is most suitable for designing posters for fashion, apparel, and luxury brand promotions.
Tomcat – Free Display Font

Featuring a unique handcrafted design this creative font will help you design more fun titles for posters and banners, especially for projects related to children.
COCO – Free Fashion Typefamily

COCO is an elegant free poster font featuring a design made specifically for luxury brands and agencies. The font comes in 8 weights and features more than 200 glyphs as well.
Castillo – Poster Font

This poster font features a creative design that makes your text look like cave paintings from thousands of years ago. It’s ideal for designing creative and entertaining posters.
Portico Outline – Poster Font

The outline version of the popular Portico font looks perfect for designing technology and business event posters. According to its designer, and from the looks of the previews, the font looks great in neon colors.
Alora – Creative Poster Font

Alora is a modern and creative poster font featuring a quirky design. It’s perfect for promoting special events, holiday-themed promotions, and posters related to kids.
Hennigar – Poster Font

Hennigar is a Neo-Grotesque sans font that features a unique and formal design. You can use it to design posters for formal events, business conferences, and more.
Fort Collins – Font Duo

Fort Collins includes a pair font that seems to go well together, especially if you’re working on a retro-themed poster design. It includes a condensed sans font and a handwriting script font.
Hallowen – Poster Font

This is the perfect font you can use to design attractive and scary-looking posters for Halloween events and promotions. It comes in 6 different styles, including grunge and inline.
Snowy – Winter Floral Color Font

Snowy is a unique font that features a floral design most suitable for winter-themed poster designs. The font has been created using a new font format known as OpenType-SVG. You’ll need Photoshop CC 2017 or Illustrator CC 2018 or better to use this font.
5 Tips for Choosing a Poster Font
Finding the right poster font can be quite challenging since different types of designs require different styles of fonts. These quick tips will help you make the right pick.
1. Go Big and Bold
A fun part of using poster fonts is that you get to go big with your text. When crafting the titles of your posters, website headers, banners, etc, you get to try fonts using large sizes and bold font weights. During these tests, you’ll also notice that not all fonts look great when used in large font sizes.

Thankfully, all of the poster fonts on our list will look great no matter how big you make them out to be. Feel free to experiment with them.
2. Use Themed Fonts
Whether you’re designing a poster for a music festival or for a luxury brand, you should use the fonts that are appropriate for the theme of your poster.

Poster fonts come in various themes ranging from minimal designs to retro styles, brushstroke designs, and more. Pick themed fonts to make your designs look more creative. For example, a brush font is a great choice for designing titles for a rock music poster.
3. Pick the Right Font Pair

When talking about poster fonts we usually only consider the title font, but let’s not forget about the subheadings and body text. Only with the right combination of the title font and paragraph font you can design an effective and impactful poster. Make sure to find a matching font pair for your project.
4. Consider Sans-Serif

Unless you’re designing a poster for a corporate business event or a luxury brand, consider using sans-serif fonts for your poster design. Sans-serif fonts not only improve readability but they also make your poster text and titles clearly visible from a distance.
5. Narrow Fonts Are Better

Narrow and condensed fonts are usually a great choice for designing a poster title. Especially when it’s a long title a narrow font offers a great opportunity to squeeze in more letters without cluttering the design. However, be mindful not to choose a font with too narrow spacing that affects readability.

- Data Science
- Machine Learning
- Digital Marketing
Poster Font Size Guidelines: What Is a Good Font Size for A Poster?

Standard poster layouts
Posters are one of the best advertising tools for companies. Although regularly used, companies need to be careful when creating and printing posters to attract attention.
Posters are usually viewed by individuals who are on the move. It should only take them one glance to recognize and understand a poster. If the poster takes a lot of time to read, there are very minimal chances its message will be understood.
Therefore, you need to determine the best font size for your poster to catch your readers’ attention . Here are a few things you need to consider when looking for your poster’s best font size.
Table of Contents
Poster Font Guidelines for a Professional and Easy to Read Poster
Other than being readable, a poster needs to use any available white space creatively . The controlling element in any poster has to be what the poster is advertising or marketing – there should be no confusion. To do this:
Think About Your Target Market
Although you can create a poster for a specific audience, you must create one that attracts a wider audience. As such, as you design the poster, think about the different types of people you want to convey the message to. Some of these peoples could include skimmers and readers.
These are people who read a poster without reading every word. For instance, they can read the title of the poster and any other prominent text, and that’s it.
Readers generally spend more time on a poster because the text contains information that directly addresses their needs. People can only read the entire text of a poster if they are interested in the topic or converted skimmers.
Creating an Easy-to-Read Poster
To create an easy-to-read poster:
- Ensure your company’s name or your name is prominent throughout the poster.
- Pick a title that is relevant to your theme. The title also needs to have some level of creativity.
- Use as few words as possible to state your main point.
- Ensure the poster can be viewed under different resolutions
- Do not use caps because it makes you look like you are shouting.
- Avoid using more than two different types of font on a single poster.
- Avoid centering text.
Your font will largely depend on the amount of information or content you want to use. You need to ensure that everyone in your target audience can comfortably read the text in your poster. However, the font size should not also be too big.
To develop the right font size for your audience, create your poster using the available default size. The standard size will help you determine the extent to which you can resize your content depending on your amount of content and/or layout you use.
You should not create a layout or try to perfect an existing layout while adding more content to your poster. Creating/perfecting a layout and/or font size should come at the end – this will save you a lot of time.
What You Need to Know When Making a Poster Using PowerPoint
Since PowerPoint is readily available for most people, it can help you create a great poster within a short time. However, the program has a page size of 56 inches, making it challenging for those who want to create larger posters. The good news is that you can still create a poster that is larger than 56 inches.
If you want to create a more than 56 inches poster, you need to create a document that is half the final size of the poster. While sometimes you may make a poster size that is as small as 8.5 by 11 inches, on most occasions, you may need to create a poster that is as large as 48 by 72 inches. In this case, the 48 by 72 in will be printed from a 24 by the 36-inch document.
Therefore, if you want to create a poster that is has a font of 36, it needs to be 18 on the PowerPoint document. The recommended minimum font for a poster includes:
- 18-point for captions
- 24-point for body text
- 36-point for subheadings
- 85-point for the main title
Whichever style you may decide to use, the primary goal is to make sure the poster is easy to read. Font styles allow you to customize your text and determine how your text will appear on the poster. Here are a few tips to consider:
1. Use Fairly Standard Font Styles
PowerPoint has a wide selection of styles that can help you design a poster. To make the most out of your presentation, stick to a standard font for your text, and ensure your presentation is uniform. However, you can use two different font styles for visual interest. Some fonts you can try out include:
- Times New Roman
2. Incorporate Contrast
Irrespective of the font you select, readability may not be very easy if there is no adequate contrast. There should be a contrast between the text itself and the poster background. You can opt for a dark background with light text or a light text background with dark/black text.
When incorporating contrast, you need to consider the environment in which the poster will be used.
3. Do Not Use Scripts
Although handwriting, novelty typefaces, and scripts may seem pretty and interesting, they are often hard to read. That’s because there is often not enough size or contrast to make handwriting, novelty typefaces, and scripts readable from a distance.
Other Helpful Poster Formatting Tips
Spacing ad layout
- Use a 1-inch margin when creating your poster
- Always use a ruler – found on the right side of the PowerPoint slide
- Use the grid and guides option if you wish to use a lot of pictures, graphs, or text boxes
- Use columns for content
- Ensure your text is evenly distributed between the margins
- Spacing within and between columns should be equal and consistent
Professional Poster Printing
Are you looking for professional large format poster printing services? At Custom Printing Inc., we take pride in offering high quality and durable custom poster printing services. We rely on modern technology to create oversize prints perfect for everything, from window graphics to framing.
Our prints let you make an impact on your training events, tradeshows, and presentations. We print large format of different sizes up to 64″ x 160ft.
Follow Techdee for informative articles.
How Business Intelligence Is Used to Improve Workforce Management
6 e-commerce strategies for success in 2021.

How Has Technology Changed The Mortgage Industry?
Leave a reply cancel reply.
Your email address will not be published. Required fields are marked *
Save my name, email, and website in this browser for the next time I comment.
- Write for us

Techdee is all in one business and technology blog. We provide latest and authentic news related to tech, marketing, gaming, business, and etc
Site Navigation
- Terms and Condition
- Privacy Policy
Google News

© 2021 Techdee - Business and Technology Blog.
Login to your account below
Fill the forms bellow to register
Retrieve your password
Please enter your username or email address to reset your password.
Privacy Overview
Necessary cookies are absolutely essential for the website to function properly. This category only includes cookies that ensures basic functionalities and security features of the website. These cookies do not store any personal information.
Any cookies that may not be particularly necessary for the website to function and is used specifically to collect user personal data via analytics, ads, other embedded contents are termed as non-necessary cookies. It is mandatory to procure user consent prior to running these cookies on your website.
How-To Geek
How to make a poster using microsoft powerpoint.
Microsoft PowerPoint isn't just for presentations--you can make posters with it, as well. Here's how.
Quick Links
Define the poster dimensions, design your poster.
Microsoft PowerPoint isn't just for presentations---it also provides all of the creative tools you need to design a beautiful poster. Just set the dimensions, design the poster, and print it out. Here's how to make a poster using PowerPoint.
Posters come in all sizes, but the first thing you need to know is PowerPoint's slide limit is 56-inches x 56-inches, so you'll need to plan accordingly. It's also important to note that you want to set your poster dimensions before you start designing your poster. Otherwise, you might end up having to rework parts of your design due to the size change.
Related: How to Reduce the File Size of a PowerPoint Presentation
Here are some of the standard poster sizes to get you started:
- Small poster: 11" x 17"
- Medium poster: 18" x 24"
- Large posters: 24" x 36" or 27" x 39"
Once you've decided on your poster size, set the dimensions in PowerPoint. To do this, open PowerPoint and navigate to the "Design" tab.
In the "Customize" group, select "Slide Size."
Select "Custom Slide Size" from the dropdown menu.
The "Slide Size" window will appear. Input the width and height specifications to match your required size. Keep in mind that if your height is larger in size than your width, the orientation of the slide will automatically change to "Portrait."
When you're finished, select "OK."
Once selected, a new window will appear giving you two scaling options: Maximize or Ensure Fit. If your slide already has content on it, you'll want to select "Ensure Fit."
Your slide will now be resized.
Your poster design is going to depend completely on you. You'll want to pay attention to the background of the poster, text and image arrangement, font size and style, etc. Essentially, you should treat this part exactly as if you were just creating another slide for a presentation.
Because the design and process of this step is going to differ for everyone, we'd like to offer some of our previous guides to get you started in the design process:
- Insert a picture or other object.
- Use an image as a background.
- Insert an image inside text.
- Get a picture behind text.
- Make a border or frame.
Once your design is ready, all that's left to do is print it out and hang it up!
Related: How to Troubleshoot Printing Issues in Microsoft Word
IMAGES
VIDEO
COMMENTS
The body of your poster should have a minimum 24 point font. Viewers should be able to read your smallest text from a few feet away. The title of your poster should have a 50+ font size, depending on the size of your poster and the length of the title. Do not use all uppercase letters for the title or body of the poster.
Choose your fonts. For maximum impact, choose different fonts for the header and body of your poster. Select a serif font for your title and a sans serif font for the body. Serif fonts, such as Times New Roman and Garamond, have short lines at the ends of the strokes in a letter (as indicated by the arrows in the images below); sans serif fonts ...
Your poster presentation should follow a path that leads anyone reading from section ... Using 24-36pt font for your poster font size is a good place to start. Edit and trim the text as needed, and adjust the font size until it fits well ... When choosing colors for your poster, using 2-3 colors will give the best look. Too many colors make it look
For this we recommend the following font sizes as a minimum for your text (based on an A0 size): Title: 90. Headers: 40. Body text: 36. Your body text should be easily readable from 1 metre away. To check that you have the right sizes, I suggest zooming in on your poster to 100 %. Then, take a step back to a metre or so.
Authors use different sizes of font for their poster text (Table 2). The general rule is to use a font size that can be read from a distance of 3-feet (1 meter), which is the approximate distance that a person will stand when viewing a poster. The largest fonts (e.g., 40-120 point font) will be used for the title, author list and institutions.
These two 8.5x11 charts will help you preview how big or small your fonts will appear on your actual poster. If your poster size can fit in a 48x56 inch space, download and print chart A on your desktop printer. Otherwise, download and print chart B. Place the chart of your choice on the wall and look at it from approximately 3 to 4 feet away.
Step 3: Write the content. Write or rewrite the content for the sections in your poster presentation. Use the text in your research paper as a base, but summarize it to be more succinct in what you share. Don't forget to write a catchy title that presents the problem and your findings in a clear way.
The font sizes you should use depends on your overall poster size as well as the amount of content in your poster, and it is somewhat subjective. ... If you are doing a digital poster, disregard the font sizes listed above, unless you have increased the dimensions of your slide. PowerPoint slides default to 13.3 inches wide by 7.5 inches high.
Print a font size test sheet: Print out a sheet of paper of your font at different sizes and place it on a wall to see what the title, subtitles, and text look like at a distance. 15. Production Timeline a. Rough draft or storyboard . 1 month. before deadline (the hardest part) b. Final draft of poster ~ 2 weeks before. c. Print and mount at least
text broken into multiple columns, usually three or four depending on the size of the poster. You may also want to use section headings within the columns. Sans‐serif fonts work best for posters, particularly for titles, subtitles, and headers. The most common fonts are Times New Roman and Arial.
Proposals ranges for font sizes of different poster portions (Remember, an typical academic poster, when printed, is MUCH larger than a laptop screen!): bill title: 80-150 pts (bold recommended) author name(s): 54-60 pts; headings: 36-40 pts; body text: 24-32 pts; figure captions: 18 pts .
Use-case 2: Presentation font size for a keynote presentation. Text type: No smaller than: Aim for: Body text. 28pt. 48pt or larger. Top tip: If you're also using text labels or callouts in a keynote presentation, then make sure the font is slightly smaller than the rest of your text - ideally no smaller than 28pt.
Arial, Helvetica, and Verdana are examples of popular sans serif fonts. Script typefaces can be used for posters as well, but they should be utilized with caution because they are difficult to read. Although Times New Roman is a common serif font for posters, other serif fonts such as Georgia and Garamond can also be effective.
The font size must be large enough for a viewer to read from a distance. Don't use a font size smaller than 24 point. Most posters use three font sizes (section headings, sub-headings, text, in decreasing order of size). ... The two most popular sizes for presentation posters are 24" x 36" and 32" x 40". These currently cost $18 or $26. ...
The best way to judge the readability of your poster is to ask someone else to read it. ... Font size in PowerPoint is in 'points' - a sizing convention which is consistent across different paper sizes: 14pt on a sheet of A4 paper is the same as 14pt on a sheet of A1, which means you can always print off a handy font-size chart in Word and ...
Presentation Font #26: Dela Gothic One. Dela Gothic One is a thick and chunky font with a strong feel. It's ideal for headings on posters, packaging and in titles on presentations. This font has a lot of power and is best paired with a simple sans serif font or even a classic serif like Garamond for body copy.
check if the conference or event has specific guidelines for formatting posters and follow them; Suggested ranges for font sizes of different poster sections (Remember, a typical academic poster, when printed, is MUCH larger than a laptop screen!): poster title: 80-150 pts (bold recommended) author name(s): 54-60 pts; headings: 36-40 pts
It will also let you adjust that font sizes before tweaking everything to perfection. PowerPoint's little-known limitation PowerPoint has a page frame limit of 56 inches (142.24 cm). So to create a poster larger than 56 inches, one poster document had to breathe built at half that size of the final printed poster.
Suggest ranges for font sizes of different poster sections (Remember, one typical academic poster, when printed, is MUCH wider faster a laptop screen!): poster title: 80-150 pts (bold recommended) author name(s): 54-60 pts; headings: 36-40 pts; body text: 24-32 pts; figure captions: 18 pts .
Snowy - Winter Floral Color Font. Snowy is a unique font that features a floral design most suitable for winter-themed poster designs. The font has been created using a new font format known as OpenType-SVG. You'll need Photoshop CC 2017 or Illustrator CC 2018 or better to use this font.
The main of your poster should have a minimum 24 issue font. Viewers have be able to read insert slightest text from a few feet away. The title on your poster should have a 50+ font size, depending on the size of your poster and this length of the title. Do not use sum uppercase letters for the title or body of the poster.
In this case, the 48 by 72 in will be printed from a 24 by the 36-inch document. Therefore, if you want to create a poster that is has a font of 36, it needs to be 18 on the PowerPoint document. The recommended minimum font for a poster includes: 18-point for captions. 24-point for body text. 36-point for subheadings.
Medium poster: 18" x 24". Large posters: 24" x 36" or 27" x 39". Once you've decided on your poster size, set the dimensions in PowerPoint. To do this, open PowerPoint and navigate to the "Design" tab. In the "Customize" group, select "Slide Size." Select "Custom Slide Size" from the dropdown menu.